

I’ve been doing a lot of cooking and not as much Crafting here lately, but I’m back on track and have a fun little project for you that satisfies my love of both accessories and fabric. It’s also perfect for making Valentine’s Day gifts for your friends and family or just for yourself! Today’s tutorial shows you how to make fabric rosettes which can be used on brooches, hair clips, necklaces, home decor projects and more.
What you’ll need:
fabric
felt
cardstock
pins
scissors
iron
craft glue (I use E9000)
pin backs, hair clips, bobby pins etc
buttons, beads, misc embellishments (optional)
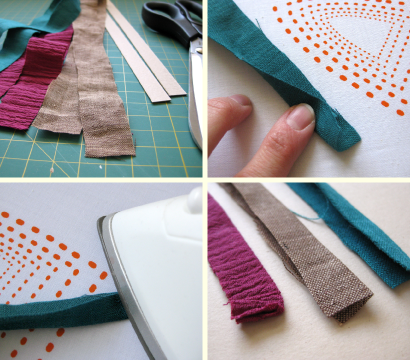
Start with a strip of fabric 1″ by about 20″ – 25″. (I cut a 1″ strip the height of my fabric, then cut it in half. Many fabrics are 44″ so you end up with a 22″ strip, but some do vary which is ok.) You’ll need one strip of fabric per rosette.
Fold the strip in half and press with an iron.

Cut a piece of cardstock (or cardboard) 1/2″ x 11″ (or the height of your stock). Pin the folded fabric strip to the cardstock and begin wrapping it around on an angle, not too tight. Secure the other end with a pin and press with the iron.

Once completely cooled, slide the cardstock out, keeping the wrapping as is. Fix any spots as necessary and press again with the iron.
To form the rosette, roll the strip around a pencil starting at one end. Once rolled, slide the pencil out and begin to shape the rosette by spreading it out a bit and twisting the center with your fingers if needed. Secure the loose end on the back with a pin and lightly press again with the iron to flatten it a bit.

Depending on what you will be doing with your rosette, you can either stitch it together or you can glue it to a piece of felt (remove the pin before glueing). Ideally you’ll want to use a piece of felt that is close in color to your fabric but I just used what I had on hand.
You can then glue or stitch a pinback, bobby pin or hair clip to your rosette or sew it onto a shirt, bag, etc!

While I love the look of the simple rosettes by themselves, you can also embellish the center with buttons or beads which can be glued or stitched into place.


You can create rosettes in different sizes by using a longer or shorter piece of fabric or wrapping them tighter or more loosely. You will also find the type of fabric you use will affect the size of the finished rosette. Above can see how different embellishments really change the look of the finished piece.

If using more than one rosette on a hair clip, brooch or necklace, glue them to a piece of felt and trim the excess felt once dry (shown a few photos up). You can then embellish and glue to a hair clip or add ribbon or chain for a necklace.
These would also be darling stitched right onto a tank top strap, across the top of a tshirt or onto one side of a cardigan. Oh, the possibilities!

A variety of materials, colors and textures creates a nice grouping and you can also add other elements, such as buttons or charms, to create a unique cluster or fill any gaps between rosettes with beads, pearls or scraps of trim and lace. Just have fun and experiment! And if you do, I’d love to hear about it. Happy crafting!

I love love love it!! I saw a shirt with these once in the how-tuesday, but it didnt have clear instructions for the rosettes…I will be using this for sure. I might make a bunch and send to my sister in halifax!
thanks Nicole 🙂
LikeLike
Just lovely – and you make it seem so easy *sigh*
LikeLike
Thanks for posting this! I am going to defiantly make some!
LikeLike
Love those! Looks like they will be so fun to make!
LikeLike
VERY nice! I hope I can do these! My daughter will have so many hair pretties!
LikeLike
So cute! Checking out your blog from Scoutie Girl~ you have a lovely site! Can't wait to try these!
LikeLike
Fun! These look like they'd be great o do with older children. I think my daughter would love these!
LikeLike
oh my gosh, those are awesome! I really need to remember this for when my daughter is old enough to craft with me. You'll remind me, won't you? 😉 Thanks for sharing, Nik!
LikeLike
Oh how pretty! I love the clusters. Thanks so much for sharing, I'll be linking to this.
LikeLike
Thanks!! Great idea!!
LikeLike
i like this idea… thanks for sharing.. going to make for my brother's wedding
LikeLike
oh! it's a great tutorial!!
can i post it in my blog?
please, visit us:
http://www.espacionualan.com
Many thnaks!!
LikeLike
The button in the middle is a lovely touch.
LikeLike
Fun tutorial, thanks!s
LikeLike
Thanks for the tutorial! I can't wait to try this. I love the look of fabric blooms, and I'm excited about trying them myself!
LikeLike
ooh, fun! I just made a bunch of these to use on hairbands for my girlies! Thanks for posting…
LikeLike
These are soooo pretty! Thanks so much for sharing. Can't wait to try them!
LikeLike
I am completely new to pretty much all things crafty and still learning about different types of fabrics. May I ask what types you used, especially for the fuschia example? Or if you have any recommendations for types of fabric to use, they would be greatly appreciated!
Thanks and these are very cool.
LikeLike
Hey Emily!
You can use any kind of fabric for this project – the thickness and texture will just affect the final size and look of the rosette a bit.
In these photos, the teal and brown fabrics I show are linen, the mustard patterned fabric and the blue/brown/chartreuse pattern are both cottons, like quilting fabric, and the pink (which was my favorite and the easiest to work with), Im not sure what it is – I had some scraps that my neighbor gave me. It was very lightweight and gauzy feeling, it had some stretch in the 'wrinkles' – Ill see if I can find out and I'll post back when I do.
LikeLike
Thank you so much! I live in a REALLY small town ergo my fabric choices are limited. However, today I made the drive and found lots of fabric that appears similar to yours. May have gone a little overboard and bought a button making kit too!
LikeLike
Thanks so much! I'll be trying this out soon – I've been wanting to make them for awhile now, and your tutorial makes it look easy!
LikeLike
Amazing! I've always wondered how these are made. Thank you for the beautiful tutorial!
LikeLike
Love this tutorial!! Ok…I tried making them and whenever I come to the part of winding it around the pencil and then arranging the 'petals', it basically falls apart. It all unravels. What am I doing wrong?
~Kat
LikeLike
Hey Kat,
Without seeing what is happening, it's really hard for me to say, but you may be wrapping it too tightly around the pencil, it needs to be fairly loose, at least the first couple wraps, so that you can slide the pencil out without pulling the twisted rosette apart. Could that be the problem? report back!
~ nicole
LikeLike
Actually I can get it off the pencil it's the next step that gets really tricky! Ok.. when I take it off the pencil the whole thing unravels! It will not keep the shape of the rose! I don't understand how you hold and work with it without it becoming flat and popping loose and everything! Does this make since? It becomes a ball of nothing!
~Kat
LikeLike
sorry, kat! Im really not sure what to tell you without seeing it. Maybe try a different fabric? Also make sure your 'winding' of the fabric is nice and tight and pressed firmly down when you remove the cardboard strip. if it's too loose with too many gaps between 'twists', I could see how it might fall apart. Also, if you are using very stiff fabric or even some cottons, it is harder to flatten out and shape the rose. Try a soft fabric like a lightweight linen or a guaze, see if that works better. let me know!
LikeLike
Yes, I can see how it is hard to understand what I'm saying! ha! Ok I will give it another go and let you know how it turns out!
~Kat
LikeLike
I MADE A PERFECT ONE! FINALLY!!! OK…I was winding it way to tight..or something like that! Thanks so much for your advice!
God Bless!
~Kat
LikeLike
Your tutorial is great and thorough! My friends and I made some this weekend. We had found a couple of other tutorials and yours was the easiest to understand! Thanks so much!
LikeLike
These are so cute! I posted a link on my blog: http://ificould-ificould.blogspot.com/2010/04/fabric-rosettes.html
Thanks for the great tutorial!
Missy
LikeLike
Making these for mother's day, thx Nicole!
LikeLike
Thank you sooooo much for this tutorial!!!!!
Very kind of you 🙂
Can't wait to make my own rosettes 😀
Have a great day!
Lindy
LikeLike
Thanks for the tutorial! I have tried a couple others online, and this one was by far the easiest!
LikeLike
Oh my gosh…..thank you, thank you, thank you! I love these!
Jasmin
http://www.thelemondroptree.etsy.com
http://www.thelemondroptree.blogspot.com
LikeLike
just love these thank you ! x
LikeLike
This is definitely the smartest rosette making design I've seen! Thanks for sharing your love of crafting and your talent!
LikeLike
Wonderful, wonderful instructions, but did you mean E6000? I didn't find E9000 in the craft store.
LikeLike
Hi Donna,
they are essentially the same thing, E6000 will work just fine, and so will many clear multi purpose craft glues. I also like Aleene's Clear Gel Tacky Glue, but it's not as strong as the E6000.
thanks for visiting!
nicole
LikeLike
These are beautiful. I make and sell rosettes and have never tried making them like this. Will try it next time, this looks easier then how I do it.
I am a new follower. I have a give away going on if you would like to stop by my blog.
http://bacontimewiththehungryhypo.blogspot.com/2011/03/couture-bracelet-free-give-away.html
LikeLike
hey….this is an very awesome link….it is very cute!! but i am having a little problem can u please assist me lillyella?
LikeLike
Hey Sherma, I can try! Send me an email nicole at lillyella dot com
LikeLike
Hi, thank you for sharing this nice tutorial! I post a link on my blog, because I think it's really inspiring 🙂
LikeLike
Excelente tutorial.
Muito obrigada por compartilhar…
um grande abraço de Maria Filomena
LikeLike