In the Kitchen: Bow Tie Chicken and Spinach

I’ve been cooking up so many desserts, snacks and side dishes lately and I realized it’s been quite some time since I shared an entree. So before I get into all the sugar-free and natural recipes I’ve been working on and talking about, I have one of my favorite dinner dishes to share with you. This one-skillet wonder is easy to make combining a unique blend of flavors that is equally delicious served vegetarian without the meat. You’ll find a link to a printable recipe card at the end of this post.

Ingredients:
1/2 – 1 lb chicken (optional)
1/4 lb bacon (optional)
1 cup sliced mushrooms
1 Tbsp minced garlic
2 Tbsp flour
2 tsp onion powder

1 tsp garlic powder
1 tsp pepper
salt to taste
14 oz low sodium chicken broth
6 oz fresh spinach
10 oz fresh or frozen corn kernels
16 oz sour cream
1/2 cup sliced green onions (optional)
crushed croutons (optional)
8 oz bow tie pasta

Healthy alternatives:
Omit bacon, flour for coating chicken, salt and croutons.
Use low sodium or no salt added broth, fat free or light sour cream and whole wheat pasta.

Saute bacon, mushrooms and minced garlic until all are cooked. Crumble bacon (or chop before cooking) and set mixture aside.

Cut chicken into bite sized pieces and coat with 2 Tbsp flour. Saute in a deep skillet until cooked through and slightly browned.

Add chicken broth, mushroom mixture, onion powder, garlic powder and pepper to skillet. Cover and simmer for 10 minutes.

Stir in sour cream, corn and spinach, cover and simmer 5 – 10 minutes until corn is cooked through, spinach cooks down and sauce begins to thicken. If you’d like a thicker sauce, add flour, one tablespoon at a time, until it reaches desired consistency.
You can also give it a taste at this point, you may want to add more seasonings to the sauce sauce as onion, garlic powder, pepper or a little salt.

Serve over cooked pasta and top with crushed croutons and green onions if desired. Add a side of fresh fruit and you have a meal that is sure to please!

And find more easy and delicious recipes here.

Crafting: Book Vases

Do you fancy yourself a Bibliophile? Or maybe you just love the look, feel and smell of old books. Either way, this one’s for you! Today I’ll show you how to make a ‘vase’ out of a hardcover book. It’s the perfect piece to decorate your favorite reading nook or a book shelf and is easy to make requiring just a few tools and no special skills.

What you’ll need:

Hardcover book
Cardboard
Pencil
Craft knife (or a scroll or band saw)

The book I used I found at a thrift store for $1.00. I especially loved the green coloring on the top edge. If you feel bad destroying good books, look for ones with missing or torn pages.
Cut a piece of cardboard to the size of the book and draw your vase shape. I’ve created a JPG of the shape I drew and you can download it here. It can be sized up or down to fit the height of your book. If you draw your own, keep in mind it will be twice as wide when it’s finished, so you’ll want to make the shape much thinner than you would think for it to look proportional when cut.

Cut your template shape out of the cardboard and place it onto the first page of the book, snug against the binding. You can trace it with a pencil if you’d like to have a guidline if your template moves, but it’s easiest to cut along the template. I taped mine in place at the top and bottom to hold it secure.
With a sharp knife, cut along the template, gradually slicing through all pages of the book.
Alternatively, if you have a scroll saw or band saw, you can do it in a fraction of the time! Just trace your template and go. (I recommend removing the cover before cutting the pages with a saw.) I cut half of my vase by hand and finished with a band saw, to try both techniques.

When cutting by hand, I found it easiest to move the template further into the book as I continued cutting, every 1/4″ of pages or so.
Once complete, cut off the covers, leaving the spine binding in tact. Open the book and fold it backward, gluing together the first and last pages with craft glue or a glue gun. Hold for a few seconds until secure.
I used a thin pencil top and bottom to keep the shape of the center hole while gluing.

Spread out the pages and you’re done! Since you do end up with a small opening along the spine, you can use this as a ‘vase’ for a silk flower stem or some dried pieces like I show in my opening photo. You can also create a small cluster in different sizes and shapes for a unique arrangement.
The possibilities for this project are only limited by your imagination so get creative and have fun — happy crafting!

In the Kitchen: Homemade Carrot Cake with Cream Cheese Frosting

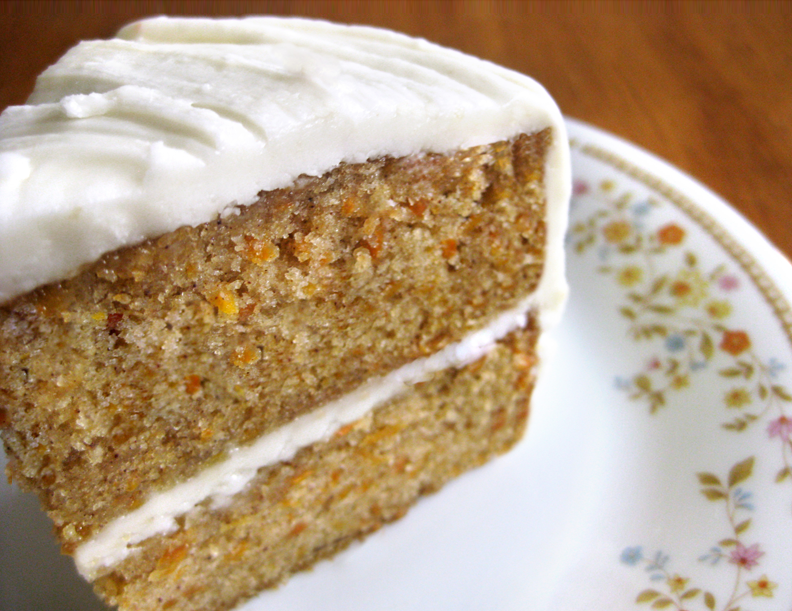
I’ve been promising this recipe for at a least a month and now that I’m sharing it – I couldn’t find my darn photos! At least I have the finished product, that’s what really matters, because this completely from scratch recipe (frosting and all) is as easy to make as it is delicious.

On a side note, those of you who chat with me on Twitter and Facebook may have noticed me talking recently about my concerns with eating too much sugar and too many artificial and processed foods. I’ve begun making some changes in the items I buy and the way I cook and am ‘perfecting’ some all-natural, sugar-free and wholesome recipes that I hope to share with you soon. These include a sugar free carrot cake and brown rice pudding, just to name a couple desserts. I’ll also be sharing what I learn about substituting whole grain and natural ingredients in your favorite recipes (and my previous recipes posted), so if you, too, are trying to make these changes in your diet – stay tuned!
But first, here’s my favorite recipe for simple, good old fashioned, bare bones homemade carrot cake with rich cream cheese frosting. While it does call for all-purpose flour and refined and powdered sugar, making anything from scratch is better for you (and better tasting) than any box mix you’ll find, or at least I think so, so start here and work your way up to the whole wheat, sugar free version I’ll be sharing soon. You’ll find a printable recipe card at the end of this post.
Ingredients
Cake:
4 eggs, beaten
2 cups all-purpose flour
2 cups sugar
2 teaspoons baking powder
1 teaspoon ground cinnamon (optional – but I use 2!)
1/2 teaspoon salt
3 cups finely shredded carrot (lightly packed)
3/4 cup oil
Frosting:
8 oz cream cheese, softened
1/2 cup butter, softened
2 teaspoons vanilla
5 to 6 cups powdered sugar
Allow eggs to stand at room temperature for 30 minutes. Meanwhile, grease two 8″ or 9″ round cake pans. Line the pans with wax paper, then grease the wax paper. You don’t have to use the wax paper but it makes it so much easier! For greasing, I use Pam with Flour spray, I love the stuff.
Preheat oven to 350°. In a large bowl stir flour, sugar, baking powder, cinnamon, salt and baking soda. In another bowl mix eggs, grated carrot* and oil. Add the egg mixture to the flour mixture and stir until blended. Divide the batter between the two pans.
*Baking Tip: If your carrots are not shredded fine enough, they may sink to the bottom of your cake when baking.
Bake at 350° for 3o – 35 minutes or until a toothpick inserted near the center comes out clean. Cool the cakes in the pans on wire racks for about 10 minutes then remove the cakes and cool completely on the wire racks.
To make the frosting, beat the cream cheese, butter and vanilla in a large bowl on medium speed until light and fluffy. Begin adding the powdered sugar, beating as you go, a little at a time until you reach your desired consistency. It will be thick and hard to mix as you go, but it’ll get there! This recipe yields enough to frost the top and sides of two round cakes, along with some for in between the layers. (You can half the recipe if you’re frosting a 13×9 cake.)
To frost the cake, make sure it is completely cooled. Lay the first cake rounded top down on a plate and brush any loose crumbs away from the surface and edges with your hands or a pastry brush. Spread about 1/2 cup frosting on top and smooth. Next place the second cake on top with the rounded side facing up and begin frosting the sides, going about 1/4″ above the cake. Last frost the top. You can sprinkle the top and sides with chopped nuts if desired, but I prefer it plain and simple. Enjoy!

And find more easy and delicious recipes here.

p.s. After finishing this post, cousin Valorie reminded me that we didn’t take any photos while baking this cake, so now I don’t feel as bad about ‘misplacing’ them!

In the Kitchen: Lemon Bars

This classic dessert is always a crowd favorite and surprisingly easy to make from scratch. The refreshing blend of sweet and tart makes it a perfect treat for the warm Spring days ahead. Chances are you have most of the ingredients in your cupboards, so pick up a lemon and get to it! You’ll find a printable recipe card at the end of the post.

Ingredients
Crust:
2 cups flour
2/3 cup powdered sugar
2 tbsp cornstarch
1/4 teaspoon salt
3/4 cup butter

Filling:
4 eggs
1 1/2 cups granulated sugar
3 tbsp flour
1 tsp finely grated lemon peel
3/4 cup juice of lemon
1/4 cup half & half, light cream or milk
powdered sugar for garnish

Heat oven to 350°. In a large bowl mix flour, powdered sugar, cornstarch and salt. Cut in butter using a pastry blender until it looks like coarse crumbs.

Grease a 13×9 baking dish (or what I do for easier removal when making any kind of bars is line the pan with foil, then grease the foil – I use Pam with flour spray, works awesome!)

Press the dough mixture firmly into the pan and bake 18 minutes (don’t overcook).

For the filling, you’ll need grated lemon peel. Using a fine grater, grate just the yellow skin of the lemon until you start to see the white rind inside. You’ll grate most of the skin of a palm sized lemon to get one teaspoon.

In a medium bowl, lightly beat eggs, mix in sugar, flour, cream, lemon peel and lemon juice (I squeeze what I can out of the lemon after grating the peel then use bottled juice for the rest).

Pour filling over hot crust and bake 15-18 minutes until center is set. It won’t look much different but will turn from a liquid to solid consistency.

Cool completely on a wire rack. Cover and chill in the fridge until cold, sift powdered sugar on top before serving. Enjoy!

You can store leftovers covered in the fridge but the powdered sugar will dissolve, so you may want to cut smaller portions to sift with sugar and serve if you don’t expect the entire pan to disappear in one sitting. (fat chance, right? 🙂


And find more easy and delicious recipes here.

p.s. That beautiful plate is made by the talented Whitney Smith.

Crafting: Anthro Style Rope Necklace

The first thing I thought when I saw the Curls & Coils Necklace at Anthropologie was, ooo cute! Then the next thing I thought was, I can totally make that. But more importantly, I can totally make that for 1/8 of the $42 price tag.

The original design (shown left) was also a little large for my liking, so I was excited to modify the concept to my daintier and more structured tastes. And while I love the nautical fashion style, I have yet to really jump in, so this piece felt like the perfect place to start.

At first glance, the necklace looks to be made of rope, but upon inspection I realized it’s actually made of soft cotton piping cord used for upholstery, which is much more pleasant on your skin than rope would be anyways!

A few basic materials and less than an hour of time are all you need to create your own Curls & Coils Necklace.

What you’ll need:
Cotton Upholstery Cording (1.5 – 3 yards depending on how long & loopy you want it)
Transparent Nylon Thread
Buttons or beads for embellishment
End caps/cones
Craft glue
Wire or head pins and a clasp

While I used the same raw cotton style cording as the original necklace, you can find many sizes, colors and materials that would work equally as well. I especially love the satin cording and picked up some in a lovely mustard yellow that I think will be just awesome! I purchased all my materials at JoAnn Fabrics.

Begin by approximating your loop pattern and determining how much cording you will need. For reference, I used a 1.5 yard piece and had about 4″ left on either end when I was done. Better too long than too short!

Be sure to leave a long enough tail before you start sewing your coils. Starting and ending on the back of the necklace, begin tacking your loops in place with a few stitches. It doesn’t take much to hold it together and if you place the stitches in the ‘grooves’, you can’t see them at all.

Next, decide on an arrangement for your embellishments and stitch them in place. I wanted mine a little less ‘blingy’ than the original so I used a plastic rose shaped button along with a simple gold metal one and one with a small rhinestone.

Once you finish sewing the loops and embellishments, determine the length you’d like the necklace and trim the ends about an inch shorter to account for the length the clasp will add.

To finish the ends, I used brass cones that I also found at JoAnn Fabrics. Using a ball end head pin or a piece of wire, fashion a loop on both cones for attaching the clasp.

Apply a few dabs of craft glue to the end of the cording and begin twisting into a point. Warning – this will make your fingers messy! Allow the glue to begin drying a bit and then continue shaping. You can also twist the cone onto the end to help shape it. Once you have a good point, apply a little more glue then twist the cap on, getting all loose ends tucked up underneath.

Add your clasp and voila!

Liven up a simple cardigan or sun dress or accent a nautical striped tank top. Soft and lightweight, this necklace is the perfect year-round statement piece!

You can also apply this idea to other accessories such as a bracelet or belt – get creative! I’d love to hear if you try your hand at this project and how it turns out. Happy crafting!

In the Kitchen: Guacamole

Guacamole! I’ll admit I’ve never liked the stuff, but it sure is fun to say, don’t ya think? Say it again… guacamole! Ok, now that we’ve gotten that out the way, why am I making it if I don’t like it? Well, I’m all for second chances, when it comes to food at least, and guess what? I liked it! Turns out most things are much more delicious when you make them from scratch with yummy, fresh ingredients. Who knew? 😉
This recipe has minimal, basic ingredients and is really easy to make — doesn’t get much better than that, right? Read on for the how-to and find a printable recipe card at the end of the post.
Ingredients:
2 ripe avocados (they should be firm, but yield to gentle pressure)
juice of half a lime
3 tablespoons red onion, finely diced
3 tablespoons fresh cilantro, stemmed and chopped
1/2 teaspoon salt
dash freshly ground pepper

Peel, pit and coarsely chop the avocados.

Add the lime juice, diced red onions, cilantro, salt and pepper.
Mix gently with a fork and (about to get technical here) smush to your chunkiness liking. You can also puree in a food processor if you like it smooth. Optionally, add two tablespoons fresh chopped tomatoes.

Serve immediately or place in an airtight container and chill in the fridge. Delicious with chips or on your favorite entrees, like these Hawaiian Tacos. Enjoy!

And find more easy and delicious recipes here.

Valorie’s in my Kitchen: Hawaiian Tacos

I had the great pleasure of hanging out with my ‘cousin-in-law’, Valorie, last week when she came in for a visit from Colorado. You may have seen her In the Kitchen posts here over the last few months so what did we do during her trip? Cook, of course! First we made a delicious homemade carrot cake with cream cheese frosting, which I will be posting soon, and on Sunday night Valorie shared a favorite of hers, Hawaiian Tacos! I’ll let her take it from here…
Someone I knew once made me tacos with teriyaki-marinated chicken. Other than the teriyaki flavor, these were pretty standard tacos, but I remember the uniqueness of the Asian-style chicken in the Mexican dish and like it quite well. Maybe that’s what people mean by Asian Fusion? I’ve taken the idea of teriyaki-marinated chicken and blended it with pineapple, salsa, and cilantro. Yes, it sounds odd, but I’ve never met anyone who tried it and didn’t like it. You’ll find a link to a printable recipe card at the end of this post.

Prep time: 30 min | Serves about 4
Ingredients:

6-8 eight-inch corn tortillas
2-4 tablespoons canola oil
1 lb boneless, skinless chicken breasts, cut into pieces
8oz can of crushed pineapple or pineapple tidbits
1/4 cup thick teriyaki sauce or marinade
shredded cheddar cheese
roasted, diced green Chile peppers
fresh cilantro, finely chopped
fresh lime wedges
sour cream, salsa, guacamole

If you have time, marinate the chicken in the teriyaki sauce and pineapple juice for 2-6 hours. Alternatively, add uncooked chicken, teriyaki sauce and the can of pineapple (with juice) to a nonstick skillet. Simmer over medium heat until chicken is cooked, liquid is evaporated, and sauce is thick and slightly sticky, about 20 minutes.

To prepare the tortillas, heat canola oil in a skillet over medium flame. Well-seasoned cast iron or non-stick finish works best, as stainless steel tends to stick and require more oil. Heat tortillas in canola oil for about 30 seconds on each side, or just until the tortilla forms air bubbles inside. Set aside on a paper towel to catch any oil.
Assemble tacos with chicken and pineapple mixture, cheese, fresh cilantro, green chiles, salsa, guacamole, sour cream and a squeeze of fresh lime juice (this really adds to it!). We couldn’t find fresh, ripe avocados so had to pass on the guac this time, but I’ll share my homemade recipe here soon.
Delicious with a side of black beans jazzed up with fresh cilantro, diced tomatoes, chopped green chilies and your favorite seasonings.
Pile high, fold and enjoy!


And find more easy and delicious recipes here.

In the Kitchen: Chicken Paprikash & Spaetzel

Everyone has their preferred method of making Paprikash and this one is my favorite. It’s all about the paprika and uses no tomato products. It’s rich and hearty, but pretty easy to make with very minimal ingredients. You can also adjust the recipe to cook up as much or as little as you want making it perfect for a holiday or get together or just for a weeknight meal. You’ll find a link to printable recipe card at the end of this post.

Ingredients:

2 chicken breasts (with skin and bones)
1 small onion, diced
2 cloves garlic, minced
5 chicken bullion cubes
paprika (about 7 Tbsp)
flour (about 8 – 10 Tbsp)
8 oz sour cream
salt and pepper
Spaetzel (per batch):
1 cup flour
1 egg
1/3 cup water

Saute the diced onion and garlic in a deep skillet or electric fry pan with one tablespoon margarine and one tablespoon paprika.
Remove the skin from the chicken breasts and brown on each side.

Fill the pan with enough water to almost cover the chicken and add the bullion cubes. Simmer, covered, for about an hour. Flip the chicken as needed.
Remove the chicken (keep the liquid in the pan) and let cool. Debone and shred or chop.

To make the sauce, add flour slowly, continuously whisking over medium heat, until it begins to thicken. I end up using about 8 – 10 tablespoons. The flour may clump a bit at first but will break up and smooth out as you continue to whisk and the sauce heats up.
Once thickened, add the sour cream and stir until blended. Next add more paprika, salt and pepper to taste. I use about 5-6 tablespoons paprika. Add the shredded chicken back to the pan.
This is one of those recipes where nothing is too exact because quantities will depend on the size of your pan and your taste preferences, so sample often and trust your palette!

To make the spaetzel, you need one cup flour, one egg, and about 1/3 cup water per batch. I usually make 2 -3 batches at once per meal.
Stir ingredients until you have a semi moist doughy consistency. Using two spoons, drop small balls of the dough into boiling water.

When the spaetzel float to the top, they are done (usually about 5 min). Drain, then return to the pan and season with butter, salt and pepper to taste.
Serve and enjoy! You can also serve the paprikash over egg noodles, which is yummy as well.
The recipe makes quite a bit, it would easily serve 6 – 8 with leftovers to spare, but it stores well in the fridge or freezer. This serves the two of us twice, with leftovers, but I make the spaetzel fresh each time we have it. You can also make a smaller batch of paprikash by using less chicken and a smaller pan, just adjust all the ingredients as necessary.


And find more easy and delicious recipes here.

Me? In the Olympics?

Back in my figure skating days, I had a dream or two of Olympic gold, who didn’t? But I knew deep down there wasn’t really a chance in hell. Well, almost 20 years later, here’s my chance to make a go of it! I never thought my name would be associated with anything even rhyming with Olympics, so I’m thrilled and honored to be a part of the rikrak studio’s Handmade Olympics!
My little blog here was chosen as a finalist in the favorite blog category and yep, here’s where I ask once again for your vote! But not just because I want to win, or have more votes than everyone else, but because I want to see that you, my readers, appreciate what I’m doing here enough to take a minute and express that. To show that you support the handmade community and all the artists behind it busting their humps to do what they love and inspiring others to do the same. That this amazing community is more than just browsing, but about being involved and showing your support.
Ok, enough sappiness. If you love visiting my blog, I’d love to know.