

{QUICK LINKS}
Week one: planning & prep
Week two: templates, cutting & basting
Week three: piecing
{weeks four – six: work at your own pace}
Week seven: joining points and handling bulk
Wrap-up: removing papers, outer edges & finishing
Yahoo! It’s finally time to kick off the Butterfly Effect Sew Along! Thank you all so much for supporting me and my work and joining in this SAL. I hope you find as much enjoyment in learning this process and sewing up this piece as I have. Creating this pattern was a labor of love, as are all my patterns, but in a very different way that made my brain hurt at times. It was totally worth it though, because I absolutely love the results and am glad you do, too! If you have not purchased the pattern yet, you can do so here.
A few notes before we get started…
I know many of you are new to English Paper Piecing and that some are intimidated by the size of the pieces in this pattern, but don’t fear! My goal with this sew along is to share a wealth of knowledge with you that I have learned from others and have figured out myself as I learned EPP, and to walk you through every step of the process in detail to really help you feel comfortable and master the art of EPP! This is a project that requires time and patience (like every EPP project!) and maybe a little practice, but it will be worth it! Even if you are experienced in EPP, I recommend you check out my tips and tutorials because it’s always possible to learn a new trick or way of doing things that feels better for you or may simply work differently for a different type of project.
I will be putting out a lot of information throughout the sew along in text, photos and videos and I recommend that you read through all of it carefully, maybe more than once! We are definitely in a time where we are used to processing small bits of data that are thrown at us in emails or on social media, and sometimes we are in such a hurry that we skip over things or miss information when reading a few paragraphs. I *often* get asked questions about things that are clearly covered in blog posts and social media posts simply because people miss the information. I will try to be clear and concise and label sections accordingly throughout the posts so it’s easy to find what you’re looking for. You also don’t want to miss information about photo prompts and giveaways!
If at any point you feel stuck or need some additional help, I recommend checking out the Sew Along Facebook group. You can ask questions and you can search for topics or key words to see if someone else has already been discussing a specific topic. It’s also a great place to share your own personal knowledge and tips and tricks that have worked for you! I also encourage you to post on Instagram with the #ButterflyEffectPatternSAL hashtag where you can ask questions and check out what others in the sew along are up to. If you are not on social media, you can always email me, though I may be a bit slow in responding compared to the other methods mentioned above, but I am always happy to lend personal assistance so please never hesitate!
If you would like a brief overview of the entire EPP process and to learn more about all the tools I’ll be using and referencing throughout the sew along, you can check out my Beginner’s Guide to EPP blog post here.
UPDATE: AT the time of this Sew Along, supplies were available from Pink Door Fabrics and are referenced throughout. Supplies are now currently available from Paper Pieces here. You can select solid or windowed acrylic templates with a 1/4″ (preferred) or 3/8″ see allowance, as well as paper packs and a printed pattern. Some information below in regard to supplies will not apply to the current templates and papers available from Paper Pieces. Templates and papers can still be printed from the pattern pages. Thank you!
Before we jump in to week one, I want to share the SAL schedule again:

This week we’ll be working on project planning, pulling fabrics, and prepping our basting papers. Week two, May 10, I will dive into cutting fabric using templates (acrylic or printed) and basting the fabric to the paper pieces. You can select a few sections (or as many as you’d like!) to start with to get comfortable with the process. Week three, May 17, we will start piecing all those bits together and then you will continue to work at your own pace for a few weeks until I share some finishing details toward the end of the sew along. I will have photo prompts for you to share your progress on social media and/or via email as we go, as well as prizes along the way for doing so!
During every step of the SAL, you can select just a few pieces to work on or practice with, or you can work through as much of the pattern as you’d like. There is no timeline or obligation to complete anything or get to a certain point at any time. All of this information will remain here for you access and review. If you are waiting for supplies to arrive, you can print a few papers and templates from the pattern file to begin with or use for practice as we go. You are welcome to work at your own pace throughout the sew along.
Week One – Let’s Get Started!
PART ONE: PLANNING
The first step is to plan your project and select fabrics. I don’t know about you, but this is my favorite part of any project. I love coloring and playing with fabric combinations, then I have a reallllly hard time deciding which way to go and usually end up overwhelmed to inaction… so don’t be like me! 🙂
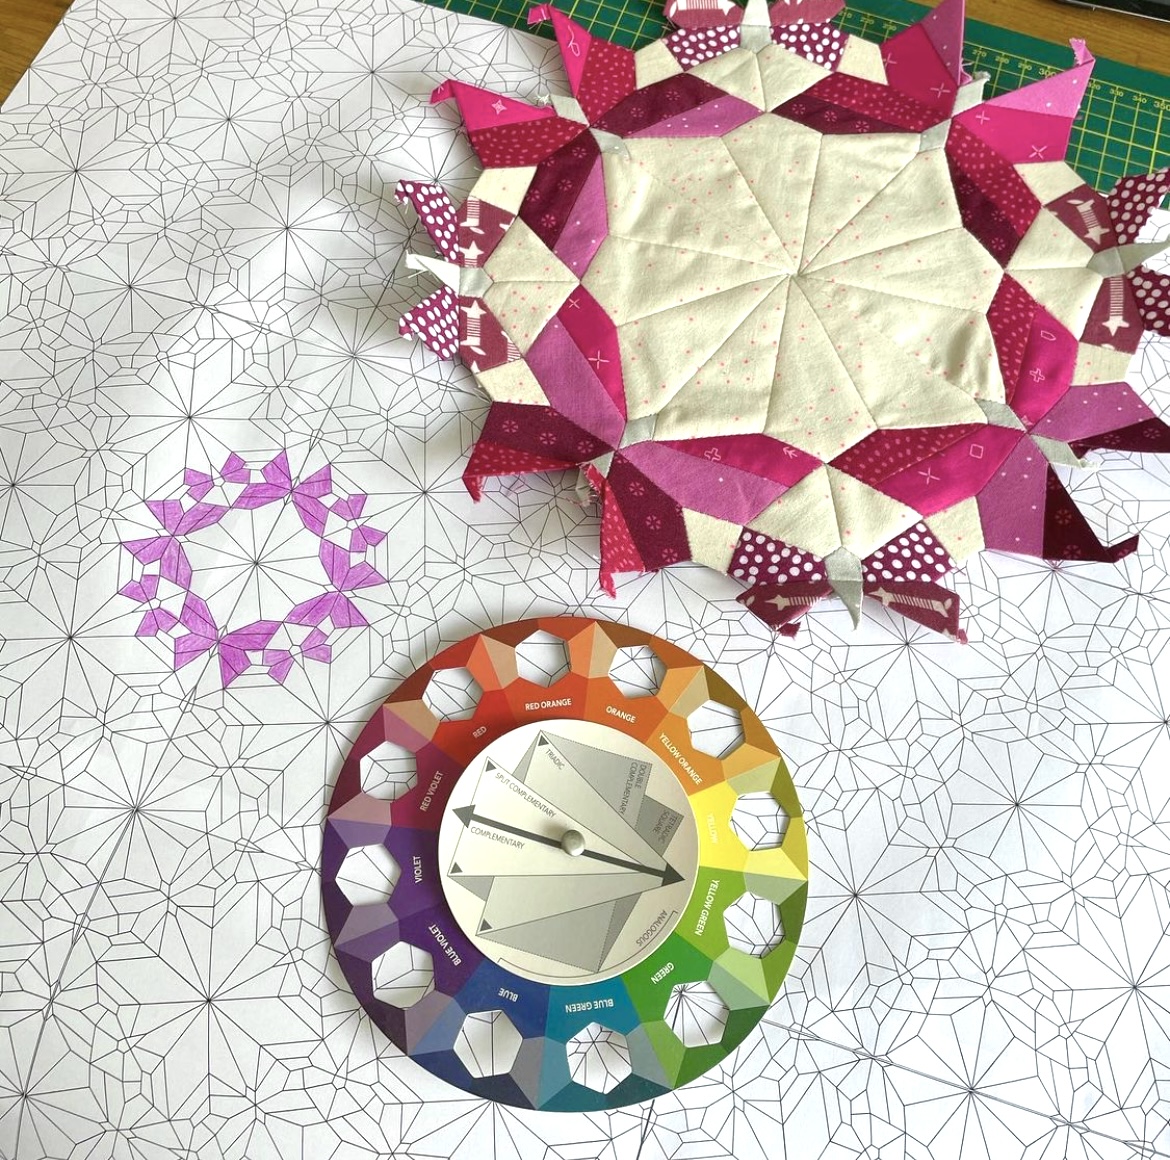
Everyone has their own methods of planning and for me it is usually a multi-step process. I start with a coloring page and you can find one on page three of the pattern file. Sometimes I play with color on the computer, but I really love sitting down with paper and colored pencils to get some rough ideas in place first.

Sometimes I have a bundle of fabric that I know I want to use, so it’s a matter of figuring out how. That was the case for this pattern. Other times I begin with colors and then select fabrics to match the palette I want.
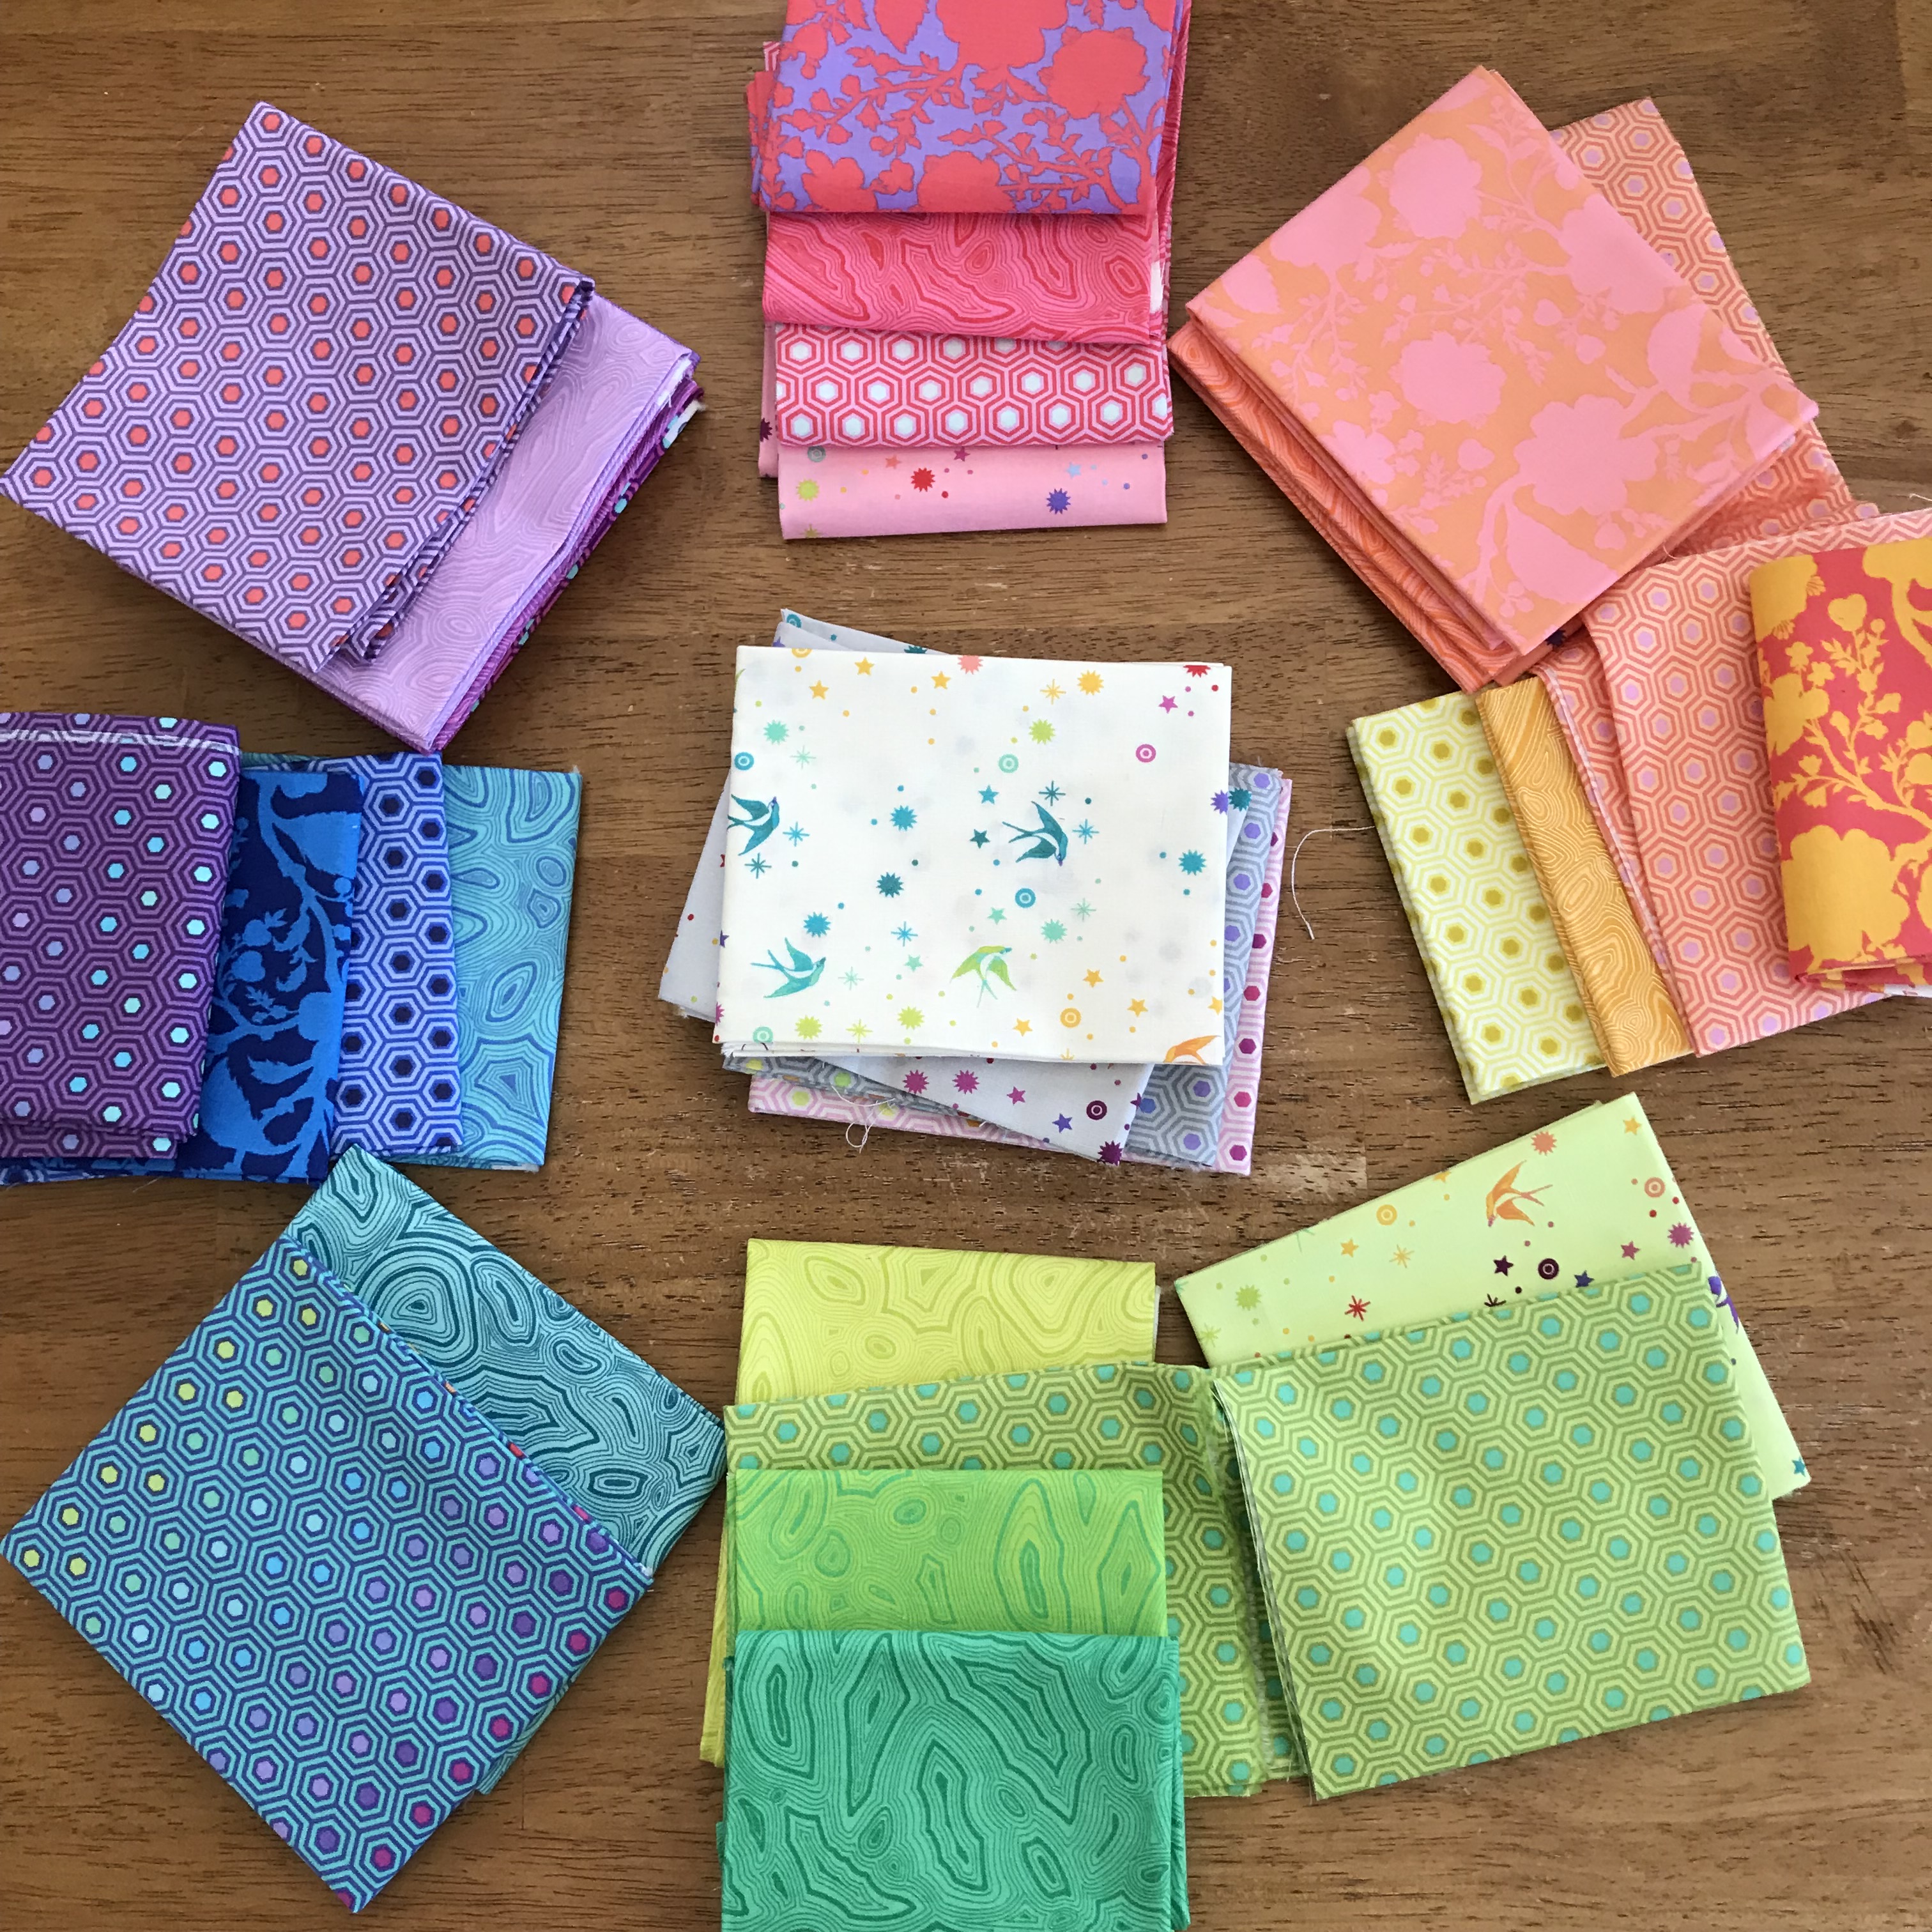
This bundle of Tula Pink True Colors showed up as I was finishing this pattern and I knew I had to use it. I played around with various combinations of a rainbow gradient and color placements for the butterflies and moths and then figured out how many different fabrics I would need to fit my color plan.

Here are some of the options I considered before deciding on the bottom right as the final for the pattern sample. I really loved them all and chose the one I did because I thought about different uses for this mini quilt and if making it into a pillow, I wanted there to be more even color distribution and was worried that the purple corners on the two left options would get lost wrapping around the edges of a pillow. I also loved the movement of the final version, it just keeps your eye fluttering around like butterflies do in nature.
Once I finalized my color and layout, I figured out how many different fabrics I needed and began pulling from my bundle. When I’m selecting fabrics, I always try to lay them out in a way that relates to the placement in the pattern to really give me a good idea of how they will look. So, in this instance, I focused on the center ring of butterflies and moths and laid out my fabrics in a similar ring.
I had no less than two dozen variations of this. I took photos of each and would look at them, then look again, look and squint my eyes, flip it around and look again, text seventeen options to seven friends and then ignore all their suggestions. You know how it goes. From here, it was time to begin. I made all the butterflies and moth and placed them in a ring, only to decide that I didn’t love the purples I chose and ended up going to a different option I had previously ruled out.
An important thing to remember is that sometimes you can only plan so much before you have to jump in and see what you think. You can always make changes. This is partly why I often will create small chunks of any project to make sure I love where it’s going before jumping in and creating all of the pieces.
Play around!
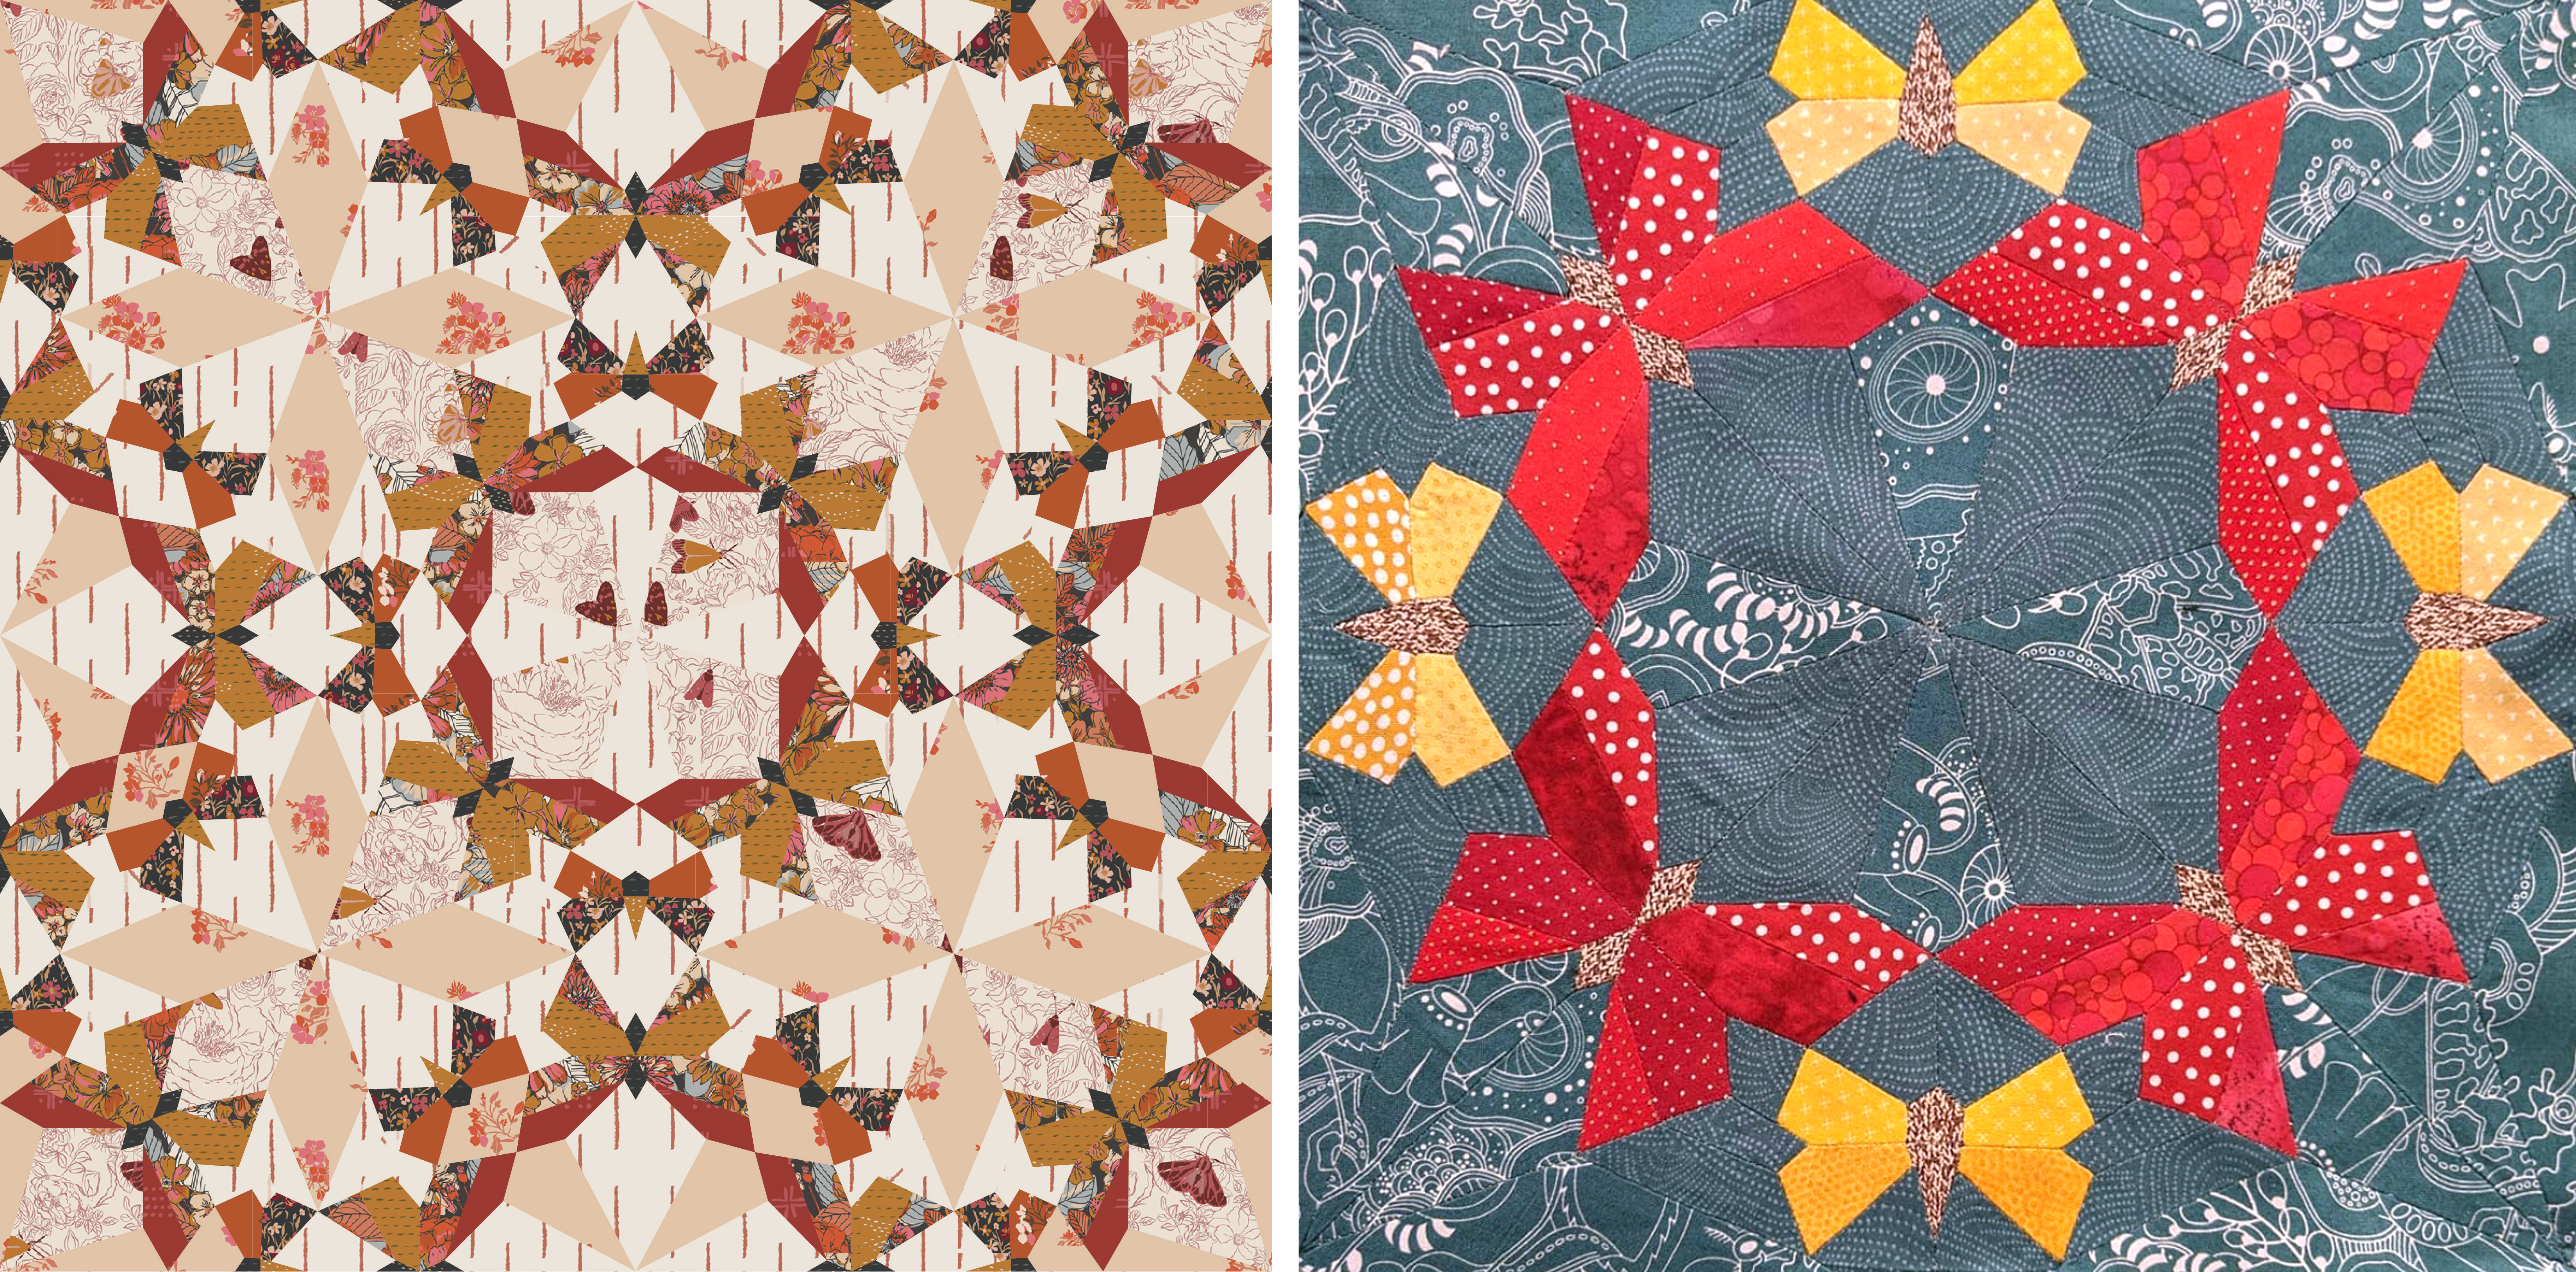
While many of you are making similar rainbow versions, I have seem some amazing pieces popping up that use a very limited number of fabrics and have all the butterflies in the same colors/fabrics. Below on the left is a version I mocked up using Sharon Holland’s Kismet collection and I think it is stunning! I’m currently beginning a second Butterfly Effect using Art Gallery Fabrics Flower Society collection and I can’t wait to show you. On the right is a piece in progress by Erica Texhecks (@Texhecks), isn’t it gorgeous?
Here you can see that Anna Kenna (@thespottedoctopus on Instagram) is up to something super cool with her gigantic layout and monochrome rings!
For this project, I recommend standard weight quilting cotton or lightweight alternative substrates such as silk or rayon. Because of the size of some pieces, I do not recommend any heavier fabrics such as linens, Essex or canvas.
PHOTO PROMPT & giveaway!
During week one, post a photo (or photos) of your coloring page and/or fabric pull for your Butterfly Effect! You can do so on Instagram or Facebook and use the hashtag #ButterflyEffectPatternSAL. If you are not on social media, you can email your photo to me.
Everyone who shares a photo is eligible to win one of this week’s prizes of an EPP sewing kit from Stash Fabrics or an Invisafil thread pack from Wonderfil! Winners will be drawn at random and announced on Thursday, May 6.


Part two: prepping your papers (and organization!)
English Paper Piecing is a method of hand sewing where you stabilize your fabric on heavy paper (or cardstock) before sewing them together. The papers you use are cut to the exact size and shape as the pieces in the finished pattern and you cut your fabric 1/4″ (or 3/8″ at times) larger than your papers using templates. The extra 1/4″ of fabric wraps around your paper and becomes your seam allowance, just as you would have with traditionally pieced or hand sewn quilt blocks. Papers are essential to EPP and with this pattern you can either print your own or you can order supplies from Paper Pieces here. The pattern includes directions for how to print and cut your papers.
If you choose to cut your own papers, don’t be intimidated by the number of pieces. You can cut a few at a time as you go for what you need, or you can cut them all at once. I use a fairly standard 110lb index weight card stock that I purchase for $6 for 150 sheets at Walmart and I run it through my black and white laser printer. You can also take the pattern file to a copy shop or office supply store and have them print the paper pages on card stock for you.
The papers remain in place while stitching your piece together and often until the entire piece is complete. I will talk about this in more detail during upcoming weeks. You will remove the papers after piecing by carefully lifting seams and releasing your basting (lifting glue or snipping stitches) with a small tool such as a seam ripper, tiny crochet hook, awl, purple thang etc. Sometimes people will punch a hole in their papers to have a place to insert a small tool and “pop” the papers out. I have never found this method to be especially helpful myself, especially with smaller pattern pieces such as those in Butterfly Effect. I typically use a seam ripper and make myself comfortable on the couch! If you have ever done Foundation Paper Piecing, it’s a similar process of removing your paper after you are done sewing.
If you are gentle when piecing and removing your papers, you can often times reuse them or pass them on to someone else to use.
The next thing I’m going to talk about is KEY to making this project smooth and successful – organization!
There are several shapes and a lot of tiny pieces in this pattern, but don’t let that scare you! Spending a little time up front to keep your pieces organized and taking some steps to ensure they are easy to work with will be invaluable down the road. One very important thing I will refer to multiple times throughout the sew along is orientation of your pieces. Some of the shapes look symmetrical, but are not, and some shapes will need to be used in various orientations, so it’s important to pay attention to this at every step and I will talk about how to do this.
If you are printing and cutting your own papers, you can skip to the organization section. If you ordered a laser cut paper piece set from Pink Door Fabrics, this next part is for you! UPDATE: Supplies are now currently available from PAPER PIECES HERE and are formatted differently. Thanks!

You will receive 16 sheets as shown above from Pink Door. There are four each of four different sheets. This includes all the pieces needed to create the full Butterfly Effect Pattern plus some extras of each piece. The pieces are perforated and pop out easily, though take care with extra pointy corners as to not tear them.
The pieces are laser cut and etched, so there may be some light residue from the laser on the sheets. It is not harmful and can be brushed off with a dry towel, if desired, to avoid getting residue on your fingers and fabrics.
One of each different sheet has the paper piece letters etched into every piece as a guide for helping to familiarize you with the shapes and assist with direction and placement. The letters and placement on the paper pieces match all the diagrams in the pattern file. Each subsequent sheet has only one of each piece labeled to assist with sorting.
I recommend writing in the letters on each blank piece or keep at least one paper piece with a letter unused to use a reference as you work. You can also always reference the template pages in the pattern PDF if you get confused on the orientation of a shape. Some shapes are very similar to others, such as H and I, and P, S & K. Also pieces A and R look symmetrical but are ever so slightly unsymmetrical, so you need to be sure you are using them in the proper orientation for all your pieces to fit together.

organization
I begin any EPP project by sorting and organizing all of my papers and I do this with small zip top bags and stickers!
I like to create two sets of labeled bags – one is used for holding all my paper pieces and the second is used for holding my templates, fabric cuts and basted pieces.
For this project, I used 3″x4″ bags and small stickers for holding my paper pieces. This pattern has 19 shapes labeled A thru S, so I first affixed the stickers to the bags and then punched out my paper pieces and bagged them accordingly.

For the second set of bags to hold my templates, fabrics and basted pieces, I used larger 4″x6″ bags, because they will need to hold more, and I used big fun stickers that are easy to see.

I purchased my bags and stickers at Hobby Lobby, though you can find them in many stores such as Walmart (if they have a craft section), Joann Fabrics, Michaels or your local craft store. Small bags can often be found in the jewelry supply section.
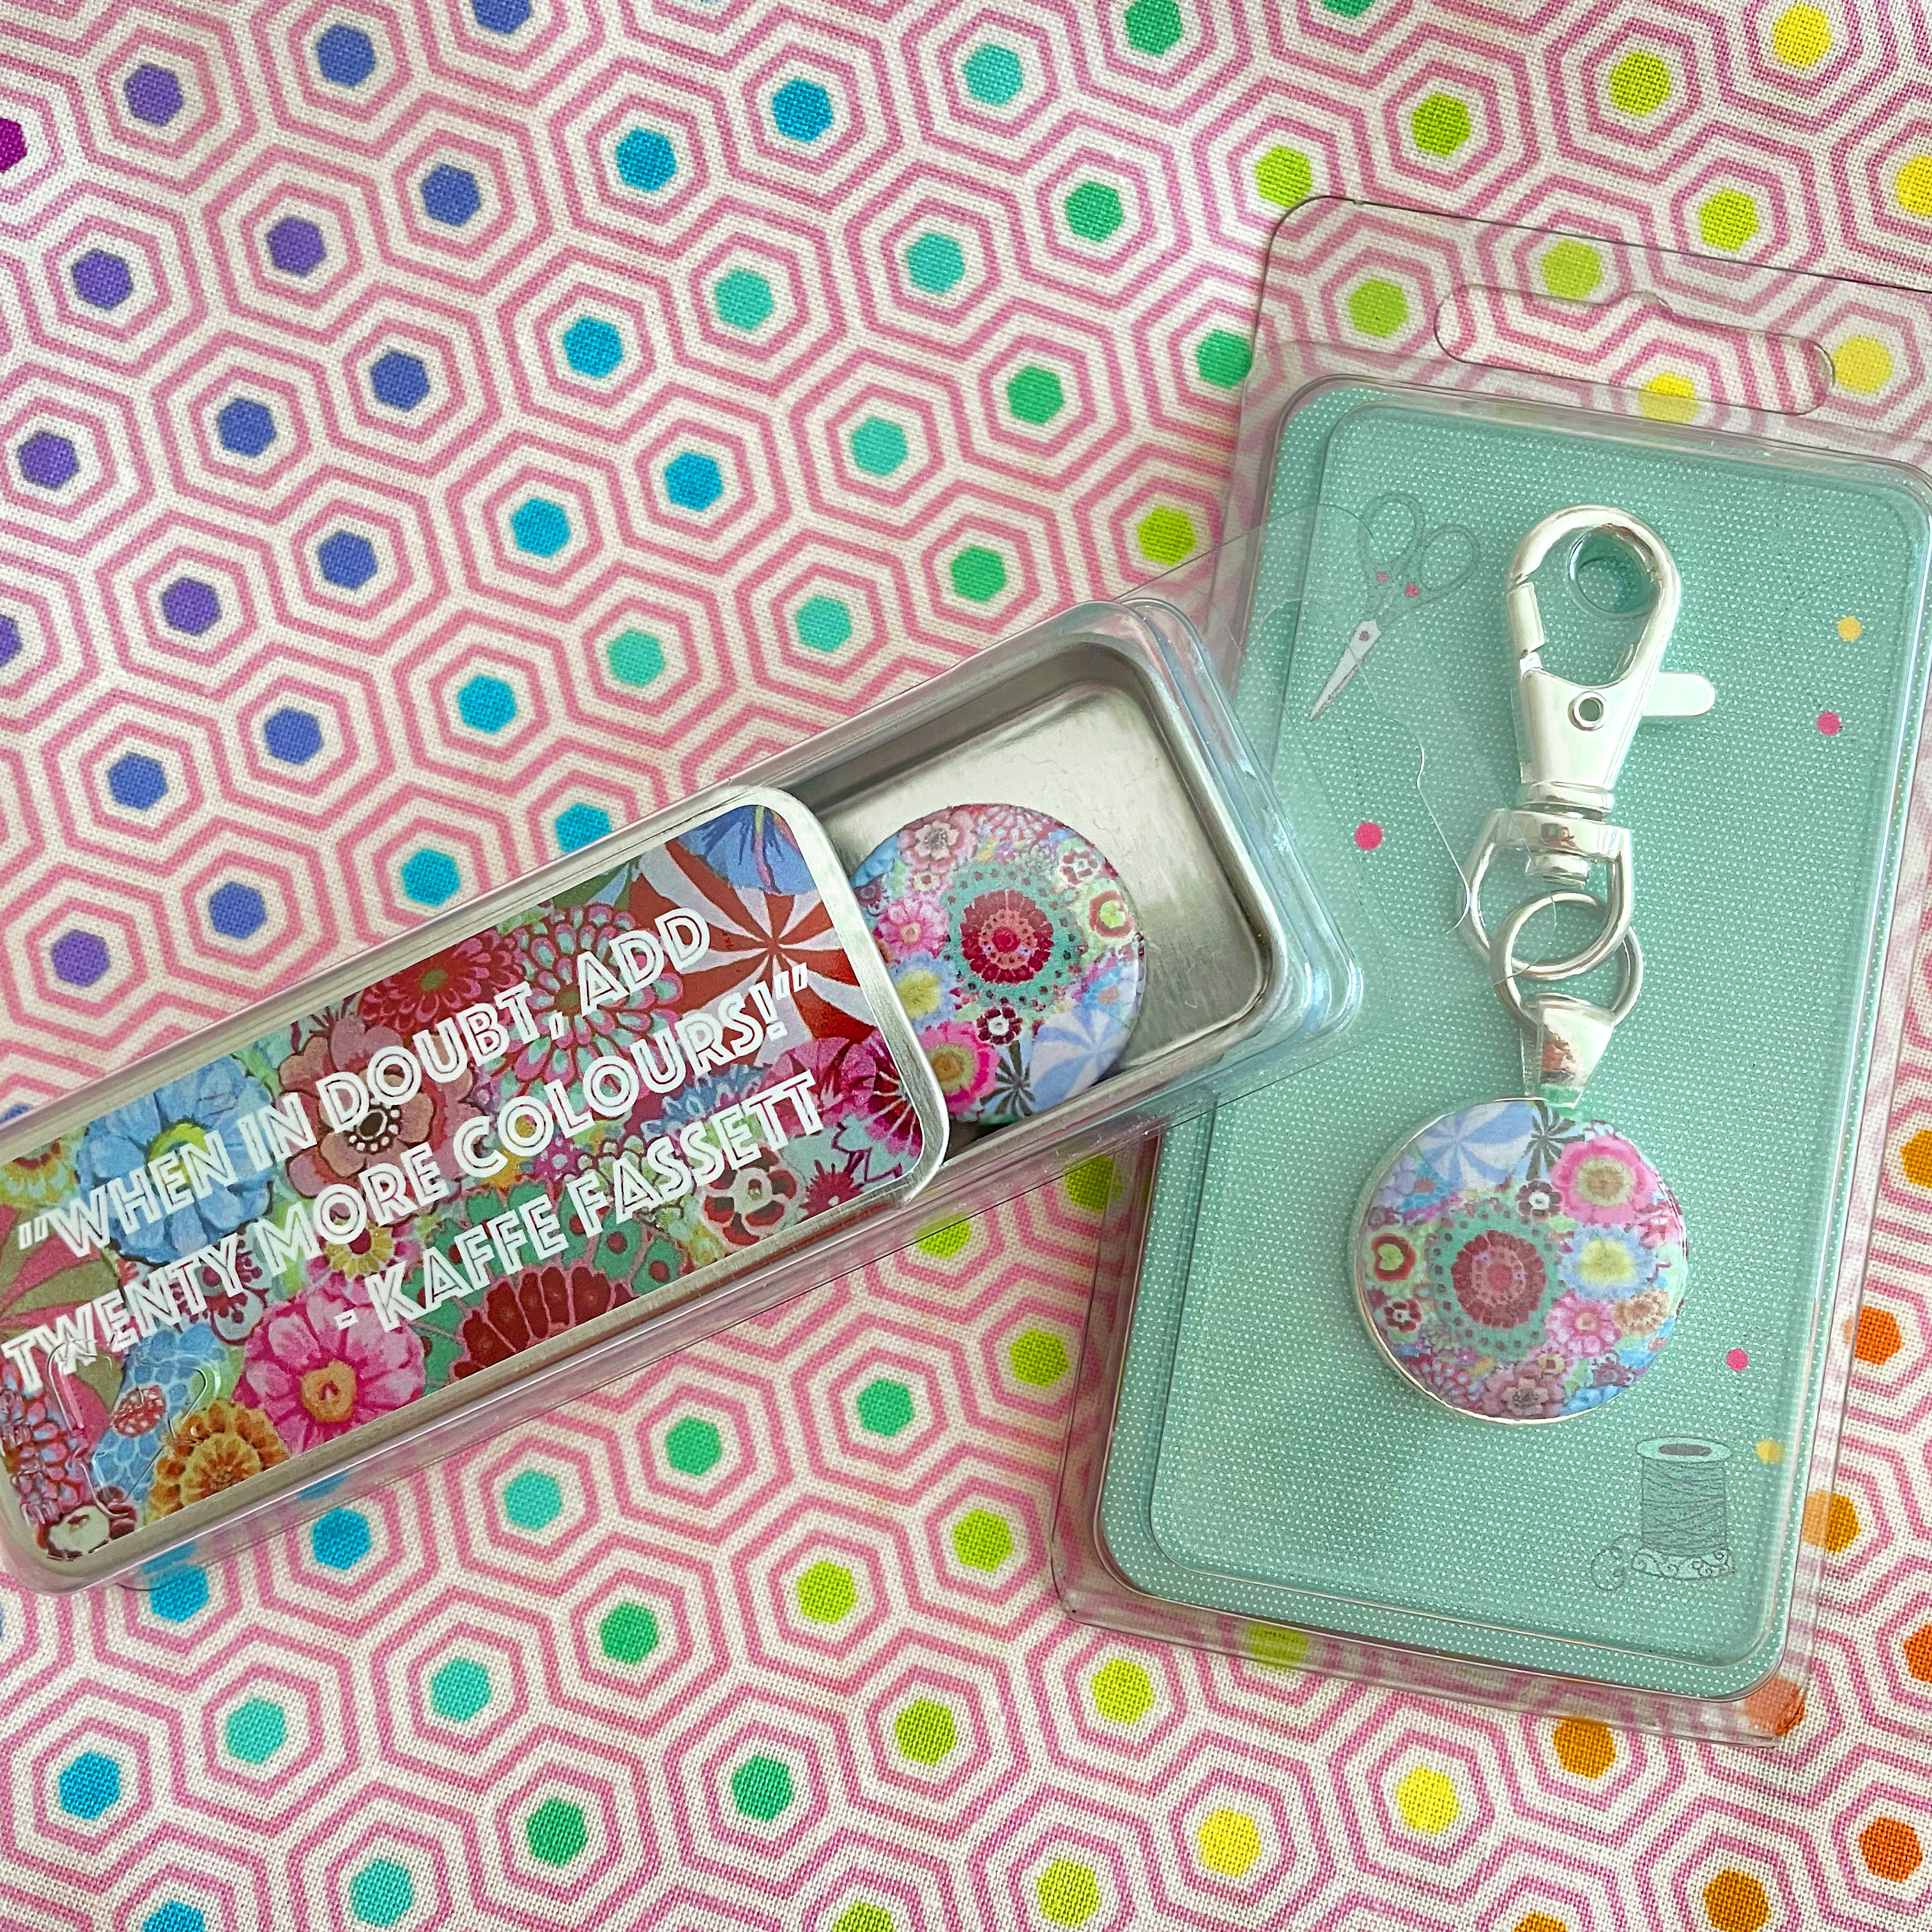
I’m working on a few different versions of this pattern at once, so I created multiple sets of bags and used different stickers for each version to help keep them sorted. My free Mini Maker Case pattern is perfect for storing all your baggies and parts, too! You could also punch a hole in each bag and put them on a binder ring or in a cute pouch. I have some oil slick vinyl that is calling my name and I may need to make some!
This wraps up the content for week one! Your goal this week is to plan your project, select fabrics and begin organizing your papers, if desired! Remember to share your progress for a chance to win this week’s prizes! Winners will be selected at random on Thursday, May 6.
Next week we will begin cutting our fabrics and basting them to the paper pieces. We will be using templates to cut our fabric pieces and just like the paper pieces, you will find printable pages in the pattern file or you can order acrylic templates from Pink Door Fabrics. I will talk about how to use both of these options for cutting and if you’d like a little preview to help you decide which route is best for you, you can check out this Instagram post where I talk a bit about templates.
See you next week! ~ Nicole
WEEk TWO – Templates, cutting & basting!
Part one: templates
Hello, friends! It’s week two of the Butterfly Effect Sew Along and today I’m going to talk about templates, cutting fabric and basting your fabric to the papers. Last week I discussed how we use papers for EPP and I briefly touched on templates. Today I will cover the various types of templates you can use and how to use them.
Templates are used to accurately cut fabric pieces with a specific seam allowance to fit the papers. Many EPP patterns have a 3/8″ seam allowance, but because of the smaller size of the pieces in this pattern, the Butterfly Effect templates have a 1/4″ seam allowance. Templates are not *necessary* for an EPP pattern because you can use your paper piece and trace a 1/4” or 3/8” seam allowance all the way around and then cut it, but templates do make the process much quicker and easier, and are especially useful for fussy cutting which is common with EPP. Fussy cutting is when you target and cut a specific design from a piece of fabric for intentional placement of said design and you can create some really fun effects by doing it!
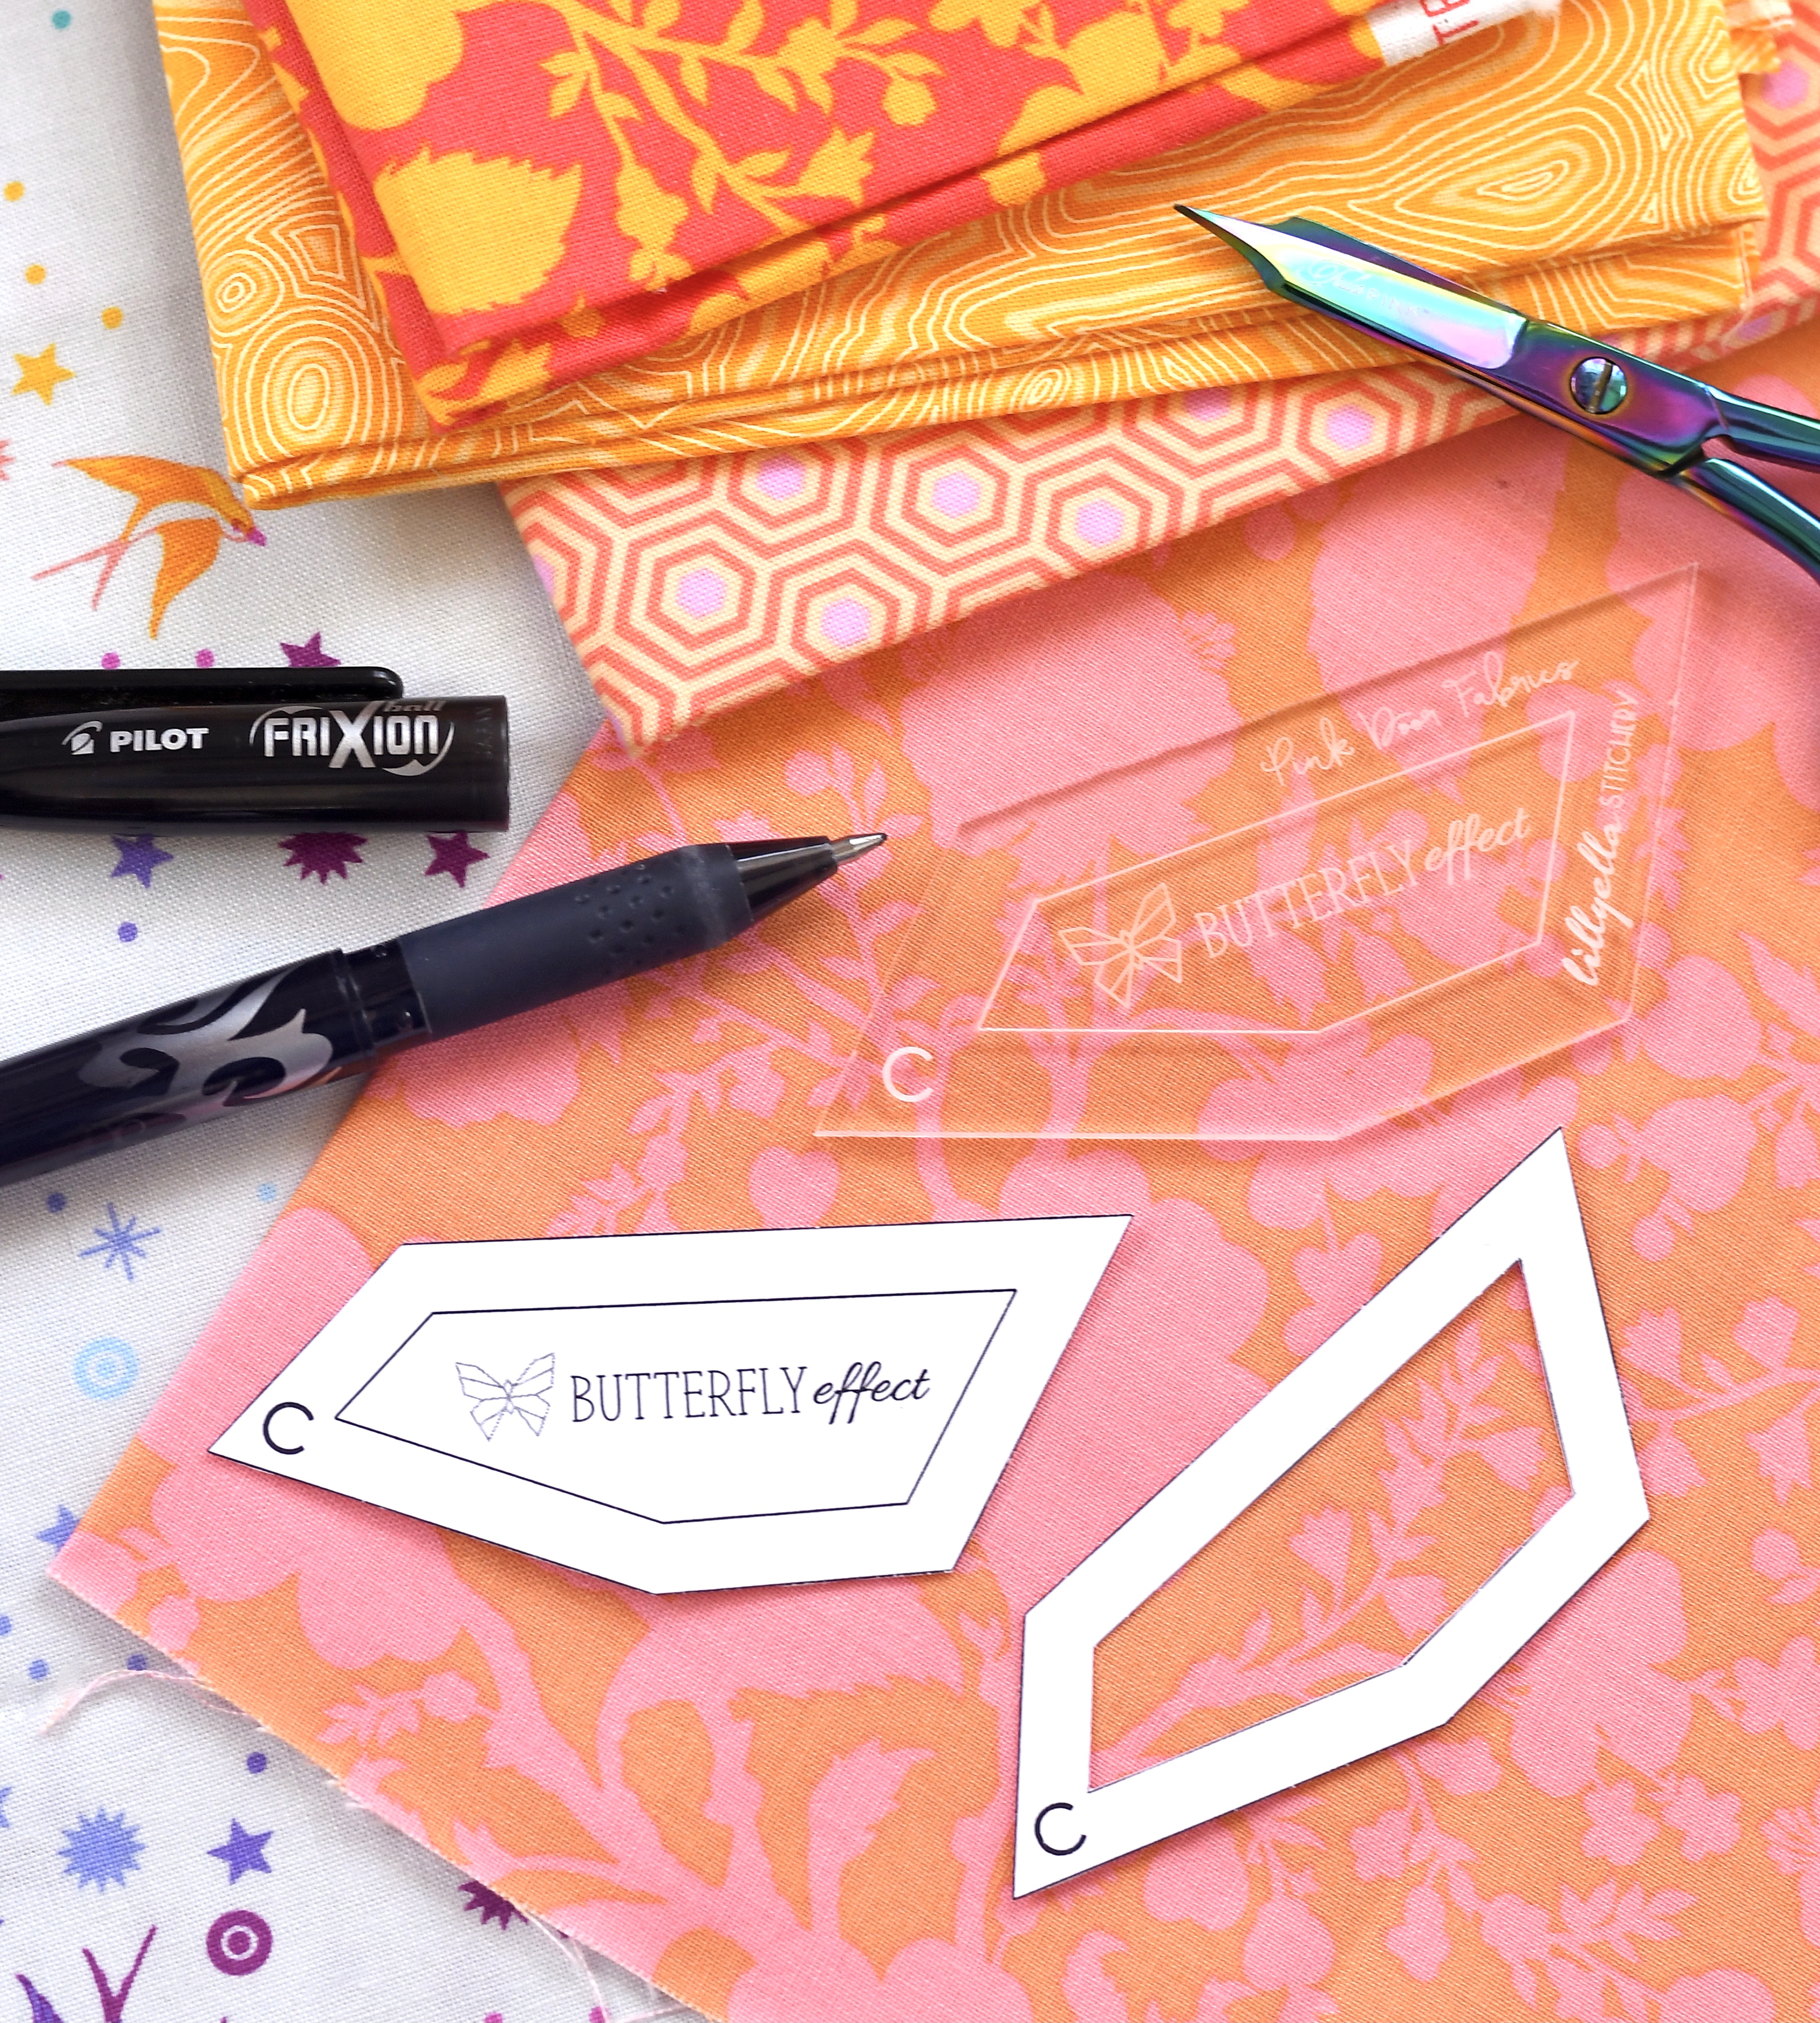
My Butterfly Effect pattern includes printable templates which are the white pieces you see above or you can order clear acrylic templates from Pink Door Fabrics, also shown above (UPDATE: Supplies are now available from PAPER PIECES HERE and you can select solid or windowed templates with a 3/8″ or 1/4″ seam allowance. I prefer 1/4″ for this project!). There are two options available for template sets from Pink Door. One includes a full set of templates for every piece of the pattern and the second is a mini set which includes acrylic templates for the butterfly and moth wings. You would then print and cut the other templates yourself. A third option is to trace the templates from the pattern file onto template plastic and cut them out.
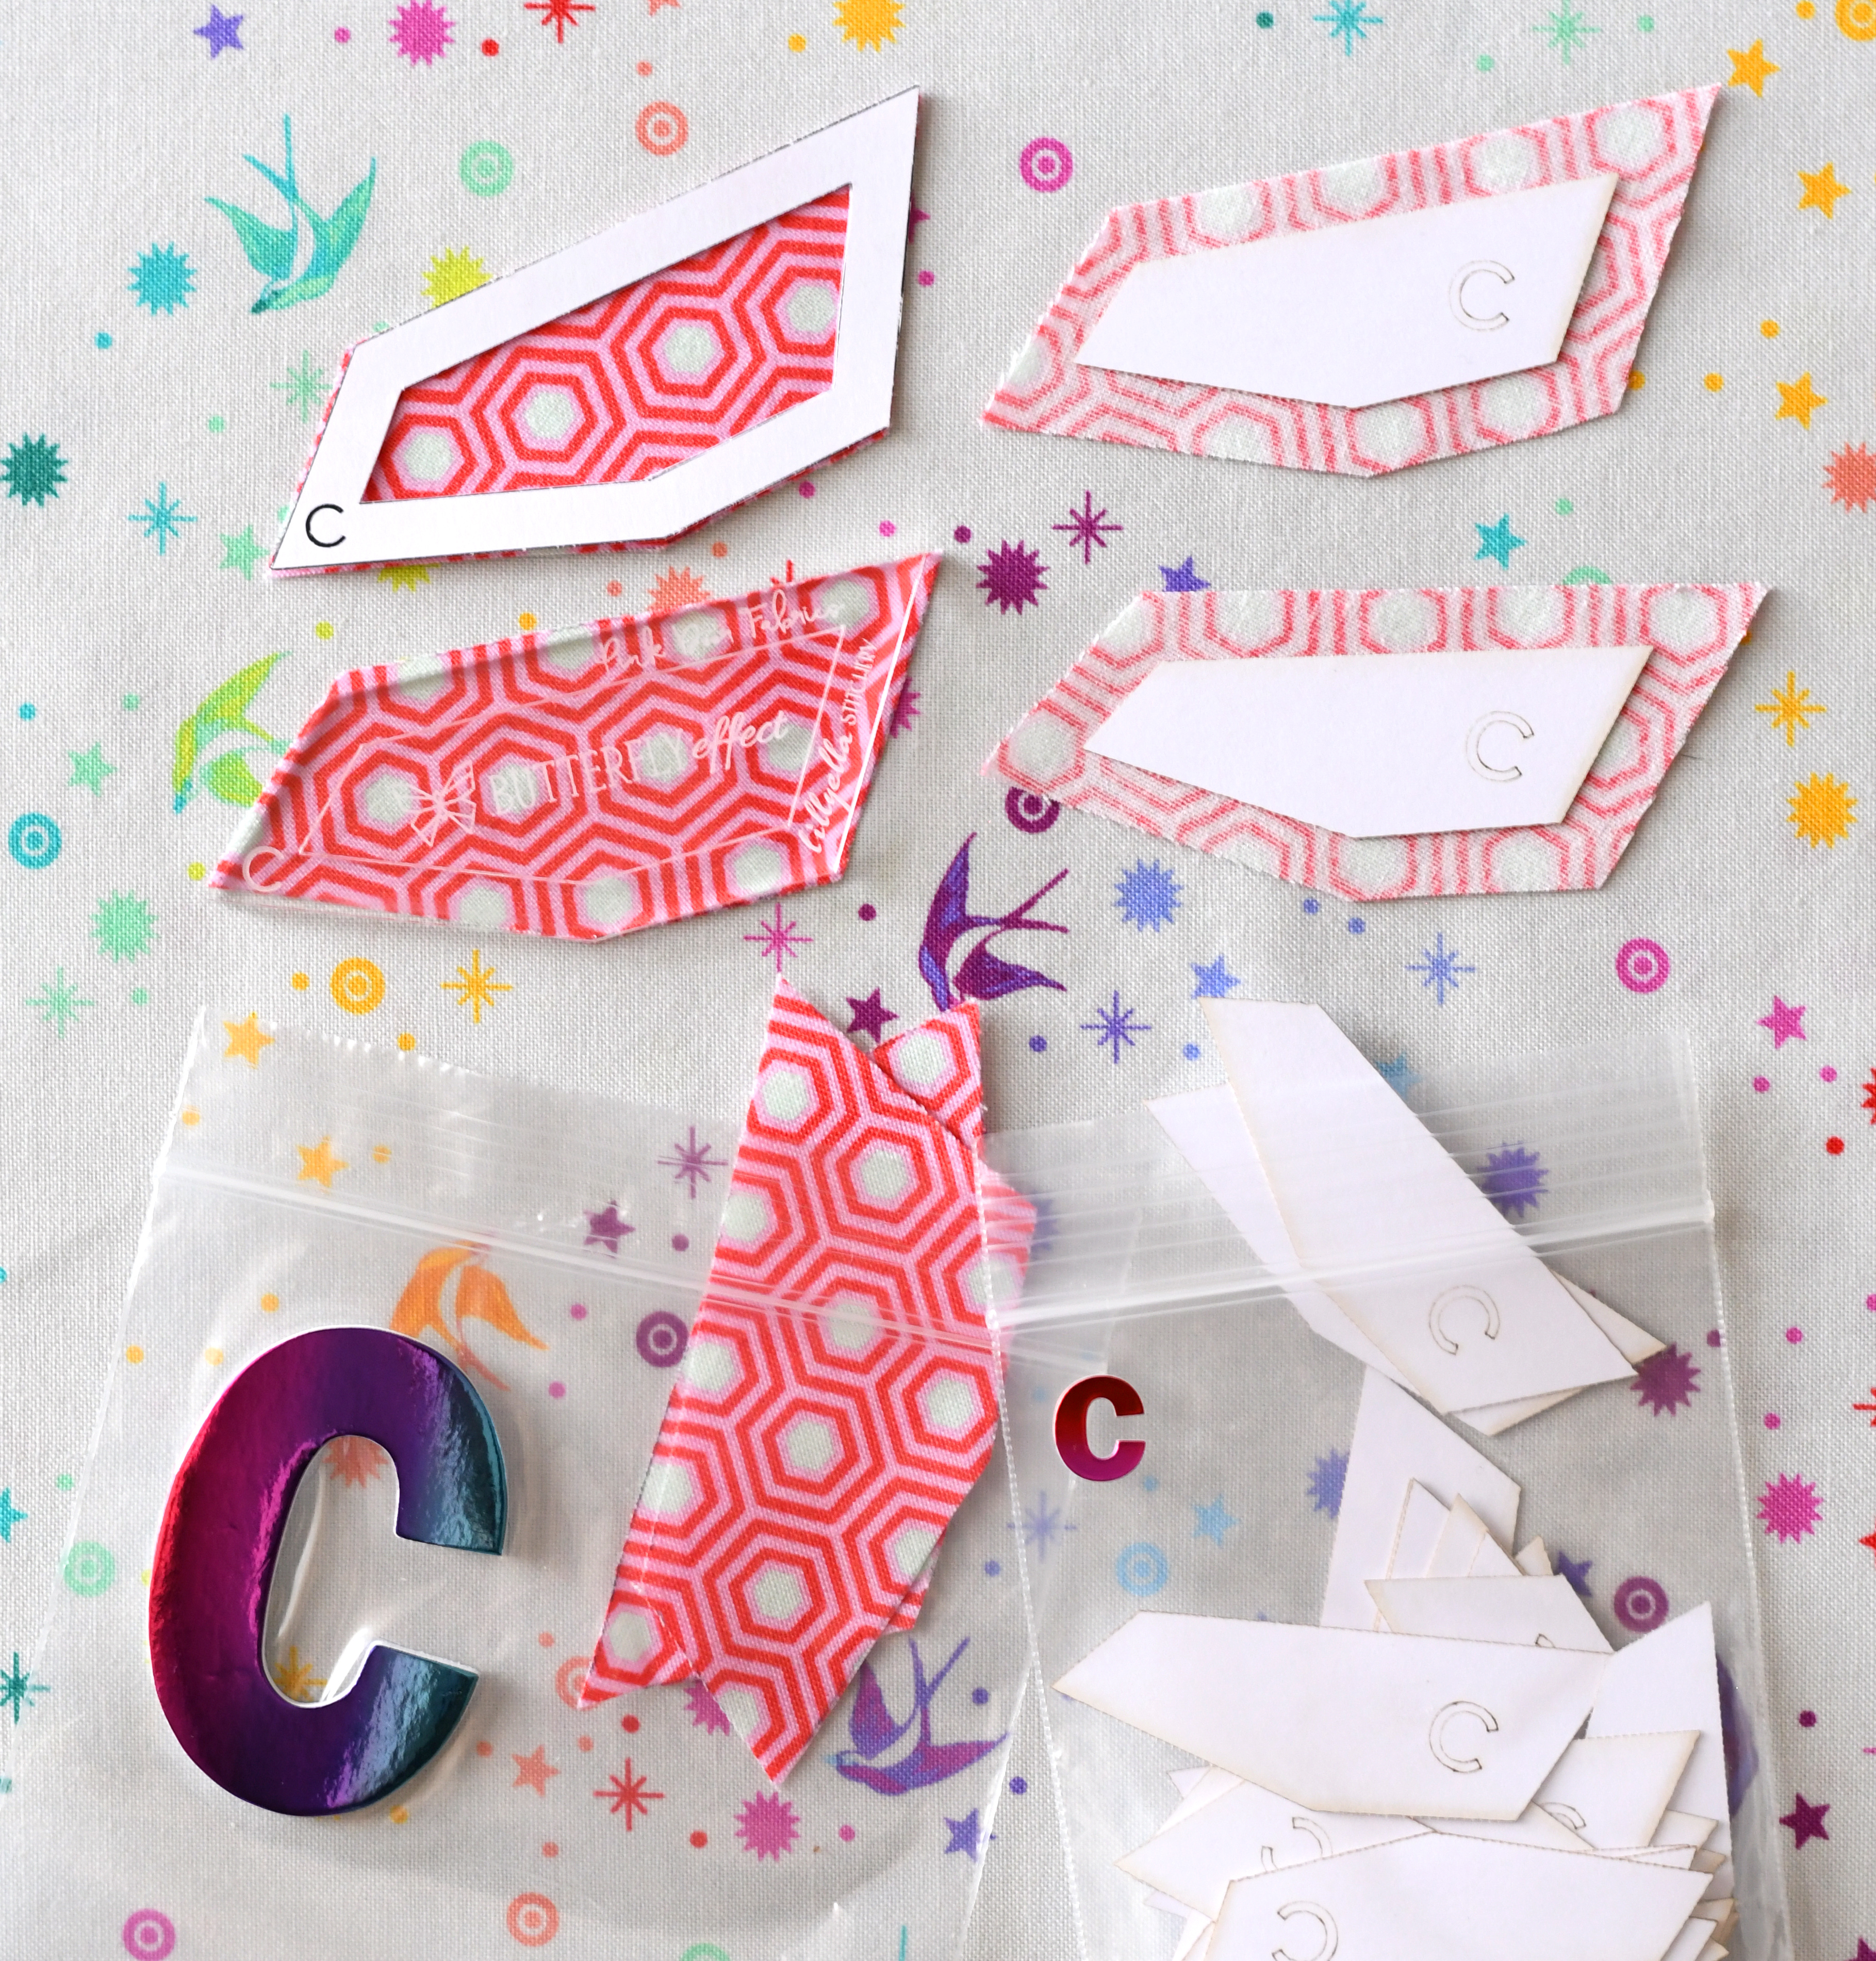
On both templates (printable or acrylic) you will see an inside line – this indicates the final size of the basted shape as used in the pattern. The space outside of it is the seam allowance. In the photo below, you can see the same fabric cut with the paper template and the acrylic template and the the corresponding paper placed on it.
If you are printing your own templates from the pattern, you can cut out this middle shape, as shown in the above photo bottom right, so that you can easily fussy cut your fabrics. If you are using solid fabric or non directional scattered prints, etc, you can keep the templates whole. If you are using the acrylic templates, will you arrange your fussy cut within the center space of the template and the seam allowance will be wrapped around the paper.
As noted on the top of page two of the pattern file, most of the templates (and papers) in this pattern will be used in the orientation that you see them on the page, as well as mirrored, meaning you will flip the template or paper over to use it. This is for all the symmetrical pieces in the pattern, such as all the wing pieces.

Before we get into cutting, I want to share a personal tip for those using acrylic templates. I like to wrap the seam allowance edge of the template with washi tape so that it’s easier for my eye to see the fussy cut I’m going for! I don’t always do this or with all pieces, but it’s a fairly routine practice for me. It’s quick and easy and then they’re all ready to go if I do want to fussy cut.

A 15mm wide washi tape wraps around these templates perfectly, but you can also just adhere it to one side, trim it down, or not wrap it all the way around, it still does the trick!
Below you can see the same template on the same fussy cut both with and without the washi tape wrap.
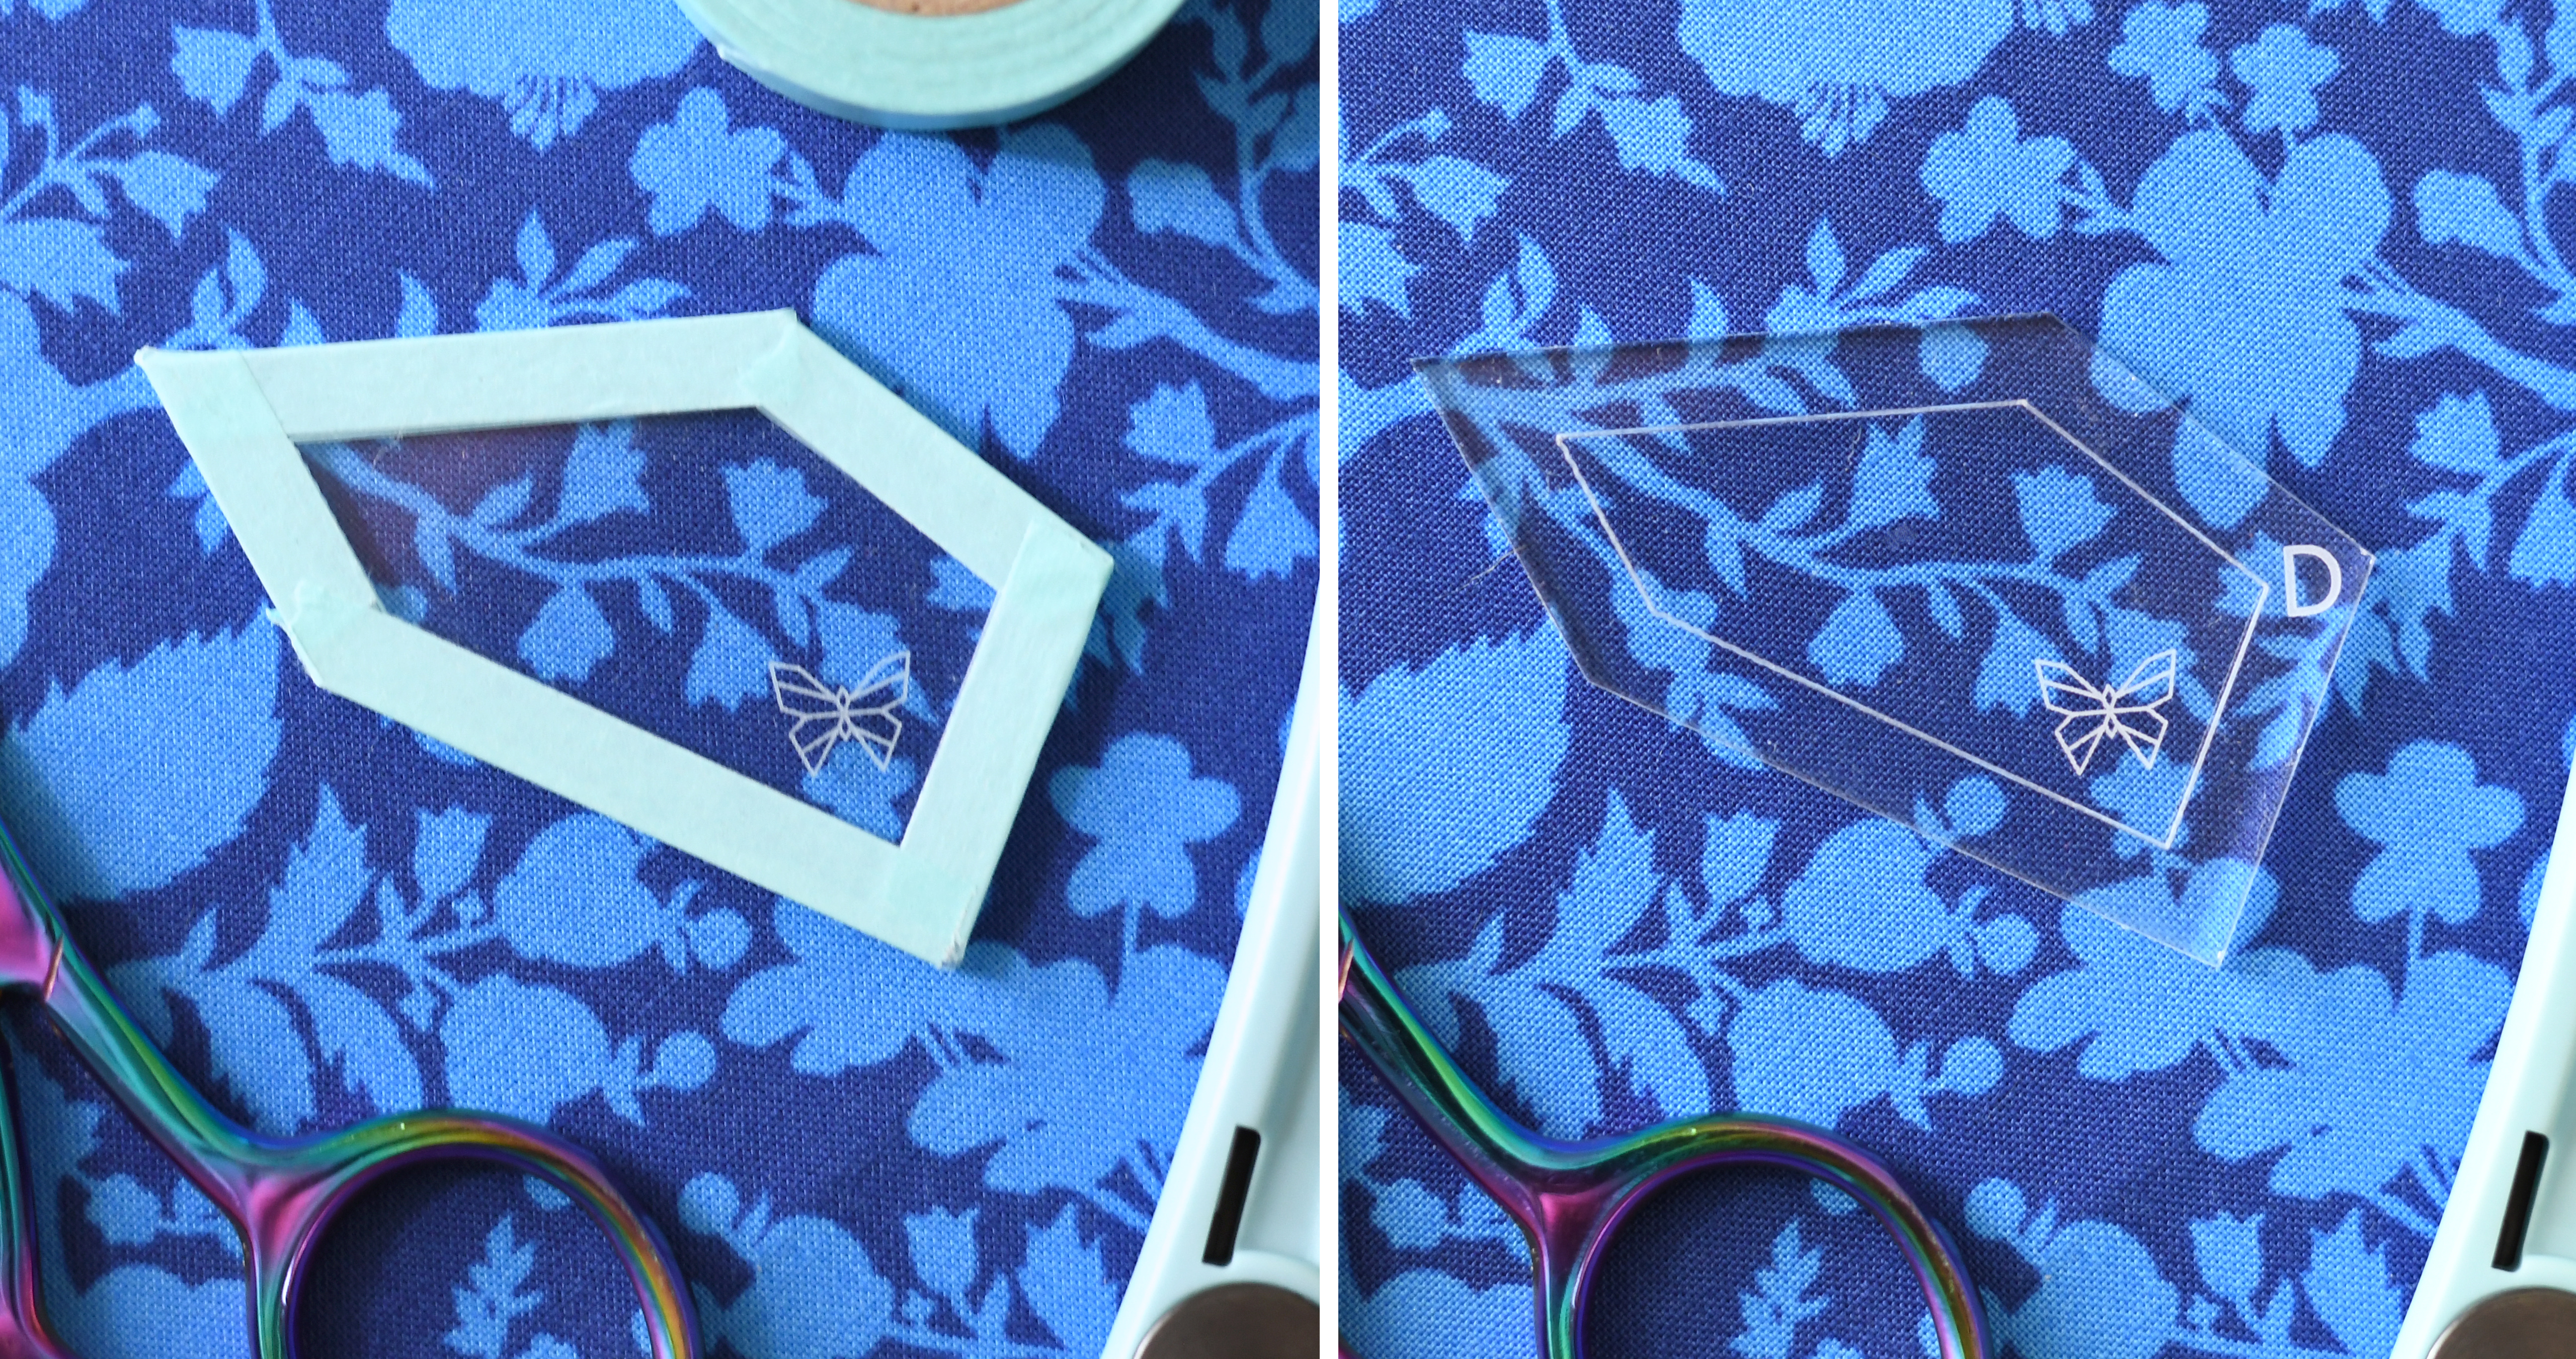
Everyone sees and processes patterns and information differently, so this may not be a useful tip to everyone, but just something that helps me! Keep in mind that with these templates, the washi tape will cover the template letter etched in the seam allowance, so you will want to draw it on the tape with a marker for reference, or if you have your templates stored in your lettered plastic bags then you’re good to go!
Part two: cutting
One quick note, I usually use a light spray of starch when I press my fabrics before cutting, but not always. It’s really just to help with stubborn deep folds or wrinkles. Some people use a lot of starch when pressing for EPP to help have crisper pieces and this is just a personal preference. Sometimes I don’t use any stash and really don’t notice much of a difference with the way I baste, which is glue basting. If you are going to try one of the other methods I discuss later (thread, starch etc), you may find a heavier spray of starch helps you. Sometimes I don’t even need to press my fabrics depending on the pieces I’m cutting!
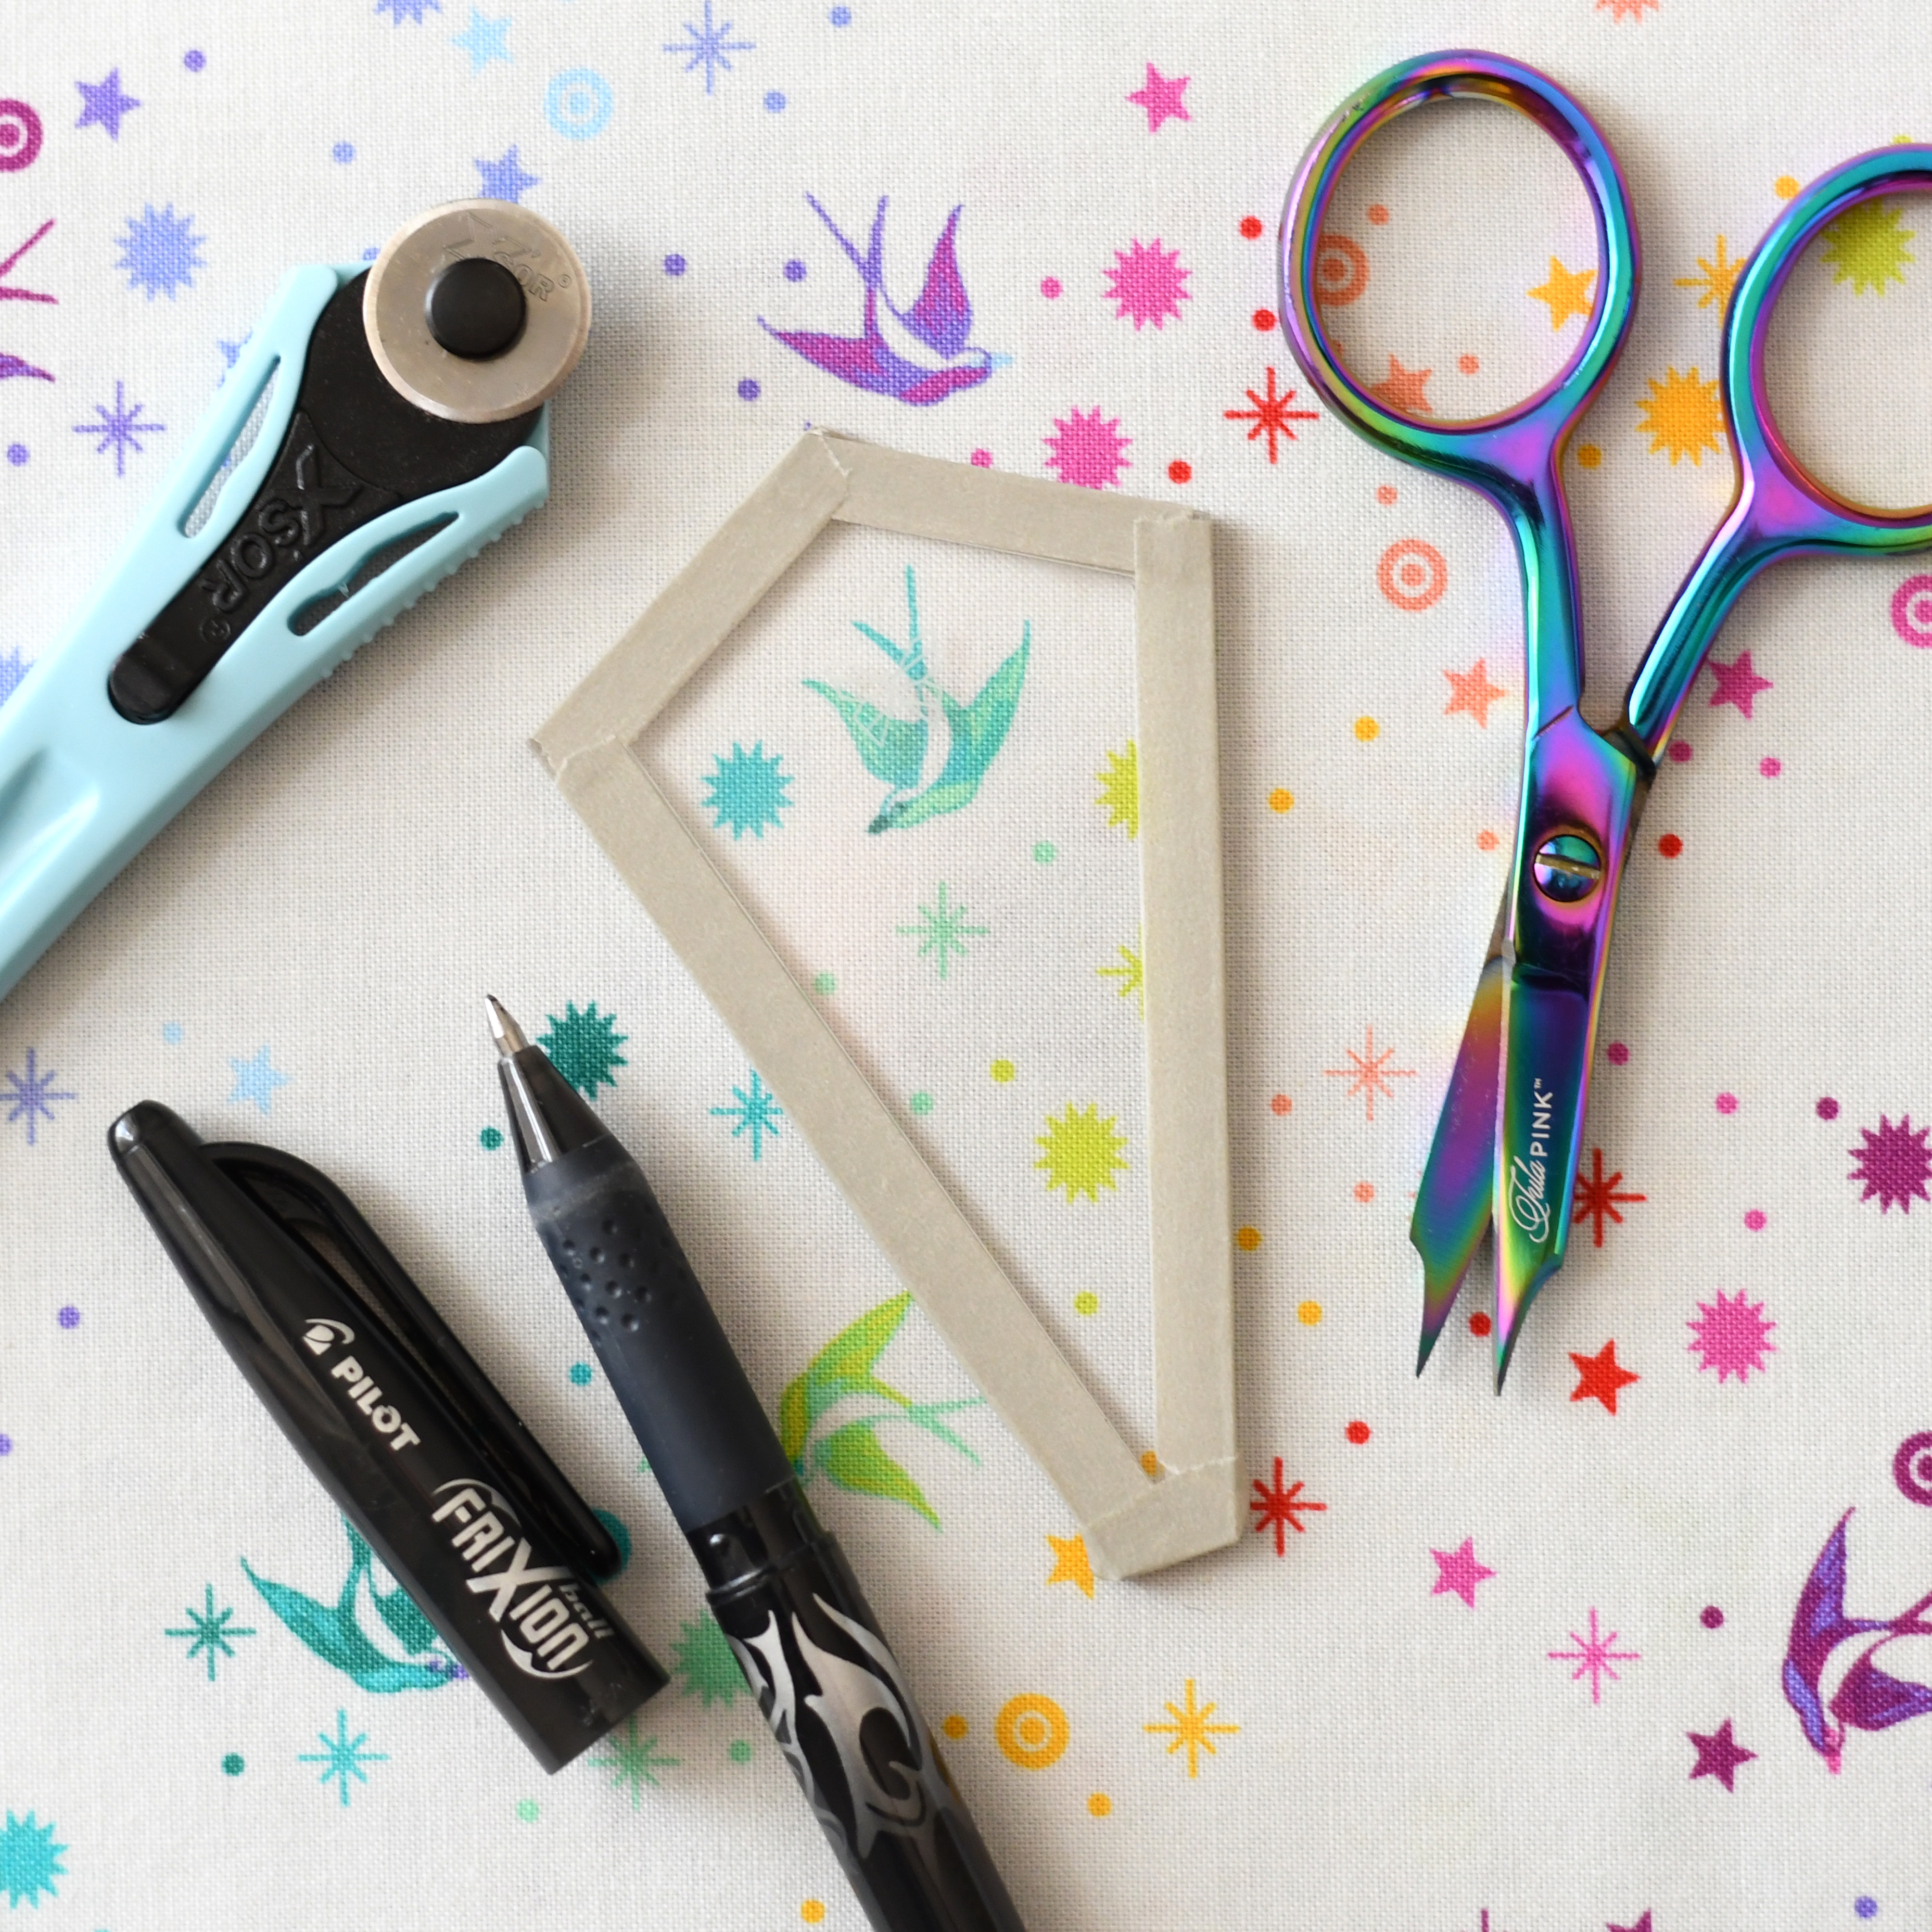
There are a couple options for tracing your template shapes and cutting your fabrics – you can trace and cut with scissors or you can use a small rotary cutter. If you are using templates that you printed onto cardstock, you will want to trace your templates and then cut them by hand. I always use a Pilot Frixion pen which erases with heat. This type of pen isn’t entirely necessary for this use since the traced edges will be hidden, but it’s just what I always have on hand and prefer to use just incase! If I trace some shapes and then change my mind, I can erase the lines away. I don’t recommend using a rotary cutter with paper templates (or template plastic) because you can easily cut into the template.

If you are using acrylic templates, a small 28mm rotary cutter is a great option that speeds up the cutting process, but there are a couple things to note.
The acrylic templates can be quite slippery on top of fabric and even if you hold them down securely when cutting with the rotary cutter, I find that they can still shift around easily. The washi tape wrap does help with this a bit, but another tool that can help you are Grip Dots.
Grip Dots are small adhesive rings and dots that you can place on your templates to help them from sliding. They work on rulers, too!
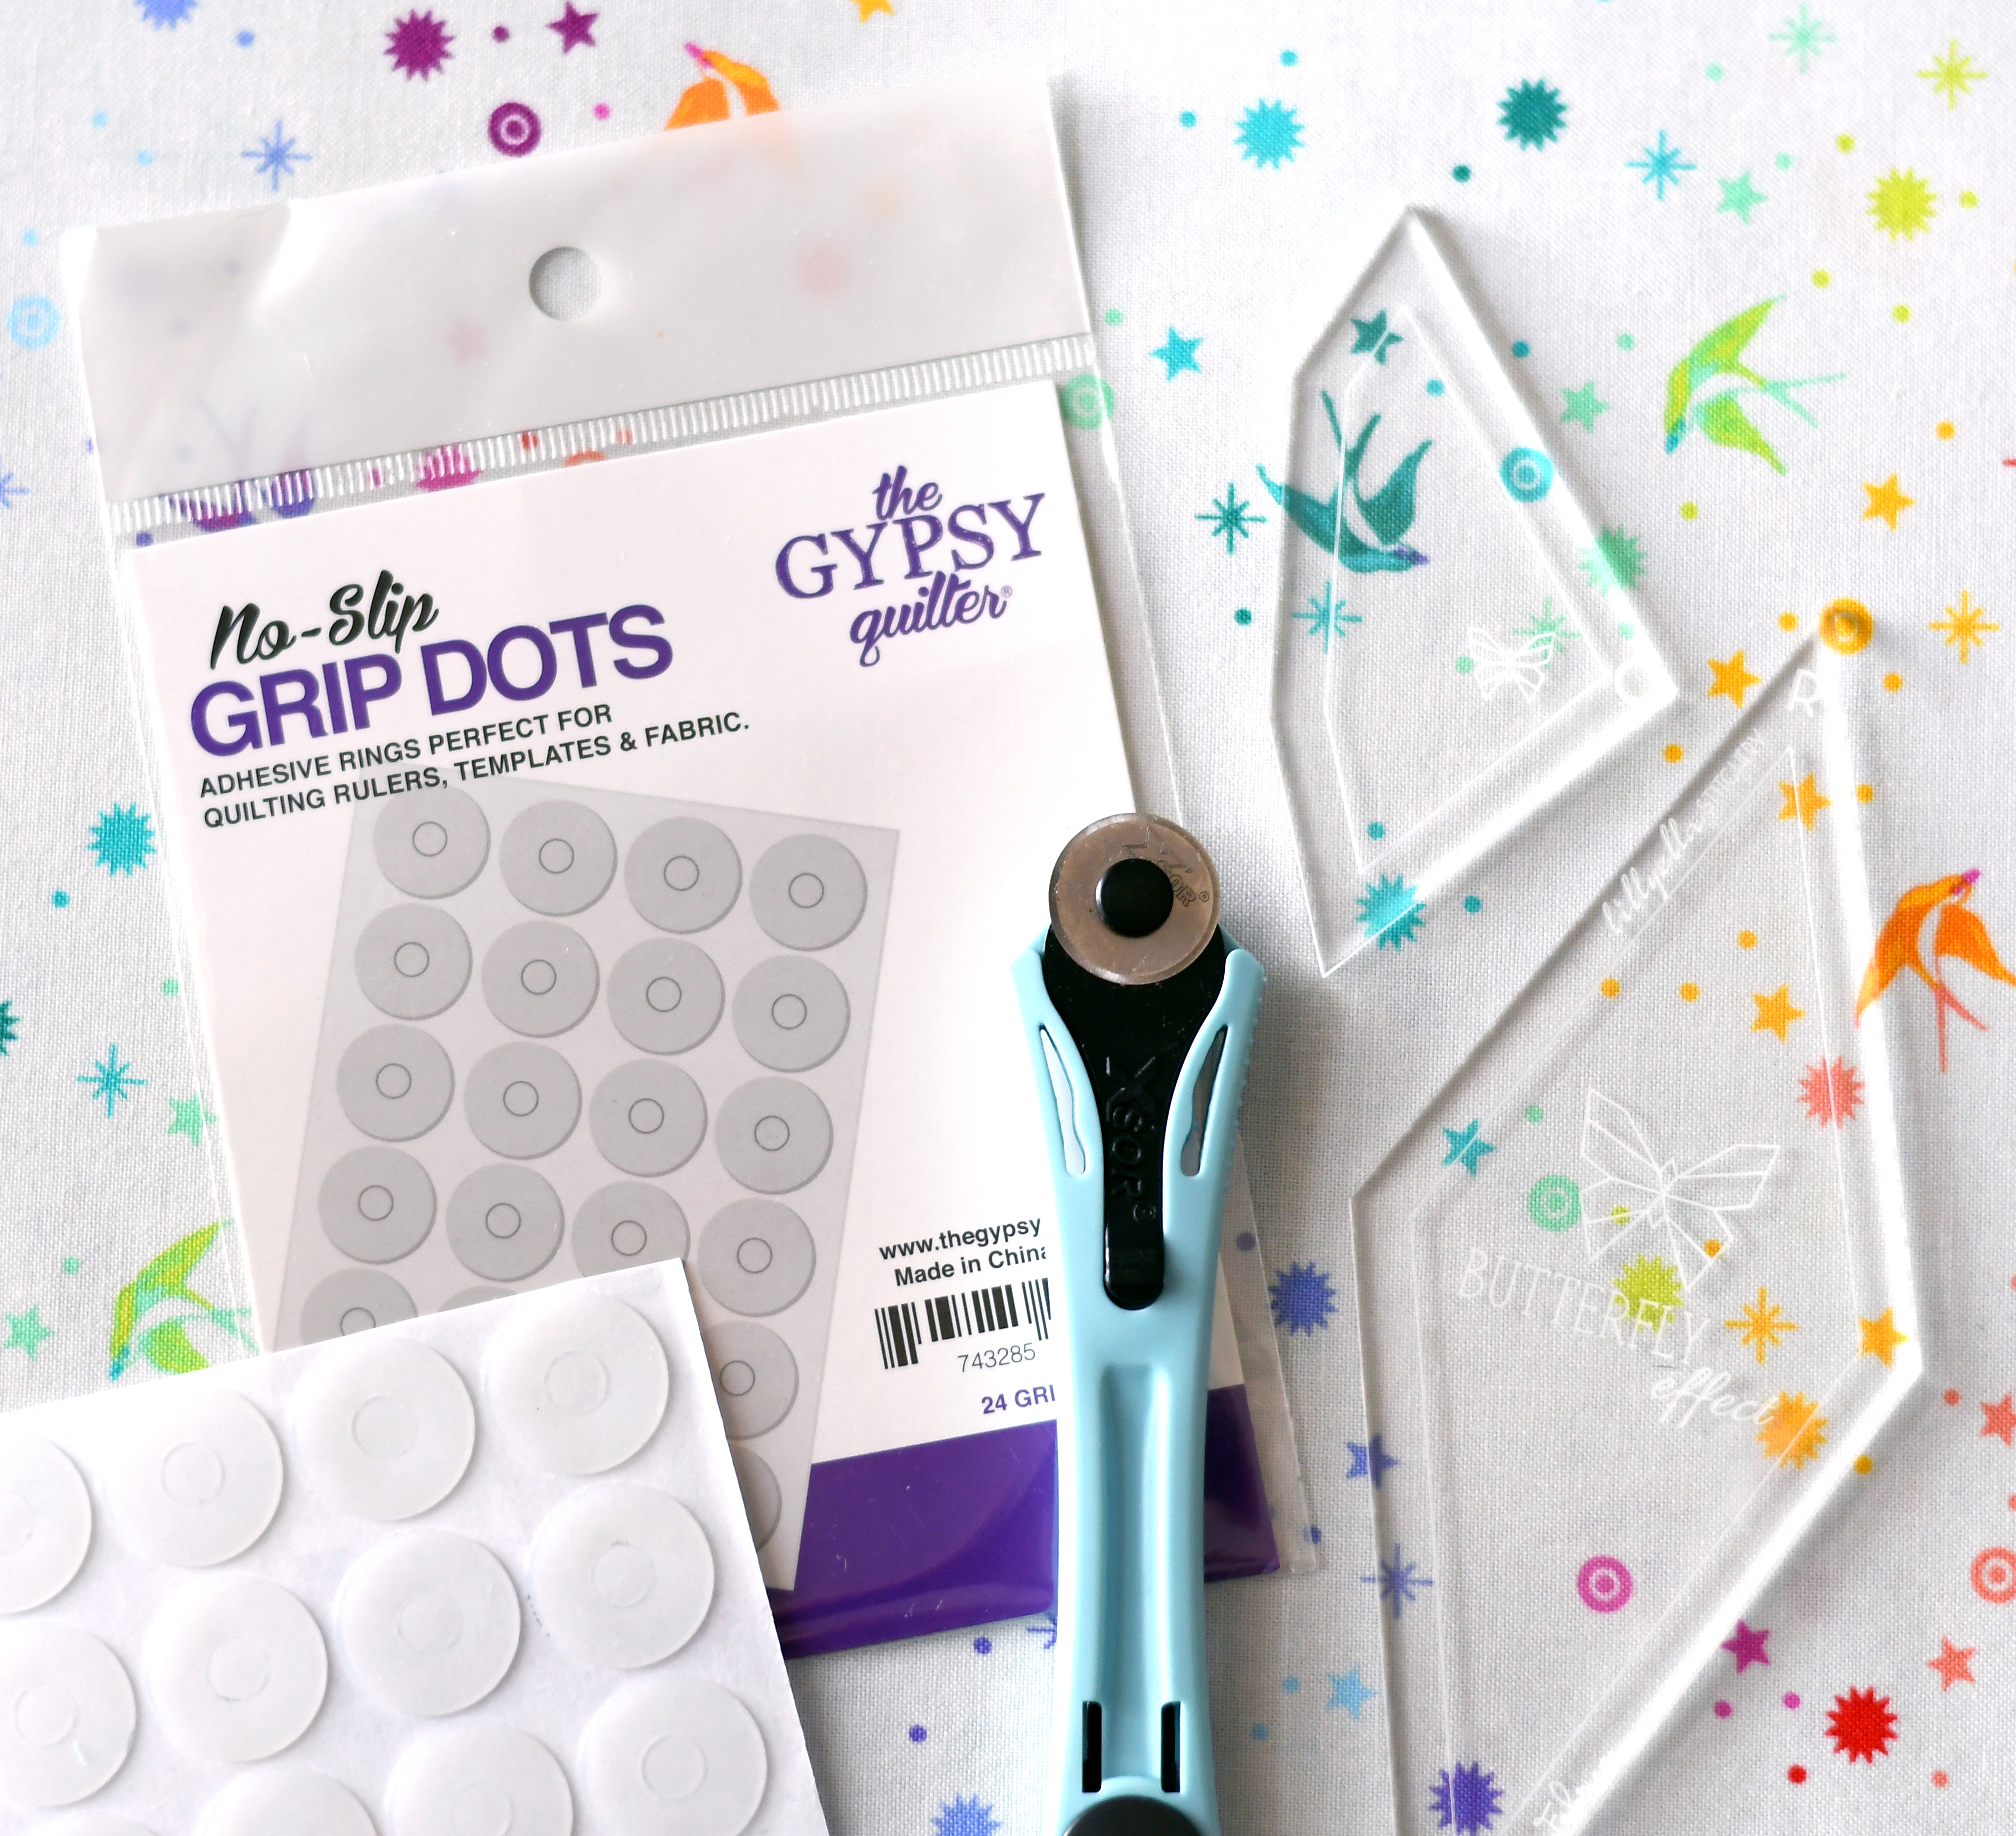
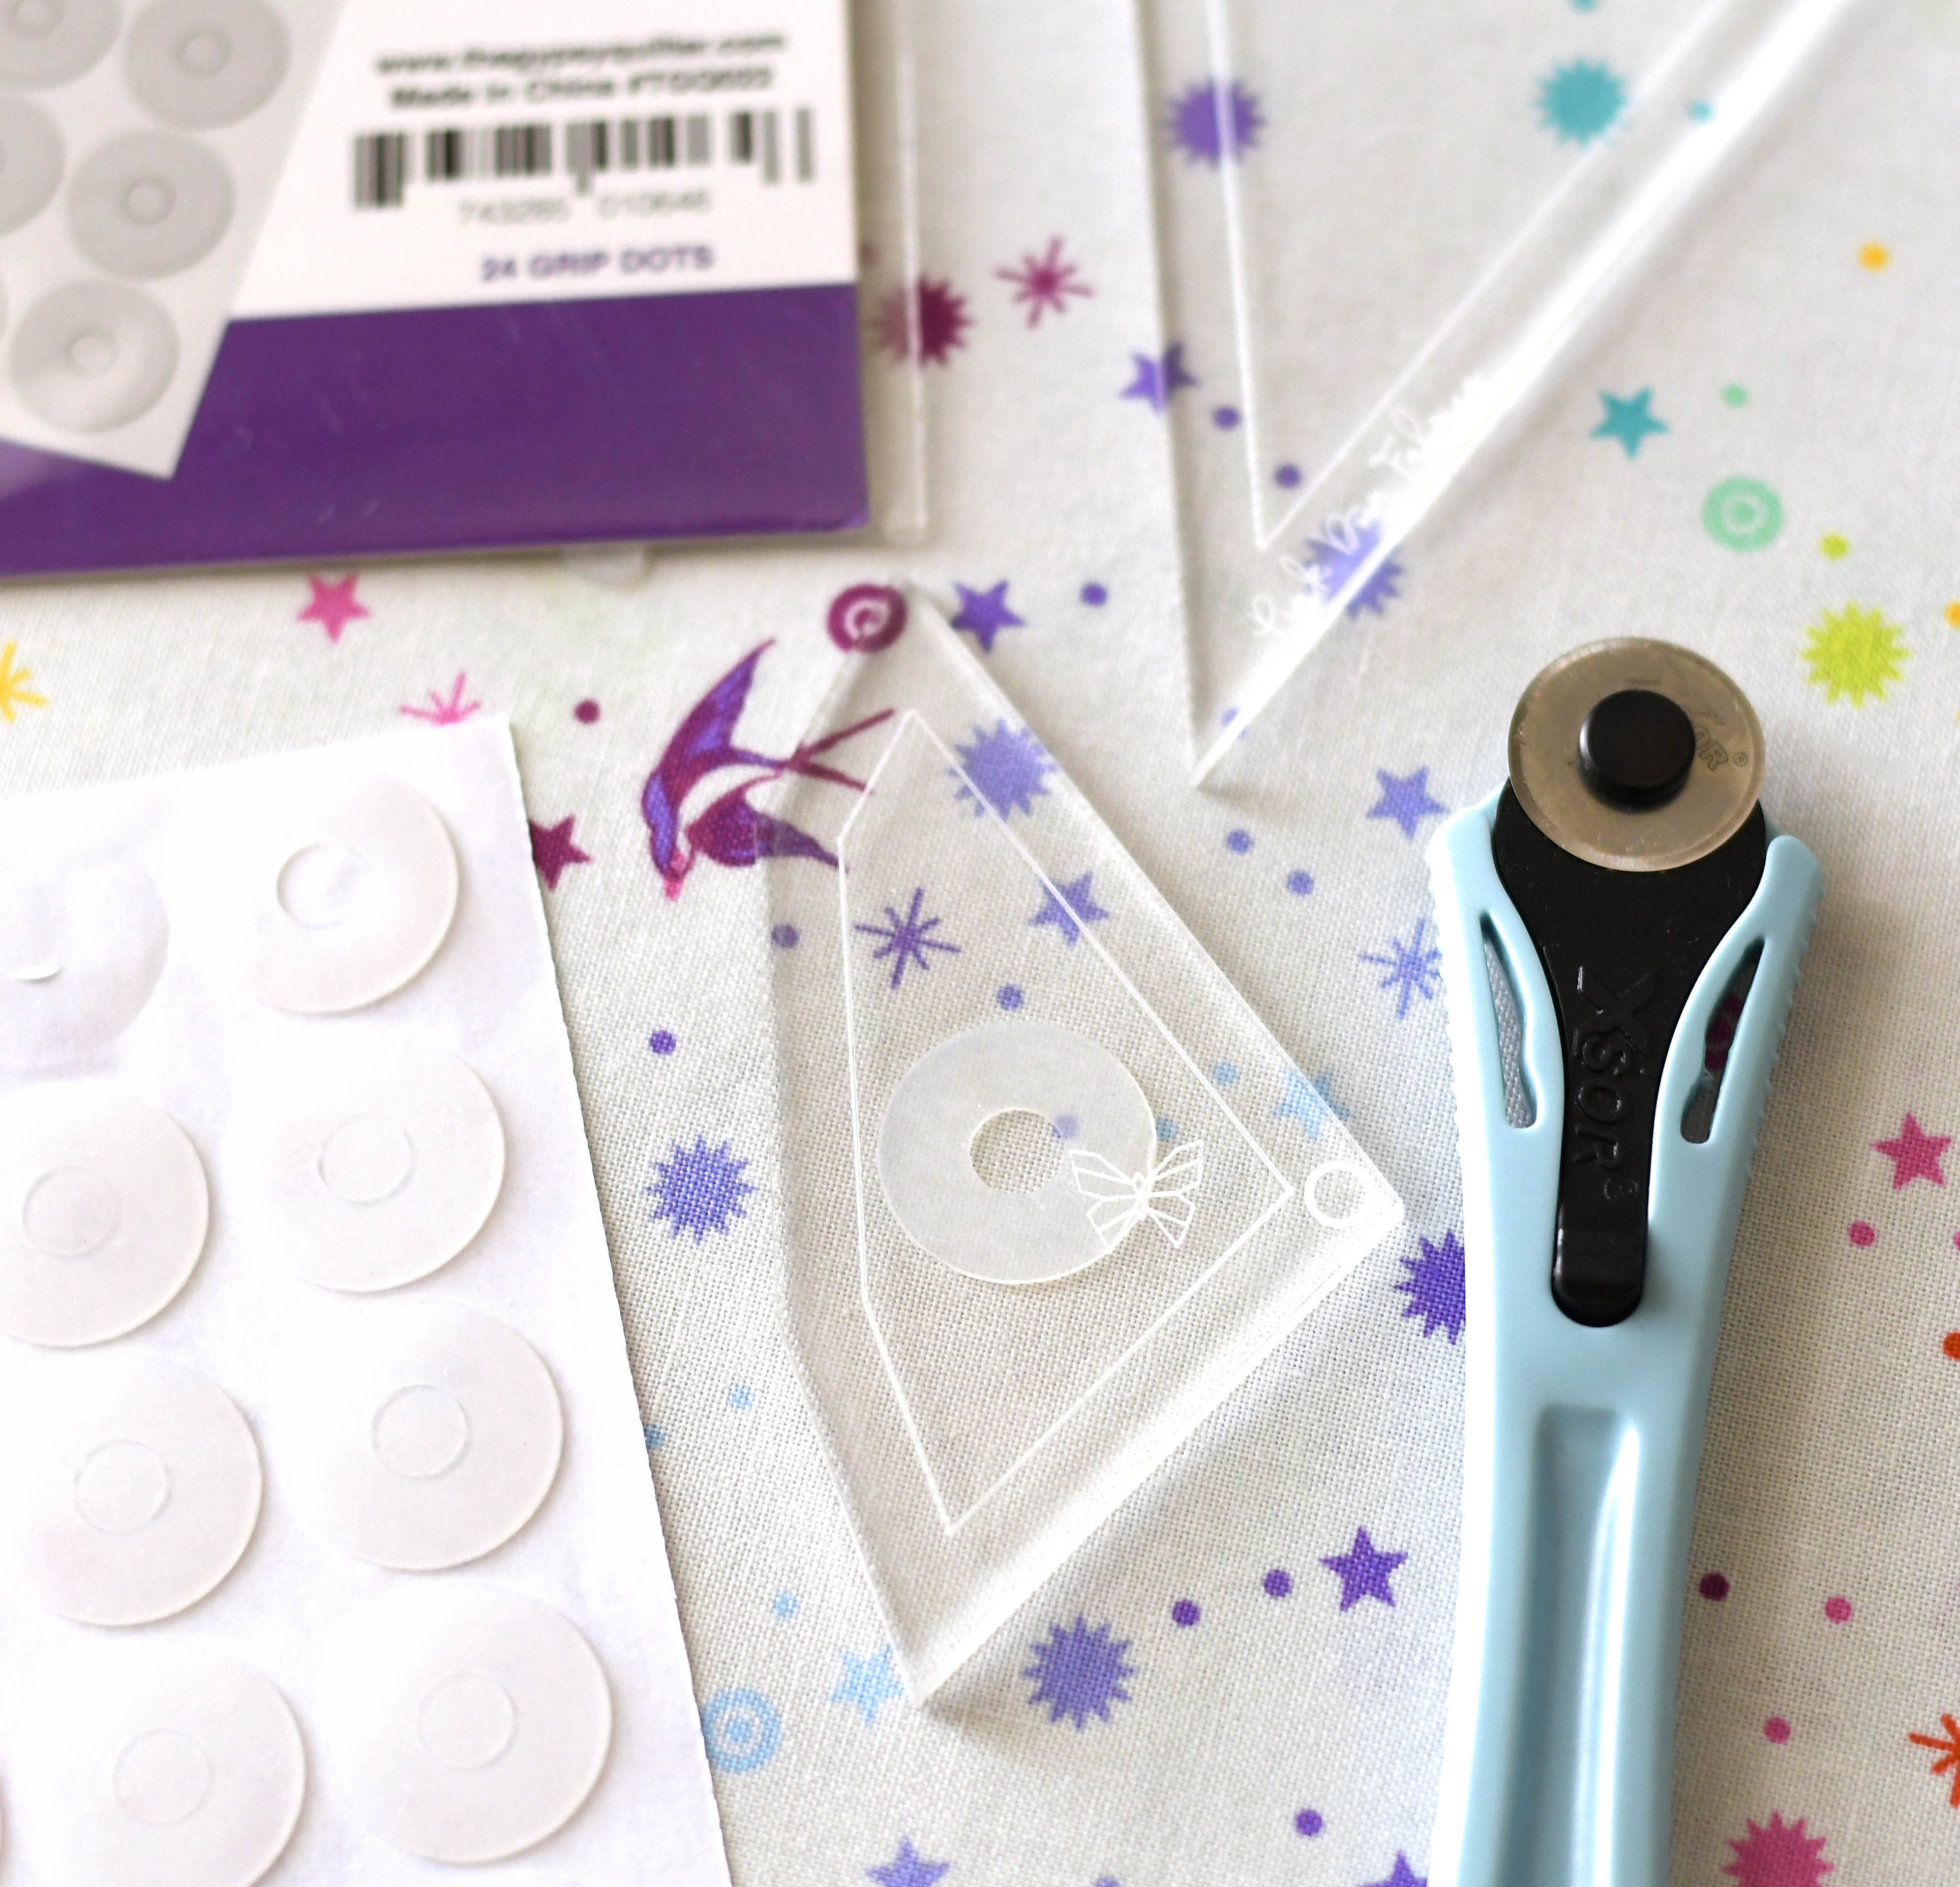
Grip Dots work really well. You can use one larger ring on the center of a small template or you can use multiples. You can also use the tiny dots in the center of the rings and use a couple on opposing edges of the template.
There are some down sides to using Grip Dots, also. I find they can make fussy cutting more difficult because the ring gets in the way of what I’m looking at, but using the small dots on the edges of the templates in the seam allowance space does eliminate this.
Also with this pattern, since we are using the templates as-is and mirrored for many of the shapes, you will be flipping the templates over and will need dots on both sides. You can adhere the dots and rings and remove and reuse them many times, but eventually they will begin to loose a bit of their stickiness.

Another thing I recommend if using a rotary cutter is a rotating cutting mat. It’s easy to lose placement of your template while holding it if you have to rotate it with the fabric on your cutting mat, a rotating cut mat lets you keep one hand securely on the template and the other hand free to cut and rotate as needed. I love this round pink rotating cut mat by Sue Daley for Riley Blake. Not only is it cute, but it’s sturdy and rotates really easily so I never have to fight with it.
Bottom line – how you cut is a personal preference and it may differ over time with practice or with each project you do. I personally just love to trace and cut. It’s easy and feels less fussy to me, even though my process likely takes longer. I never expect EPP to be fast, and I enjoy the process of it. I’m often doing this on the go, or on the couch in my lap, and tracing shapes is easy and foolproof, then I can roughly cut them all and trim them down anywhere with just my scissors. I recommend you play around with different methods and decide what works best for you!
Part three: basting
We’re onto the final step for this week – basting! Basting is the process of attaching your cut fabric pieces to the EPP papers in preparation to sew them together. You wrap the seam allowance edges of your fabric around the back of your paper and secure them in place using your method of choice – glue basting, thread basting or starch basting. The papers remain in place while you are sewing your pieces together, and usually until your entire piece is stitched together. Sometimes you can take some papers out once you have sections sewn together and this can often be a personal choice. Sometimes with large patterns, it is necessary to remove some papers to make the piece easier to handle.
I equate basting for EPP to cutting fabric for quilt blocks. The more accurate, patient and precise you are, the easier your entire piece will come together.
If your edges aren’t smooth or your corners aren’t crisp, it will be difficult to line up all the points and piece everything together precisely.
When I first attempted EPP with some hexies, I tried glue basting and despised it. It felt awkward and I was having trouble sewing my pieces together, so I would thread baste. I didn’t mind it, but I did find it hard to keep fussy cuts accurately in place and to get my edges smooth and clean. Over time and with some research, I realized I just wasn’t glue basting correctly, so I tried it differently and haven’t looked back. Each method has it’s advantages and also comes down to personal preference. I, again, recommend trying a variety of techniques and deciding what works best for you.
For this pattern, I recommend glue basting because of the size of the pieces and the accuracy needed to get precision when piecing them together, so I will be focusing on that in this post and will be sharing some personal tips and a tutorial video on glue basting below.
Thread and starch basting are just not for me with this pattern, so I’m not sharing any tutorials of my own on those methods, but I will share link to tutorials for those who would like to play around and try them. There is no right or wrong technique, so play around and see what works for you!
glue basting
For glue basting, I like to use a glue pen – I have both the Sewline glue pen and a Fons & Porter glue pen. The refill cartridges are interchangeable and there really are no differences between the two. I have used a glue stick in the past (I like the purple ones!), but I really do prefer the size of the glue pen, especially with the smaller size of the pieces in this pattern.
I’m going to outline my method and a few tips and then I will share a short video below. The first step is to secure your paper to the wrong side of your fabric using a bit of glue. For some shapes, just a bit in the middle will suffice, but for shapes with long skinny points or larger shapes, I will typically put some glue in multiple spots to make sure my paper is secure in place and won’t shift when I am wrapping the edges as this will throw off my fussy cutting placement.
You will then run a thin line of glue along one edge, slightly inside the edge of your paper, and fold your fabric over the edge, pressing it in place, making sure the edge is nice and smooth. With larger pieces, you can often do two edges at a time. I will talk later about how I decide what order I will baste the edges in.
In the video below, I am being extra particular with my basting to really highlight how to achieve accuracy and why it is important. I am fairly meticulous in everything I do, so sometimes I do work this slowly, but often I am a bit quicker and don’t go crazy with complete perfection on every piece. Over time, you will begin to learn what works and what affects the final outcome of your piece – which also comes down to your comfort level and what you’re looking for in a completed quilt. You know that phrase that everyone loves – finished is better than perfect? I just can’t hang with that :), but I know many people can, so my style may not be for everyone. I like to show you that everyone CAN achieve perfection and I like to show you how. What you do from there is all on you!
I often do not baste an entire project at once. I will usually baste a handful of pieces and then do some sewing, simply because I like the change of pace and I like seeing results. I have had mixed experience will my glue basting “holding” over time and I can’t find any rhyme or reason to it. Most people do not have any problem with their glue basted pieces loosing over time, but if you did, you will still have the majority of the basting in place and could touch up some edges as needed. I think climate and environment could have some affect on this, as well as the amount of glue you use. I always have my glue pen handy when I’m stitching my pieces together to not only secure any loose spots, but to also help move things out of the way to get to a seam, and I will talk more about this next week when begin piecing.
When it comes to the order of how you baste your edges, there is no set science to it and no right or wrong answer. When I first begin a project, I try to figure out the best “answer” for this and then stay consistent throughout. This is another reason while I will baste a few and then do some sewing. It helps me see if my order worked or there was something I want to change.
Every edge of every piece will be stitched to another, so you will always end up with a seam or fold or flap of fabric in your way at some point. I often choose my basting order based on bulk. If I have a short edge, I will usually baste it first. If I did it last, it would overlap two other pieces which would slightly elevate the entire short seam and perhaps add some play into that seam when stitching it, vs it being tighter to the paper. I also look at the overall pattern. If I have an area where many small points are coming together, or two short edges to piece together, I will baste in a way that keeps the folds out of my way as best as possible.
All that may seem like a foreign language to some of you, and I understand! This is something that is hard to explain and will make more sense only as you work through a project. It’s also subjective, like much of the EPP process! In the end, there is ultimately no wrong answer, and I will discuss all the ways to shift things around and expose your seams for piecing in next week’s post.
With some of the smaller pieces in this patter, you will notice that your entire paper is encased within the fabric seam allowance of your piece, and this is OK! You will be able to gently lift the folds to be able to remove your papers later.
Other basting methods
Here are three great articles talking about basting that show various techniques. Check them out and experiment yourself to see what works best for YOU!
• The Bating Debate by Tales of Cloth
• 5 Ways To Baste English Paper Piecing – The Little Mushroom Cap
• English Paper Piecing Basting – A Little Patchwork
There are also oodles of videos on YouTube at your disposal if you search EPP basting.
Photo prompt and giveaways!
This week, post any progress photos you like – they can be your fabric pull or paper organization if you’re working on those, or you can share some cutting and basted pieces, or both! Every photo you post on social media with the hashtags #ButterflyEffectPatternSAL and #ButterflyEffectPattern, or email to me, counts as an entry for all our sponsor giveaways.
This week I have two awesome prize packs from Zappy Dots and a thread pack from Wonderfil! Winners will be drawn at random and announced on Friday, May 14.

That wraps up the content for week two! This week, spend some time playing around with different ways to use your template and different basting methods to see what works for you. You can work through just a few pieces in preparation to stitch them up next week or if you find your groove you can work through as much as you’d like.
Next week we’ll dive into piecing all these bits together and I’ll share a few different methods for doing so, as well as video tutorials of my preferred method, all my favorite tools and how I achieve perfect matching points and precision.
Don’t forget, you can check out the Sew Along Facebook Group here to find additional support or just chat with others in the SAL!.
See you then!
~ Nicole
WEEK THREE – Piecing
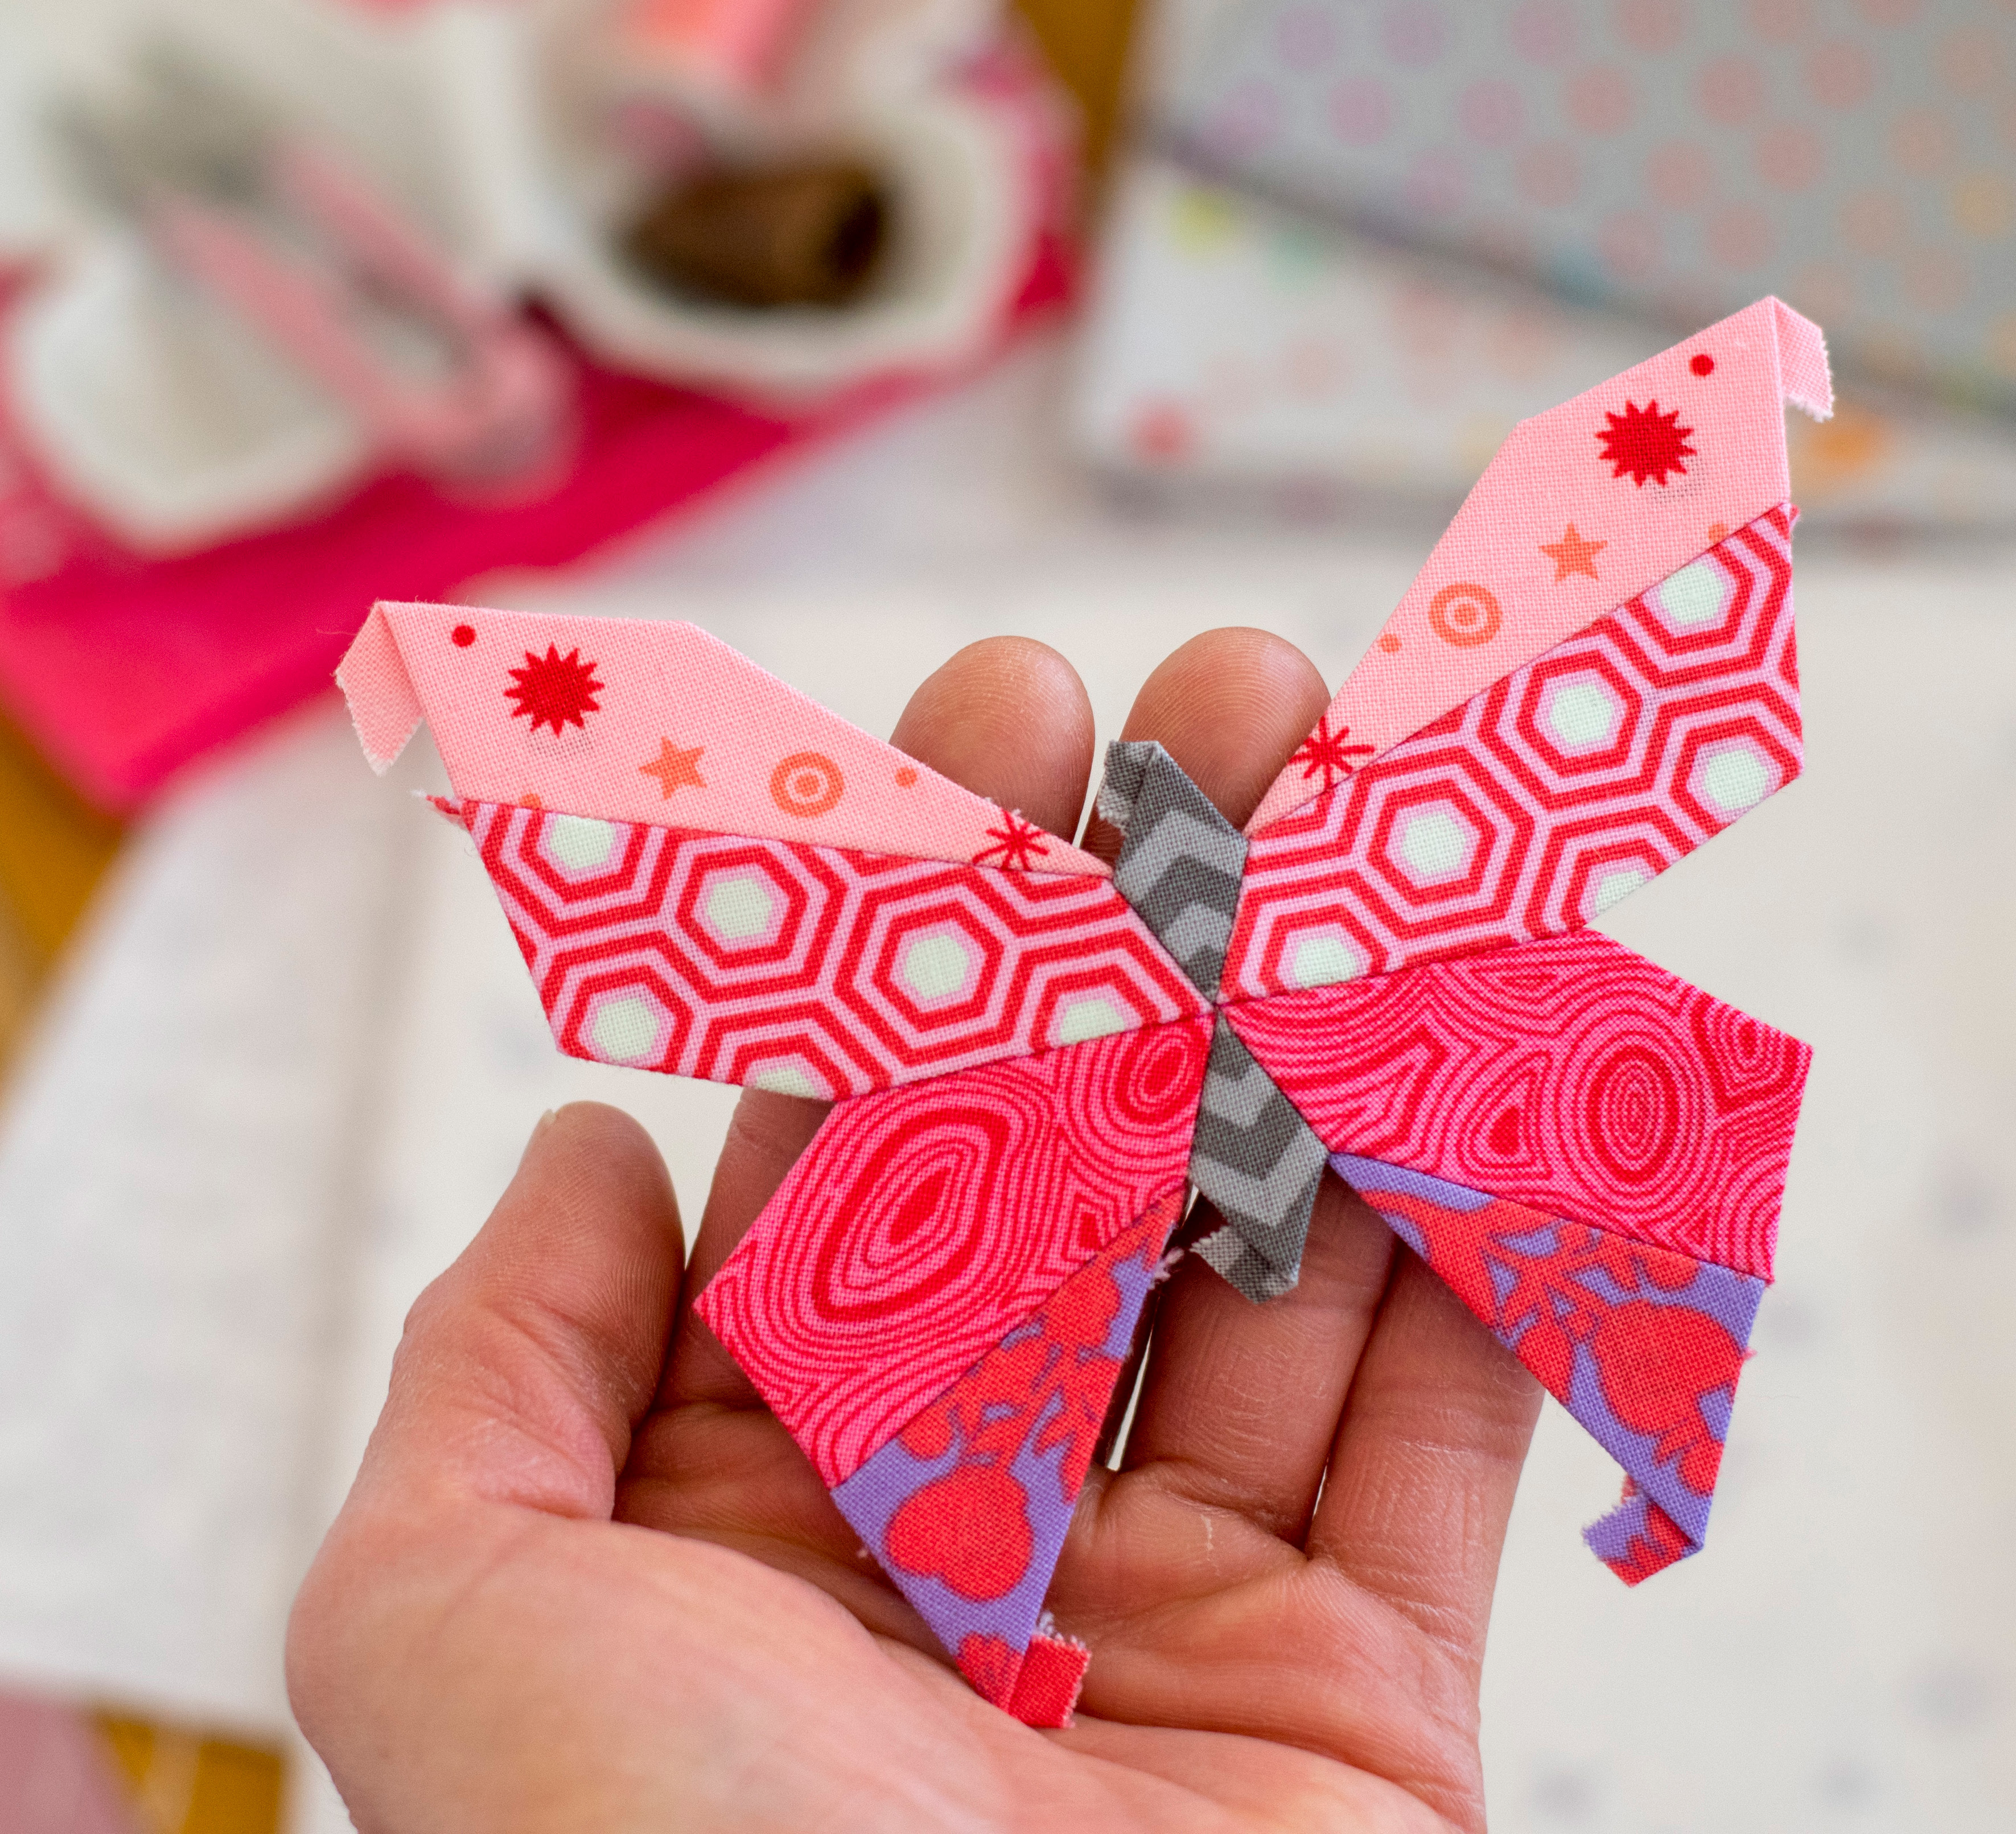
Hello again! It’s week three of the Butterfly Effect Sew Along and today I’m going to talk about stitching all our little bits together. In today’s post and video, I’ll be starting with a butterfly – joining two wing pieces together and growing from there. I then cover how I add the A body pieces, since they are the smallest and most fiddly!
The techniques and tips I share today will apply to any pieces you are stitching together, so you are welcome to start anywhere you’d like and grow your pieces as you choose. I layout my preferred piecing order in the pattern, but there is no wrong order. It’s just like building a puzzle, it all comes together no matter where you start.
In a few weeks, I will share another post about joining larger pieced sections together and some additional tips for doing this, though the process is ultimately the same as everything I will discuss today, just on a larger scale with more parts.
The papers that we basted our fabric to act as a stabilizer and stay in place while we sew our pieces together. There are a variety of methods for piecing, but all involve a way of placing corresponding pieces next to each other and hand sewing a seam in the folded-over seam allowance that then joins your pieces together – the equivalent of using a sewing machine to sew two quilt blocks together.
A common way of doing this is by placing two pieces right side together, aligning the edge you are going to sew, and sewing a whip stitch along the edge. Many people prefer this method because it’s overall pretty quick and easy. I’m not a fan of this method because I find it harder to judge the alignment of my pieces (especially with small or odd shapes) and it’s also harder to judge how “deep” into the seam you are putting your stitches and how visible they will be when you open your pieces up flat. This is something that you can get a feel for over time and find more consistency in, but I find the stitches are always visible to some degree and I don’t prefer the look of that.
Another method of stitching EPP pieces is what’s called the flat back stitch. This is where you butt the edges of your pieces up against each other, keeping them flat as they’ll appear in the final piece, and sewing your seam straight across the back of the piece within the seam allowance where your edges lines up.
After trying various methods of EPP stitching, I found the flat back stitch to work best for me. I love the look and feel of it and find it best for achieving accuracy, especially with small pieces. It’s also extremely helpful when joining larger pieced sections together because it’s easy to keep them flat compared to trying to fold them on each other when you have a lot of pieces and stiff papers.
The tips and videos shared today will all be related to the flat back stitch, though I will share tutorial links to other stitching methods for those who want to experiment or may prefer a different method. As with everything, it comes down to personal preference and comfort. I recommend experimenting to see what feels good, but not to forget that whatever you choose to try, you will improve with time so don’t be discouraged at your first attempts! Just remember how it felt if you learned to ride a bike 🙂
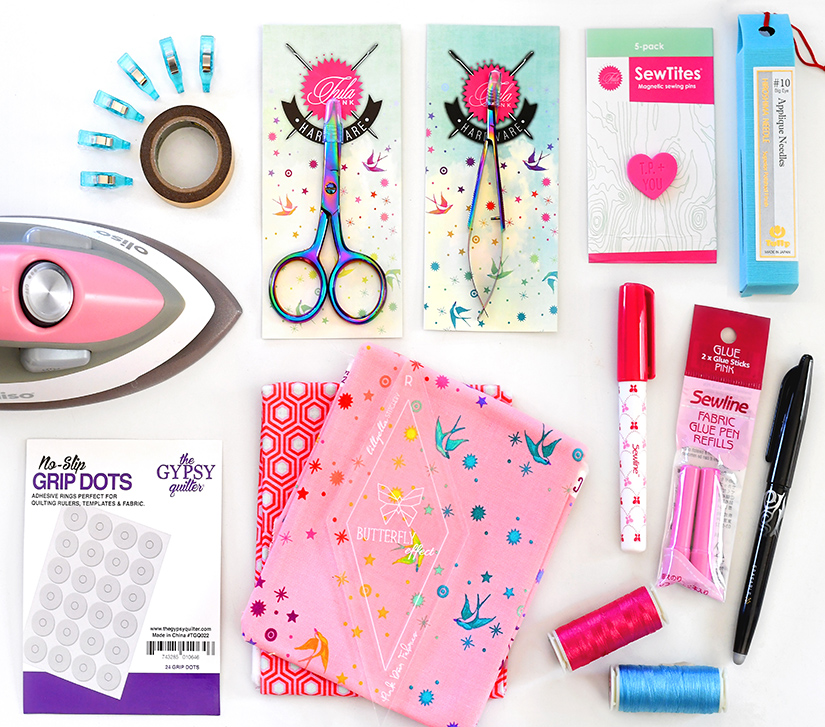
TOOLS
Before we start stitching, I want to talk briefly about tools. Some of you may have read about my favorite tools in my Beginner’s Guide to EPP blog post, but I want to cover the things I’ll be using for piecing today.
My preferred basic stitching supplies – needle and thread – are Tulip needles and WonderFil Invisafil thread. Many people use a #10 Milliners Needle for EPP and they work great. They do have very tiny eyes, however, so I prefer using a #10 big eye Applique needle. They have the same look and feel for me, but are much easier to thread. The reason that these type of needles are used and why I also like them is because they are very thin, so you’re making smaller holes in your fabric, and they flex easier when you’re trying to maneuver in tiny spots. They also start to gently curve with your stitching motion over time, making them really easy to sew with.
The Invisifil thread I use is a 100wt cottonized poly and I use a doubled over strand, simply because it’s easiest to keep it threaded in my needle! I have tried a variety of threads for EPP and this is by far my favorite. I tend to break 100% cotton thread when I pull it snug and I do not have this problem with the Invisifil. It’s also really smooth so it glides easily and doesn’t often tangle or knot. Lastly, it’s practically invisible! I use it when I stitch bindings, too.
Not pictured is the thimble I use, the Clover natural fit leather thimble. I can’t sew without it! The thin #10 needles really dig into my fingertip so I find a thimble necessary with EPP.
I’ll also be using washi tape, clover clips, pins and my glue pen to help keep everything in place as I sew. I don’t often use my SewTites when I’m initially stitching these smaller pieces simply because of size, but they are indispensable when I start joining larger sections together and will show you that in a few weeks!
FLAT BACK STITCHING
I learned the flat back stitch from Karen the DIY Addict. She is so kind and talented, and has an awesome master class about flat back stitching that you can watch on YouTube here. I highly recommend you check it out.
I will cover the basics today in a condensed format, sharing some of my tips for working with the small pieces in this specific pattern and what works for me with this stitching method. It took some practice and getting used to, and adapting the concept to my hands and the way I work, but it didn’t take long for me to fall in love with the look and feel of this method.
I will lay out the basic process and then share a video on threading my needle and the flat back stitch, followed by a step by step process of how I stitch the body pieces.
As mentioned above, I use a double strand of thread when stitching. I cut a length of thread, not too long as to get caught and tangled as I sew, but long enough to at least finish the seam I’m working on, or a couple seams. I fold my thread in half and then feed the folded edge through the eye of the needle. I then feed that loop over the top of the needle and pull it tight. This secures the thread around the eye of the needle so it doesn’t shift while you are sewing. I knot the end and begin stitching. Some people do not use knots at the beginning and end of their seams and just make a few loops instead. I have never had any issues with bulkiness from knots because this thread is so lightweight. I also don’t find the process of knotting difficult or cumbersome and it feels secure to me. You can experiment with this for yourself and see what you like!
The first step is to secure the pieces you will be stitching together. I start by using my favorite tool – washi tape! I also use pins and Clover Clips and outline this in more detail in my video and the following photos. Then, with the pieces face down, you begin stitching in your folded over seam allowance, starting at one end of the seam and continue to the other end. Depending on what part of the pattern you’re working on or how you’re piecing my sections, you can continue with the same thread and sew another piece on, though I usually only do this when I’m working on joining larger pieced sections together vs individual pieces when I’m beginning.
I’m fairly new to making tutorial videos and have not yet learned how to add subtitles to my videos, so I apologize for anyone who may need them. If you’d like a transcript of the video, please let me know!
In the video below, I’m showing how I thread my needle, secure my pieces, and sew a seam using the flat back stitch.
Next I want to show the same process I covered in my video in step-by-step photo form, with a little more detail about how to access hidden seams and then also how I add the A body pieces, because I know the small size is intimidating many of you! I thought this may be easier to outline in photos because of the size, so I hope you find this helpful! Once again, this method and these tips will work for any shape, any size piece, in any pattern. Also note that just as mentioned in my video, your seam allowance folds may look different depending on how you basted your pieces, but the same concepts will apply.
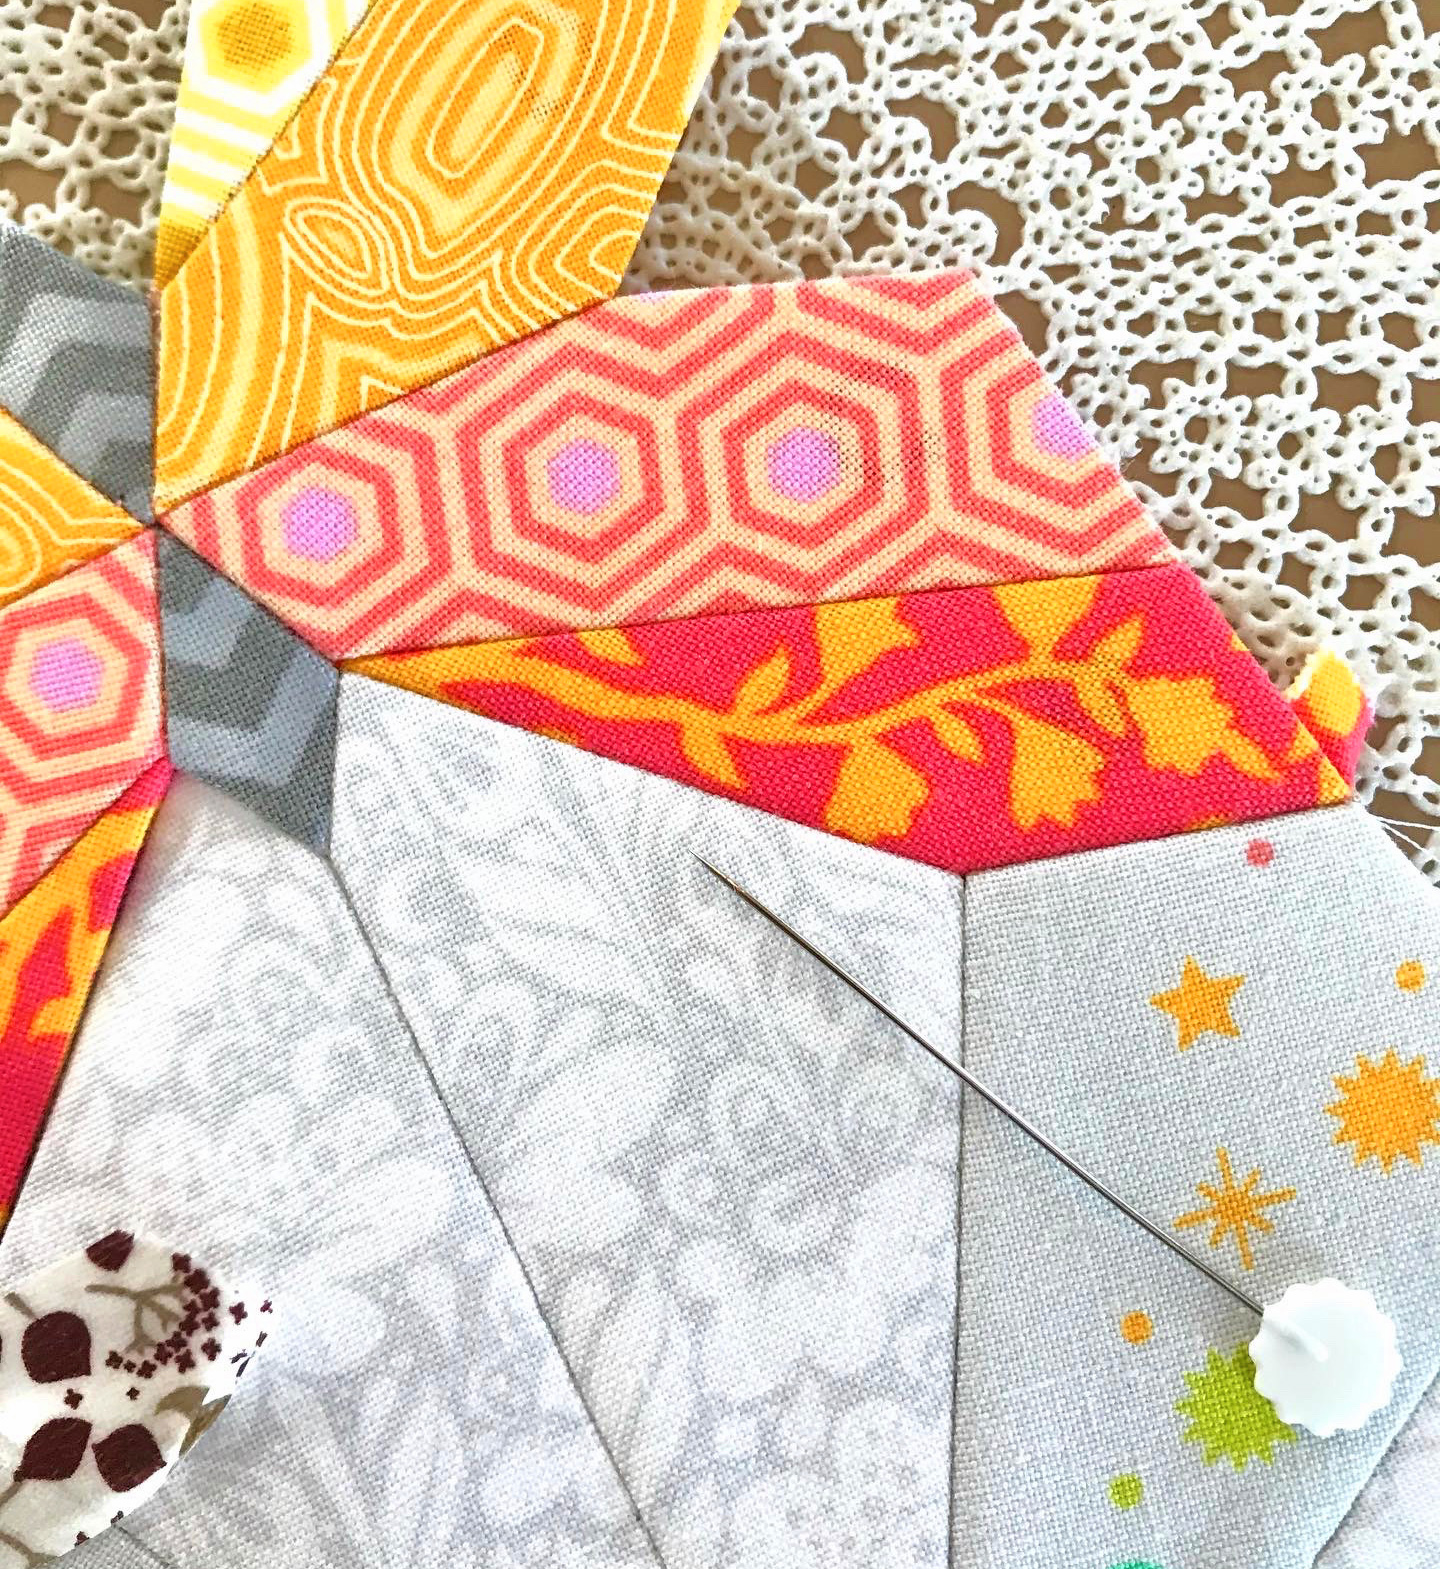
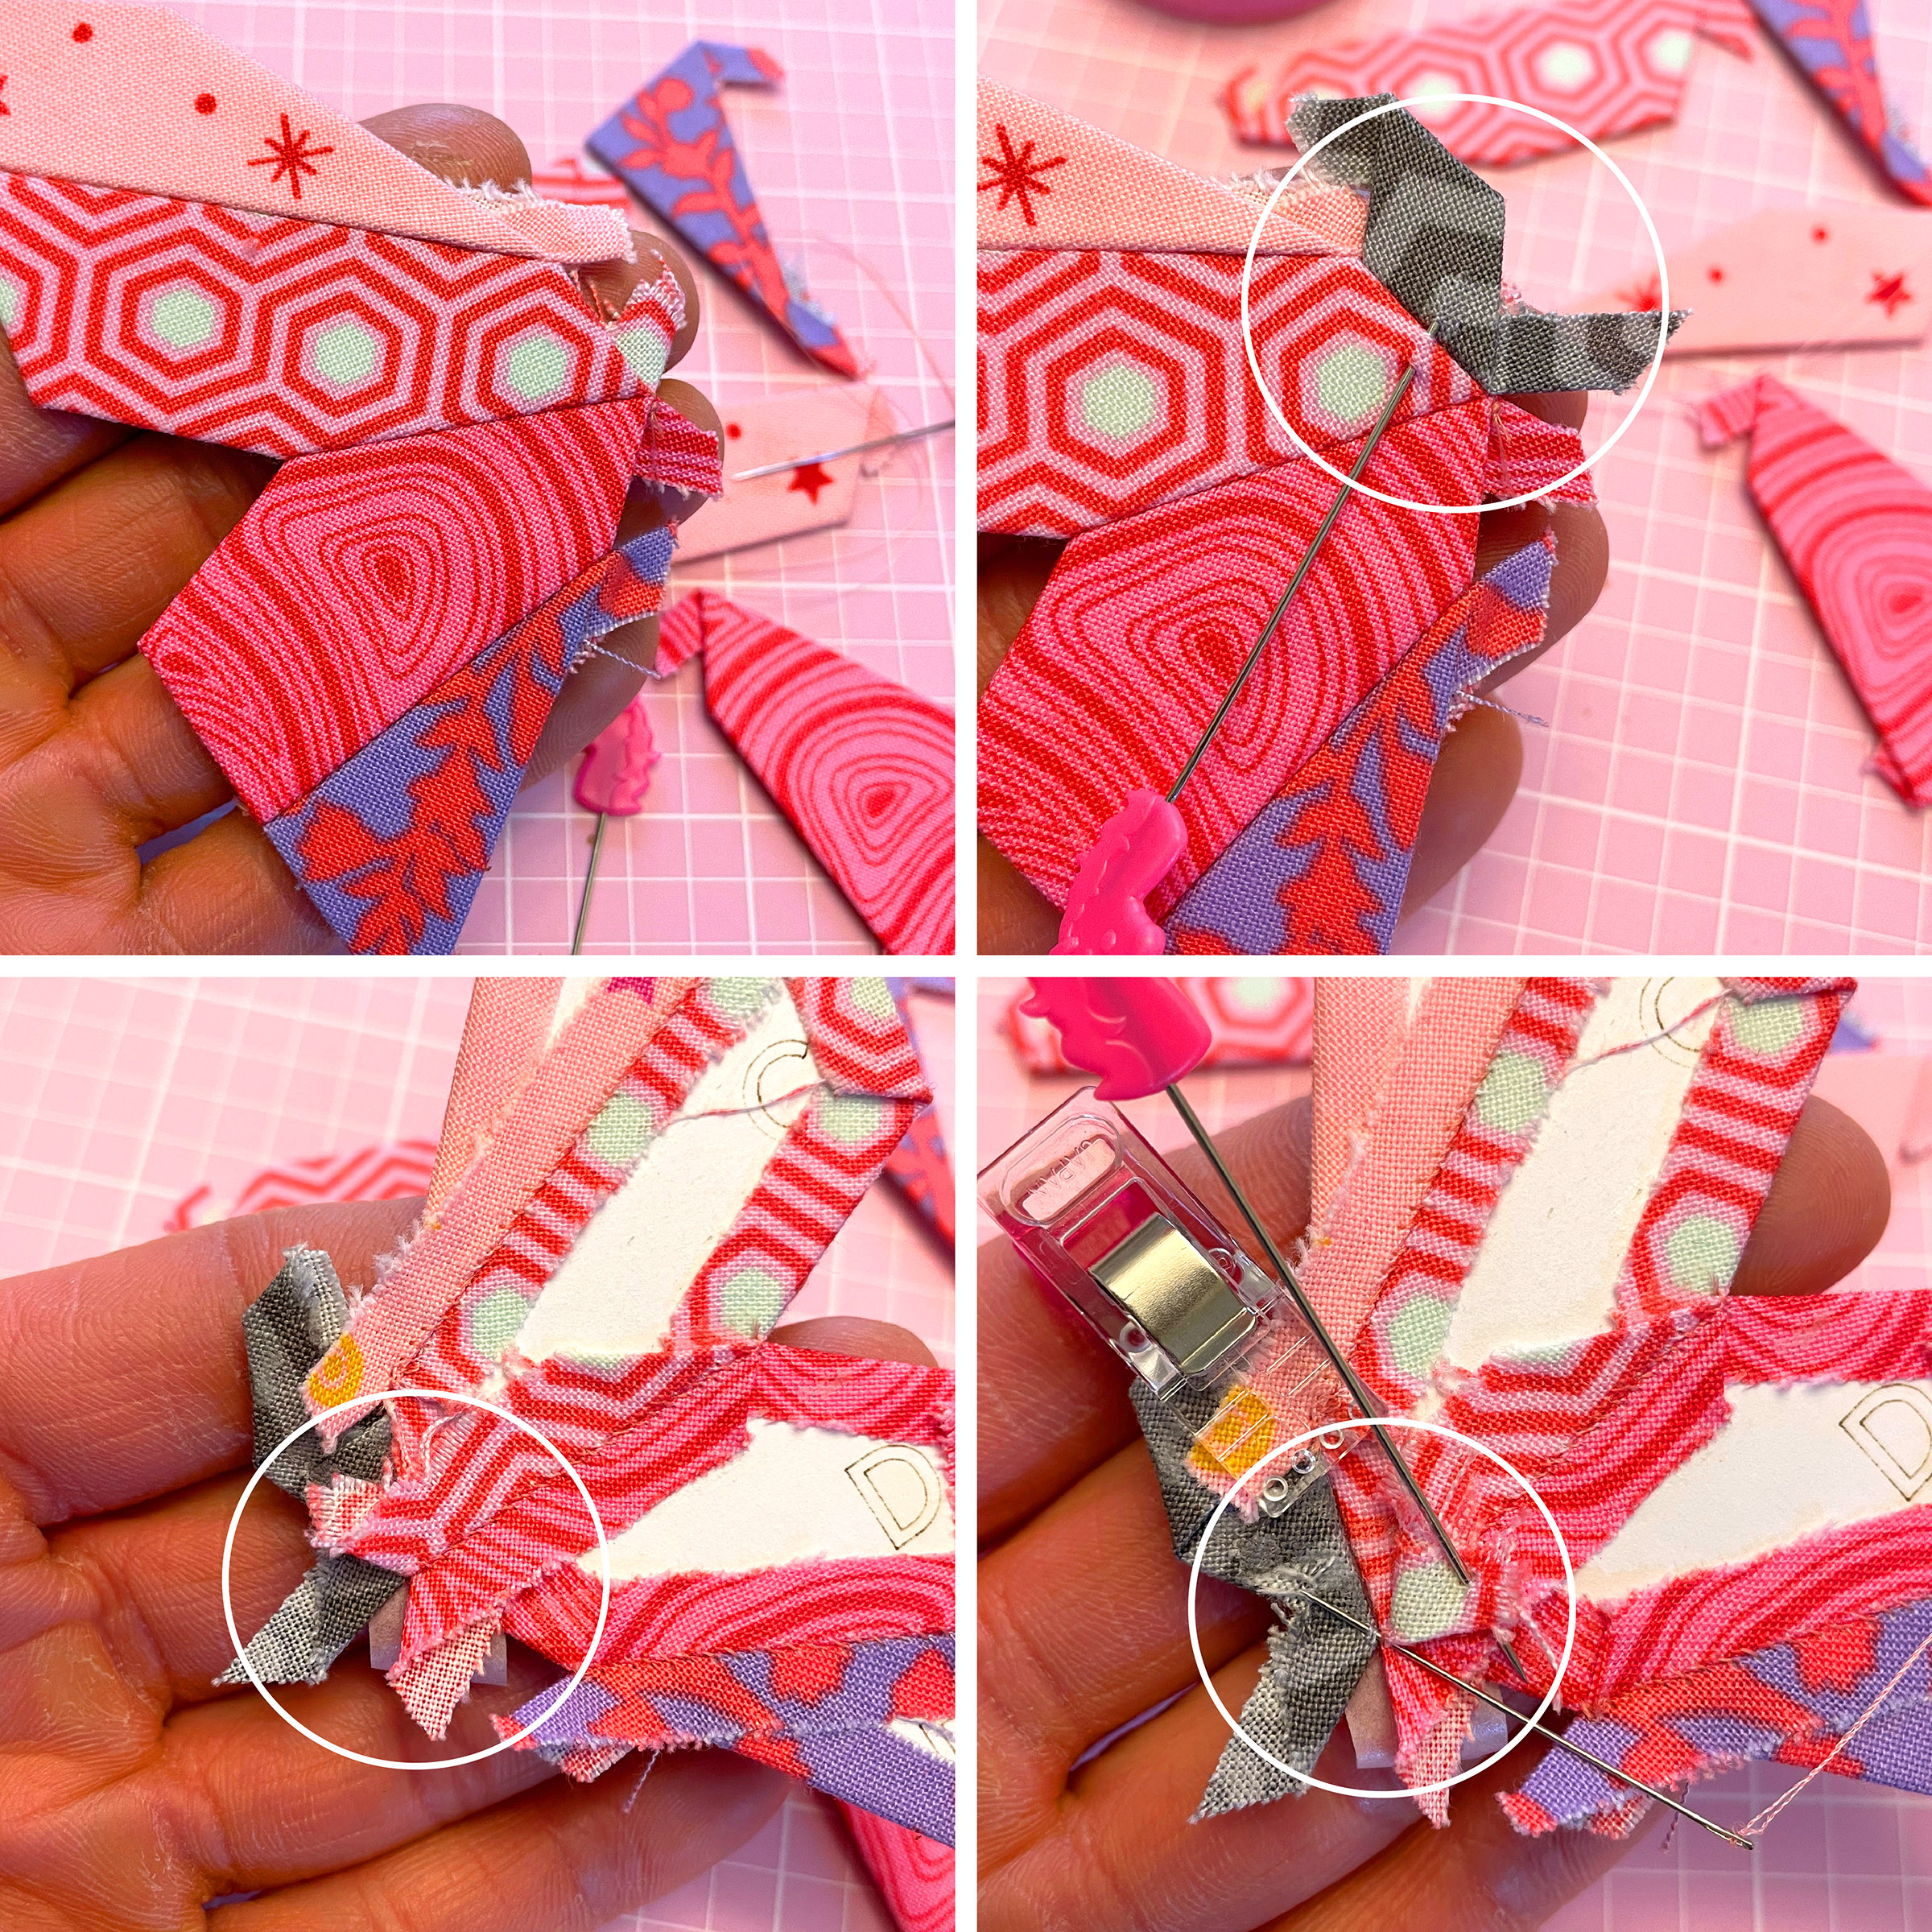
Below I am starting with piecing the D and E butterfly wing pieces and then I will join them to the B and C pieces and add the A body pieces. All images will be referenced in clockwise order.
Above I am preparing to piece my D & E wing pieces together and you can see that I have a fold of fabric from my basting in the way of beginning my seam. This is something you will encounter often, especially when you begin joining more pieces. I use mini clover clips and/or straight pins to help temporarily move the fold out of my way.
Once I get past that area, I can remove the clip/pin and continue sewing my seam. When I get to the end of the seam, I finish it off with a couple loops and a knot as shown in my video.

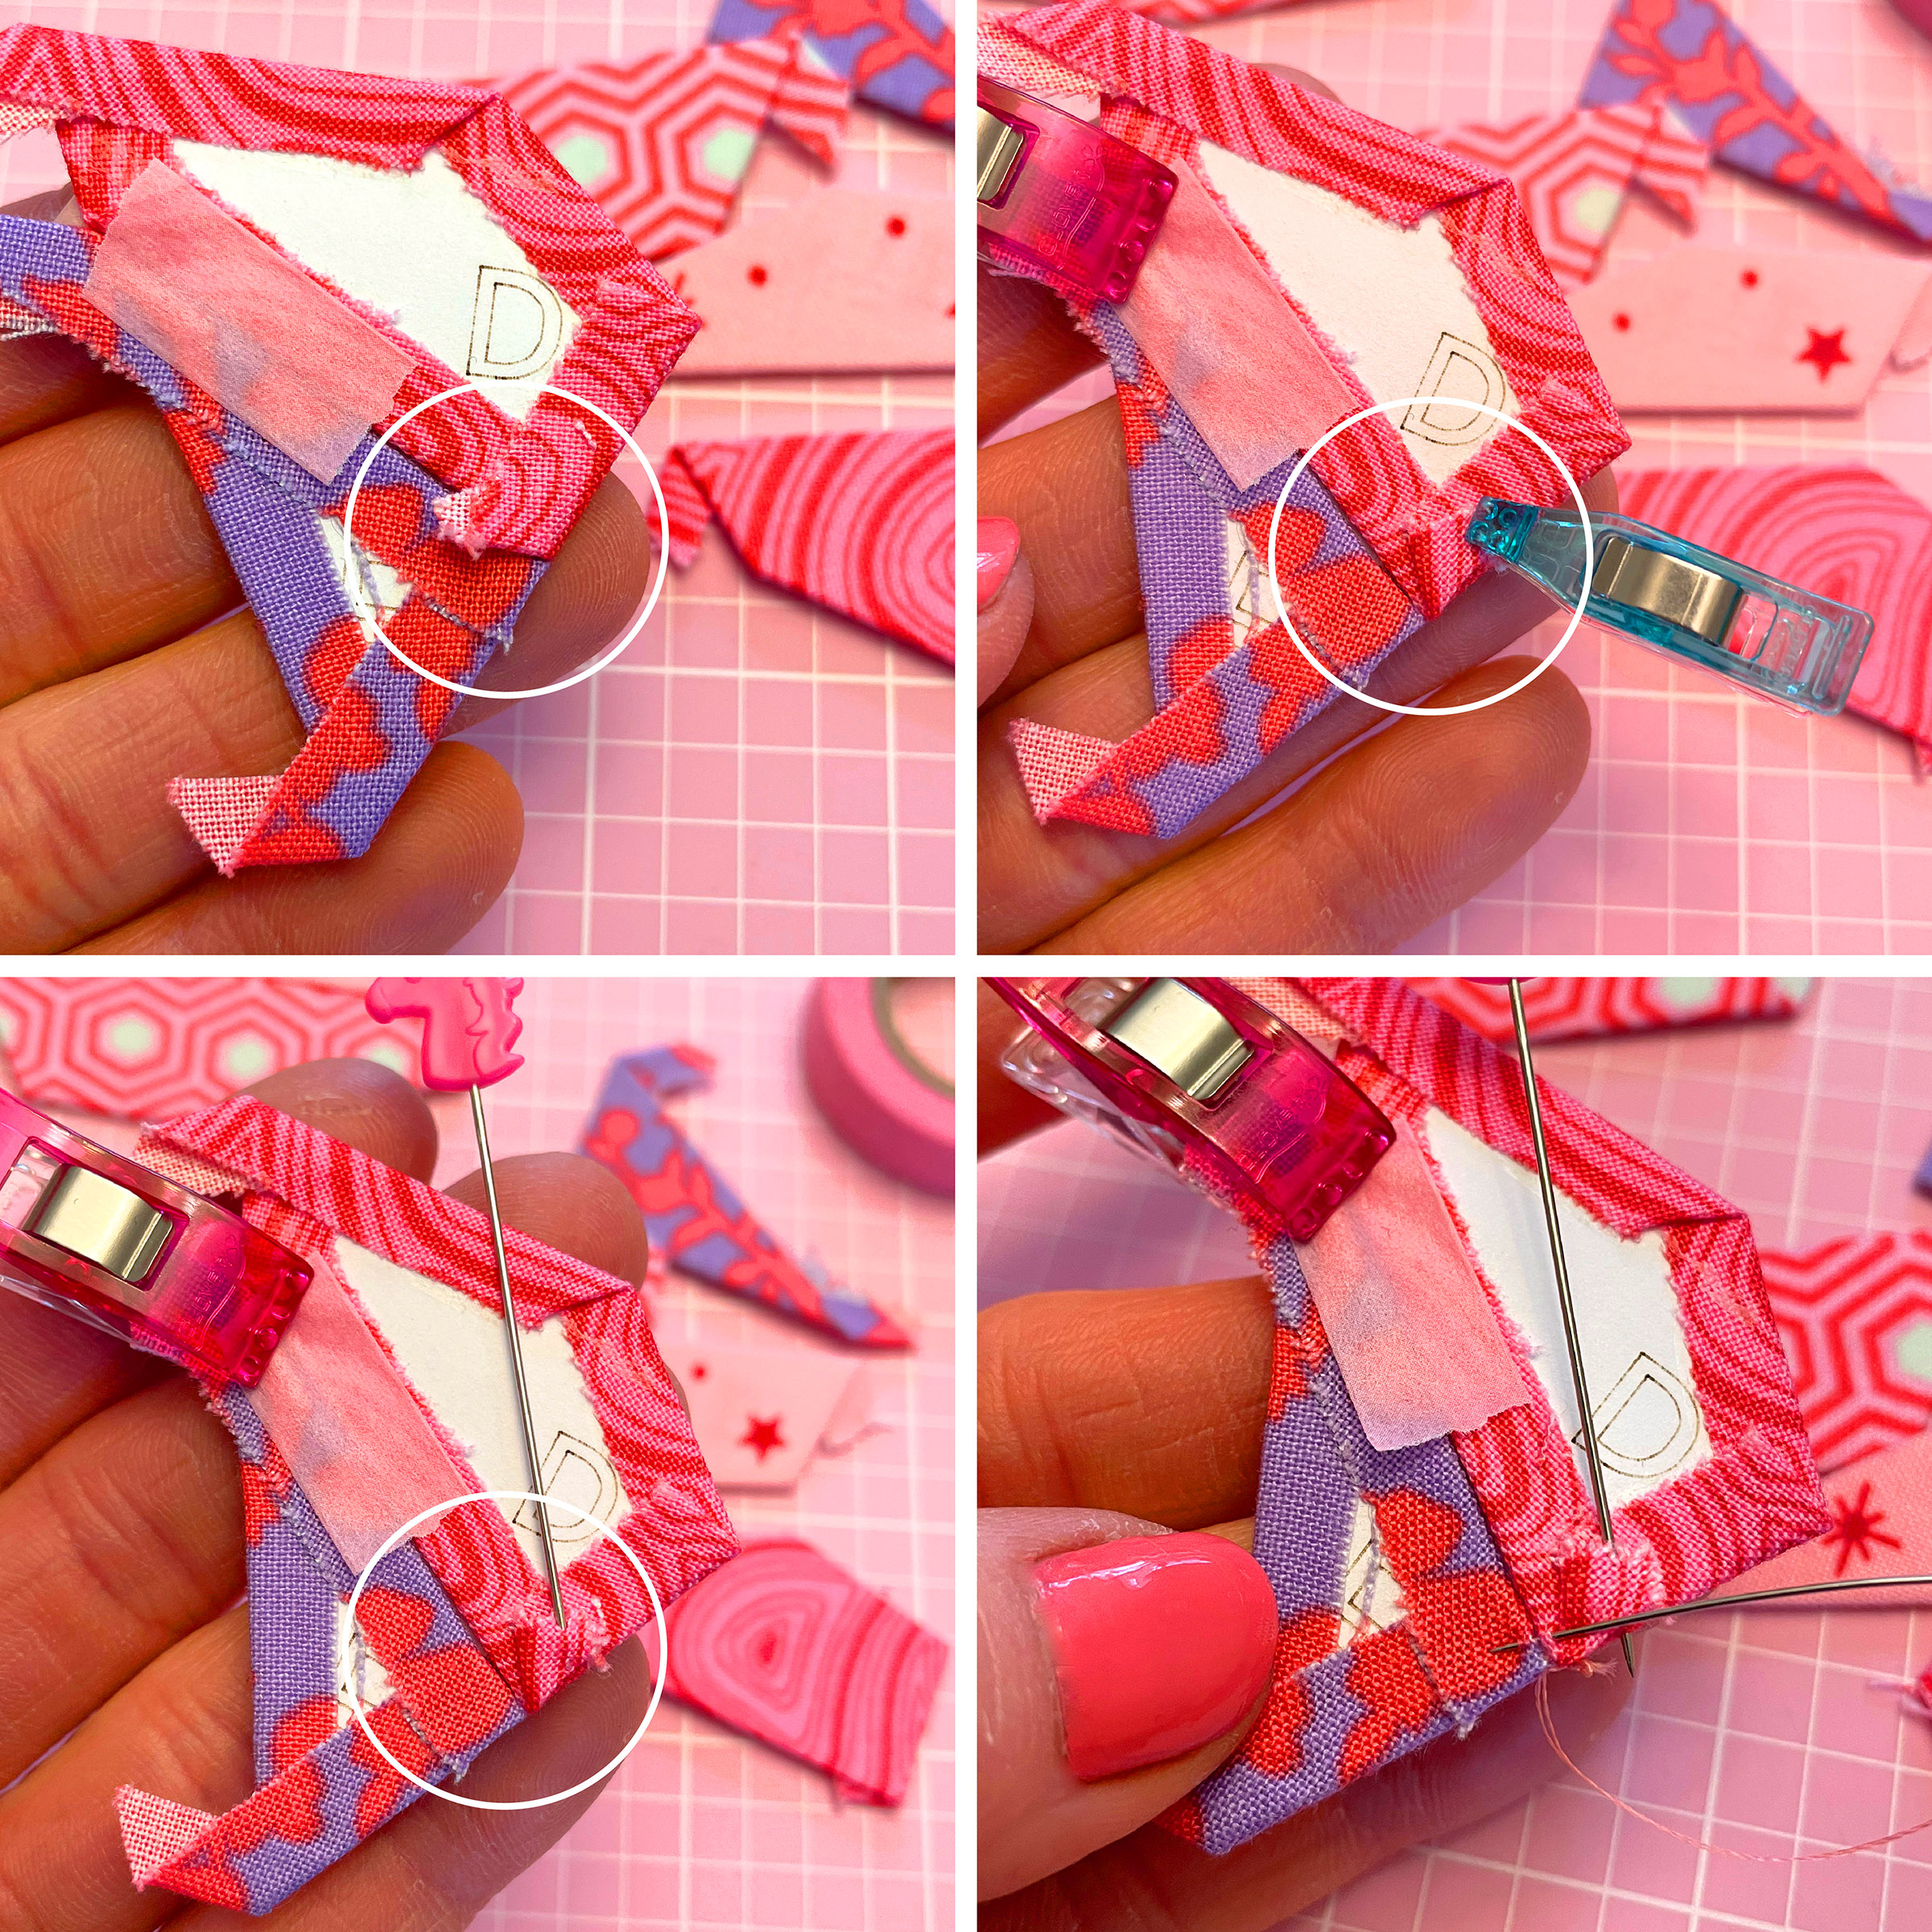
Next I will add the D/E unit to the B/C unit I already pieced. I start by securing with washi tape and clips and then securing my thread where I will being my seam. Because I have two “tails” on this seam, I will begin my seam from the front (upper right) so I can make sure the placement is accurate. I will then flip it over and sew my seam, finishing in the same manner as my other pieces.
I now have a pieced wing and am going to add my body pieces. I will use the same method of securing with tape and clips to prepare for stitching, but because this piece is small and I’ll be fighting more folds of fabric at this point, one additional trick to help with initial alignment is to use a straight pin across your pieces on the front to help keep them secure and in place, then you can use some washi and/or clips and get ready to sew.
On the back of the piece (lower left), you can see I have those same fabric “tails” in the way of starting my seam, so I will once again use a pin to fold it back out of my way and begin my seam in the proper spot.
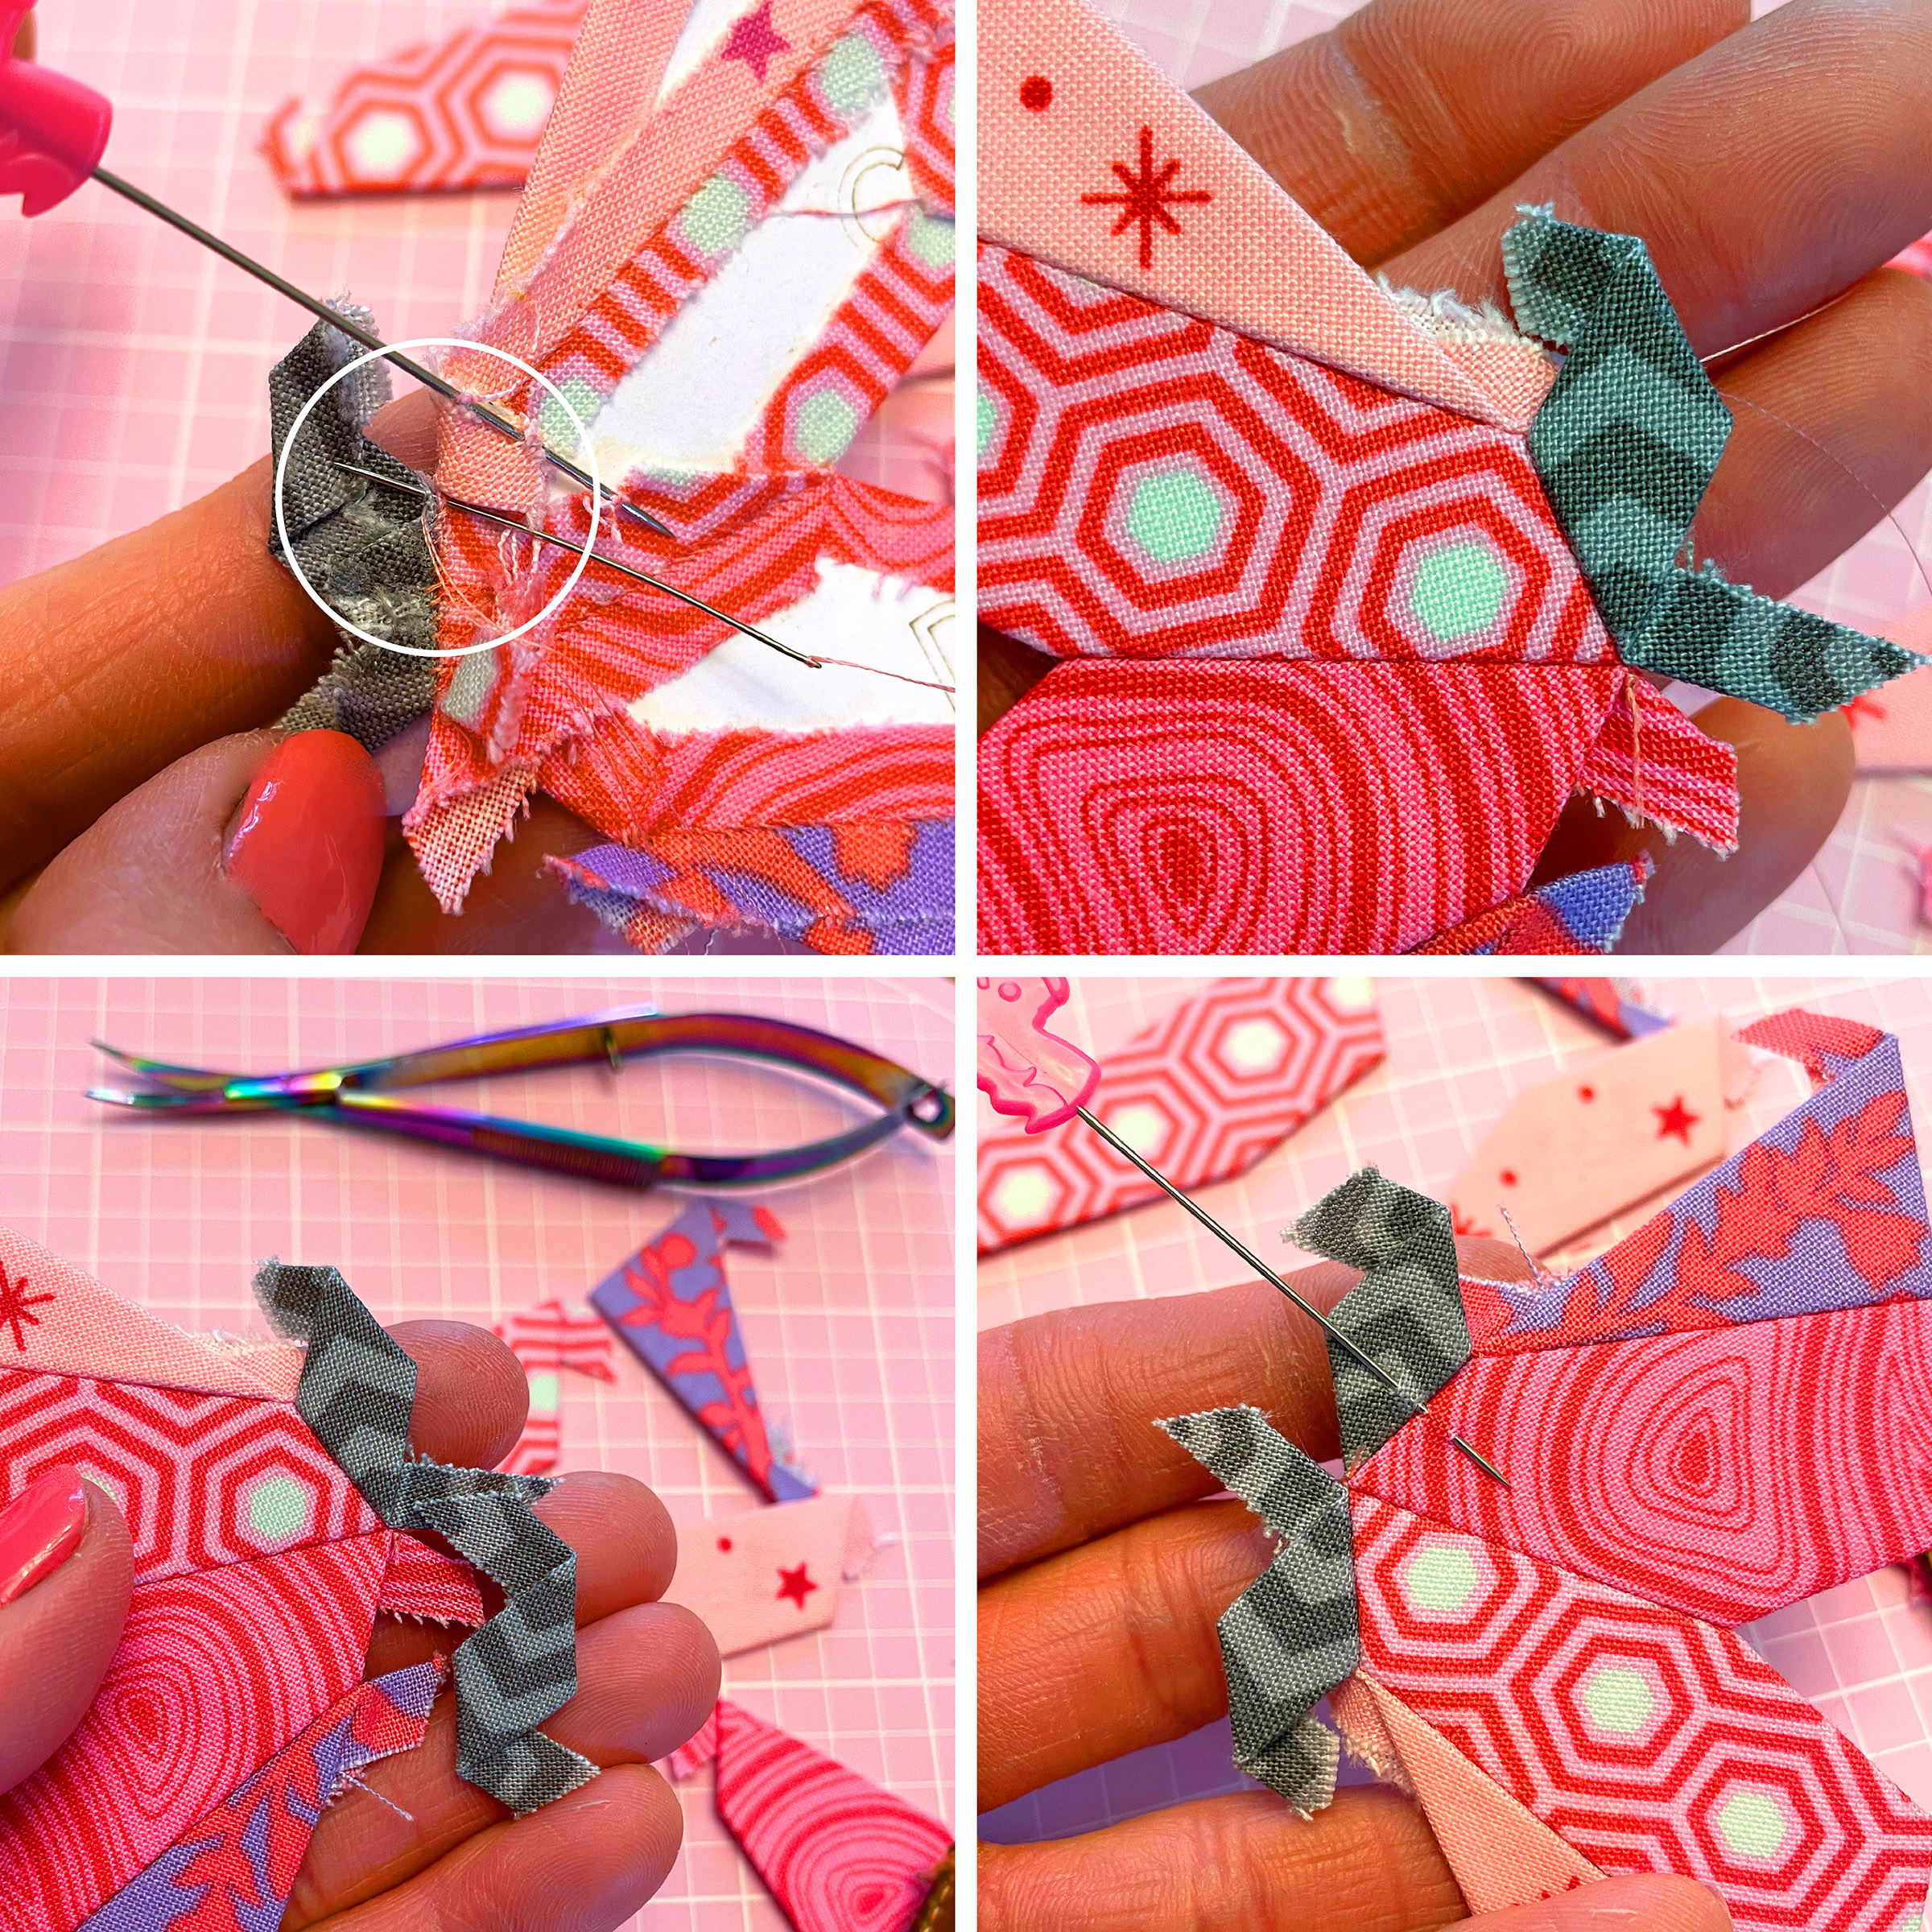
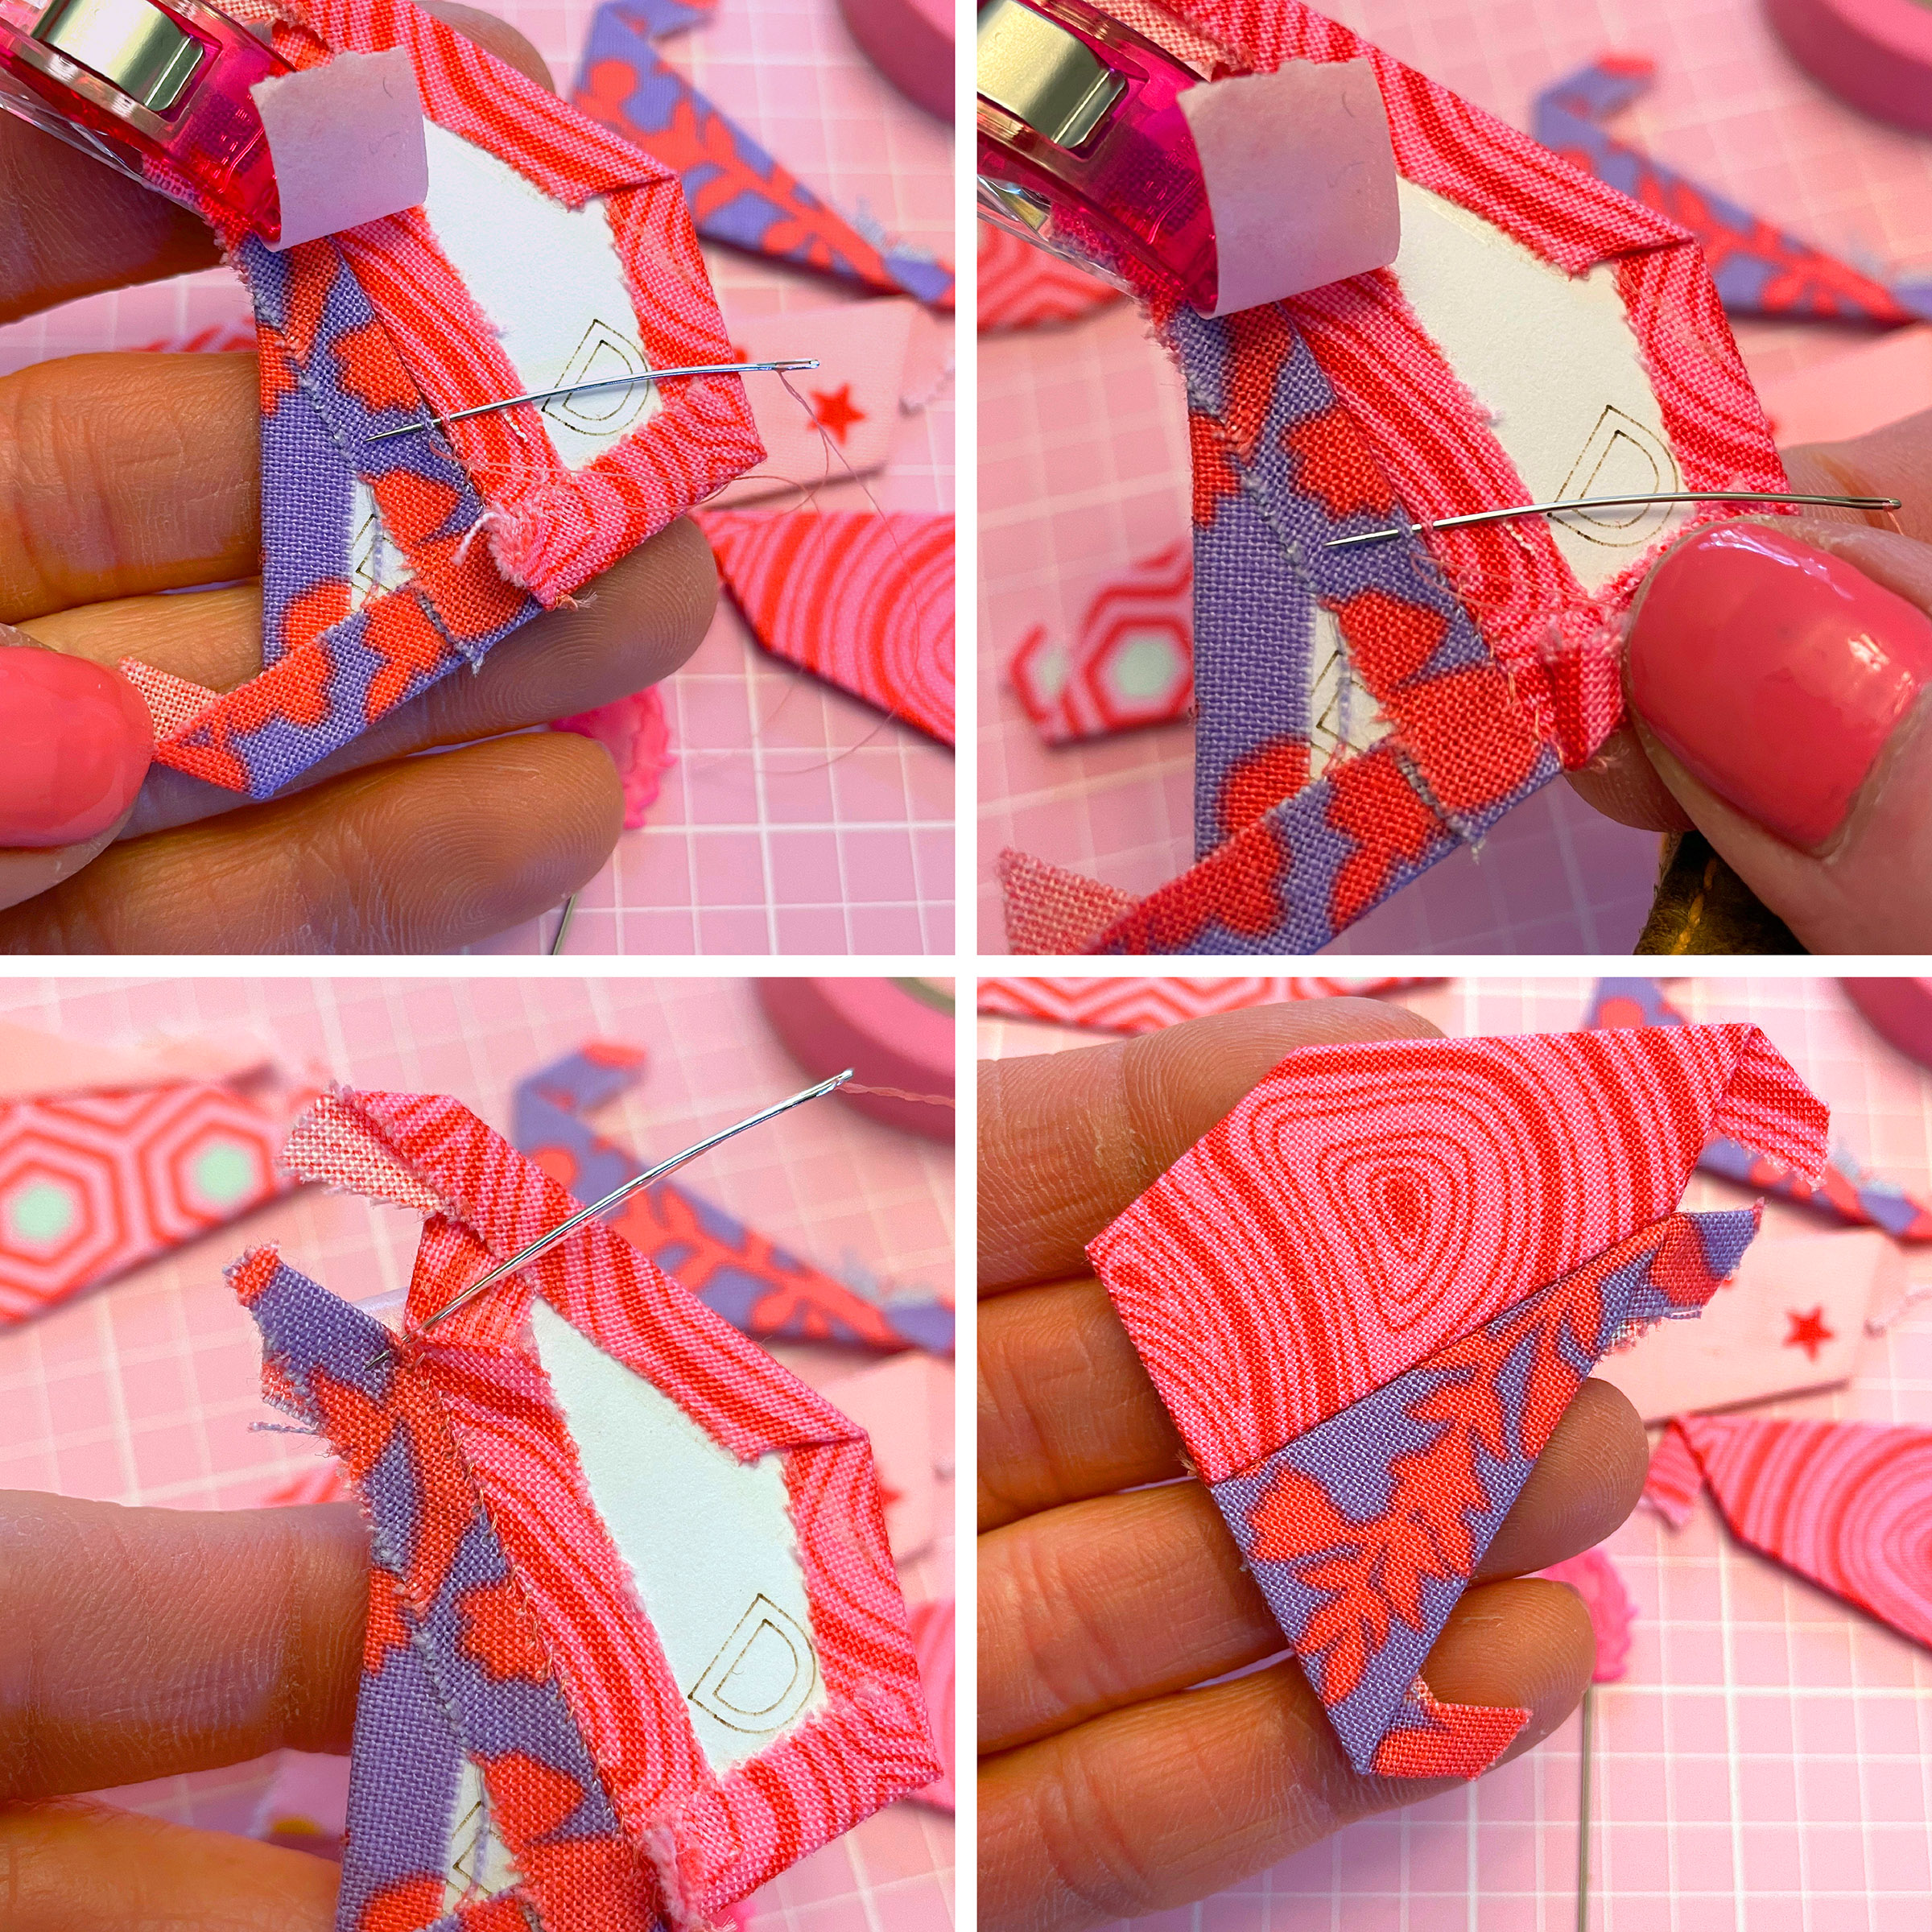
When I get to the end of that seam, I once again need to pin some fabric out of my way to finish off my seam. Flip it over and voila! Clean and precise! Because of my basting order, I now have a couple folds fighting against each other when I go to join the lower body piece. This is inevitable and will happen in various places throughout any pattern. Your process will be the same. Use a pin to help keep the placement and then secure with tape and/or clips.
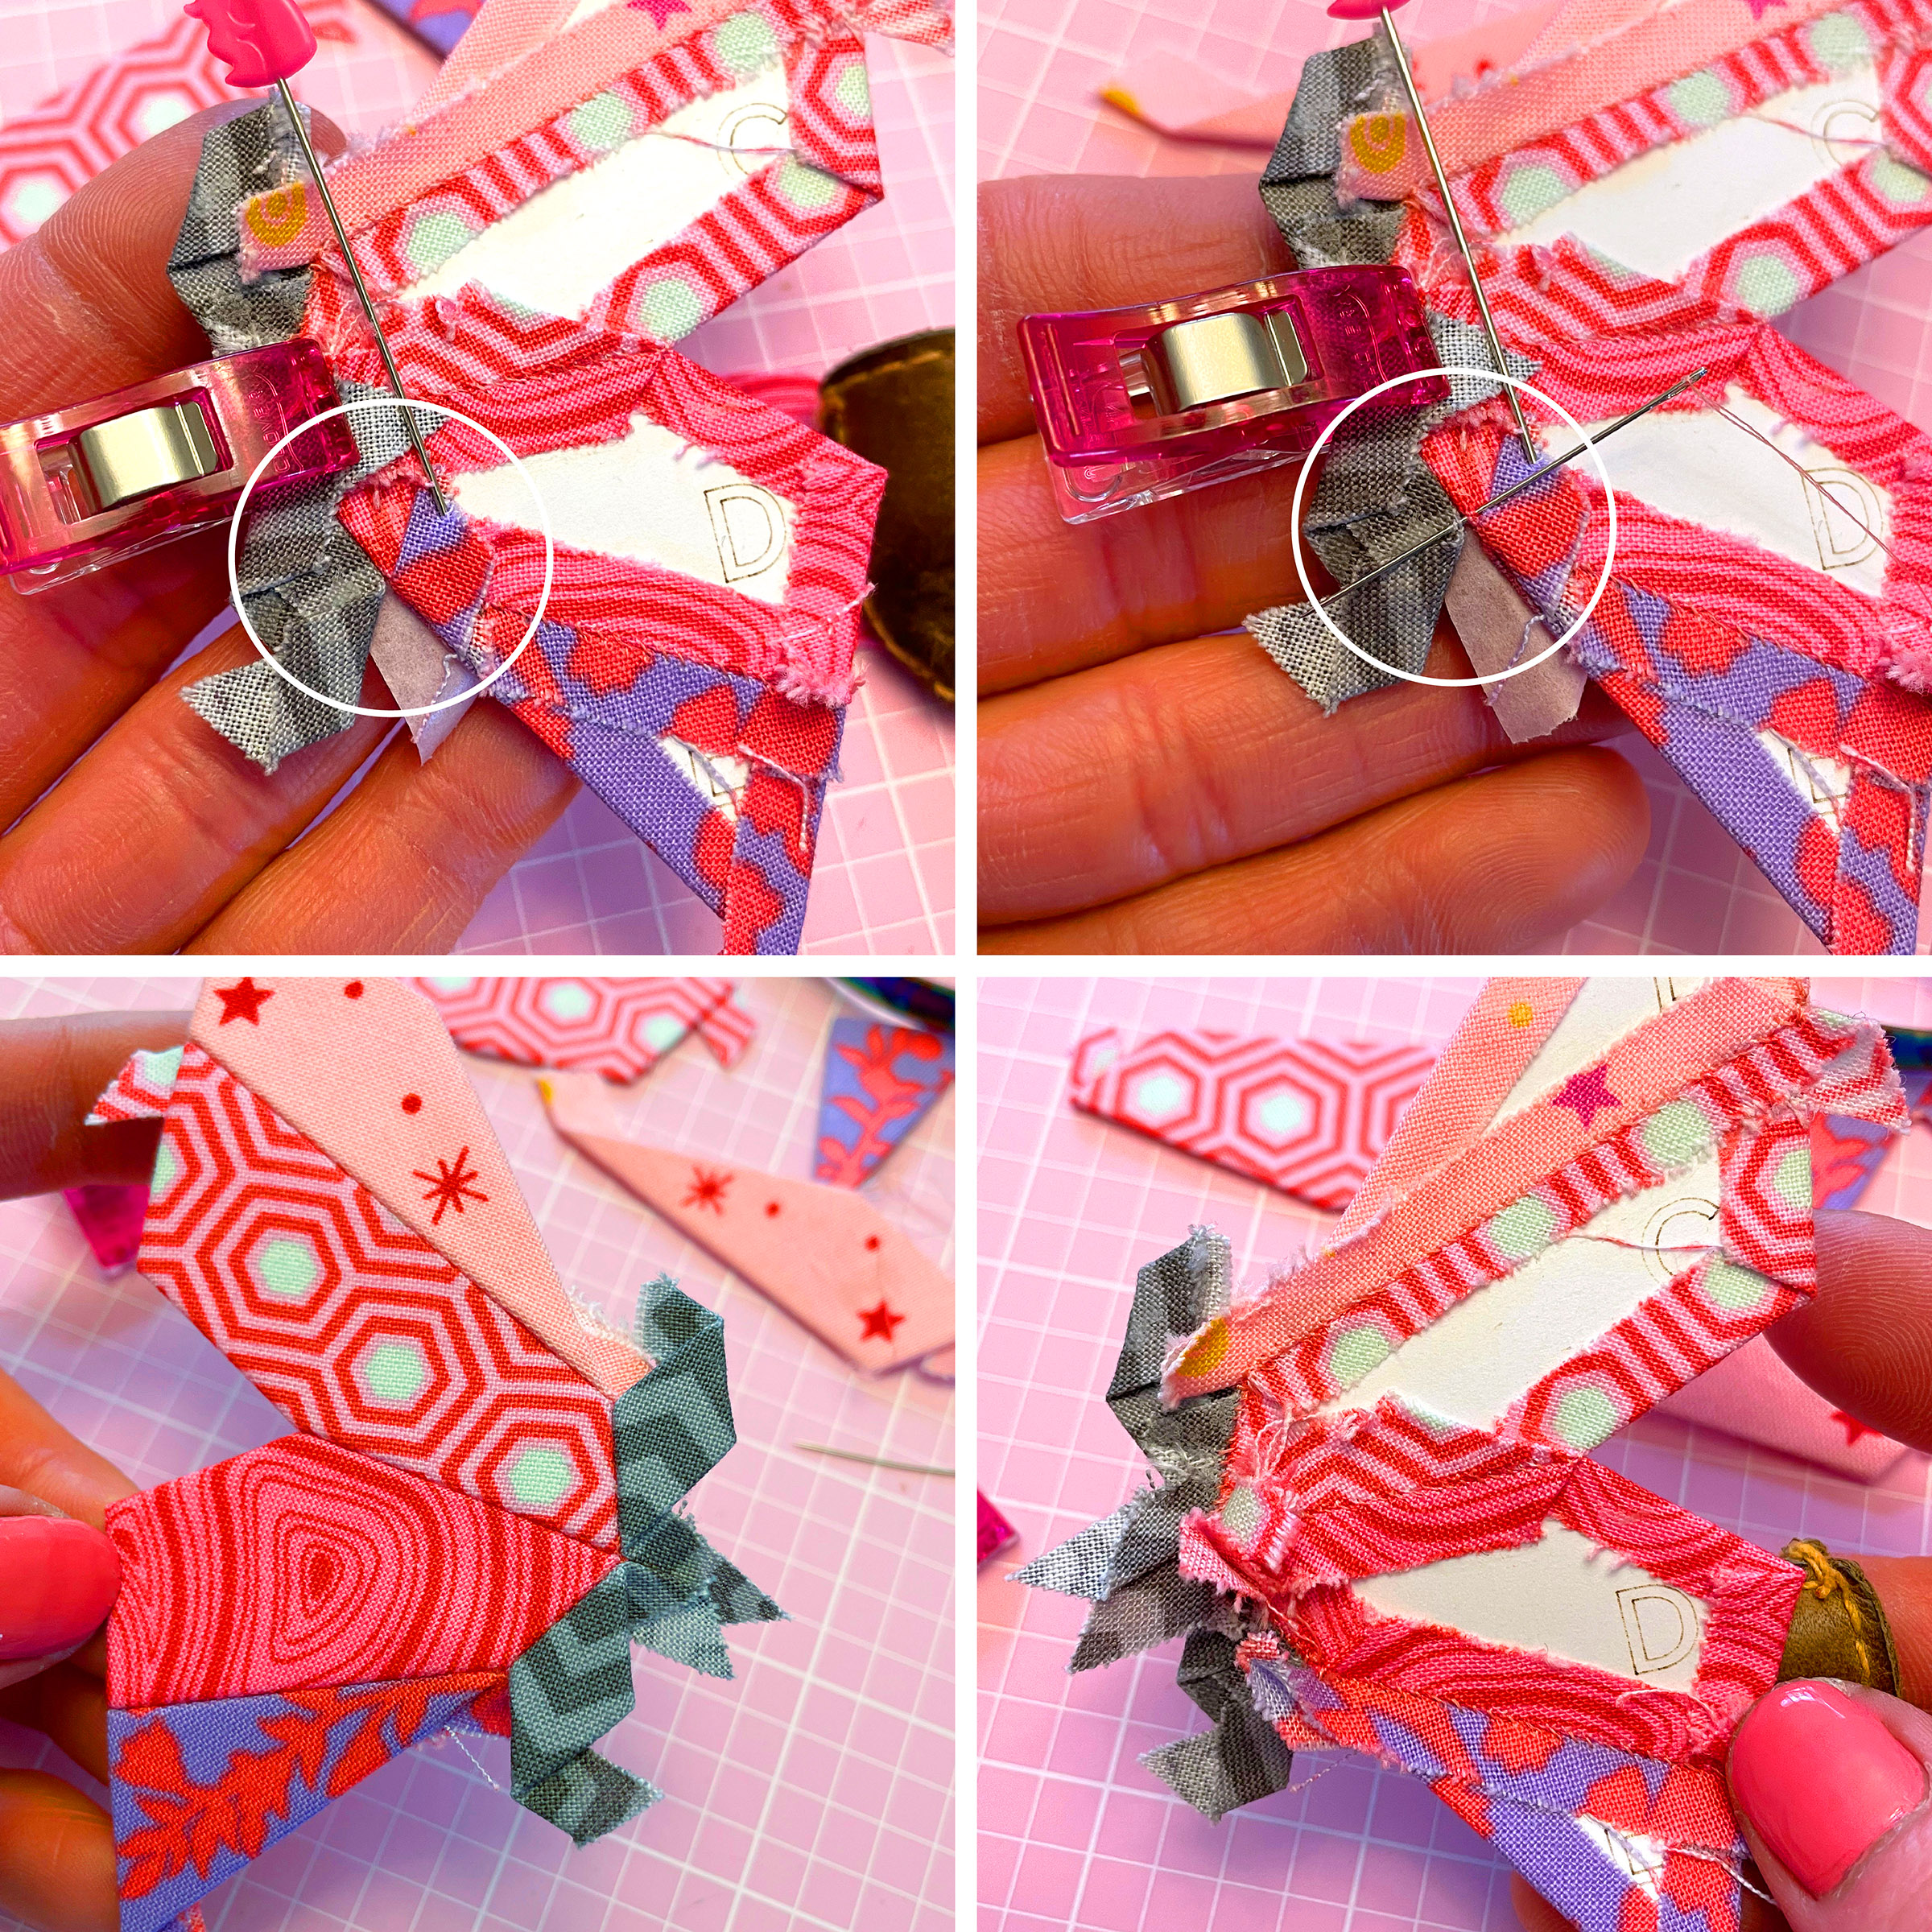
Use the same method of pinning or clipping fabric tails as needed to access your seam and piece slowly, making sure to check and keep your alignment in place as you go. All done! Two perfectly pieced little bodies, I will then add the second pieced wing unit and my butterfly is done! The bottom right photo shows the completed pieced back. It’s not always pretty, but it doesn’t need to be! Take it one seam at a time, keep everything secure and move bits as needed to get to your seams.
Other piecing methods
If you find that the flat back stitch is not for you or you would like to experiment with other stitching methods, I will share a variety of tutorials below to help you get started and always remember that many many more are just a google search away!
If you’d like to try a traditional whip stitch method of joining your pieces, here is a great tutorial from Jodi Tales of Cloth.
Another method is the invisible feather stitch demonstrated by Pat Bravo of Art Gallery Fabrics in the video below.
Finally, here is an article by Amira The Little Mushroom Cap talking about five different stitching methods.
Once again, you can find endless articles and tutorials with an internet search on any method you’d like to learn more about.
Photo prompt and giveaways!
This week, continue to post any progress photos you like! Every photo you post on social media with the hashtags #ButterflyEffectPatternSAL and #ButterflyEffectPattern, or email to me, counts as an entry for all our sponsor giveaways.
I have a pretty crazy, busy and exciting week ahead of me (I’ll share soon!), so I will not be drawing a prize winner at the end of this week – but stay tuned the following week for some big giveaways from Oliso, Pink Door Fabrics and much more!


That’s a wrap for week three! Experiment with different stitching methods and let me know what works best for you!
I’ll be in touch next week with the sew along schedule for the remaining weeks. Continue to work at your own pace in the meantime. I will be mostly unavailable for the week, but will try to check messages and emails as best I can.
Don’t forget, you can check out the Sew Along Facebook Group here to find additional support or just chat with others in the SAL!
See you soon!
~ Nicole
WEEK SEVEN
Hello friends! The Butterfly Effect Sew Along will be wrapping up soon (though I’m thinking a little progress party in the Fall?), and I have just a few more little tips and notes to share with you as you work through your piece.
Today I’m going to talk a bit about joining areas where several points come together and about fabric bulk.
I wish I had some magic tips or techniques too share that made it all perfect and easy, but I really don’t! Centers are hard and bulk happens, no way around it, but there are a few things you can do to help.
Let’s start by talking about star centers. As much as I love perfection, I’m not bothered that mine are never quite perfect. There are a few things I like to do to help me keep things lined up and to help with all the seam bulk that gathers on the back.
One thing to keep in mind is that you will have a little “wiggle” room when you remove the papers and your fabric is loose. You can make some adjustments later or you can make some adjustments when you baste your piece and quilt it.
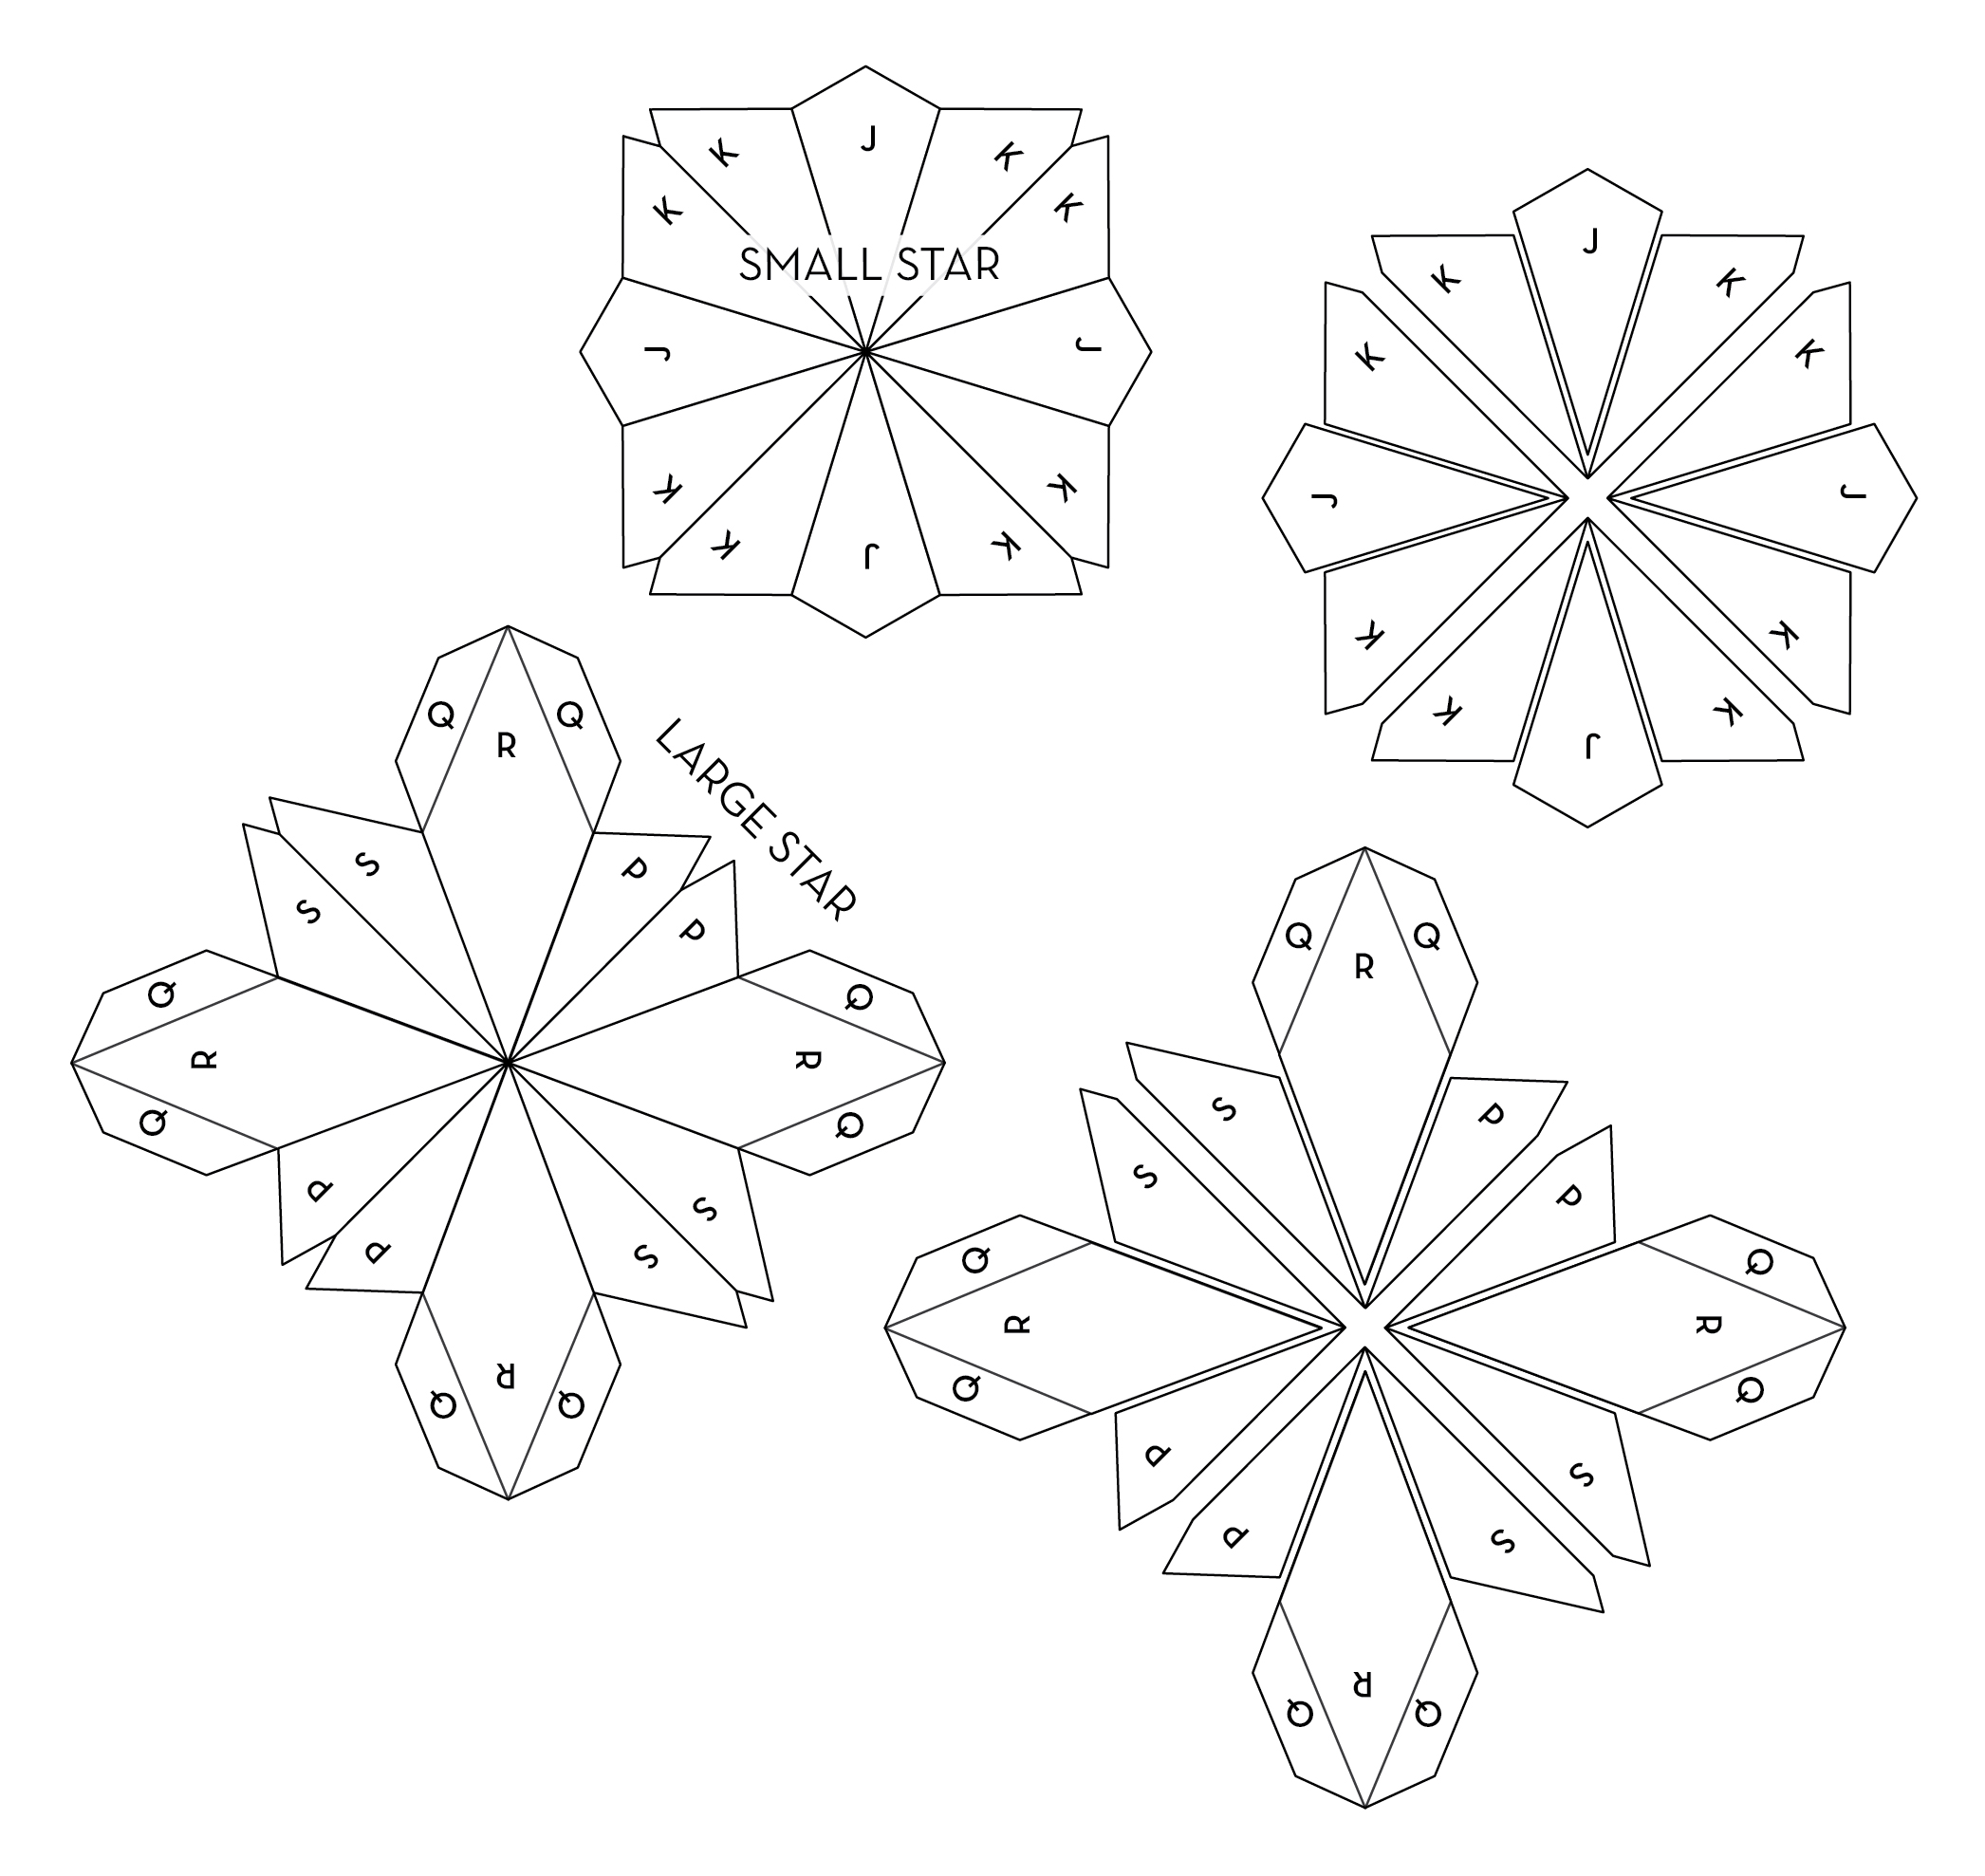
For this pattern, I first joined the star pieces in quarters, then connected two quarters and finally two halves. So, for the small star I joined two K pieces with one J piece and for the large stars, one S, one R and one P.
One thing you can try with any pattern that has several points that come together is to “back out” one of the pieces just a tiny bit. So if you join the pieces in the order I mentioned above, you can try backing out the J piece a tiny bit so that it’s point is sort of nestled between the two Ks rather than in line with it. This will give you less points coming together in your overall center.

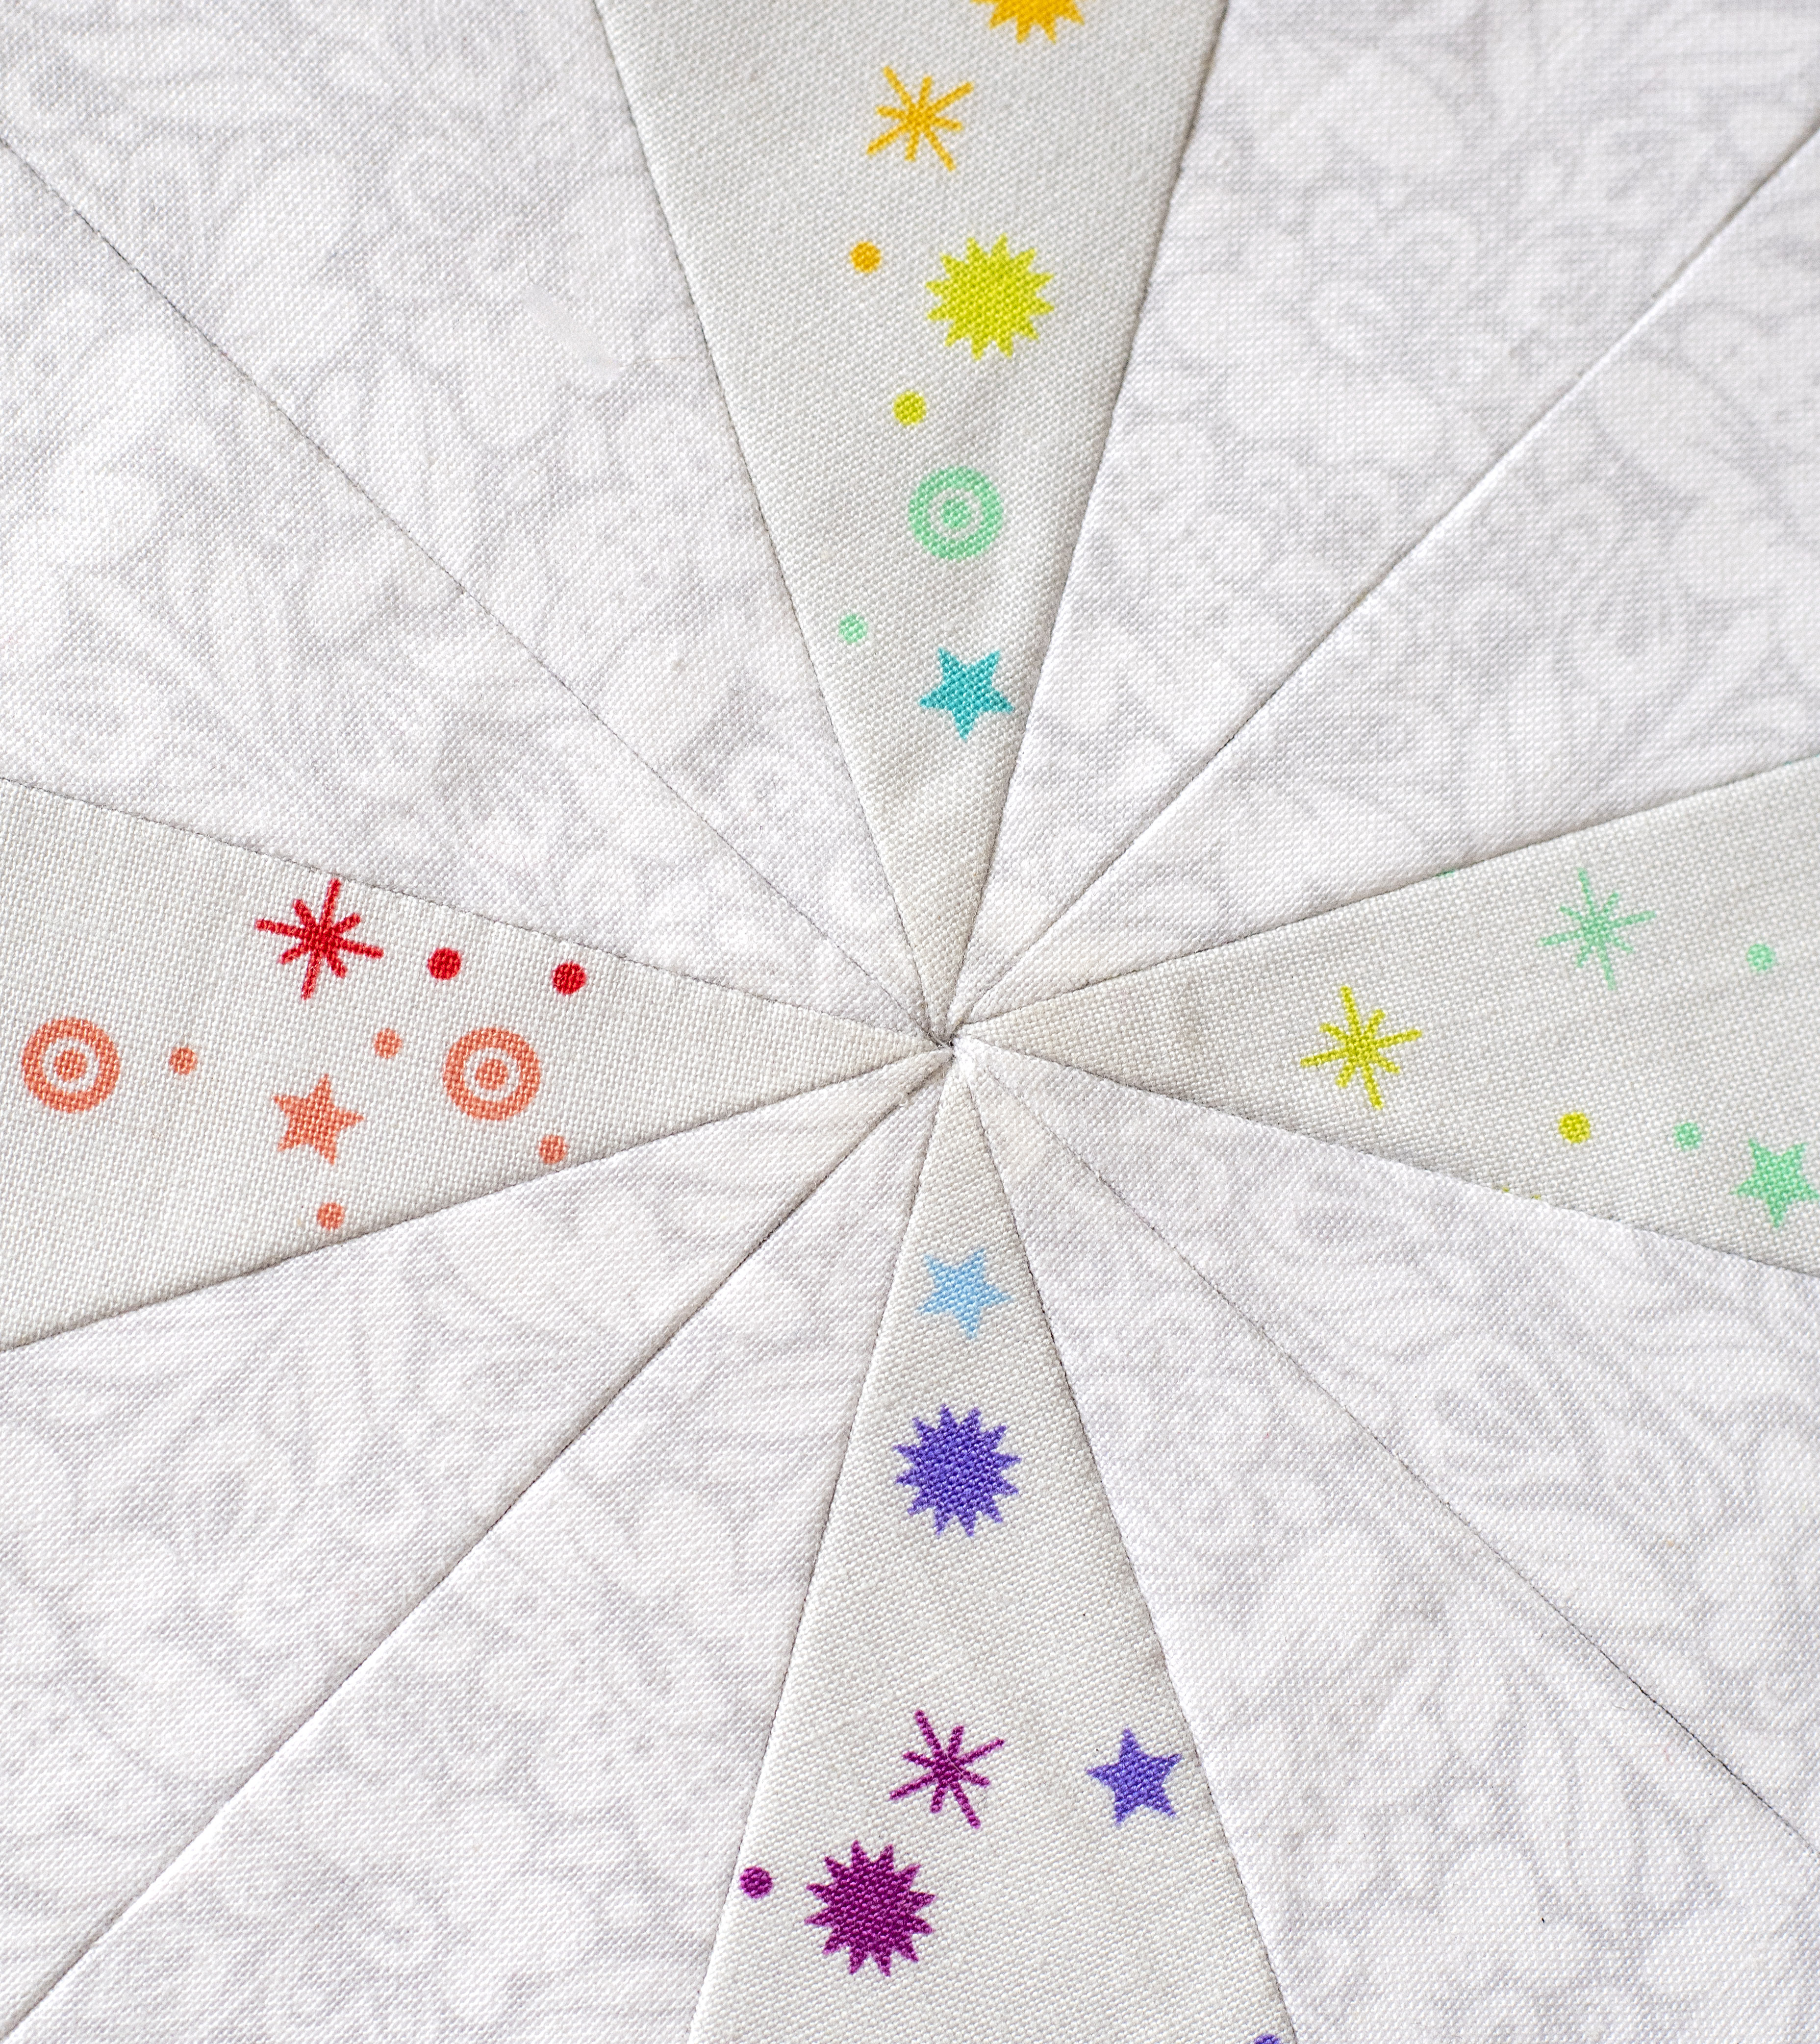
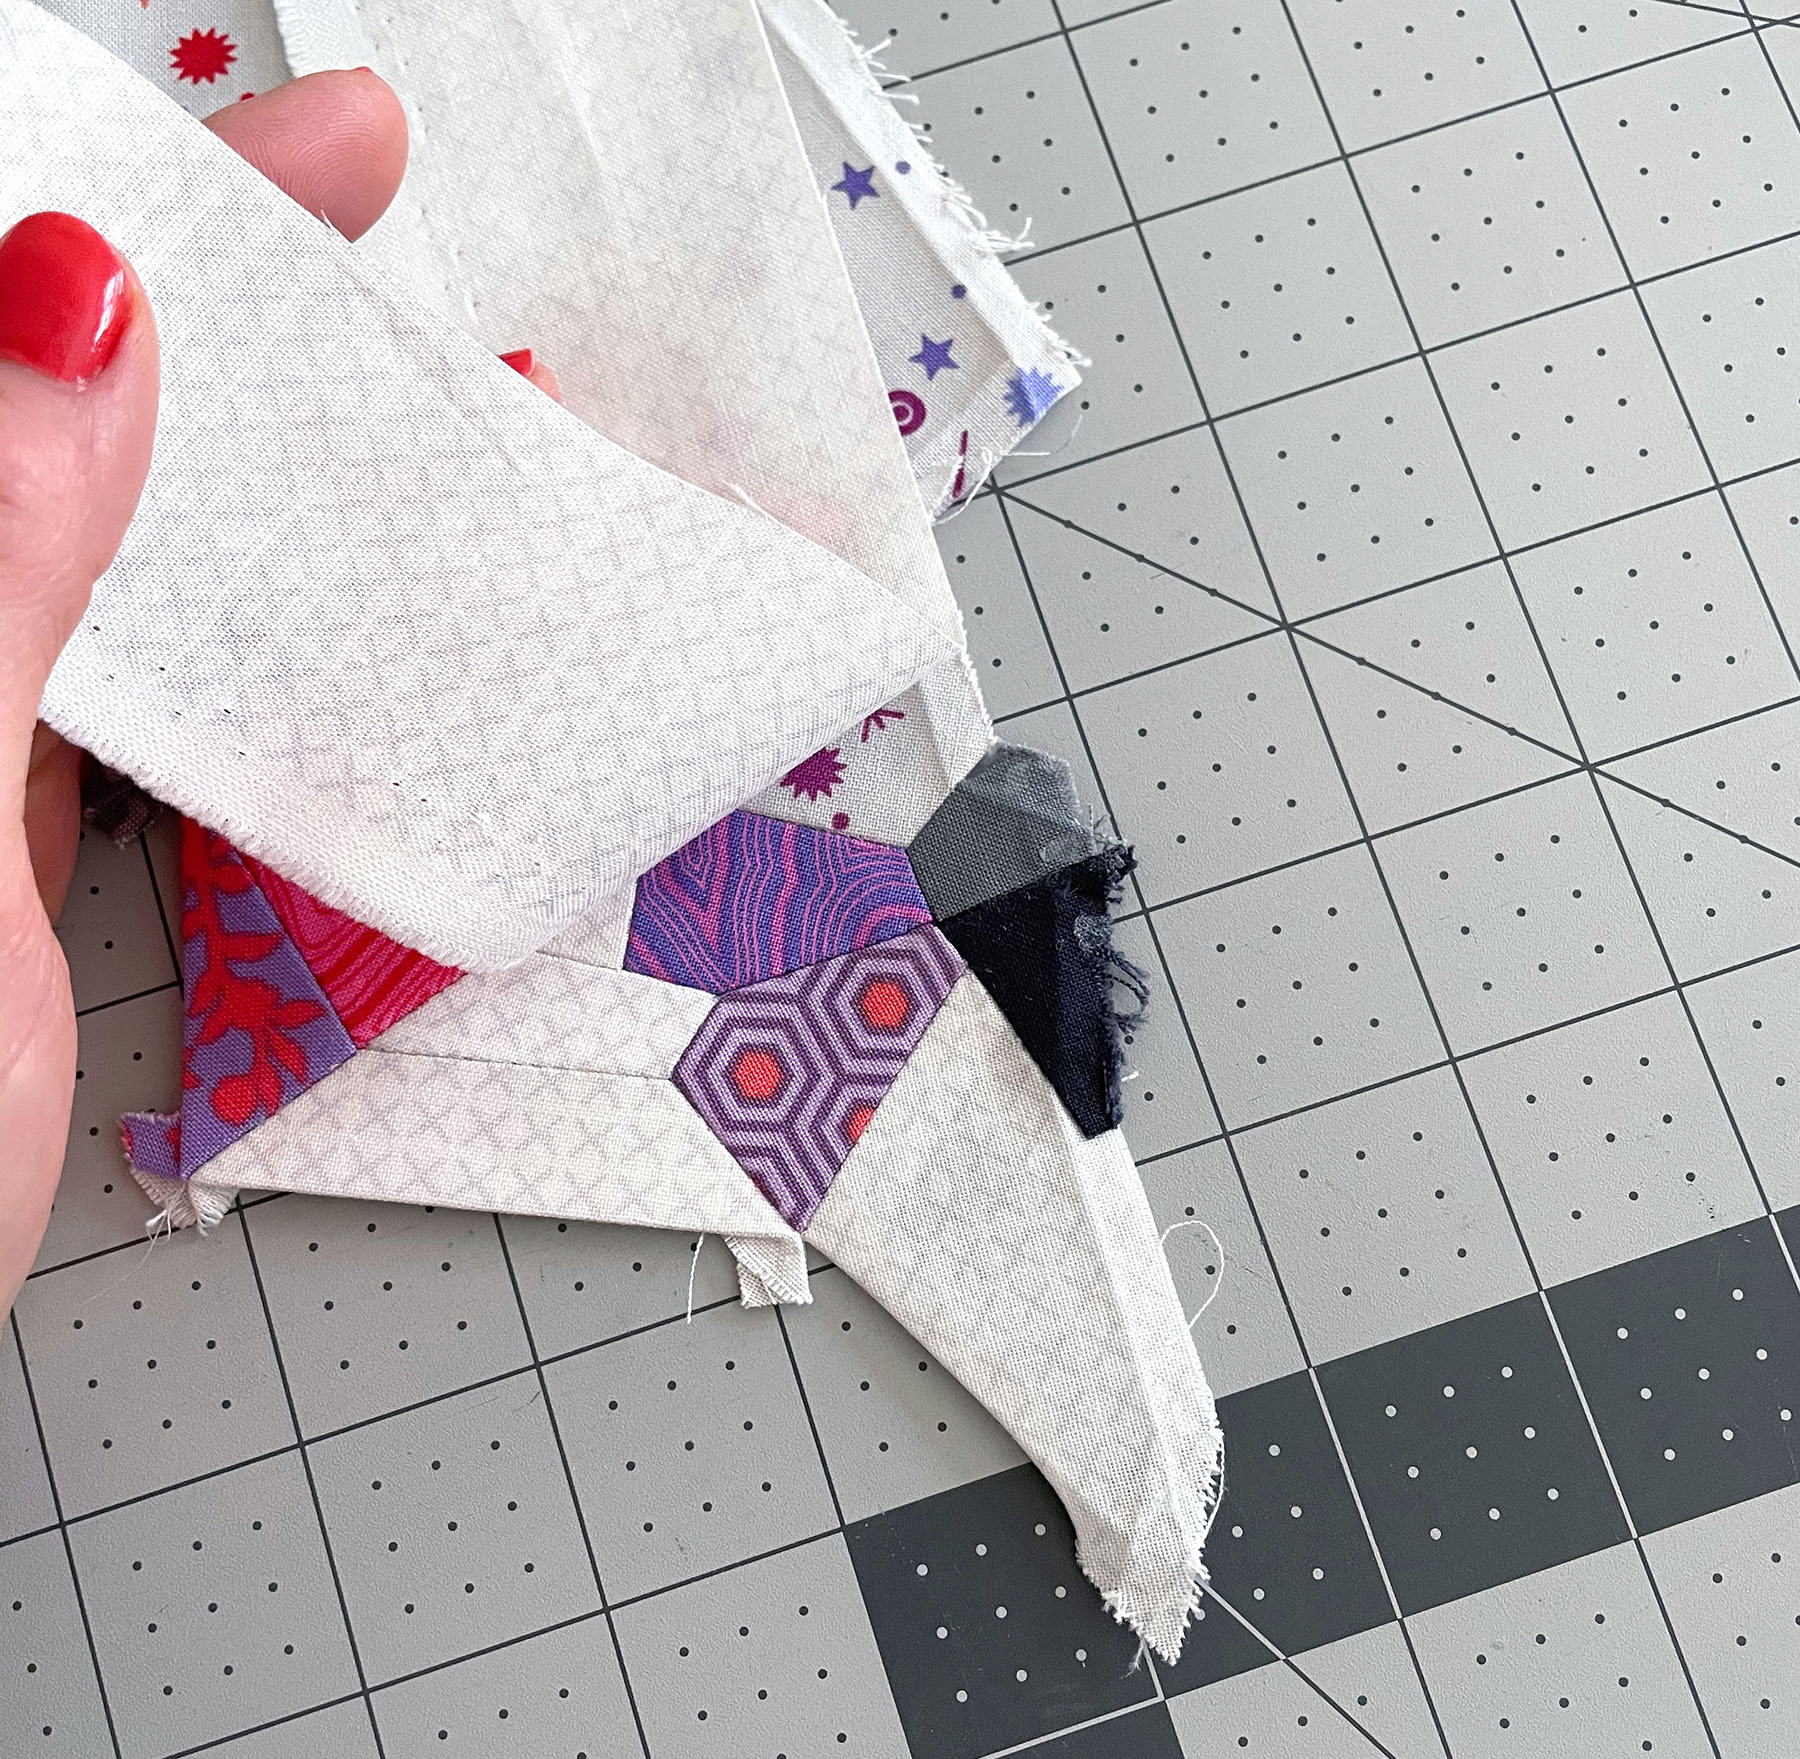
Another thing I usually do is leave a little “hole” in the middle, not stitching all the way to the ends of my points, but stopping just shy. This leaves a bit of play for things to fall in place when you adjust the bulk on the back (which I will talk about next). You can only see this hole when I move the seams out of the way on the back or I fold the piece in half which I’m doing in the photo above. If you look at the top photo of this post, you’ll see that you cannot see this little hole because it “fills in” when the piece lays flat.
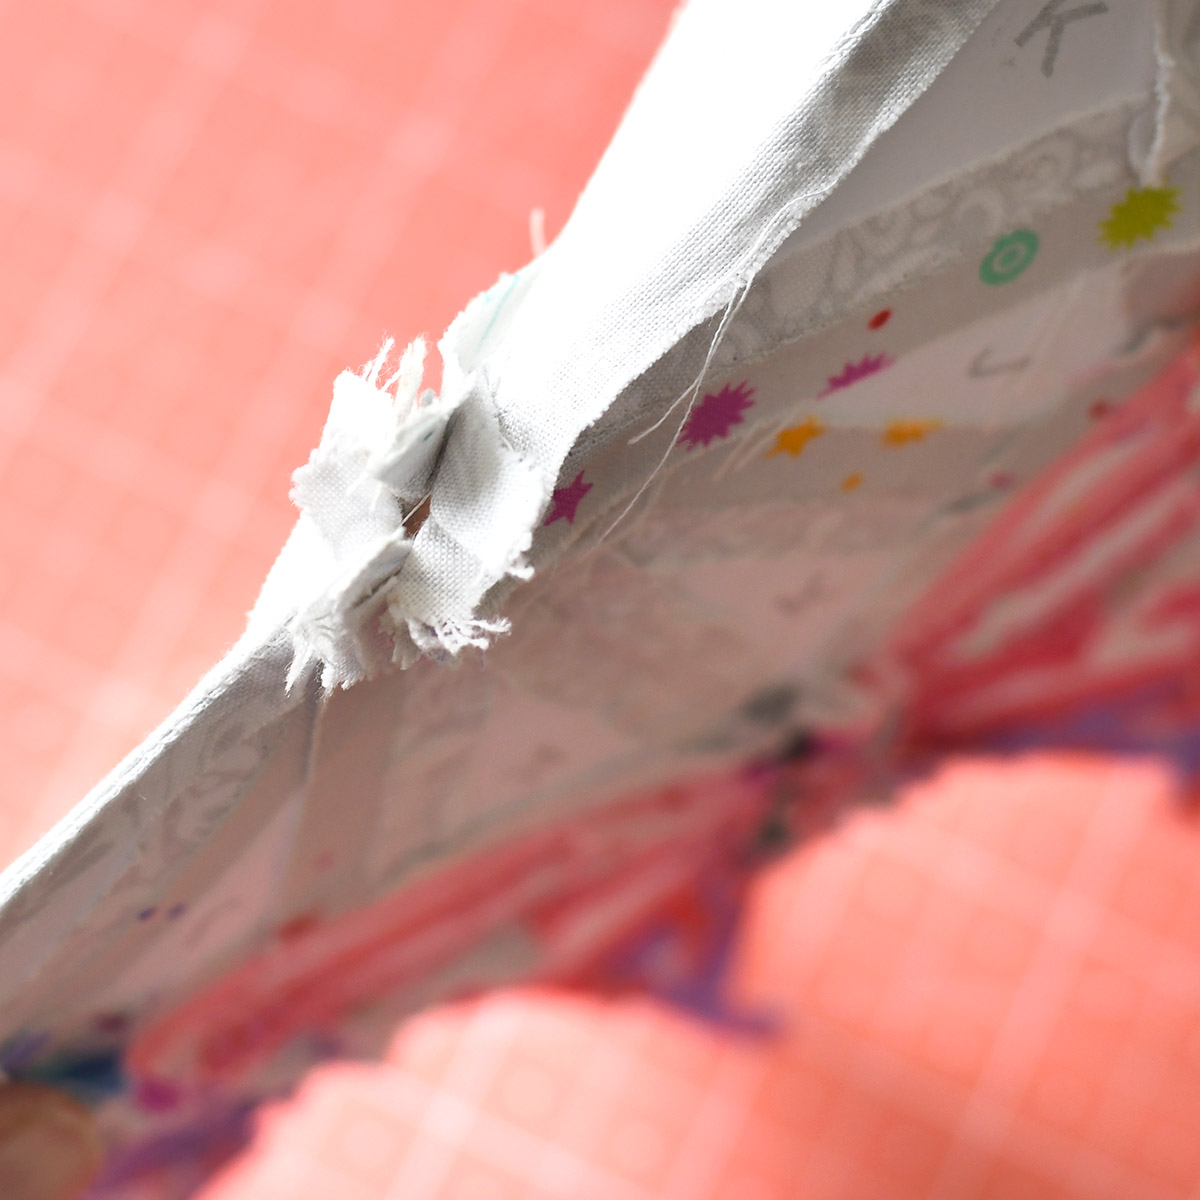
Above is a look at that same “hole” from the back of this center star with the piece folded in half.
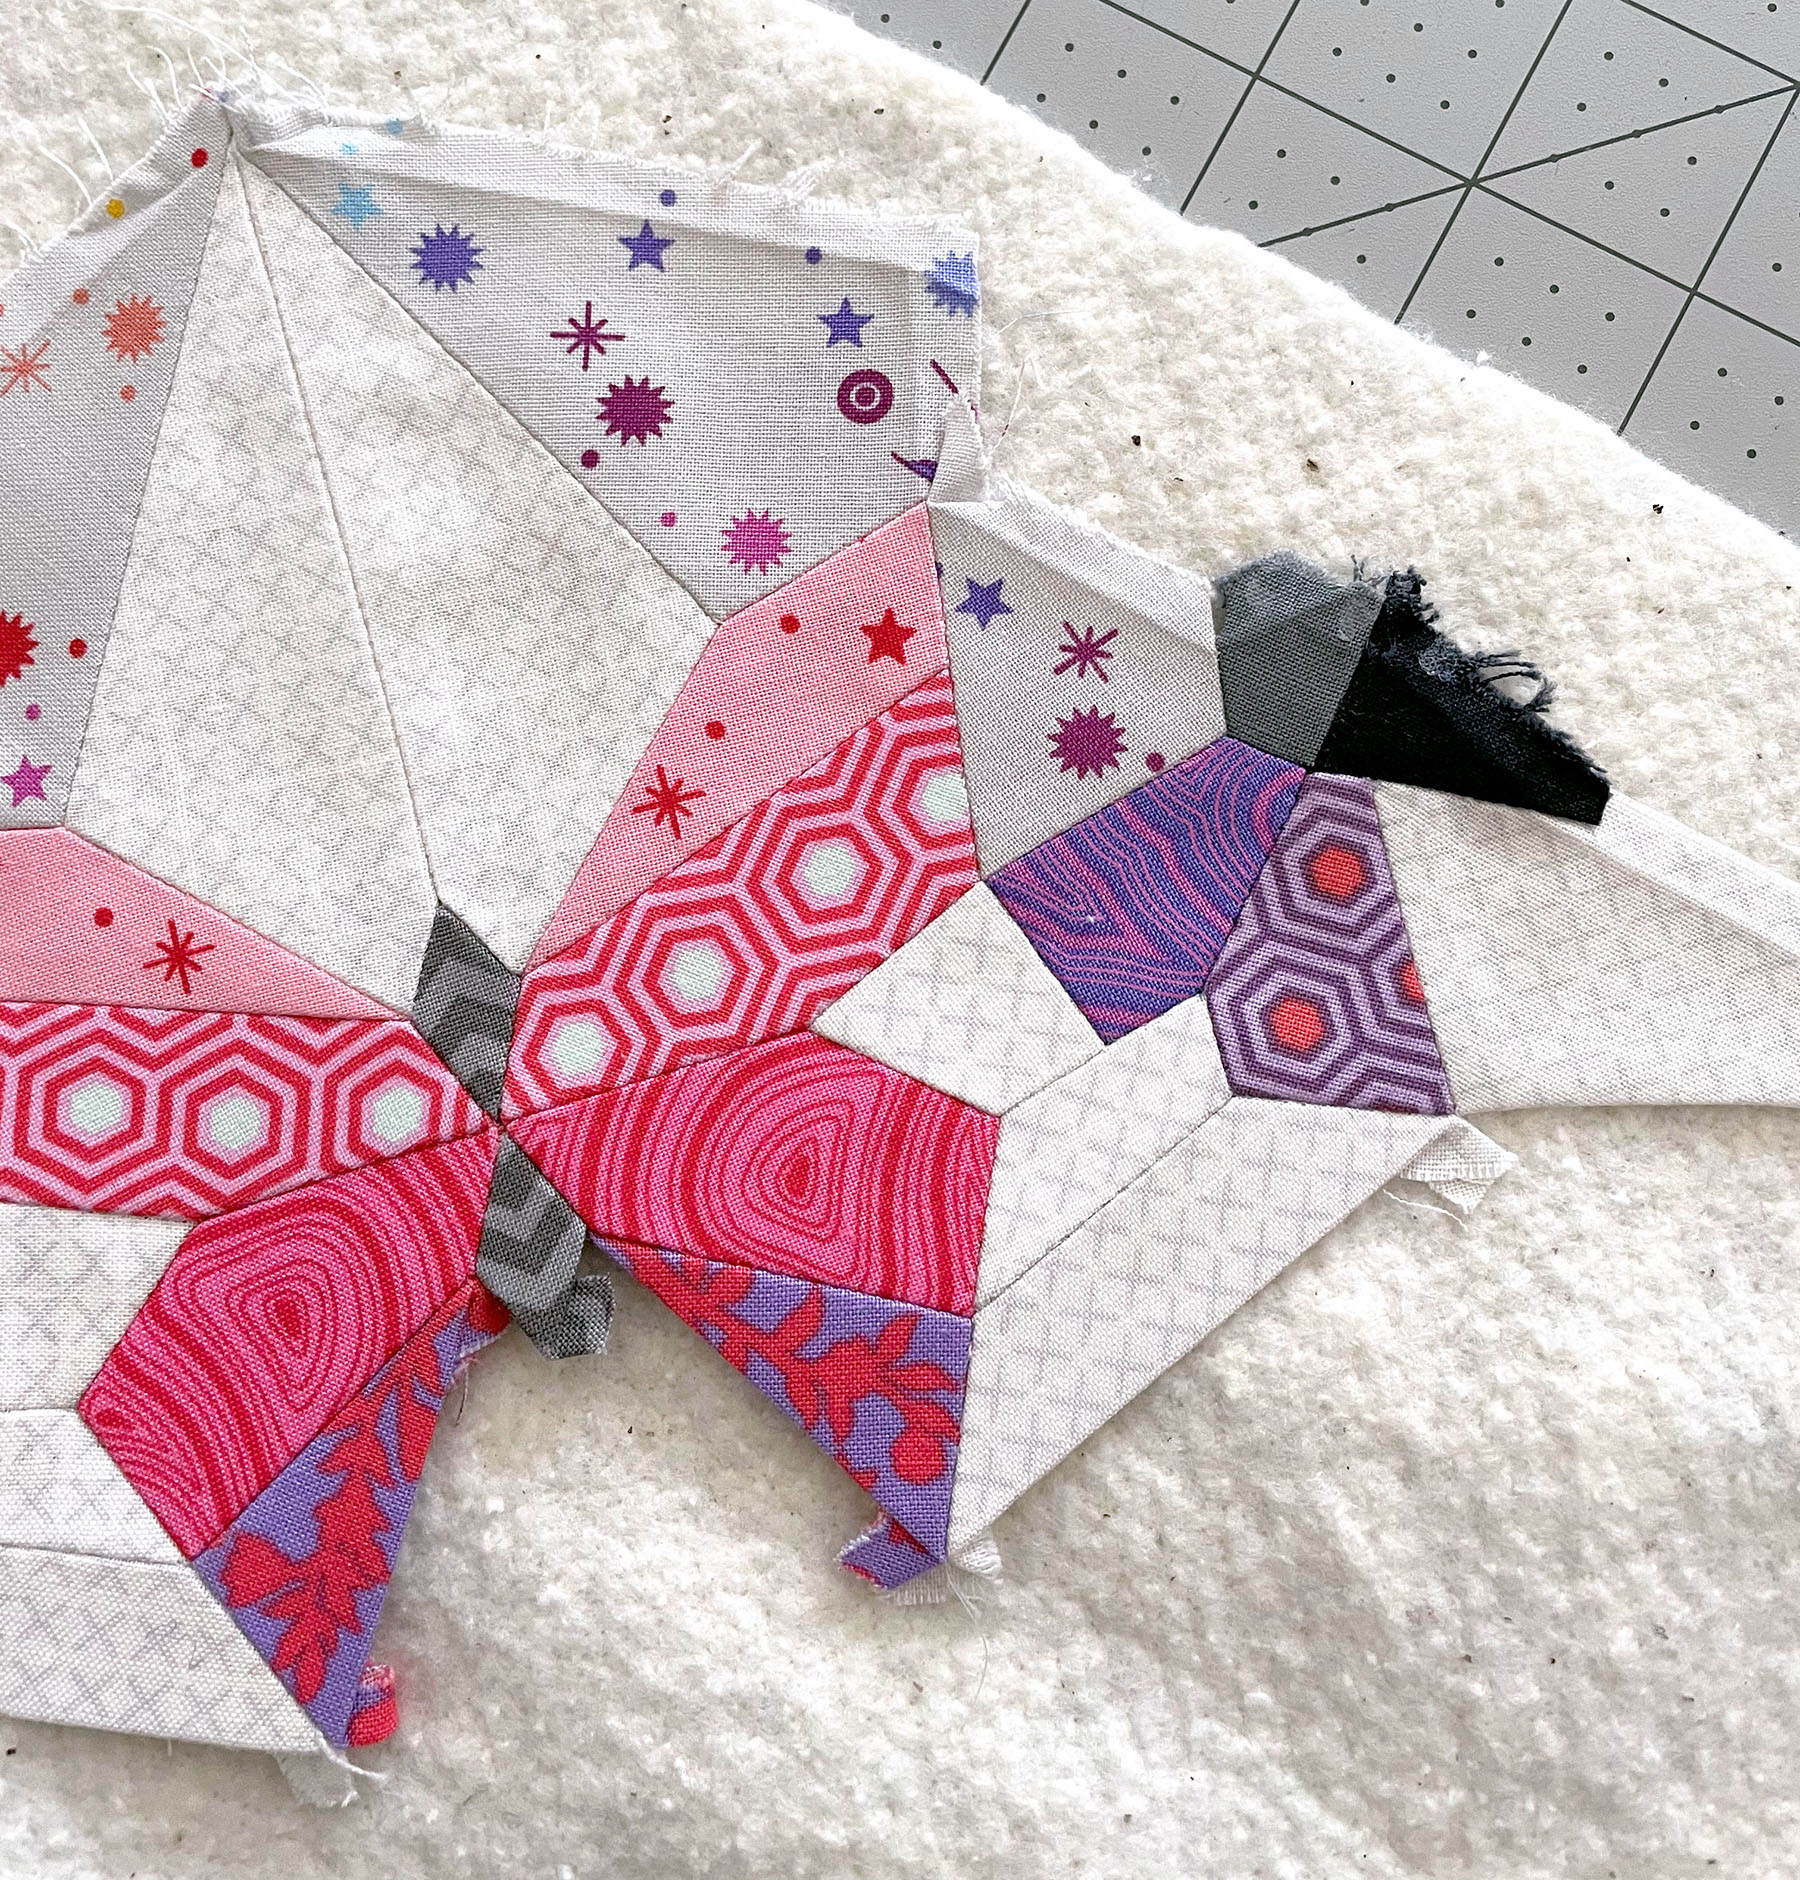
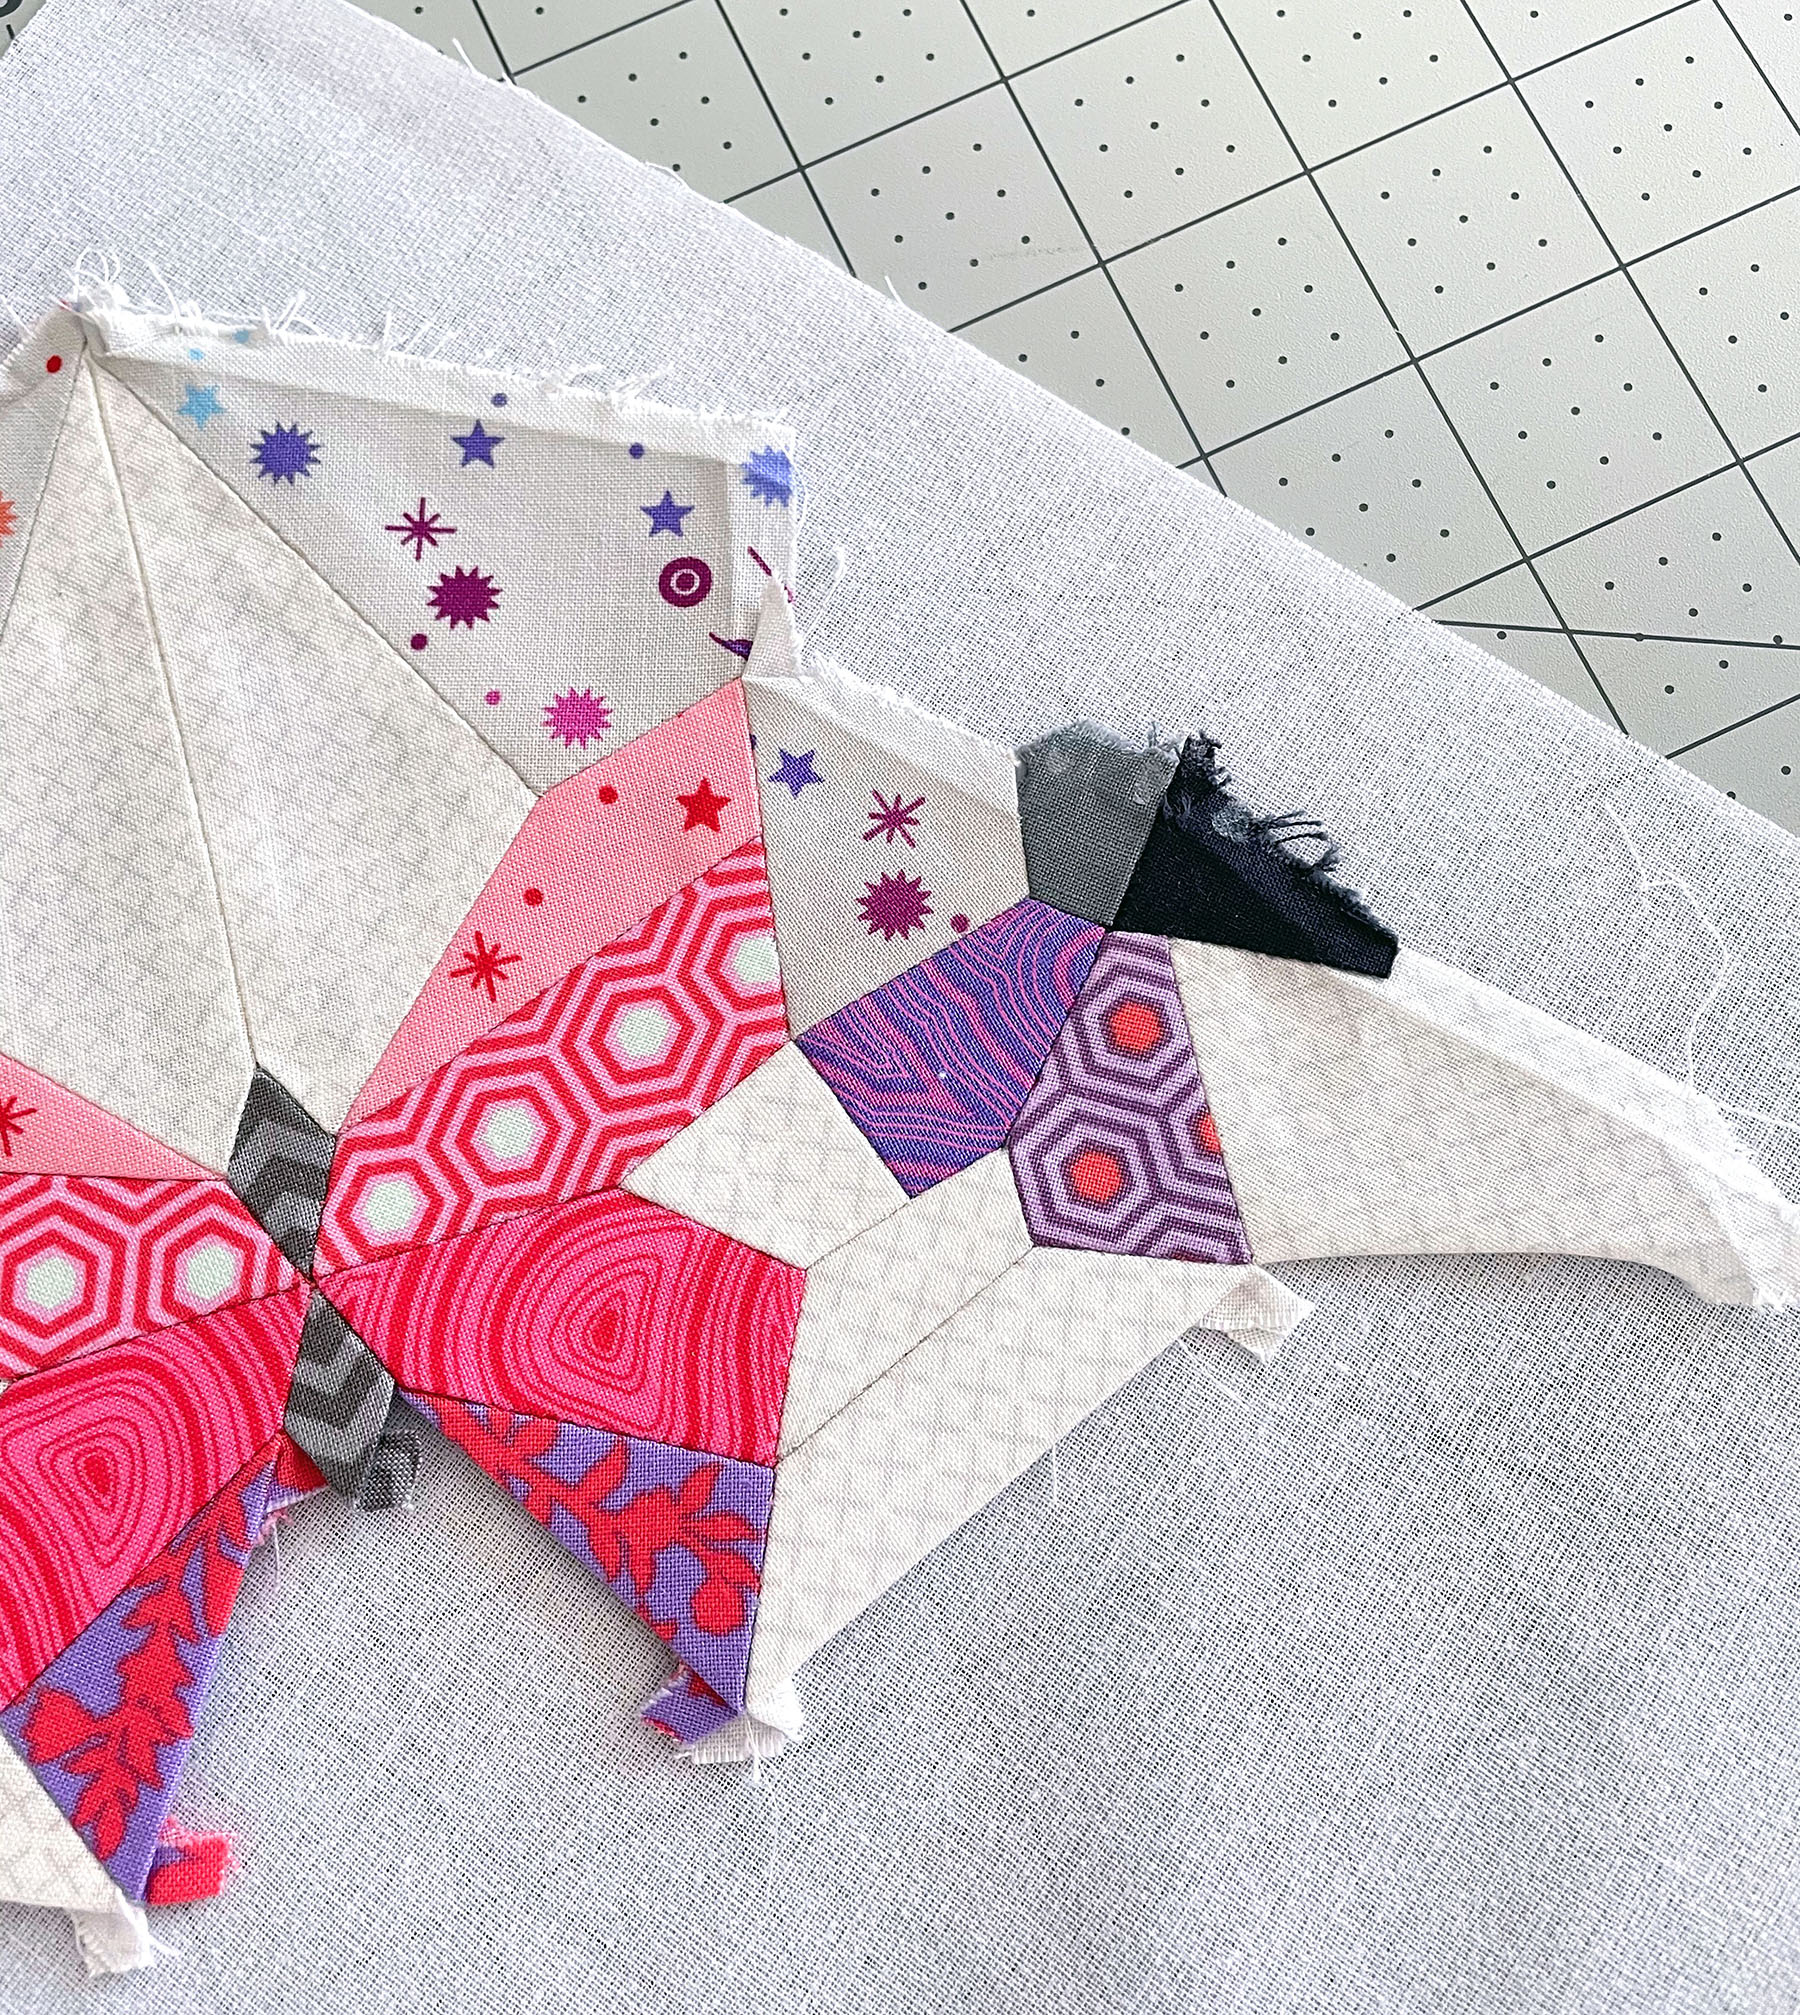
Now I’ll share the back of the star when flat and talk about bulk.
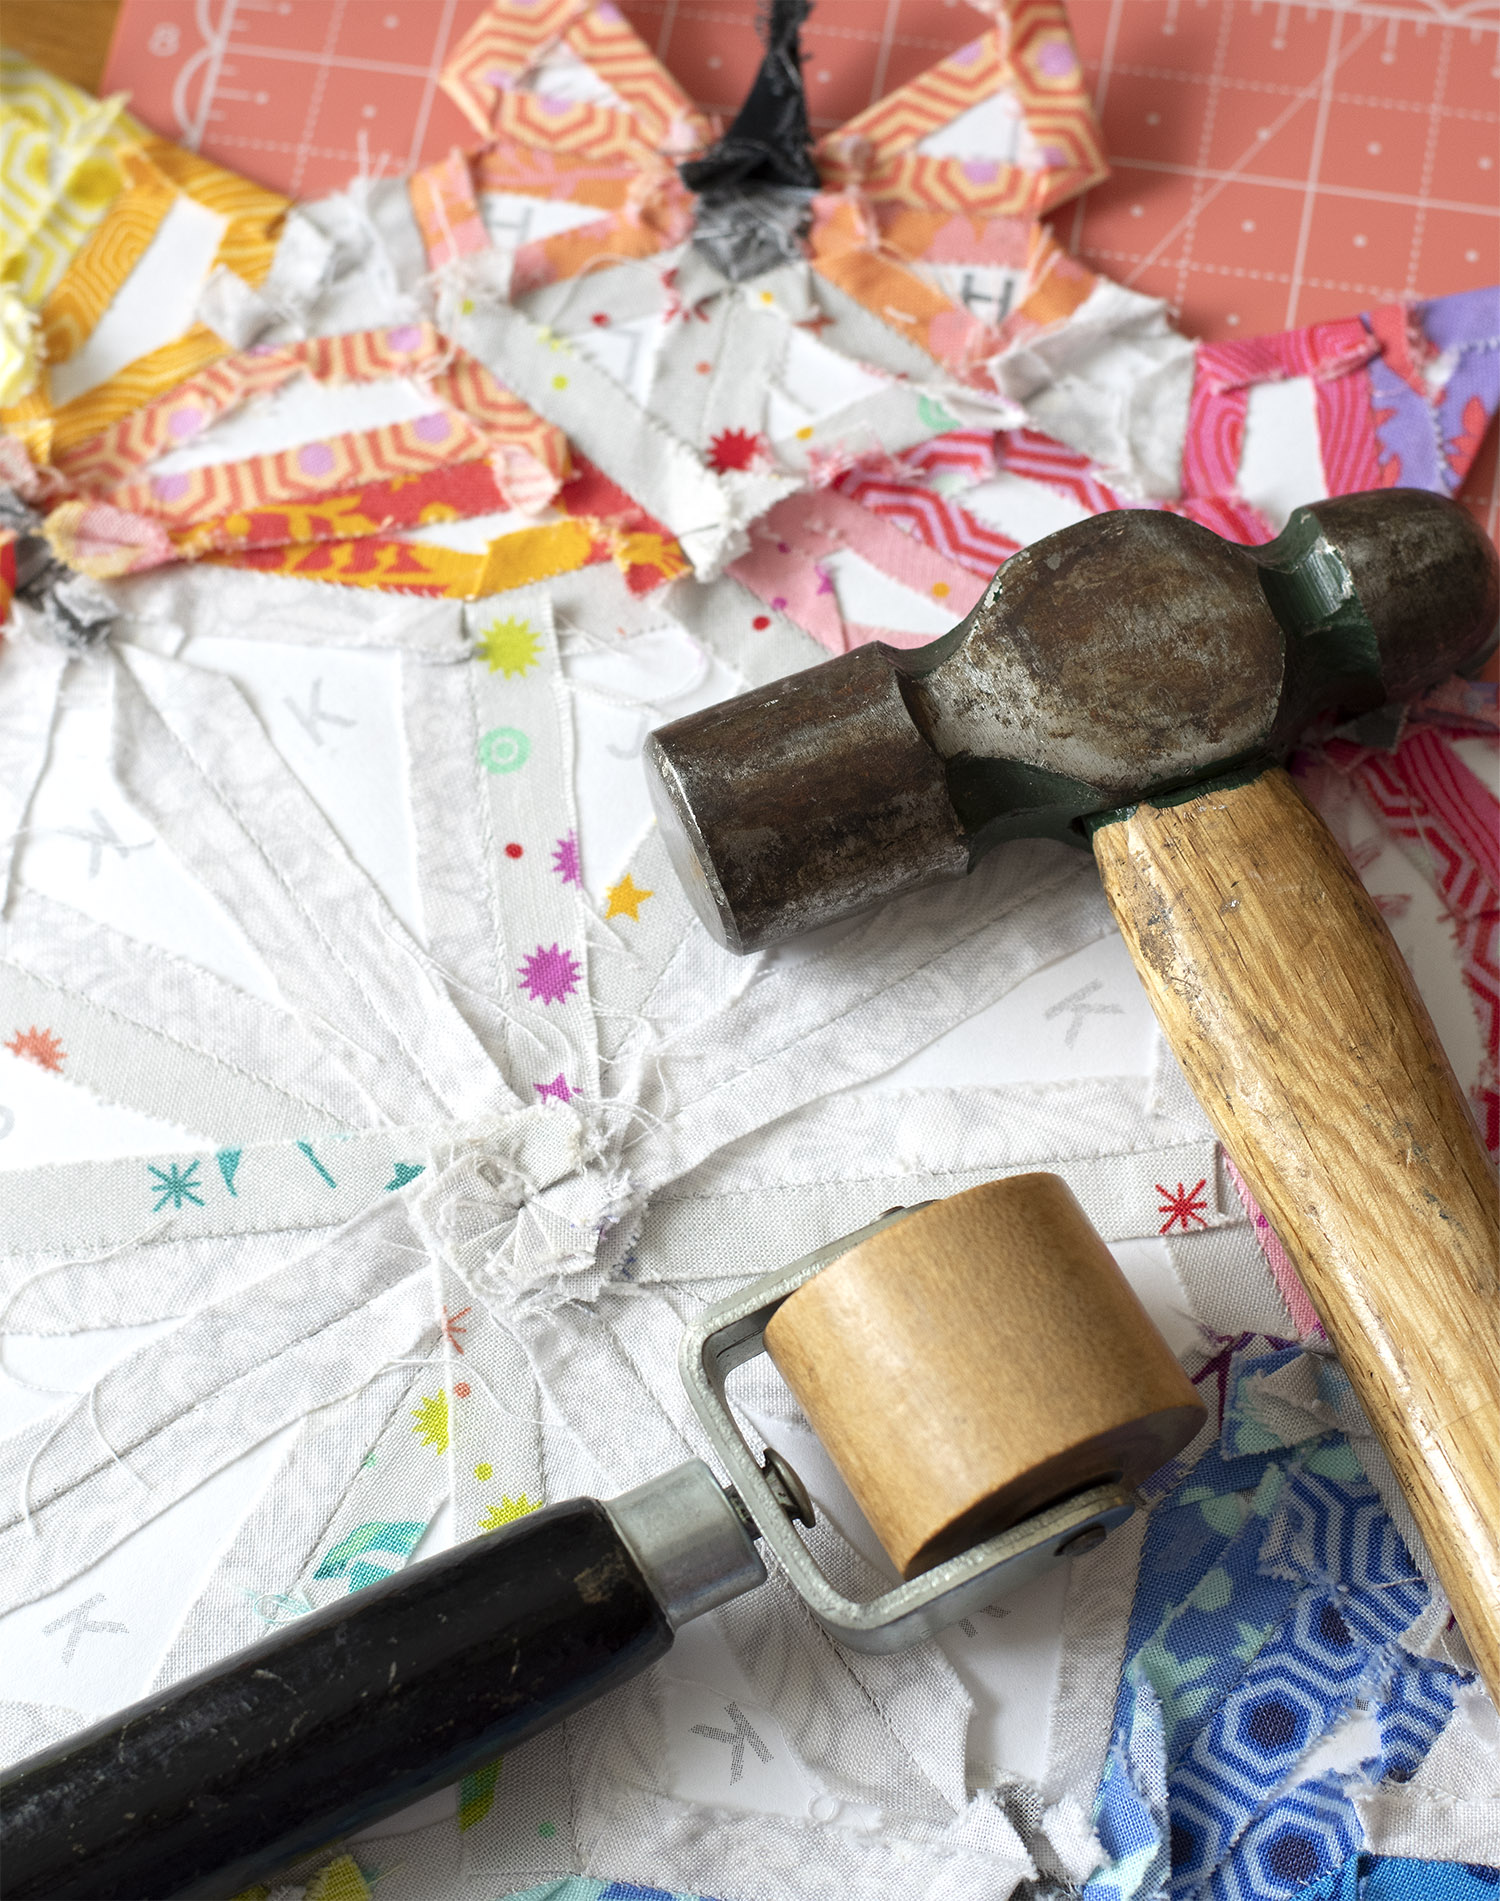
A great way to handle any bulky area of multiple seams is to twist or spiral them. If you baste all of your pieces in the same way, your fabric tails will nest together and you can create the little spiral that you see above. This area will still be thick because of the multiple layers of fabric, but the twist helps distribute it evenly. There is no special trick to making the twist, you will simply adjust and layer your fabric tails overlapping the previous one around the center and it all kind of falls in place.
To help make these thick areas a little flatter, there are a couple tools you can use. One is a wooden roller and the second is a hammer! You can roll over the bulky areas with the wood roller or you can place a scrap of fabric or thin towel over them and gently hammer it. Both help compress and flatten the fabric a bit. This works for any type of project or bulky seam you’re working on.
No magic tricks, but hopefully a few simple tips that help a bit! As with all the other steps of EPP, this is something that will be a little different for everyone and come together better over time and with practice!
For the last week of the sew along, I will talk about removing your papers and some options for finishing piece. I know many of you won’t be at that stage (probably myself included!), but I want to cover it for those who are and for when you get there. I’ll also have some final grand prizes! See you soon!
WRAP UP – Finishing
Hello friends! It’s time to wrap up the Butterfly Effect Sew Along and I want to thank you for patience with me in getting this last post up! I know many of you (including myself) are still sewing away on your piece and may be for some time, but today I’m sharing just a few short videos and some basic information about removing your basting papers and finishing your piece.
I’d love for you to continue posting your progress with the hashtags #ButterflyEffectPattern and #ButterflyEffectPatternSAL as you work! I will plan a little update/progress party for the Fall, too, so keep an eye out for that! I will also share more photos and videos as I finish my own piece, do some hand quilting, and make it into a pillow.
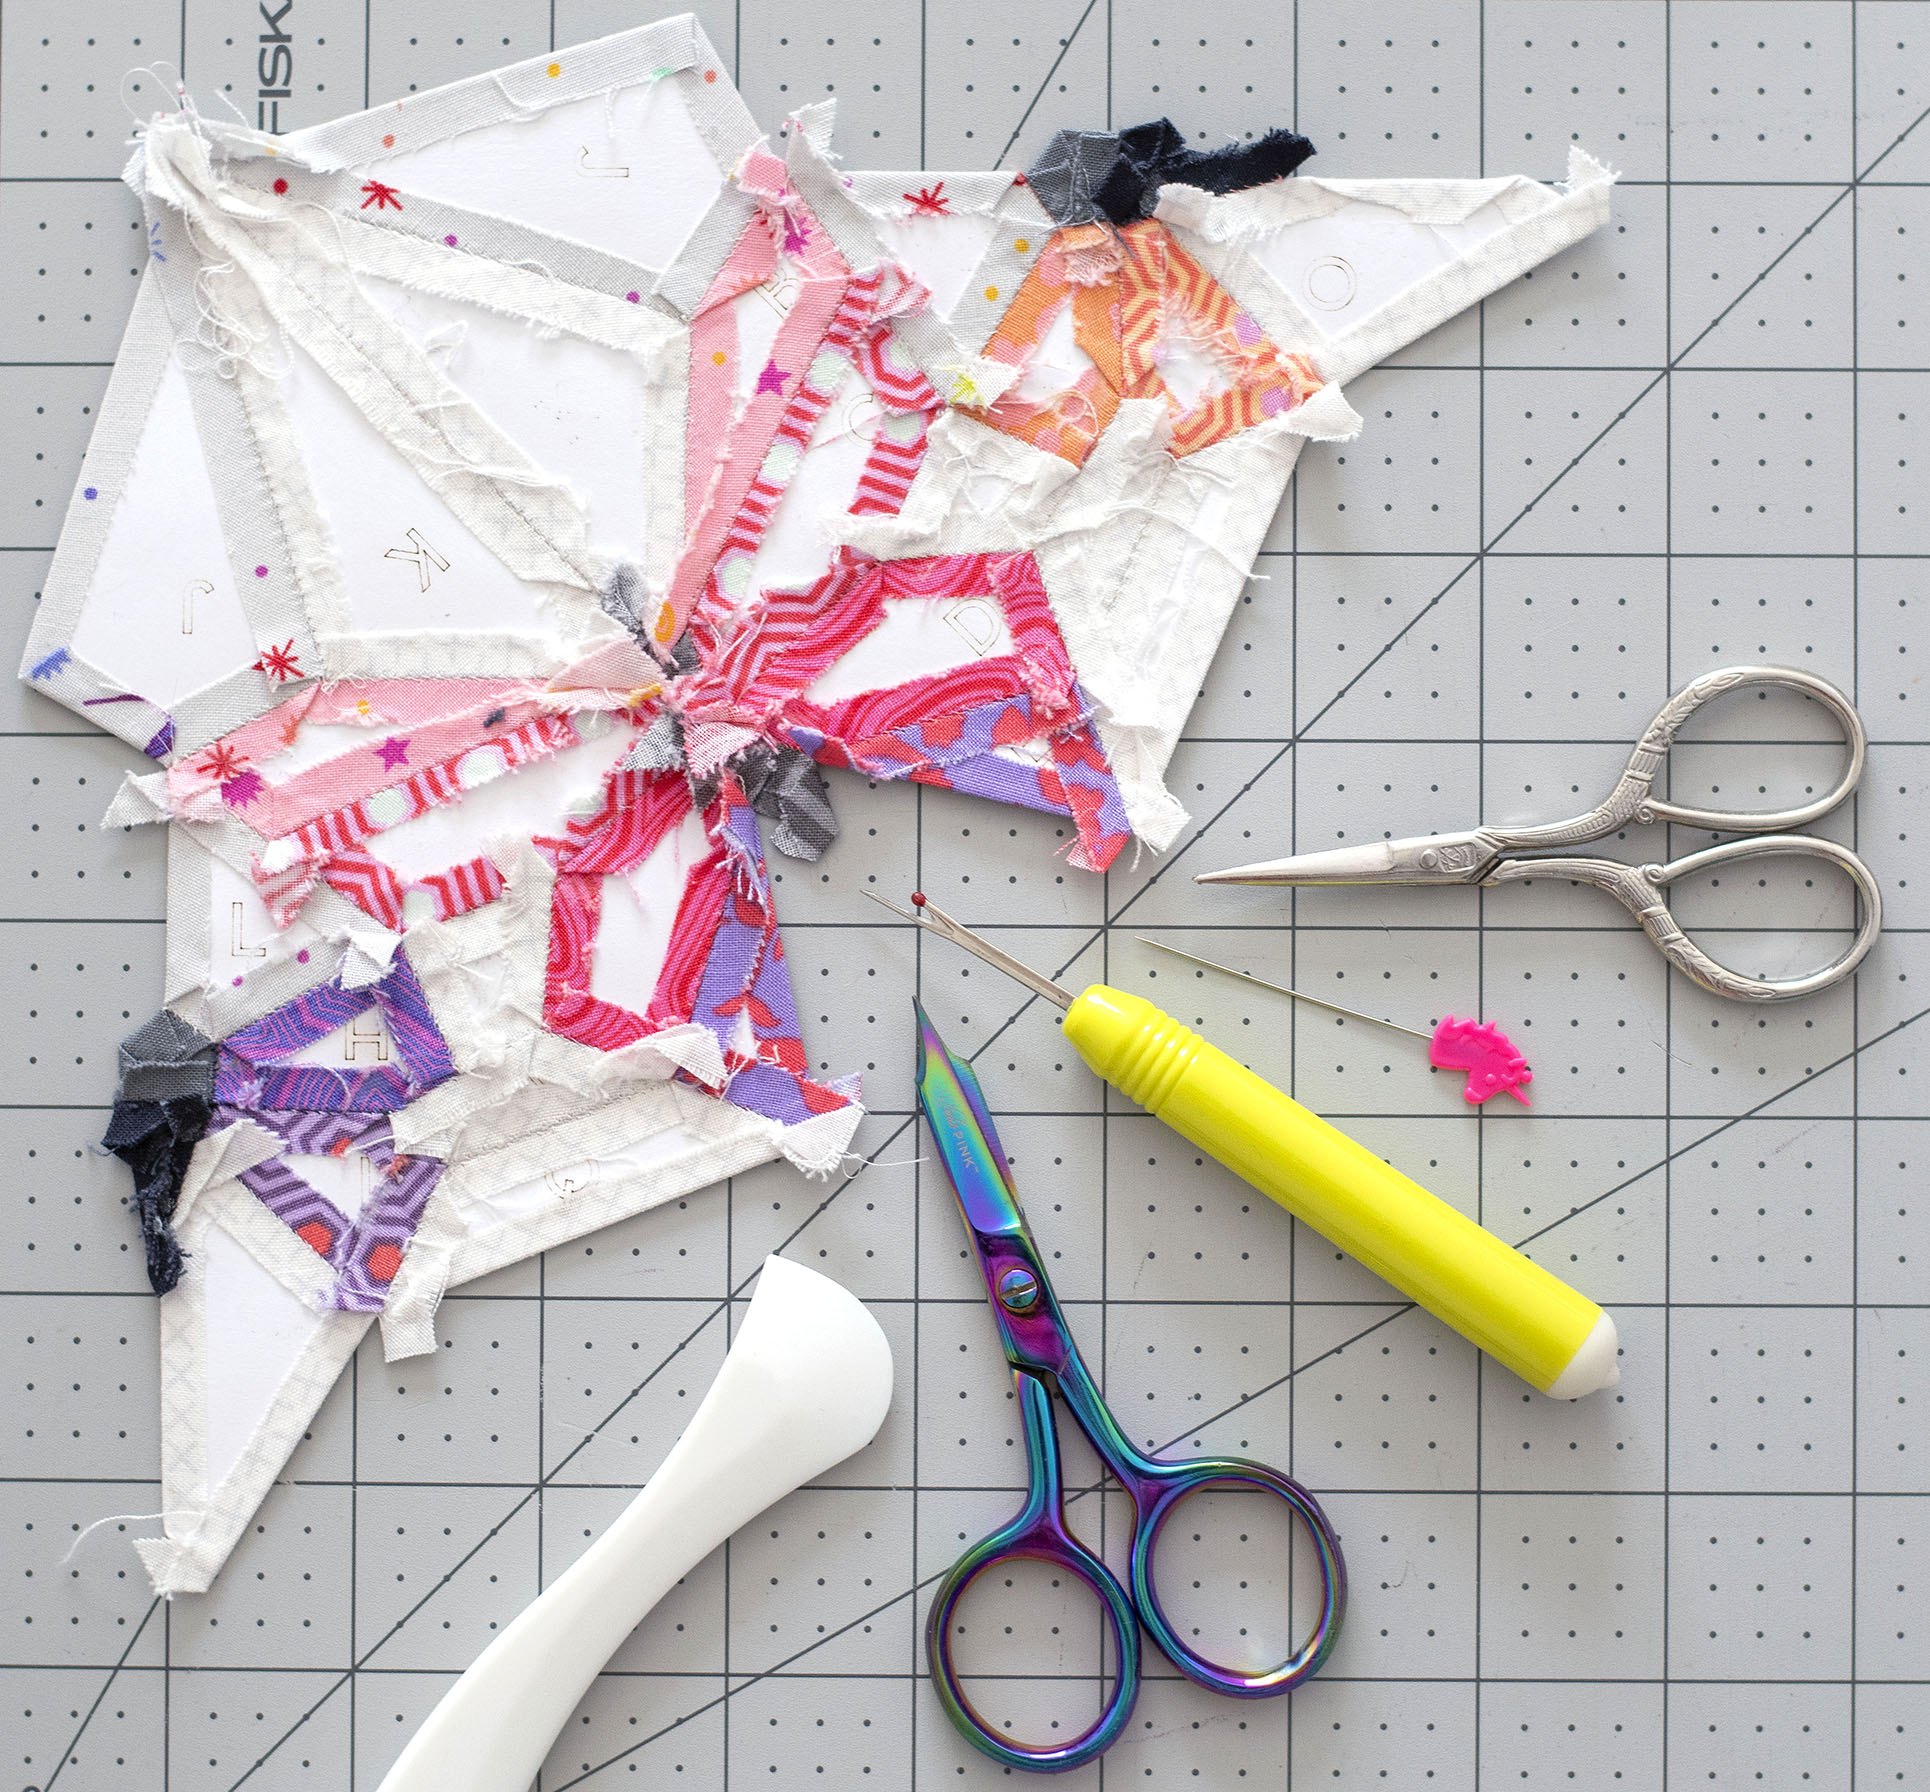
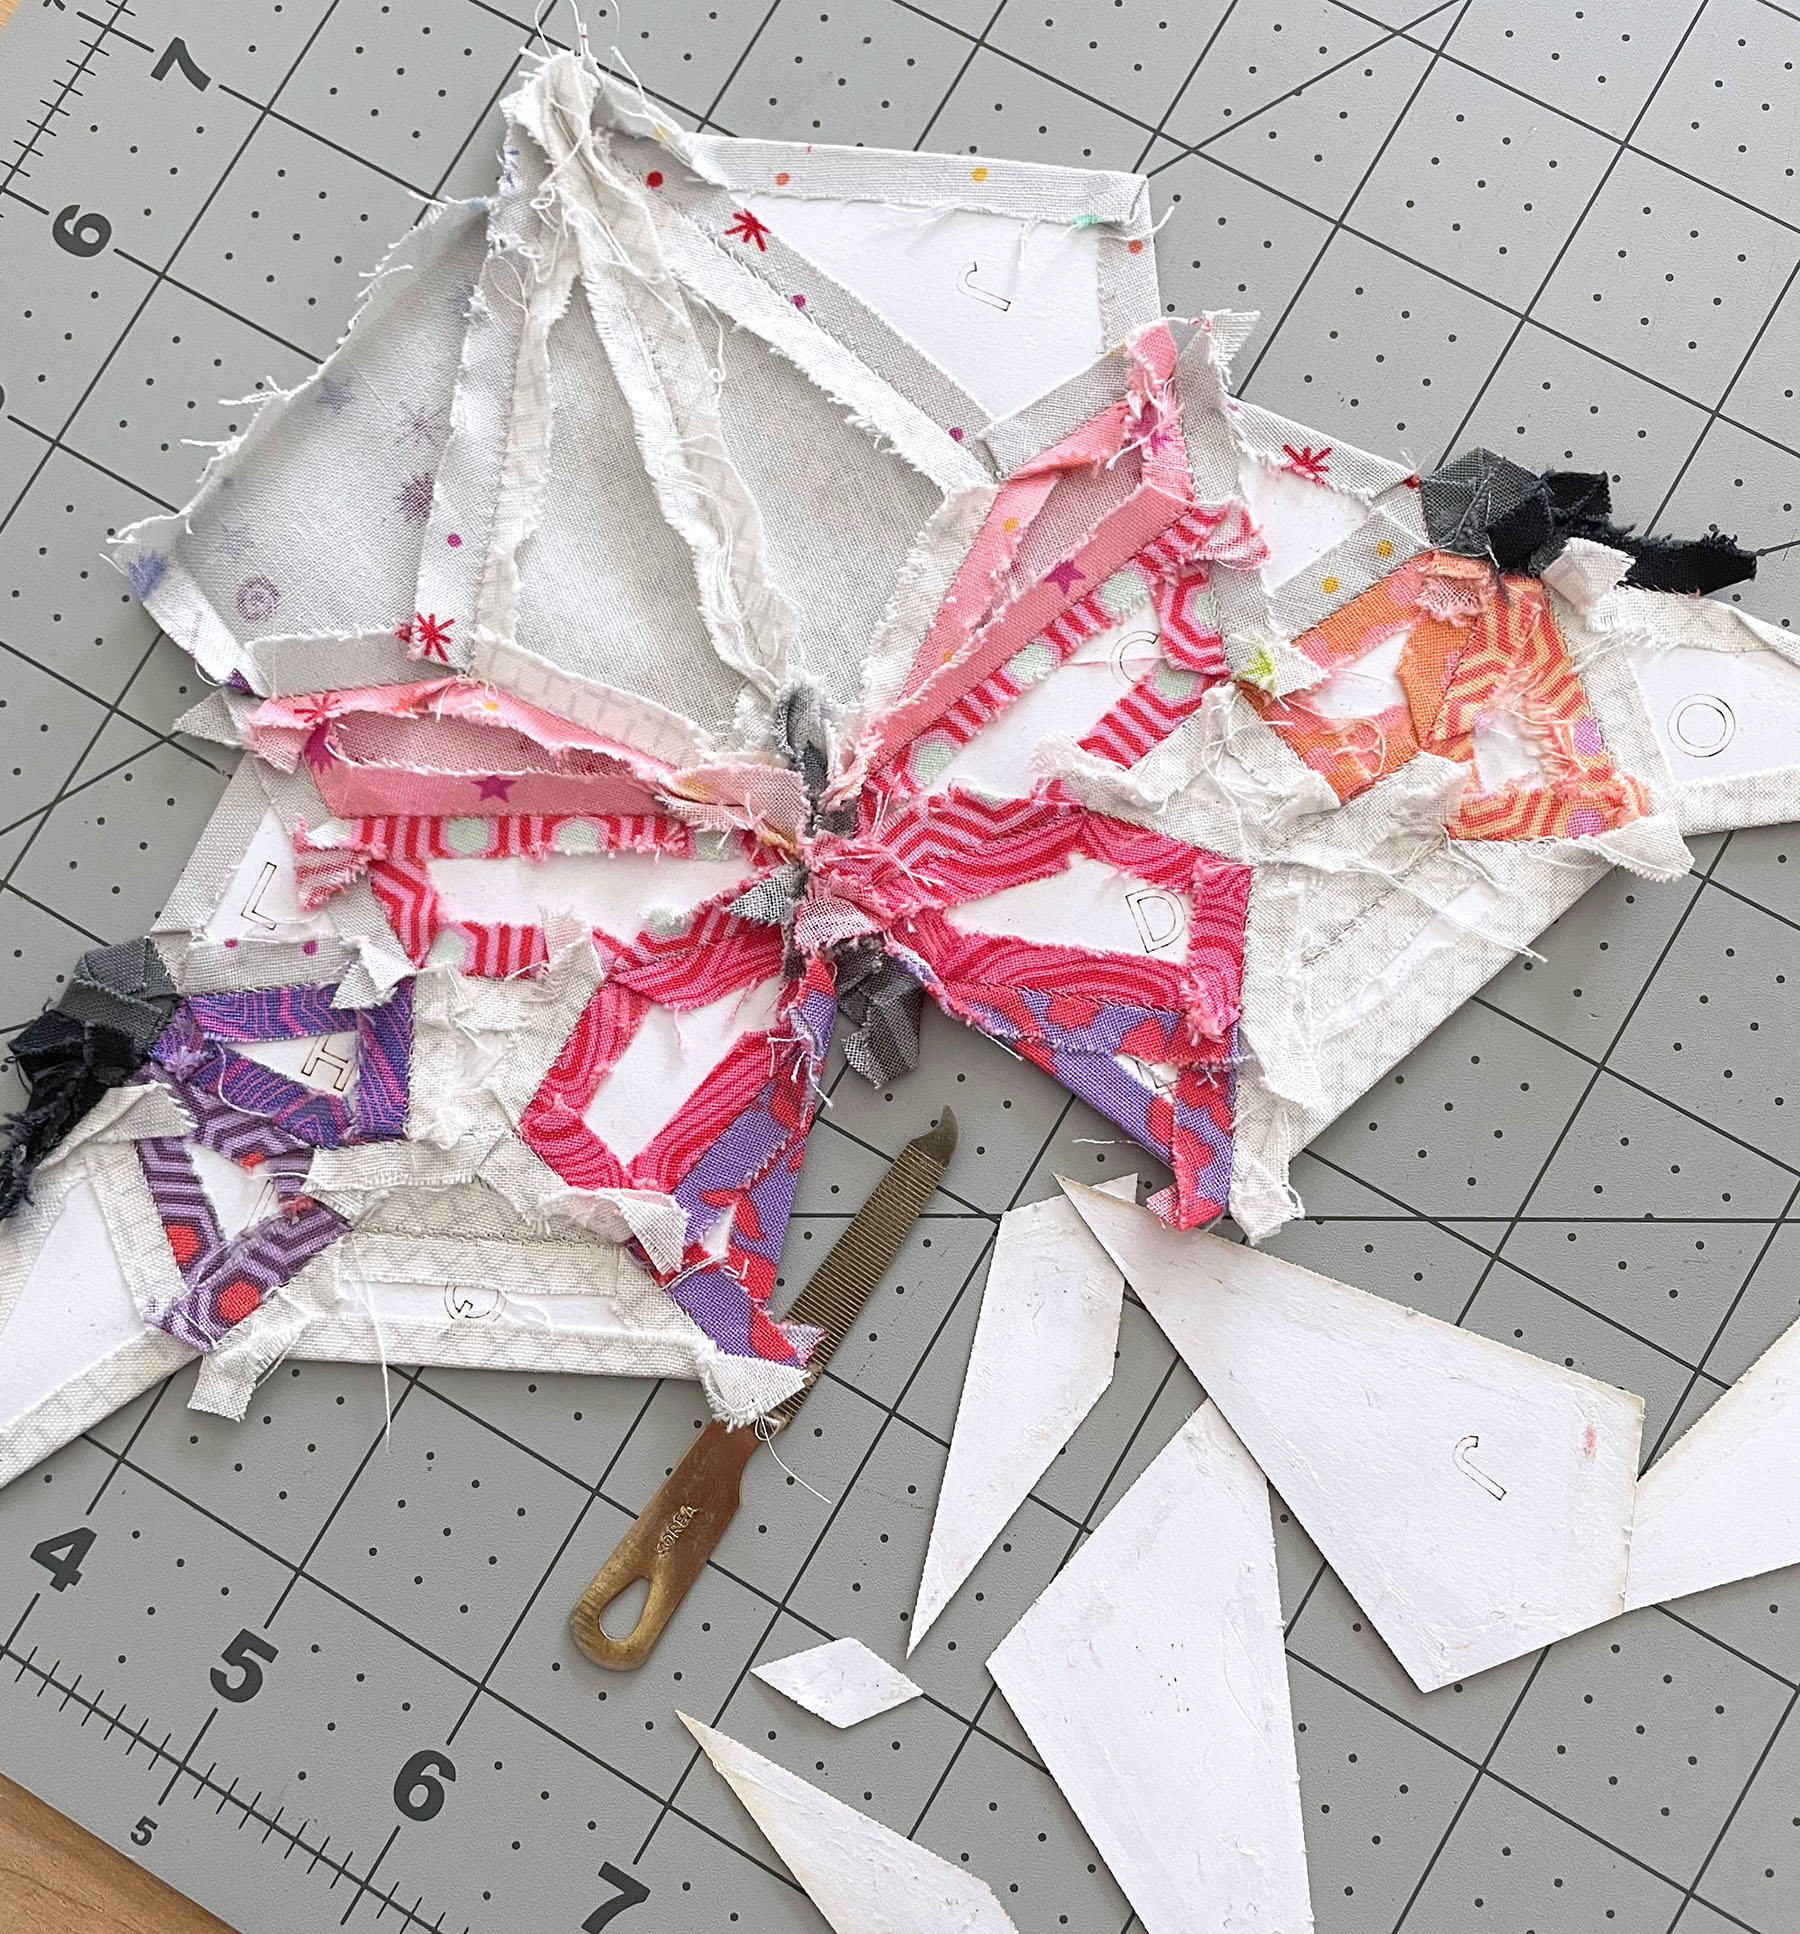
Since I’m not finished with my entire Butterfly Effect Mini, I created a corner of the block to use an example for today’s post. First I will talk about removing papers and then will discuss some options for finishing.
Above you can see a few tools that you can use to help remove your papers. Some of my favorites aren’t pictured, but are used in the video below. You want to try a variety of tools that have thin, pointy edges and tips, but aren’t super sharp as to easily tear your fabric or papers.
I discuss this a bit more in the video below as I show my process for removing glue basted papers:
Below you can see a few photos showing how your piece will look from the back and the front after you remove the papers. This piece is sewn using the flat back stitched as detailed in my previous posts.
As mentioned in the video, if you are gentle about removing your papers, you can use them again or pass them along to a friend to use!

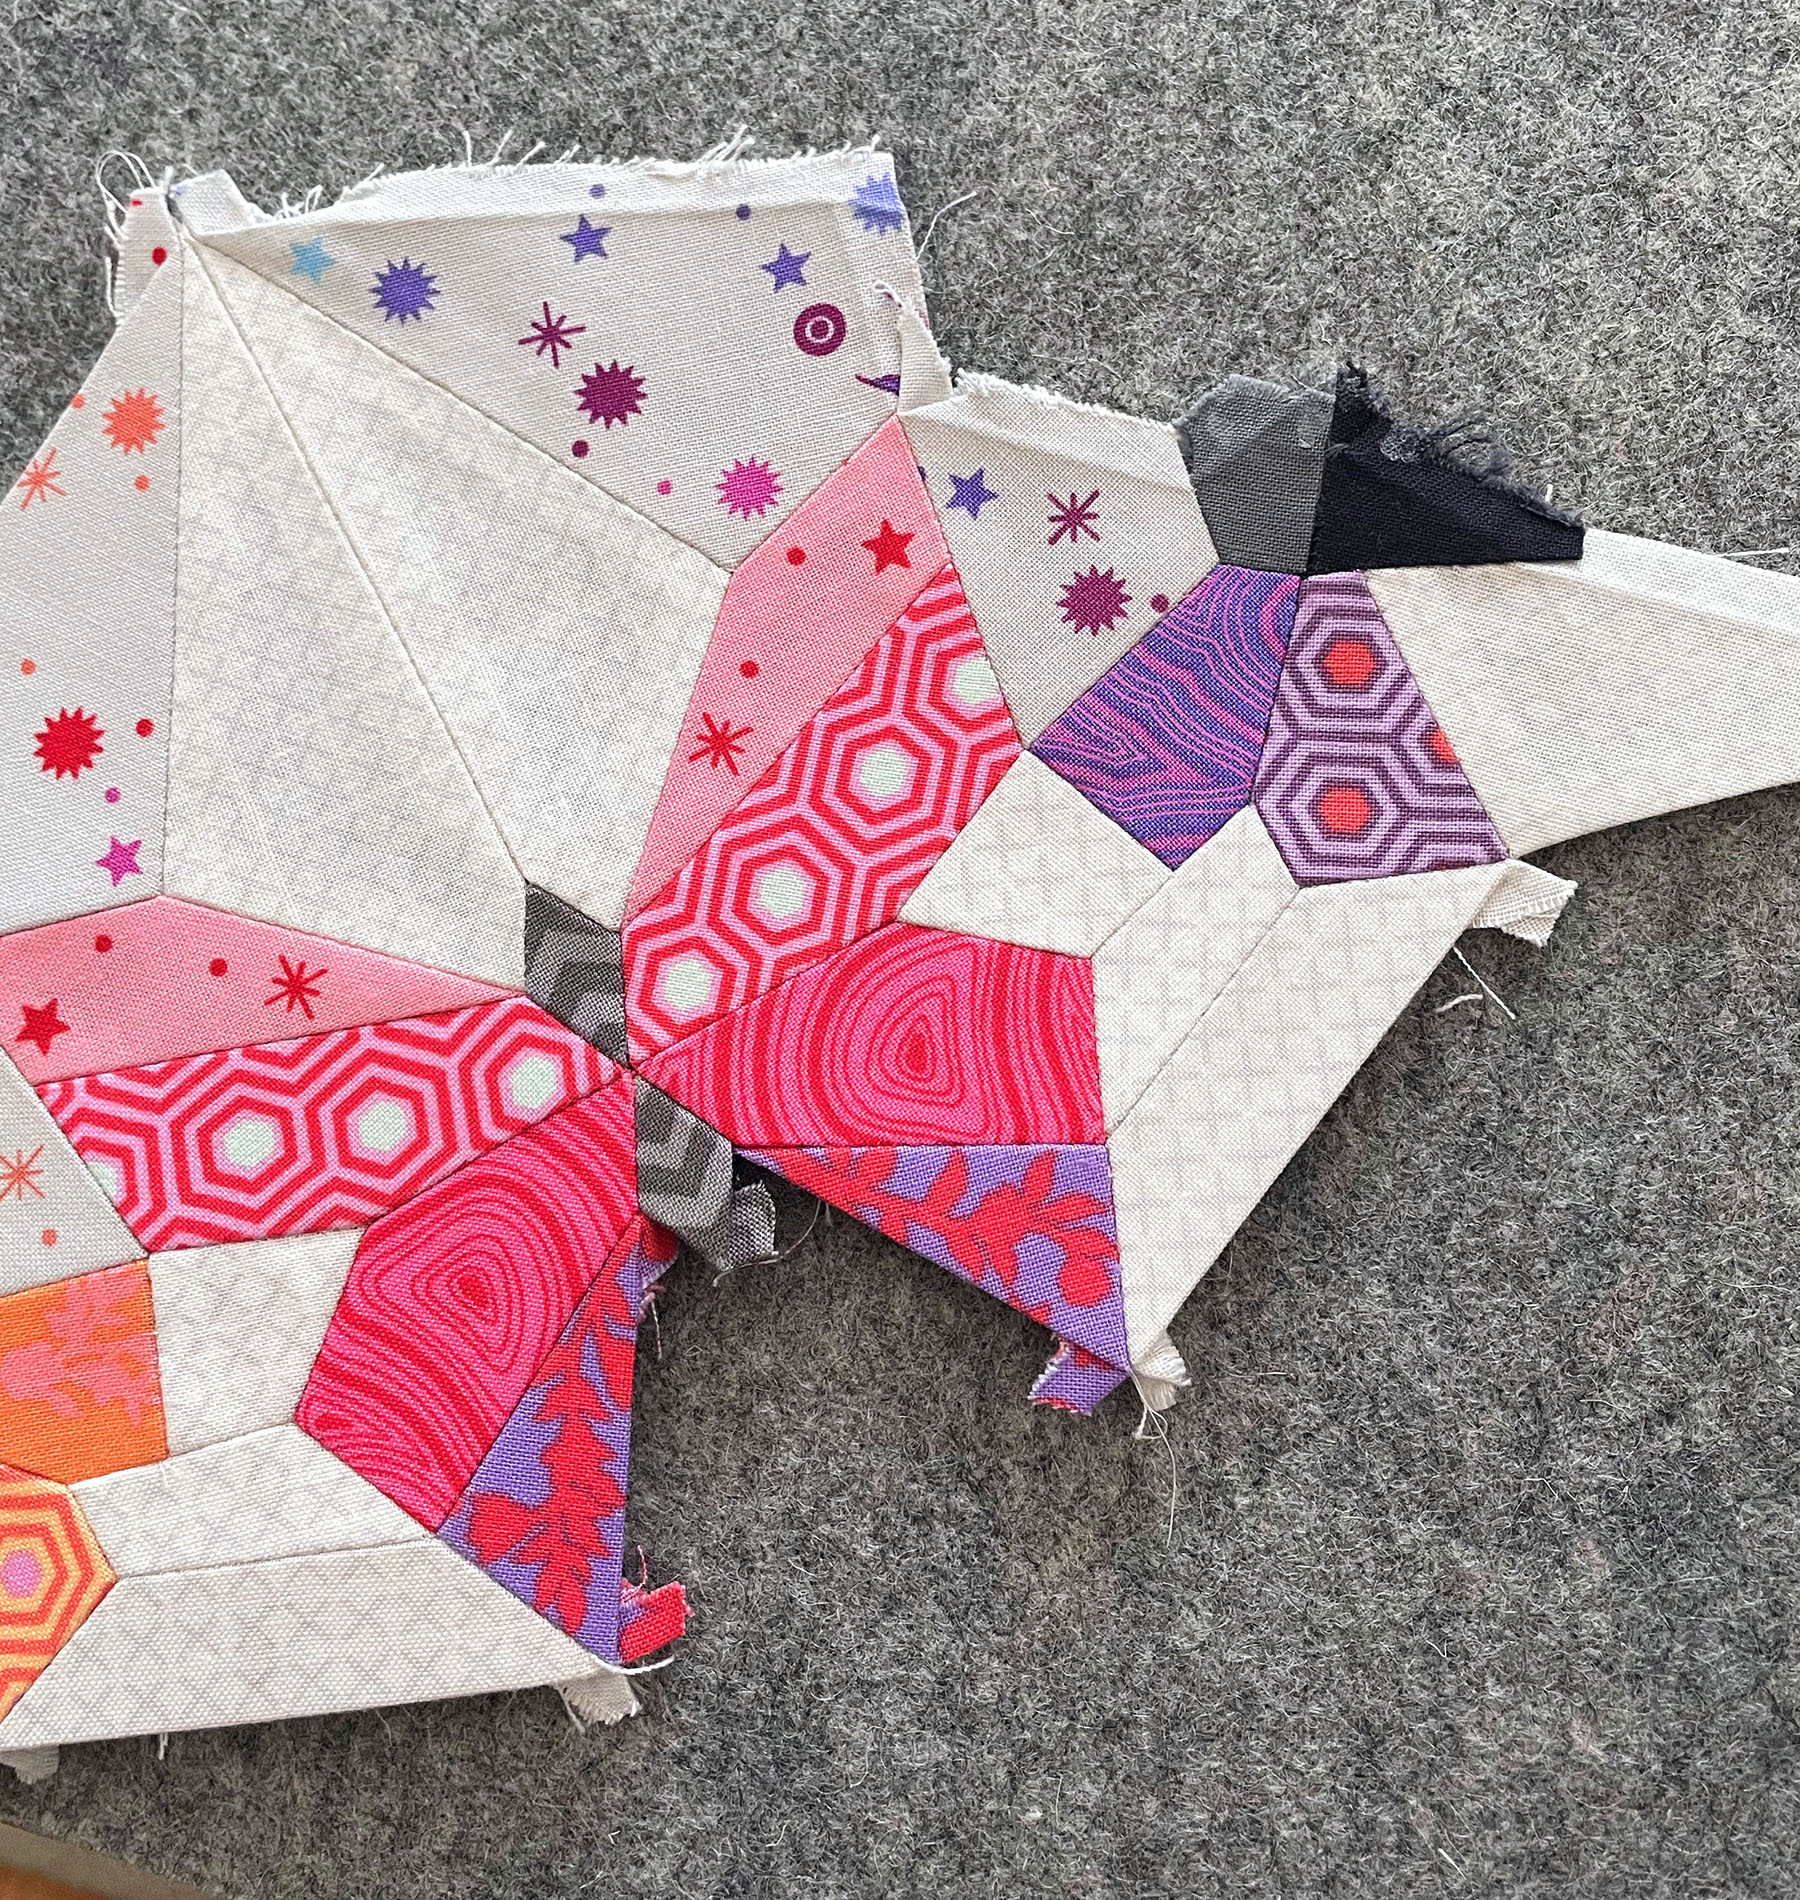
Once the papers are removed, the next step will be to press down your inner seams and flatten out the outer edges that create your seam allowance for finishing the piece.
As you remove your papers, your basted seams will get a little “messy”. Some will fall back down naturally into place and others will remain a bit chaotic. Lay your piece flat with the back facing up and go through “reorganizing” your seams. Arrange any overlaps and twisted star centers in their proper order, finger press any folds that are sticking up and get everything ready for a nice press with your iron, then go ahead and lightly press your piece from the front and back to flatten out the seams, adjusting anything you may have missed as you go.
For all the outer edges, you will need to flatten and press those seams out to create your seam allowance. For those who are new to quilting, the seam allowance I speak of is just like the seam allowance we created on each of our little pieces by folding the fabric over and basting it to the paper. It’s (typically) a 1/4″ of fabric that extends beyond the finished size/shape of your piece that you use for finishing – whether that is attaching other blocks, sewing on a border, or attaching a backing to create a pillow.
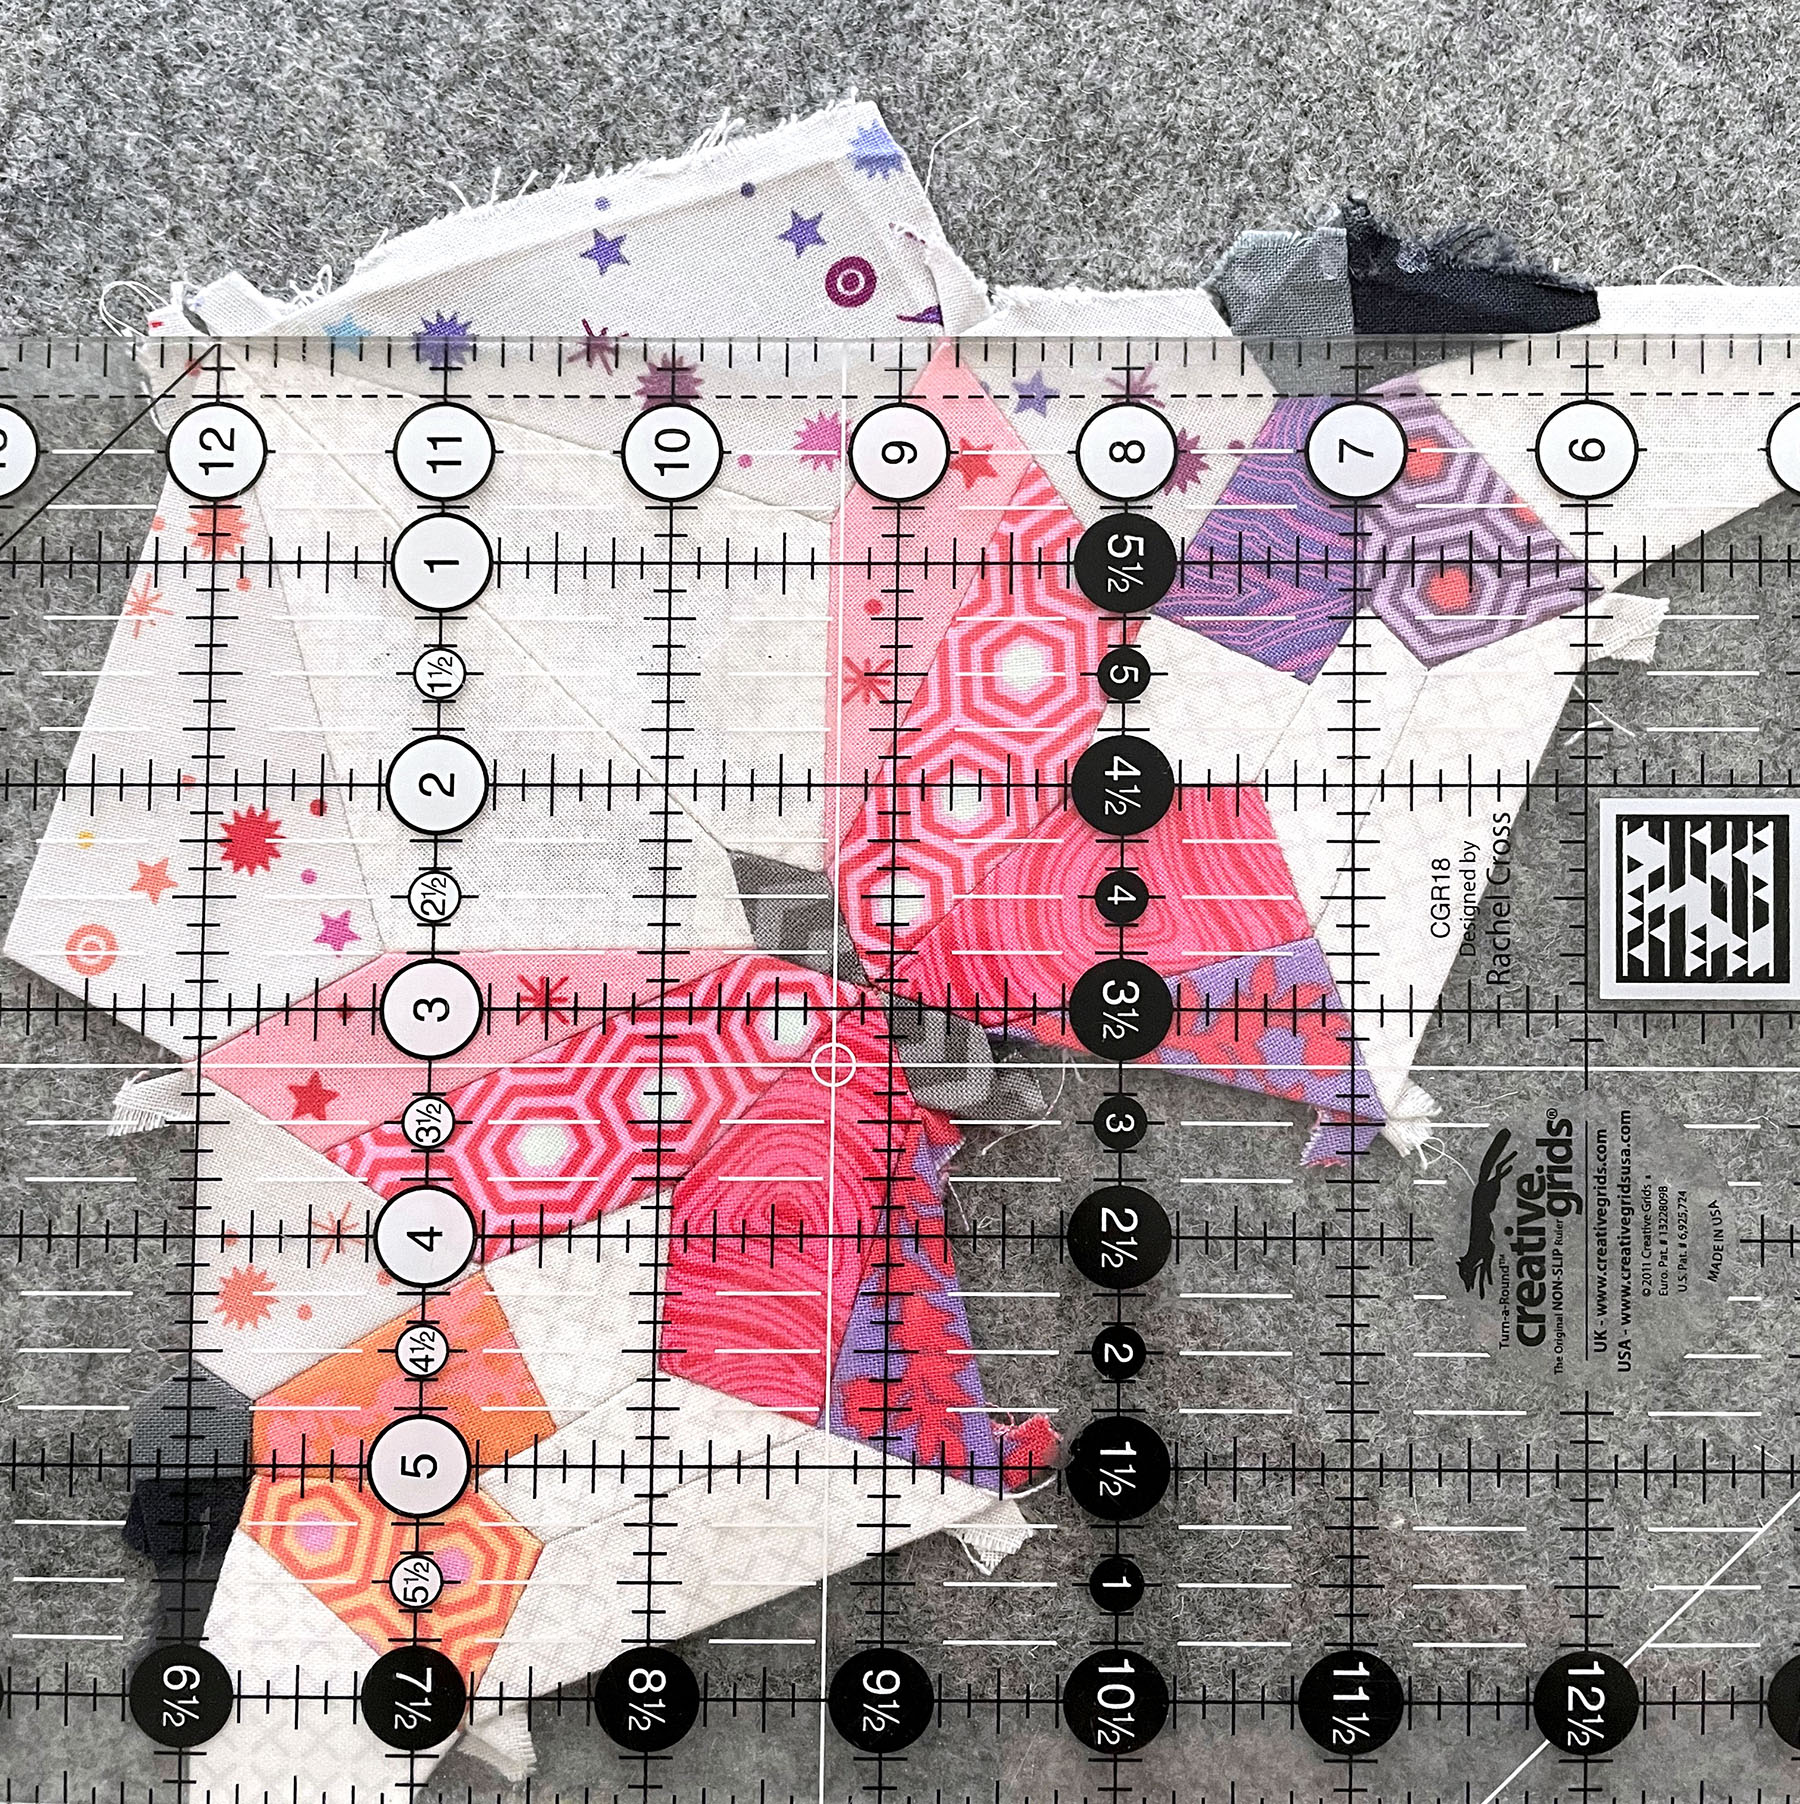
You need at least 1/4″ all the way around your piece for this purpose. With this pattern, you will have some uneven edges due to the shape of the pieces and this was discussed in the pattern. If you look along the top edge of the piece above, you can see I already pressed out my seams and have fabric extending beyond the edge of the ruler for my seam allowance. You can see the pieces that are “exact” and the pieces that are larger, like the moth bodies and corner star piece. If you look down the left edge of the piece above on the 12″ line, you will see I have not yet pressed these seams open and flat so I don’t have that 1/4″ seam allowance.
The below video briefly discusses all of this and a bit more about pressing these outer edge seams:
Below you can see side by side images of the back before and after pressing my seams, followed by a shot from the front of the pressed seams.

Now that your papers are removed and all your seams are pressed, you are ready to finish your piece as desired.
There are a variety of ways to use your Butterfly Effect Mini Block – you can quilt and bind it to use as a wall hanging or table topper, you can use it as a block in a larger quilt, as a bag panel, or as a pillow – just to name a few! You can add borders or additional blocks to make your piece larger, or you can finish it as is.
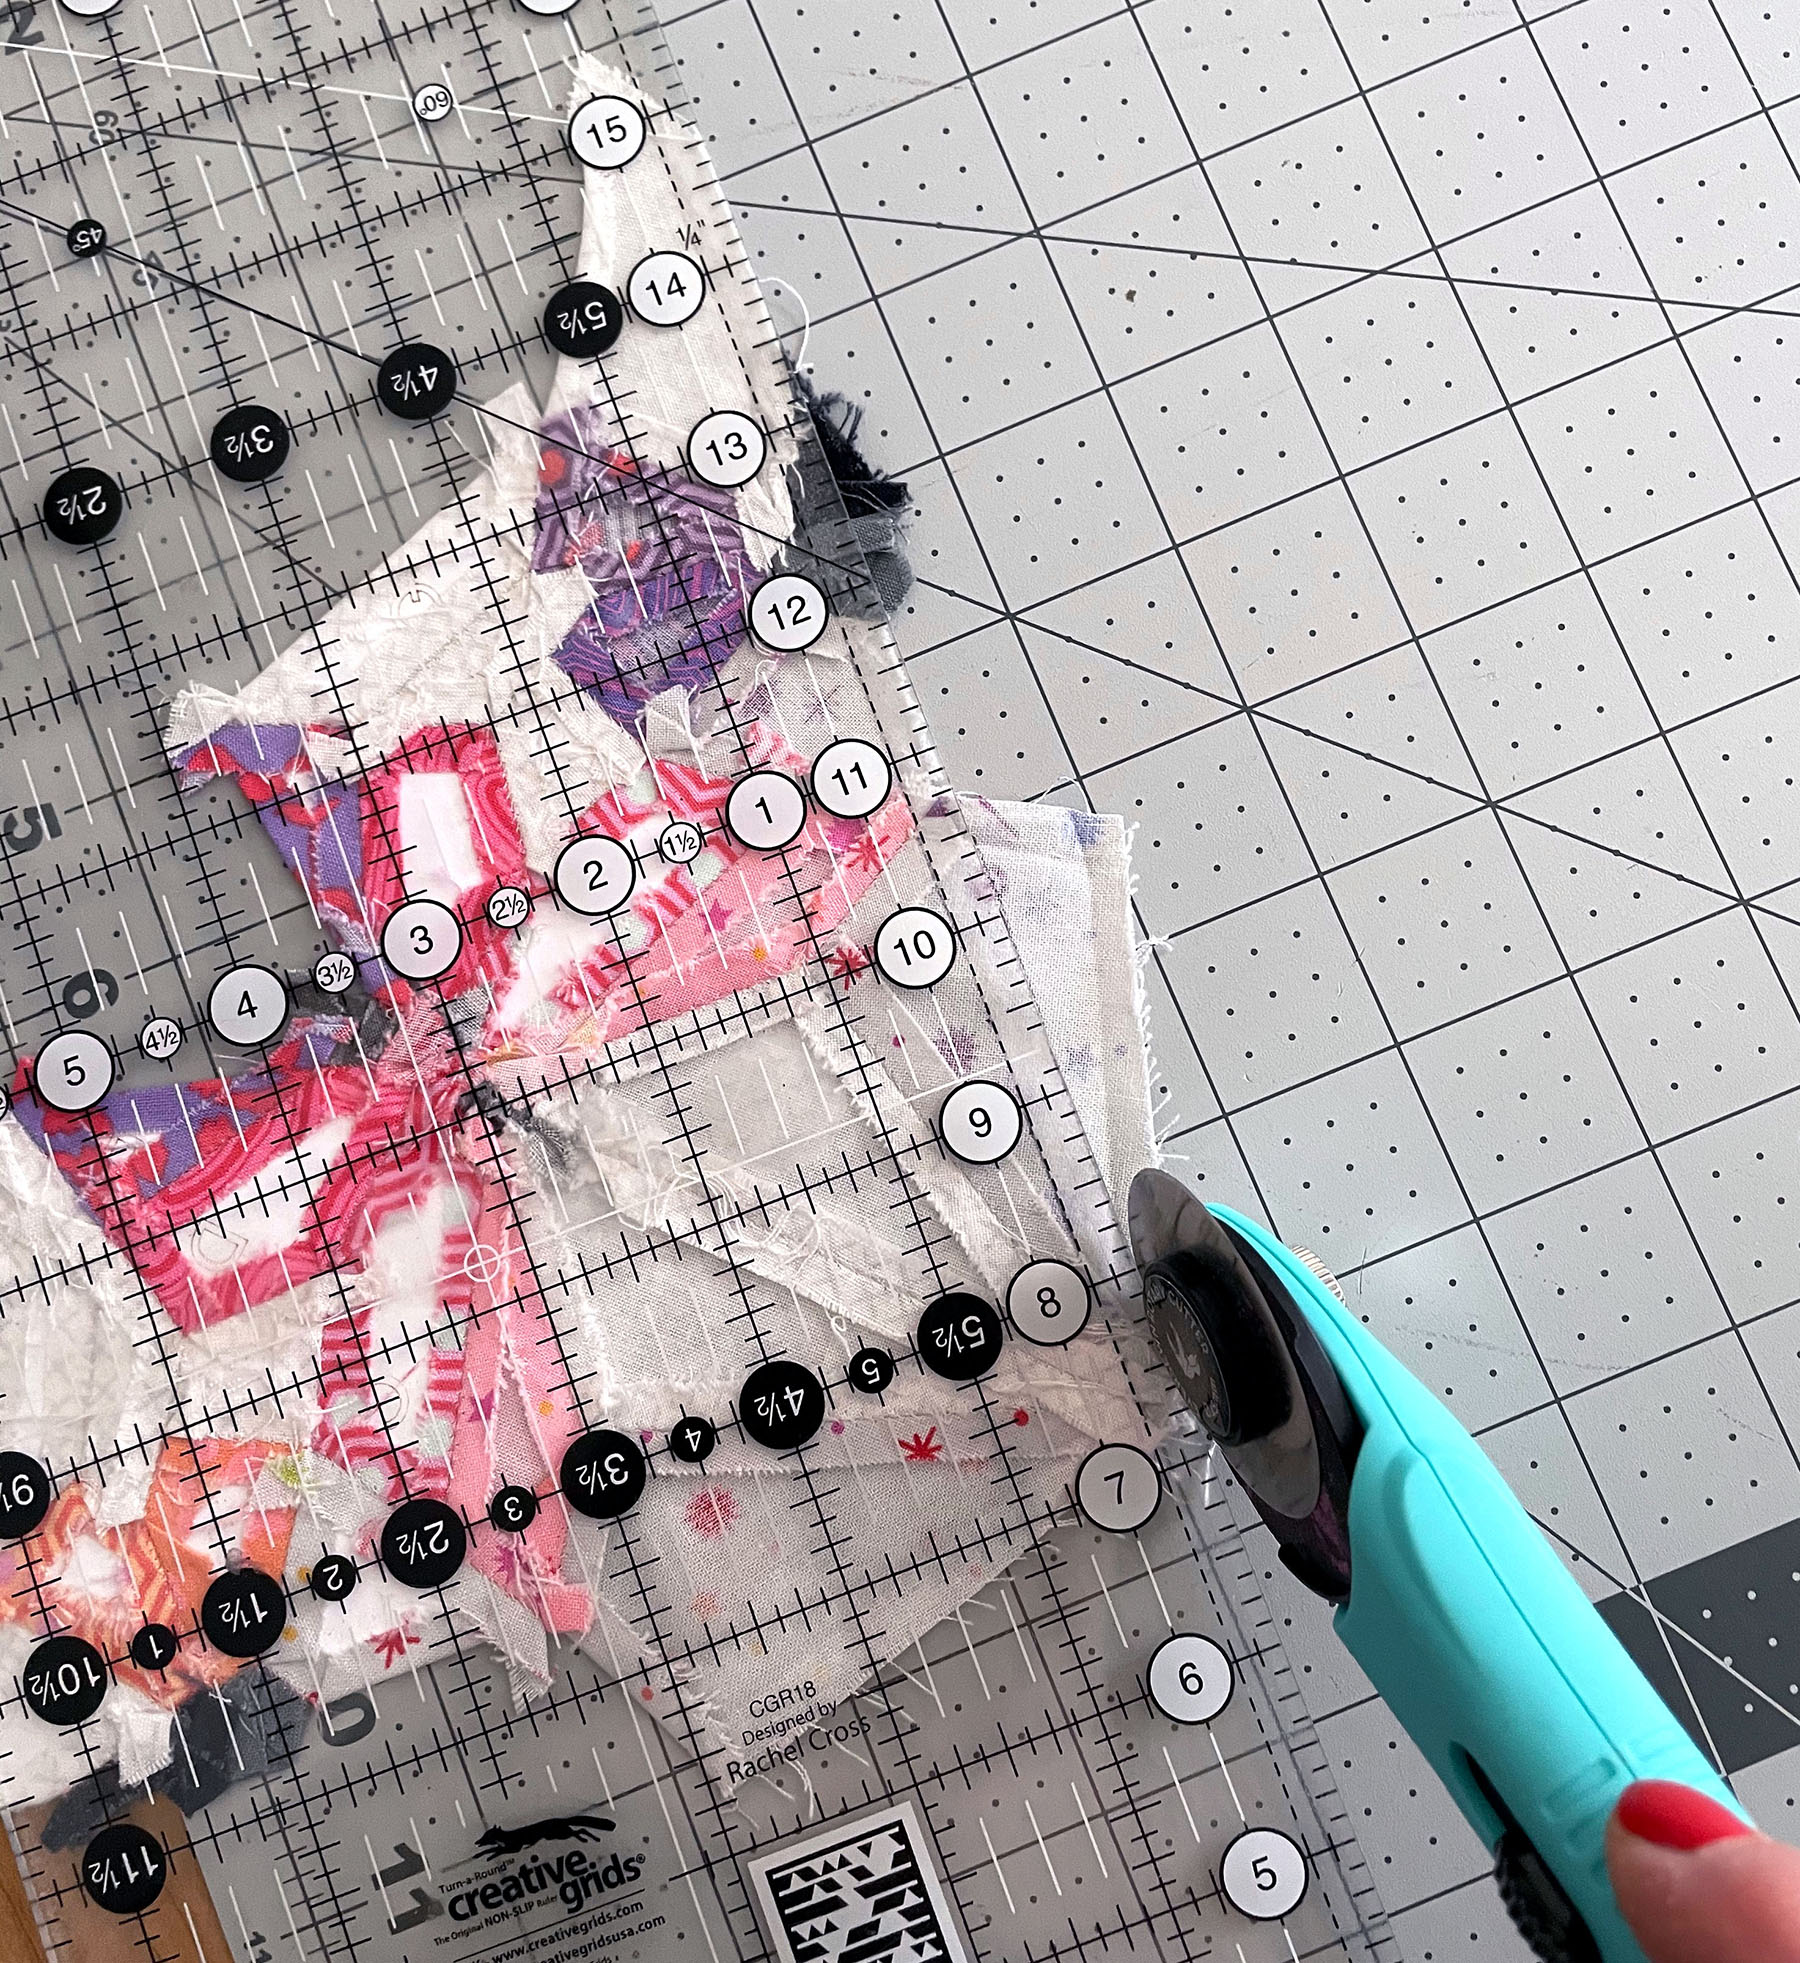
If you’d like a clean even 1/4″ seam allowance all the way around, use a quilter’s ruler and rotary cutter to trim your piece.
If adding a border or additional blocks, align the raw edges with right sides together, and sew with a 1/4″ seam allowance then press open.
If finishing your piece to size, you can pin or spray baste it to a piece of batting, make your quilt sandwich with a backing and then hand or machine quilt it.
If you’re not planning to quilt your piece and are planning to use it as a pillow or bag panel, one thing I often like to do is to fuse my piece to SF101 Shape-Flex (or similar) interfacing. This gives the piece some extra stability and sturdiness and also an added layer or opaqueness.

Place the back of your piece against the fusible side of the interfacing and press from the top of your piece with high heat and steam, being careful to not press any exposed edges of the interfacing around the outer edge of your piece (it will melt onto your iron!).
You can then trim it down and use your block as desired.
So there are just some quick tips for how to complete and finish your piece and I hope you’ve found them helpful! As I mentioned above, please continue to share your progress photos, and finished pieces, with the pattern and sew along hashtags and keep an eye out as I share more while finishing my piece.
For those interested in the full size Butterfly Effect quilt, I’m currently working out all the release details and dates and will share soon!
Thank you so much for joining in the sew along! All of the information shared will remain accessible through the email links and you can access it at any time. You can also direct people to sign up for the sew along through my website and even though it’s over, they will still then be able to access all the sew along information and videos.
Happy Stitching!
~ Nicole
