My husband recently saw this recipe while browsing my Martha Stewart Living magazine (you can laugh at the visual, I do) and was for some reason obsessed! I could never claim to be mightier than Martha, but I have to admit that I’ve never been a huge fan of her recipes as they are written. I typically find they are missing something or need more flavor, more liquid, a touch of this or that, so I honestly would have passed right over this one if he wasn’t so darn persistent.
It seems to have become quite the rage ’round the interwebs these days and while I read many variations on this recipe, I (more or less) stuck with the original and loved it!
It’s simple (one pan, ten minutes people!) and surprisingly fresh and flavorful. I thought it would be dry, and even looks a little dry in photos, but was pleasantly surprised with the amount of sauciness. The taste was different than I expected (sweeter and spicier), but super delicious and easy to modify to your personal tastes, not to mention a beautiful way to put your garden harvest to use! (And an excitement Mr. Wizard type experience for your children, or husband, in my case…)
Here is a link to the original recipe on the Martha Stewart website and below is how I made it, what I learned and how I’ll change it next time:
Ingredients
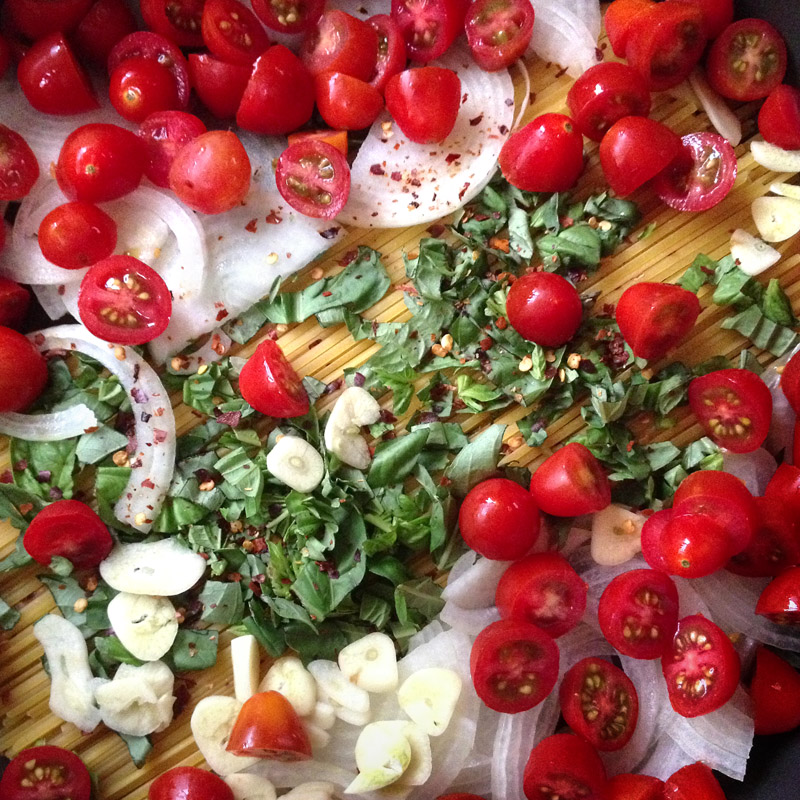
12 ounces linguine
12 ounces grape or cherry tomatoes (halved or quartered)
1 yellow onion, thinly sliced
4 large garlic cloves, thinly sliced
1/2 teaspoon red pepper flakes
2 sprigs basil, chopped
2 tablespoons extra virgin olive oil
4 cups (32 ounces) vegetable broth
1/2 cup water
Fresh grated parmesan cheese
Combine all ingredients except the cheese in a large straight-sided skillet or wide dutch oven. You’ll need a pan that’s big enough for the pasta to lay flat and some room for the liquid to bubble.
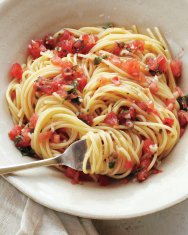
Bring to a boil over high heat and continue boiling, stirring occasionally to prevent the noodles from sticking, for about 9 – 10 minutes until the pasta is al dente and most of the liquid has evaporated. And that’s it! You’re done! Spoon it into a bowl, top it with loads of grated parm and scarf it up.
I made mini beef meatballs that we mixed in before serving, and husband requested ‘those little balls of fresh mozzarella’, which I thought was a great idea!
Modifications
The original recipe calls for water and about 2 teaspoons salt (or more to taste). I used vegetable broth for some added flavor and a little water to make up the difference. Four and half cups of liquid worked perfect for me, which is what the original recipe called for. I thought being at a high altitude that I would need to boil it longer for the noodles to be done and may need more liquid, but I did not.
I was worried there would be too much onion (and I always cook with onion) or that the thin slices would be too big (as opposed to diced) but they cooked down nicely and I didn’t even notice them.
The 1/2 teaspoon red pepper added quite a kick, so lessen it if you’re not a fan of spice (we are!). If you look at the other photos of this dish, you will see the basil sprigs are whole. Not really sure how that works unless they took them out at the end? I chopped mine up so it could incorporate. You can also save some fresh to add when serving if you like it (yum!).
Next time I cook this dish, I will make a few changes…
I love mushrooms, so will add about 6 – 8 ounces fresh sliced along with the other ingredients at the beginning.
It made a ton! Dinner twice (for two) and then some. I think I will use 8 ounces of pasta instead, but keep the other ingredients the same. Most boxes of pasta are 16 ounces, so I measured out 12 for the original recipe, but will use half a box and save the other half for the next time. We typically eat whole wheat pasta which takes longer to cook, so I used regular linguine the first time around and it cooked well. Next time I will try using whole wheat angel hair. The whole wheat will take longer but the pasta is much thinner, so I think the cooking time to liquid ratio will balance out.
I will also wait to add the basil until about halfway through the cooking. I want it to cook with the dish a bit, but I think it looses too much flavor when cooked for the entire time.
Some other variations I read about on other blogs included using canned tomatoes and dried herbs instead of fresh, using chicken broth for the liquid, sweet or red onion instead of yellow and adding additional ingredients such as bell peppers, parsley and lemon slices.
I recommend trying this one close to the original and seeing how you like the flavors and amount of sauce, how the liquid and cooking time works out with your stove, etc and then start making modifications to suit your preferences.
If this is something you’ve been making for years or have already modified, I want to hear about it! And if its new to you, try it and let me know what you think!


