In the Kitchen: Chicken Paprikash & Spaetzel

Everyone has their preferred method of making Paprikash and this one is my favorite. It’s all about the paprika and uses no tomato products. It’s rich and hearty, but pretty easy to make with very minimal ingredients. You can also adjust the recipe to cook up as much or as little as you want making it perfect for a holiday or get together or just for a weeknight meal. You’ll find a link to printable recipe card at the end of this post.

Ingredients:

2 chicken breasts (with skin and bones)
1 small onion, diced
2 cloves garlic, minced
5 chicken bullion cubes
paprika (about 7 Tbsp)
flour (about 8 – 10 Tbsp)
8 oz sour cream
salt and pepper
Spaetzel (per batch):
1 cup flour
1 egg
1/3 cup water

Saute the diced onion and garlic in a deep skillet or electric fry pan with one tablespoon margarine and one tablespoon paprika.
Remove the skin from the chicken breasts and brown on each side.

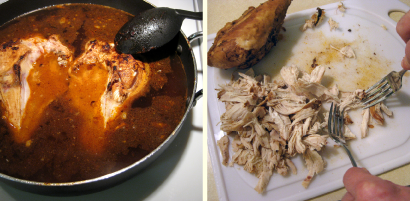
Fill the pan with enough water to almost cover the chicken and add the bullion cubes. Simmer, covered, for about an hour. Flip the chicken as needed.
Remove the chicken (keep the liquid in the pan) and let cool. Debone and shred or chop.

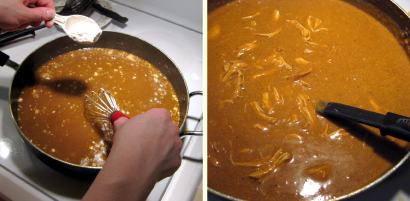
To make the sauce, add flour slowly, continuously whisking over medium heat, until it begins to thicken. I end up using about 8 – 10 tablespoons. The flour may clump a bit at first but will break up and smooth out as you continue to whisk and the sauce heats up.
Once thickened, add the sour cream and stir until blended. Next add more paprika, salt and pepper to taste. I use about 5-6 tablespoons paprika. Add the shredded chicken back to the pan.
This is one of those recipes where nothing is too exact because quantities will depend on the size of your pan and your taste preferences, so sample often and trust your palette!

To make the spaetzel, you need one cup flour, one egg, and about 1/3 cup water per batch. I usually make 2 -3 batches at once per meal.
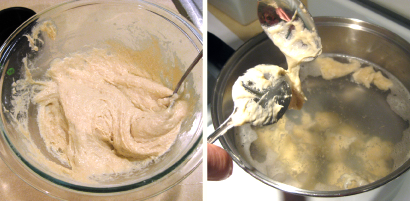
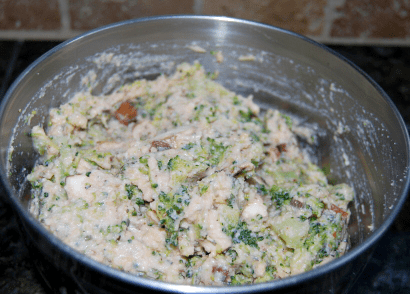
Stir ingredients until you have a semi moist doughy consistency. Using two spoons, drop small balls of the dough into boiling water.

When the spaetzel float to the top, they are done (usually about 5 min). Drain, then return to the pan and season with butter, salt and pepper to taste.
Serve and enjoy! You can also serve the paprikash over egg noodles, which is yummy as well.
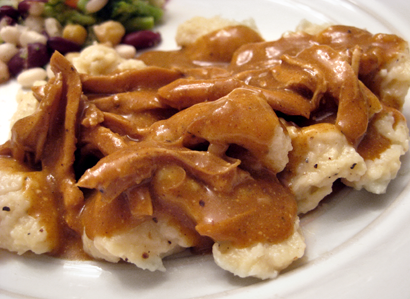
The recipe makes quite a bit, it would easily serve 6 – 8 with leftovers to spare, but it stores well in the fridge or freezer. This serves the two of us twice, with leftovers, but I make the spaetzel fresh each time we have it. You can also make a smaller batch of paprikash by using less chicken and a smaller pan, just adjust all the ingredients as necessary.


And find more easy and delicious recipes here.

In the Kitchen: Havarti Cheesecake Appetizer

I’ve been doing a lot of cooking and not as much Crafting lately, but I promise that will change soon! With Superbowl Sunday coming up, I just had to share this delicious appetizer that I’ll be taking to the party we are attending. It’s easy, it makes a ton and it’s a crowd pleaser. You will find a link to a printable recipe card at the end of this post.

Ingredients

Cheesecake:
three 8 oz packages of cream cheese, softened
1/4 cup heavy whipping cream
3 eggs
6 oz Havarti cheese, shredded
1/2 cup sun dried tomatoes (packed in oil), sliced
1 tbsp liquid from sun dried tomatoes
8 green onions, sliced
Crust:
1 1/4 cup (about 28) crushed butter crackers (Ritz)
3 tbsp butter or margarine
To make the crust, mix crumbs and butter until well blended. Press evenly into the bottom of a 10″ spring form pan. Bake about 10 min at 375° until golden brown. Set aside and reduce oven heat to 325°.
In a large bowl, beat the cream cheese until smooth. Add whipping cream, eggs and tomato liquid. Beat until creamy. Add havarti cheese, tomatoes and onion and stir until blended.
Spoon evenly over crust and bake 40-45 minutes or until center is set. Run knife around edges to loosen cheesecake. Cool completely at room temperature, cover and refrigerate for at least 2 hours.
Serve with crackers and enjoy! By the way, when I said this makes a ton, I mean it! I made this for a party Christmas and had enough left for New Years plus more leftovers! But it stores well in the fridge and we ate it for over two weeks.

And find more easy and delicious recipes here.

In the Kitchen: Biscuit-Topped Pot Pie

Did I have you at biscuit? Yeah, thought so. This non-traditional pot pie couldn’t be much easier to make but it’s just as rich, hearty and delicious. Make it with chicken, turkey or just veggies – which can be customized to your preferences. You will find a link to a printable recipe card at the end of this post.

Prep time: 20 min | Cook Time: 50 min | Serves about 6 – 8
Ingredients:

1/2 – 1 lb boneless skinless chicken or turkey, optional
1 bag frozen mixed veggies (broccoli, cauliflower, carrots)
1 cup celery, chopped
2 cans cream soup of your choice (chicken, mushroom, celery)
1 cup milk
1 tsp onion powder
2 tsp thyme
1/2 tsp pepper
1 package grands biscuits (not flaky layers)
Preheat oven to 350°. Place the frozen veggies in a 13×9 baking dish. I use broccoli, carrots and cauliflower, but you can customize your choices to suit your likes.
In a skillet, melt 1 tbsp butter and cook the celery, add to baking dish. Next cube the chicken or turkey (if using) and cook in skillet until done. Add to the baking dish.

In a medium bowl mix 2 cans cream soup (I use one chicken and one celery), milk and spices. Stir until blended.

Pour sauce over meat and veggie mixture and bake at 350° for about 30 minutes.
Remove from oven and place uncooked biscuits on top. I cut mine in half to better cover the surface. Return to the oven and bake for an additional 20 – 30 minutes or until biscuits are cooked through.

Served with a bowl of fruit or just alone, this dish is sure to bring the entire family back for more!

And find more easy and delicious recipes here.

In the Kitchen: Southwest White Chili

This delicious dish is not your typical chili, but it will warm you right through on these cold winter days just the same. As with most of my favorites, this meal is quick and easy to make and the leftovers are even better the second time around. It can be made meatless or with chicken and spiced up any way you like it. You will find a link to a printable recipe card at the end of this post.

Prep time: 15 min | Cook Time: 20 min | Serves about 4
Ingredients:

1 lb boneless skinless chicken, optional
2 medium potatoes
1/4 cup chopped onion, optional
1 can chicken broth
1 small can (4-6 oz) chopped green chilies
1 can great northern beans
1 can cannellini beans (white kidney beans)
2 tsp garlic powder
2 tsp ground cumin
1 tsp oregano leaves
1 tsp cilantro
1/4 tsp group red pepper
I don’t have step-by-step photos today because this is so easy to make!
In a large pot add the chicken broth, chiles (undrained), both cans of beans (undrained) and all the seasonings. Stir until blended and simmer over medium heat.
While that is heating, chop the potatoes into bite size cubes and cook via your preferred method. I cook mine on a plate in the microwave for about 6 minutes or so to soften them up, then I fry them in a pan with a bit of oil just to crisp up the edges and make sure they are cooked through. You can also bake the cubes on a baking sheet in the oven, but this would take longer and should be done ahead of time.
Once the potatoes are cooked, add them to the pot and continue cooking. Next cube the chicken and heat in the skillet along with the onion until cooked through. Both of these ingredients are optional, the chili is delicious with or without. If not using onion, I suggest a few shakes of onion powder for some added flavor.
Add the chicken and onion mixture to the chili and it’s ready to serve!

You can add additional ground red pepper or some crushed red pepper flakes if you like it extra spicy and you can also half this recipe with no problem. Leftovers store well in the fridge or freezer.
I serve this up with cheddar garlic biscuits which you can make from scratch or Bisquick makes a delicious bag mix, all you need to do is add water. Enjoy!

And find more easy and delicious recipes here.

In the Kitchen: Chocolate French Silk Pie

This delicious pie is a holiday staple in my family. Either my Mom or I make it every Thanksgiving, every Christmas, and if Tyler is lucky, he gets it on his birthday. I won’t lie and say it’s super easy to make, but it’s not technically difficult. There are just a lot of steps and it takes some time, but the results are well worth the work. I make my own crust and my own whip cream, but you can easily use store bought. You will find a printable recipe card at the end of this post.

Prep time: 40 min | Chill Time: 5 hours | Serves 8 – 10
Ingredients:

1 baked pastry shell
1 cup whipping cream
1 cup semi-sweet chocolate pieces (6 oz)
1/3 cup butter
1/3 cup sugar
2 eggs yolks, beaten
3 tablespoons whipping cream
1 cup whipped cream

Beat two egg yolks in a medium bowl and set aside.
In a medium heavy saucepan combine 1 cup whipping cream, the chocolate pieces, butter and sugar.

Cook over low heat, stirring constantly, until the chocolate is melted (about 10 minutes). Remove from heat.

Gradually stir half the chocolate mixture into the egg yolks. Add the egg mixture back to the remaining chocolate in the pan and continue cooking over medium-low heat, stirring constantly, until the mixture starts to thicken (about 5 minutes or so).

Remove from heat. Stir in 3 tablespoons of whipping cream.

Place the saucepan in a bowl of ice water, stirring the mixture occasionally, until it begins to stiffen (about 20 – 30 minutes).
In the meantime, prepare your pastry shell. You can use homemade or store bought but it needs to be baked before you fill it.

When the chocolate is done chilling, transfer to a medium bowl and beat with an electric mixer on medium-high speed for 2-3 minutes or until light and fluffy.

Spread the filling in your pastry shell, cover and chill for 5 – 24 hours.

Before serving, top with whipped cream and chocolate shavings. I make homemade whip cream but you can use store bought, Cool Whip works good. I also use a deep dish pie pan when making this so I can get a good thick layer of whip cream.
Since Thanksgiving was a bit ravenous at our house this year, I didn’t have the chance to get a pie slice photo before it was gone! Though I’m sure you can imagine how scrumptious it looks, and now you’ll just have to try it yourself. I’d love to hear what you think!

And find more easy and delicious recipes here.

The Circle: My Favorite Gingerbread Cookies

The lovely Roxana of Illuminated Perfume recently invited me to be part of her holiday blogging collaborative and I just couldn’t pass up this fun opportunity! It’s a blog-o-rama Advent-ure which began on November 29, correlating with the first day of advent. Each day, a different blogger adds their sparkle to this gathering of light by sharing their thoughts and memories about scents and the holidays. Today I light a candle with my contribution and by Christmas Day, all the candles on the tree will be lit.
In true lillyella fashion, when I think of scents and the holidays, I think of food and crafting — my two favorite things! Does crafting have a scent, you ask? You bet it does! The aroma of bubbling hot glue, the smell of my sewing machine engine working at high speed, dried lavender, I could go on and on.
When it comes to food, that pretty much speaks for itself, but there is one scent that unmistakably says Christmas for me, and that’s gingerbread. It’s the only time of year I bake my favorite gingerbread cookies, which I now, in my seventh year of doing so, have my friends, family and neighbors asking for come December 1st.
The recipe is simple, but it’s one I adapted and perfected over a few batches many years ago. The perfection lies in not overcooking them, but only if you like ’em soft and chewy. If not, this recipe isn’t for you.
GINGERBREAD COOKIES

Ingredients
8 Tbsp (1 stick) butter, or shortening
1/2 cup sugar
1/2 cup molasses
1 egg
2 cups all purpose flour
1 teaspoon baking soda
1/4 teaspoon salt
1 teaspoon ginger
1 teaspoon cinnamon
1/8 teaspoon ground cloves

Sift the dry ingredients into a small bowl and set aside. In a medium/large bowl, beat the butter with the sugar and molasses, then mix in the egg.

Add the sifted dry ingredients to wet mixture and mix well. Chill in the freezer for about an hour or in the refrigerator 2 hours.
Heat the oven to 350°. Roll out a portion of the dough about 1/4″ thick on a lightly floured surface or silicone cooking sheet. Keep the remaining dough chilled while working.
Cut out with cookie cutters and and place on greased cookie sheets or sheets lined with silicone mats. Bake for 8-10 minutes (depending on cookie size) and don’t overbake! They should be pretty soft when they come out and almost seem like they aren’t done yet. That’s the key to their deliciousness 🙂
Let cool completely before decorating with icing, candy pieces, powdered sugar or cinnamon and enjoy!

You can follow along with the rest of this collaborative blogging Advent-ure by visiting the Illuminated Perfume Journal each day to see the next contribution. Happy Holidays!

In Valorie’s Kitchen: Broccoli Stuffed Shells

Pasta. It’s one of my favorite comfort foods and is so versatile. But being so full of calories in the ways I like to prepare it, I’m lucky if it makes the way to my dinner table more than once a week. I’m always looking for ways to make my pasta dishes more lean and/or more nutritious without serving a skimpy marinara over noodles because, hey, that gets old after a while.

One of my favorite pasta tricks is to use the Barilla Plus noodles which are made with whole wheat, omega-3 fatty acids, and egg protein for added nutritional benefits. The texture is way better than most of the other crumbly, whole-grain noodle varieties available, but it doesn’t come in one of my favorite shapes: jumbo shells!

So when I make my favorite stuffed pasta dish, I have to settle for a reduced-fat filling and regular shells, but it’s still full of good-for-you ingredients without a lengthy or complicated recipe.

Ingredients
15 ounce box of jumbo pasta shells
15 ounce carton of reduced-fat ricotta cheese
24 ounce jar of prepared marinara sauce
10 ounce package frozen, chopped broccoli (thawed)
4 ounces fresh cremini mushrooms, sliced
1 teaspoon each fresh basil and oregano leaves (or 1/2 teaspoon each dried), finely chopped
1/2 teaspoon salt
1/4 teaspoon ground black pepper
1 cup grated, reduced-fat mozarella cheese
3 tablespoons grated parmesan cheese

Preheat your oven to 400° and then prepare the pasta shells according to package directions.
While they’re boiling, combine the ricotta cheese, broccoli, mushrooms, seasonings, and 3 tablespoons of the marinara sauce in a bowl. Whisk these ingredients together until evenly mixed and set aside.

Spread about half of the remaining sauce evenly across the bottom of a shallow baking dish. This will give the shells a sauce to cook in and will also keep them from sticking to your dish.

Next, drain the cooked pasta shells and rinse them thoroughly with cool water and then shake off any excess moisture. They need to be cool enough to handle and not dripping wet.

Gently open each shell and spoon in 2-3 teaspoons of the filling. Do this carefully, as they are delicate and tend to rip easily.
Once filled, place each shell upright into your baking dish. Repeat until your dish is full.

Spread the remaining sauce over the shells. Cover evenly with the mozarella cheese and then sprinkle the Parmesan last. Bake uncovered at 400° for 25-30 minutes, or until the cheeses are melted and beginning to brown on top. Serve with your favorite salad.

Yields about 4 servings


> Click here for a printable recipe card.

I hope you enjoyed Valorie’s contribution to the lillyella kitchen this week! You can browse more of Valorie’s recipes on her site Kitchen Improv and find previous In The Kitchen posts here.
Stop back on December 22 for the last In The Kitchen post of 2009 where I’ll share some delicious holiday drink recipes!

In Valorie’s Kitchen: A Little Butternut Love

The leaves have turned, the air is crisp and cool. It is definitely fall, and pumpkins are beginning to appear in every nook and cranny throughout the neighborhood. They’re also turning up in just about every edible delight this time of year, too, from pie and bread to soup, chili and even coffee.

I love pumpkins, both to look at and to eat. However, the pumpkin varieties worthy of a good recipe are only available in the fall and can even be hard to find in a traditional grocery store. Add to that the inferiority of canned pumpkin, and you have a very short time span when enjoying recipes with fresh pumpkin is possible.

Enter the butternut. A winter squash, butternut has bright orange flesh with a texture and sweetness similar to pumpkin. Available amost anywhere and at most times of year, it makes a good substitute for fresh pumpkin. Not only is it perfect in sweet recipes like pie, bread, and cookies, it fits nicely in the savory scene as well. I love to use butternut in fillings for homemade ravioli, or baked and topped with butter as a simple side dish. Most of all, I adore the creamy texture and rich flavor of a butternut squash soup.

BUTTERNUT SQUASH SOUP
What you’ll need:
1 large butternut squash, about 3lbs
1 medium shallot, peeled and finely minced
2 tablespoons olive oil
1 teaspoon salt
1/2 teaspoon madras curry powder
1/4 teaspoon ground black pepper
1/8 teaspoon ground nutmeg
4-6 cups chicken stock
1 tablespoon maple syrup
1 tablespoon apple cider vinegar
1/3 cup heavy cream
First, prepare the butternut squash by cutting it in half lengthwise and scraping away the seeds and any stringy, tough flesh from the center. Line a baking sheet with parchment paper and lay the halves flesh-side-down onto the paper. Bake at 350° for 45-50 minutes, or until the texture is soft under gentle pressure. The skin beginning to shrivel slightly and the juices starting to caramelize around the edges are good signs that it’s done. Remove the pan from the oven and let it cool.

Use a spoon to scrape the cooled flesh out of the shells and into a large (8-quart or bigger) sauce pan. Set this aside.
In a small skillet, warm the olive oil. Add the shallots and sautee them with a pinch of salt until they are soft and begin to brown slightly. Add the remaining salt, curry powder, pepper, and nutmeg. Mix and continue cooking for about a minute more when the combination becomes fragrant.
Add this mixture to the squash. Add about 4 cups of the chicken stock to the sauce pan. Using an immersion blender, puree the squash until the texture is smooth and free of any chunks. Add additional stock, as needed. Alternatively, the shallot & squash mixture can be pureed in a food processer in small batches.
Heat the mixture over a medium flame until it reaches a very gentle and slow boil. Add the maple syrup and cider vinegar, mix, and cook for another 1-2 minutes. Next, add the cream, stir, and cook for five minutes longer. Remove from the stove and serve immediately topped with a little grated parmesan or a drizzle of maple syrup. This is great as a cup-sized starter with fresh bread and butter, or in bigger portions, as a main course along side a green salad.

Yields 4 to 6 1.5 cup servings

> Click here for a printable recipe card.

I hope you enjoyed Valorie’s contribution to the lillyella kitchen this week! Stop back on December 15 when she’ll be sharing a delicious recipe for Stuffed Shells and I’ll have one more pumpkin recipe for you on December 1!
You can browse more of Valorie’s recipes on her site Kitchen Improv and find previous In The Kitchen posts here.

In the Kitchen: Pumpkin Cake Roll

My pumpkin extravaganza continues with what I consider a fall dessert staple, Pumpkin Roll! Last Christmas I asked for jelly roll pans just so I could make this very spiral of deliciousness. With the right tools, this recipe is fairly quick and easy and the results are nothing less than impressive. You will find a printable recipe card at the end of this post.

Prep time: 40 min | Bake Time: 15 min | Serves 8 – 10
Ingredients:
3 eggs
3/4 cup all-purpose flour
2 tsps ground cinnamon
1 tsp baking powder
1 teaspoon ground ginger
1/2 tsp salt
1/2 tsp ground nutmeg
1 cup sugar (I use Splenda and up it to 1 and 1/4 cups)
2/3 cup canned pumpkin
1 tsp lemon juice
1 cup finely chopped walnuts (optional, I left out)
sifted powder sugar
Cream Cheese Filling:
6 oz softened cream cheese
1/4 cup softened butter
1/2 tsp vanilla
1 cup powdered sugar
Allow eggs to stand at room temperature for 30 minutes.
Meanwhile, grease a 15x10x1 baking/jelly roll pan. Line the bottom with waxed paper or parchment paper, grease the paper. Set aside.
In a small bowl combine flour, cinnamon, baking powder, ginger, salt and nutmeg. Set aside.

Preheat oven to 375°. In a large bowl beat eggs on high speed about 5 minutes or until thick and lemon colored.

The volume of the eggs will significantly increase (shown left).
Next, gradually beat in the granulated sugar. Stir in pumpkin and lemon juice. Fold flour mixture into pumpkin mixture and mix well.

Spread evenly in prepared pan. If desired, top with chopped walnuts.
Prepare a towel for rolling the cake by sifting powdered sugar over it.

Bake for 15 minutes or until the top springs back when lightly touched. Do not overbake or it will get spongy.
Immediately loosen edges of cake from pan and turn out onto the prepared towel. Remove the wax paper. Position a short side of the cake at the end of the towel.

Begin rolling into a spiral, cool on a wire rack.

Meanwhile, prepare the cream cheese filling. In a small bowl beat cream cheese, butter and vanilla with an electric mixer until smooth. Gradually add powdered sugar, beating until smooth each time.
Spread filling onto cake to within 1″ of edges.

Re-roll the cake. I find it helps to kind of lift a bit as you roll, otherwise you just push all the yummy filling right out the end. Once rolled, trim the ends clean. Cover and chill for 2 – 48 hours. Store in refrigerator.
Sift a little powdered sugar over the top before serving and enjoy!
Between you and me, the real reason I love making this so much is because of how cute it looks on my favorite vintage serving tray 😉

You can find more easy and delicious recipes here.