Crafting: Ruffle Necklaces

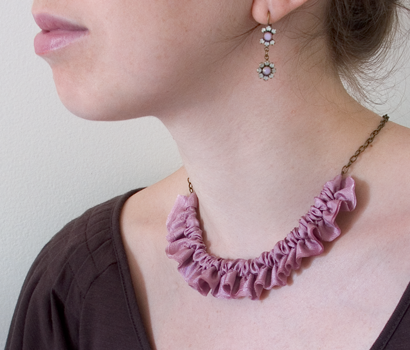
I’ve been swooning over the Candace Ang ruffle necklaces I’ve seen in magazines, but since I don’t have $200 to drop (and you probably don’t either), today’s project is an easy way to make one for yourself! It’s fast, you don’t need much and the results are just beautiful.
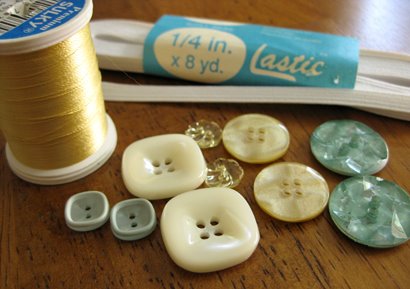
I used silk fabrics for this project but you could use any fabric that is thin enough to ruffle easily. Once you choose a fabric, you’ll need to pick a chain. You can use a chain you already have, deconstruct a piece of vintage jewelry or you can buy lengths of chain from your local craft store, in which case you will also need a clasp and some jump rings.

You will start by cutting a strip of fabric and the size will be dependent on the chain you are using, how many ruffles you want and how big you want them. For the pink necklace, I used a smaller chain and wanted shorter ‘tails’, so I cut the fabric to 2″. For the patterned silk shown above, I chose a chunkier chain so cut that piece to 2.5″. The fabric was in half yard pieces so I left the length as it was at about 18″.
Once cut, you can seal the edges of the fabric with Fray Block, Fray Check or another similar product, or heat seal them, if desired. I left the pink edges untreated because I don’t mind a little fray!
Fold the fabric strip in half and pin in place.
Next you will sew a sleeve for the chain. Be sure to make it large enough for the chain to fit through will a little extra room. When sewing, leave about 6″ of thread at the beginning and end and do not backstitch.
To create the ruffles, pull on the back thread (the bobbin thread) while scrunching up the fabric. It takes a little work to get the entire length ruffled but it will happen! I scrunched the fabric down to about a 7″ length. Knot the ends of the strings and trim them flush.
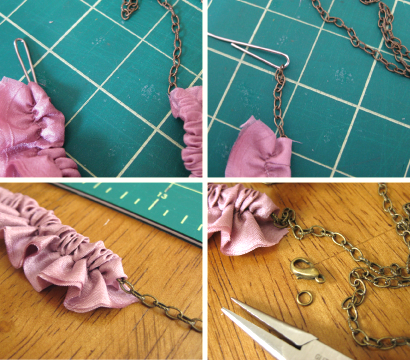
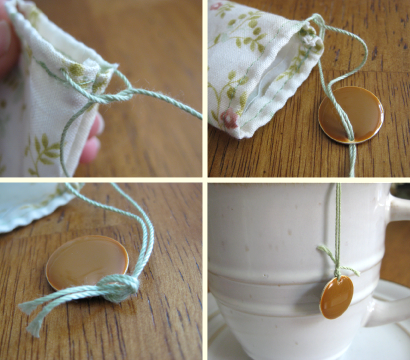
Next you will feed your chain through the pocket. You can use a safety pin or bend a paper clip to help feed the chain and it works best to have a rounded edge at the front so it slips through the fabric easier. If you are using a vintage or existing chain, you may need to remove the clasp or closure from one end to fit it through.
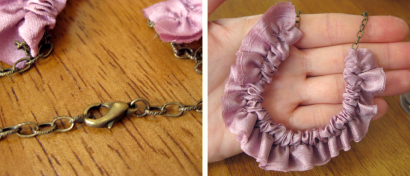
Once the chain is through you can attach (or reattach) your clasp. You can find clasps and jump rings in different metal finishes at most craft stores and you just need one or two pairs of needle nose pliers. You then have your finished necklace! 
You can easily modify this design by using different sized fabric strips and different styles and sizes of chains, the possibilities are endless! Use luxurious silks and satins for a fancier look or try springy lightweight cotton prints for a more casual piece. You can also sew on embellishments such as pearls, bead, rhinestones or fabric flowers.

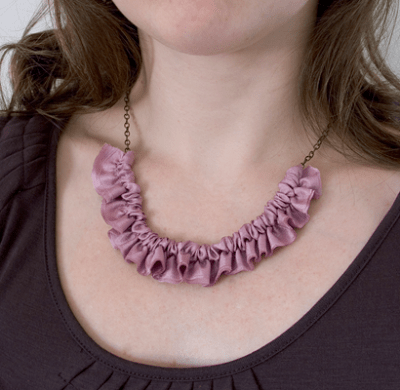
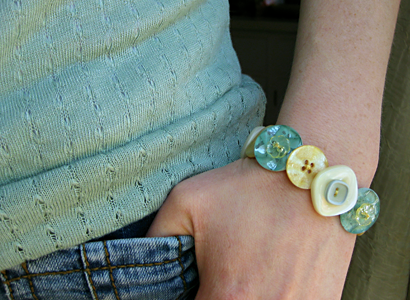
You could wear this necklace with a cocktail dress for a special occasion or with your favorite tshirt and jeans. It looks great worn as a choker like in the very top photo and also looks nice worn longer with a scoop neck shirt or off the shoulder top.
I have a couple more of these in different styles and sizes started that I did not have time to finish, but I will post some photos as soon as they are done. Maybe I’ll even give one or two away! I’d love to hear if you try your hand at this project, I hope you enjoy it!

Crafting: Button Bracelets

Love buttons? Who doesn’t?! Chances are, whether you are crafty or not, you have a stash of them laying around, or maybe an addiction to collecting vintage ones. Well today I have a simple project that will put them to good use, button bracelets! You can also use new buttons for this project, and these days there are so many cool ones available at your local fabric store, the design possibilities are endless.
What you’ll need:
Elastic, 1/4″ or 3/8″ thick
Buttons
Needle and Thread
I decided on a yellow and seafoam green color palette for my bracelet, using a mix of some chunkier vintage buttons I have collected and a few new ones I purchased to match. You can use a repeating pattern or all one-of-a-kinds and I think it adds interest to stack some of them, so keep that in mind when choosing your buttons. I also chose a gold thread that I thought would be a nice pop, but you can match your thread to each button or even use clear nylon thread.
Start by wrapping the elastic loosely around your wrist where you would like the bracelet to sit. Cut it to size with about 3/4″ or so of overlap. Make a small mark on the elastic right past the overlap. I also find it helpful to mark the middle.
With the elastic laid flat as a guide, make a rough layout of your button placement to determine the design and how many buttons you will need. Do not include the end past your mark, see photo above for reference. You want the buttons to overlap each other a little so account for this when setting them out.
Once your layout is ready, you can sew the elastic together securely, forming the bracelet. I did this by hand but you can use a sewing machine if you choose.
Next, begin sewing the buttons in place, one at a time, starting at your marked center of the bracelet. Be sure to securely knot the thread after each button is attached. Above I show a method I find to be really easy and secure. Thread the needle up under the stitches, pulling the string through, then thread the needle through the resulting loop, under the thread closest to you and pull tight. Repeat this a few times.
As I mentioned, you want the buttons to overlap each other a bit so you do not see the elastic when you are wearing it. I find it helpful to just put one stitch through the button and try it on to make sure you like the way it is laying, then finish stitching it in place. As you go, you may also decide to change your button layout.
Continue adding buttons until you cover the bracelet and you’re done! It may take a bit of adjusting to get them to fit properly toward the end, but just be flexible with your design. You can always move or replace a button pretty easily if needed since they are all sewn on separately.
I love this project because it’s easy, inexpensive and a lot of fun. I also think these bracelets would make really sweet gifts, so if you’re on my christmas list, you’ll be getting one of these and some teabags
If you try your hand at this project, I’d love to hear about it! I’ll also be starting a flickr group soon for sharing your own craft project photos, so I’ll keep you posted on that. In the meantime, have fun crafting your own button bracelets!

Crafting: Reusable Tea Bags

Last time I showed you two ways to make homemade tea bags perfect for gifts and favors, and as promised, here is part two, reusable tea bags. They are quick and easy to make, though you do need a sewing machine. These tea bags are great for the eco-friendly tea drinker and also make a great gift set when given with a few bags of loose tea.
What you’ll need for each tea bag:
4″ x 3″ piece of lightweight untreated fabric (muslin, cotton, etc)
14″ piece of cotton string (I use size 10 crochet thread)
With the fabric flat in front of you (back side facing up if patterend),
4″ wide x 3″ tall, punch two small holes on either side about 1/4″ in and 1/2″ down. You can use an awl, exacto knife or other sharp pointy object. Thread the cotton string through the holes as shown above. Fold the top fabric over the string and pin in place. Stitch along the edge as shown, this forms the drawstring.
Next fold the rectangle in half, inside facing out, and pin in place. Stitch along the bottom and the up the side, about 1/8″ in. Be sure to keep your drawstring ends toward the inside folded edge of the bag so you do not sew over them.
Flip the bags right side out and you’re almost done! The next step is to add a bead to the end of the drawstrings to keep them from coming out and to weight the tea bag.
I love using these metal tag-like beads I found at my local craft store but any bead with a large hole will do. First, loop the two strings over loosely, as if to tie the bag. Thread the two ends through your bead and double knot to secure. Trim any extra long ends.
Now you’re ready to fill with your favorite tea and enjoy! Here I’m brewing a homemade blend of green tea, chamomile and bee pollen.
When you’re done with the bag, loosen the draw string and hang it on the edge of your sink or elsewhere to dry. Once dry, you can easily dump the used tea and rinse if needed, though I often find it’s not necessary. It’s nice to have a half dozen or so on hand for company or to use while another is drying.
Aside from enjoying them yourself, a set of these with a few bags of loose tea and some homemade ‘recipe cards’ for blending suggestions would make a fantastic gift.
I promise one day soon I’ll have myself together and get some PDF instruction sheets available for download on all my Crafting posts, and I’ll be sure to let you know when they are ready. In the meantime, enjoy making some tea bags (I’d love to hear about how it goes!) and you can find other fun Crafting projects here.

May Day Flower Cones

Happy May Day, everyone! May Day (May 1st) is celebrated in many places around the world. The traditions and stories surrounding May Day vary from place to place but there is one thing that is similar in most celebrations – the use of flowers! One of the most popularly known May Day traditions is to hang spring flowers and/or other small gifts on a neighbor’s doorknob. One fun and easy way to do this is by using homemade paper cones. Here I show you how to make a small one but you can easily adjust the size by starting with a larger piece of paper.
What you’ll need:
7″ square of paper (or larger if desired, 8″ – 10″ work well)
30″ length of ribbon (longer for bigger cone)
decorative edged scissors
hole punch
craft glue or glue stick
flowers – fresh, silk, even paper
Use the decorative scissors to cut a scalloped edge (or other design of your choice) along two sides of the paper. These will be the top.
Lay the square flat, face side down, in a diamond shape and apply a dab of glue to the left point. Begin rolling the cone using a pencil to shape the bottom point and hold the glue corner in place until secure.
Next you will punch the holes for the ribbon. Punch three in the front, one on either side and two in the back (see photos for reference). Begin threading the ribbon from the back, putting one end in each back hole, leaving a length to use as the hanging loop.
From the inside, thread the ribbon back out through the next holes, back inside through the outer front holes and finally both ends to the front through the middle hole. Tie a bow and you are done! This size cone will hold a small sprig or a handful of daises or tulips but you can start with a larger square of paper to hang a more impressive bouquet. About 10″ is the largest piece of paper you would want to use.
Now all you have to do is fill it and find a doorknob to hang it on! Wouldn’t it be a lovely surprise to come home to or wake up to tomorrow morning? And don’t worry if you are a day or two late, this May Day tradition can be celebrated through the weekend.
Find more fun and easy craft projects here.

Crafting: Tissue Paper Pom-Pom Flowers

Welcome to the first in a new, highly-requested, How-To series! I’m still trying to think of some snappy little title, so that may change one day. Every other Tuesday I’ll be bringing you a new project and will cover a broad range of crafts and levels of difficulty. 
This week we’re making simple tissue paper pom-pom flowers. I’m highly addicted to making paper flowers of all kinds and will share a variety of others with you in the future but I thought this quick and easy project was a great starter!
What you’ll need for one 5″ flower:
4 pieces of tissue paper, 10″ x 5″
18″ piece of thin wire, floral or any other type
Scissors
Stack the four sheets of tissue on top of each other. Make 3/8″ accordion folds, creasing after each fold. I find it easiest to make one fold, flip it over, make the other, and repeat, so you are always folding up away from you and it’s easy to see.
Fold the 18″ piece of wire in half and slip over the center of the folded tissue. Twist the bottom closed. Using sharp scissors, trim the ends of the paper into rounded or pointy shapes. I chose rounded for this one.
Separate the four tissues layers, one at a time until the flower begins to take shape. Depending on what you will use them for, you can keep the bottom flat or you can puff them into a ball for hanging.
You can use these little flowers just about anywhere! I love using them as napkin rings for a summer picnic or when we have guests over. You can use them to decorate a basket or the back of a chair, make a bouquet for a vase or they are beautiful as a bow on a gift.
Try layering different colors of tissue for a beautiful effect or embellishing the centers with buttons or beads. You can also easily make other sizes by starting with different sized tissue. In the future I will show you how to make really big ones to hang from the ceiling. I hope you have fun making these pretty little flowers. I’d love to hear about what uses you find for them!
I’ll have a PDF instruction sheet that you can download or print 
available later today.