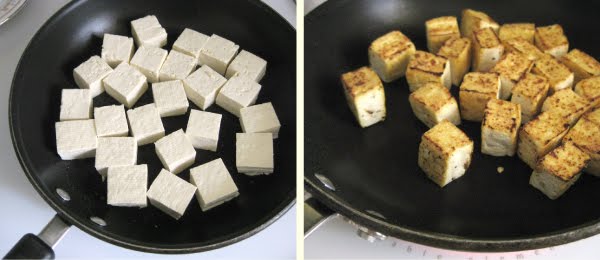
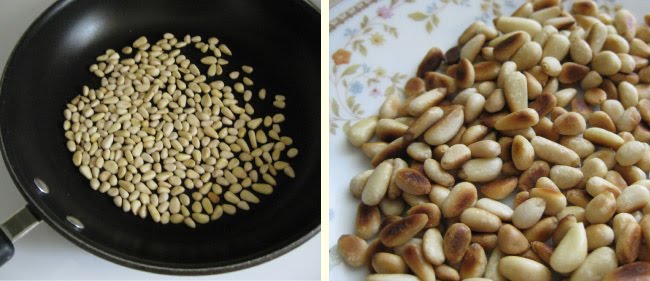
To toast the pine nuts, place them in a dry skillet over medium high heat and cook until they start to brown and become fragrant.
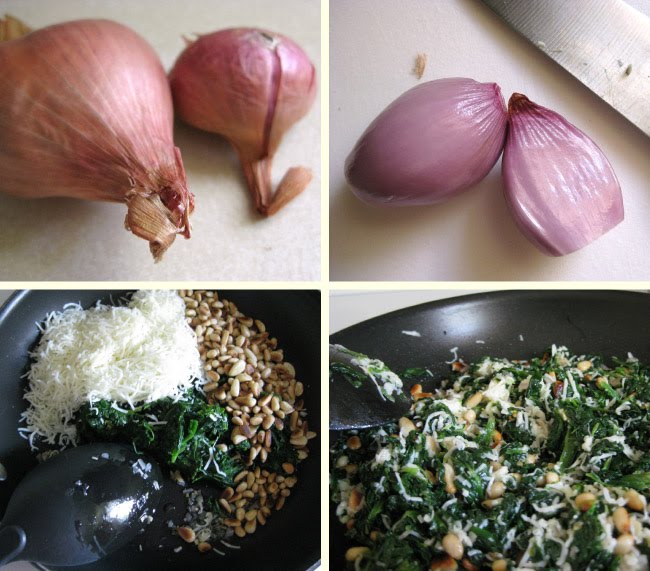
If you’ve never used a shallot, it’s kind of like an onion that looks like a big purple bulb of garlic. You can find them in the produce section of your market near the onions or garlic. Peel off the skin, just like you would garlic, and chop em up.
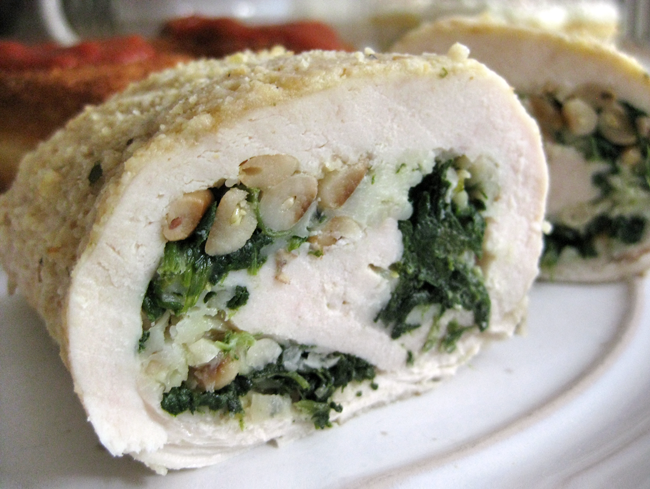
To make the filling, saute the shallot and garlic in a skillet with some olive oil until tender. Remove from heat and stir in the spinach, mozzarella and pine nuts. Set aside.
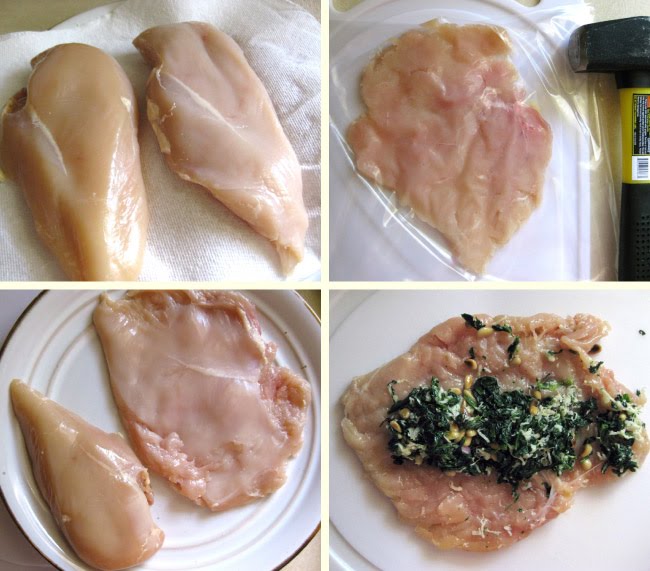
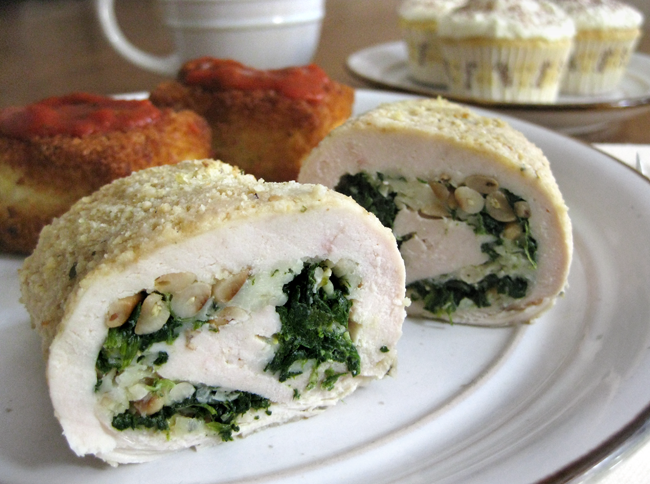
And now we pound the meat. As I mentioned, I’m sure there are better tools to do this that a rubber mallet, but it gets the job done. I placed the breast, one at a time, in a gallon zip loc bag and pounded, pushing out a bit, until the breast was about 1/8 thick.
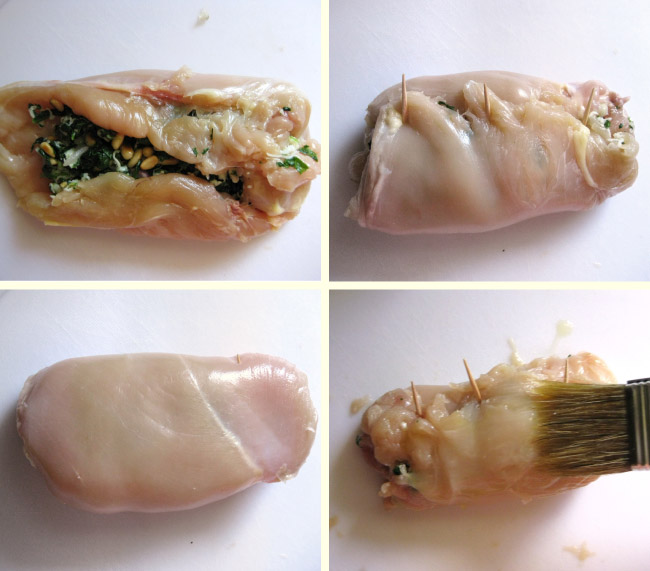
Once all the breasts are flattened, season with salt and pepper if desired. Working one at a time, spoon about 2-3 Tbsp of filling in the center.
Fold in one of the short sides, then the two long sides (as shown in the upper left photo above). Starting at the folded short end, roll the chicken, keeping the sides tucked in, towards the unfolded end and secure with toothpicks.
Brush each rolled breast with olive oil.
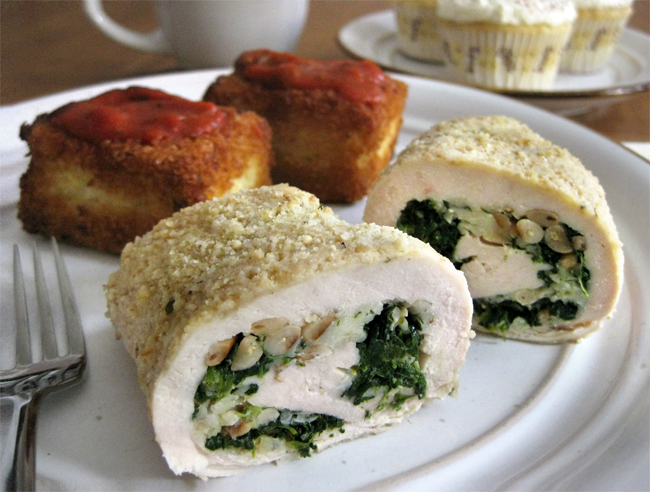
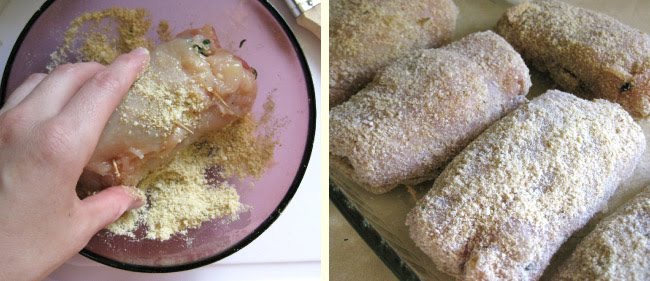
Mix the breadcrumbs and parmesan cheese in a bowl and roll each breast until coated. Place seam side down in a shallow baking dish and bake at 400° for about 25 minutes until chicken is tender and no longer pink.
Remove the toothpicks before serving. They may be a little hard to pull out, so feel free to utilize more tools (like a pair of pliers) if needed 🙂
If you’d like a crispier breading, saute the crumb coated breasts in a skillet with a little oil until browned before baking. These are delicious served as is or you can top with a little marinara or white sauce.
· · · · · · · · · · · · · · · · · · · · · · · · · · · · · · · · · · · · · · · · · · · · ·
PASTA CROQUETTES
Ingredients
8 oz egg noodles
6 Tbsp butter
3 Tbsp green onions, chopped
6 Tbsp flour
1/2 tsp salt
1/4 tsp pepper
1/4 tsp ground nutmeg (fresh is best!)
2 cups milk
3/4 cup fresh grated parmesan cheese
1 egg, beaten
For breading
Flour
2 eggs beaten with 2 Tbsp water
Panko bread crumbs
Oil for frying
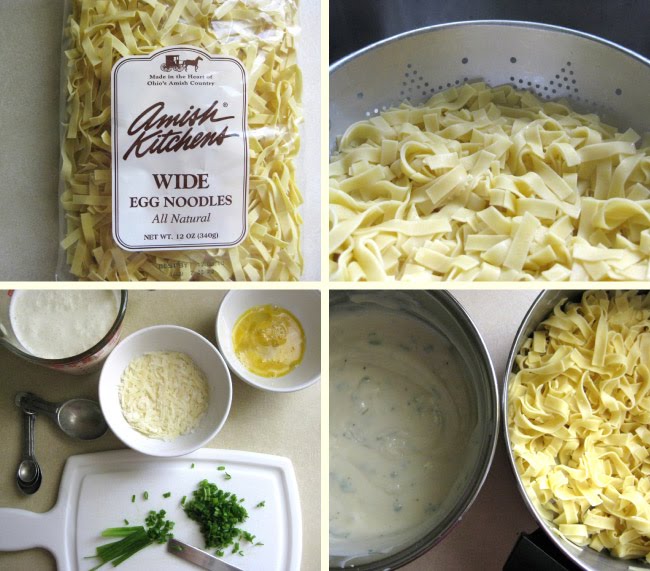
Prepare the noodles according to package directions and drain well. Even though my package of noodles said ‘wide’, I wouldn’t consider them wide. They are about the size of fettucini and flat – these will work best.
To make the sauce, melt the butter in a medium saucepan. Add the green onions and saute until tender. It may look like a lot of onion, especially if you’re not a huge onion fan, but it is important to the flavor, which is not a strong onion flavor, so use them all!
Stir in the flour, salt and pepper and stir well. Cook until it begins to bubble. Stir in the milk and cook until thickened and bubbly, stirring almost constantly.
Stir in the parmesan cheese and once melted, add a little of the mixture to the beaten egg in a small bowl then add the egg mixture back to the saucepan and cook until it just begins to boil.
Mix the sauce with the noodles and press into a greased 8″ or 9″ pan. Cover tightly with aluminum foil, pressing down on the noodles, and chill in the refrigerator for several hours or preferably, overnight.
To finish the croquettes, cut the chilled pasta into squares and working a few at a time, first thoroughly coat the squares with flour. Next dip them in the beaten egg/water mixture and finally coat them completely with the breadcrumbs.
Fry them in oil until crispy and brown on all sides, turning as you go. I used canola oil, you can also use vegetable or any oil of your choice. Set them on a paper towel to drain until all squares are done.
Place them on a baking sheet or in a baking dish and heat in the oven for about 15 – 20 minutes (you can put them in with the chicken), until thoroughly heated throughout. Depending on how you fry them and the type of pan and oil you use, they may be heated through after frying, but putting them in the oven won’t hurt them and it keeps them all warm until ready to serve.
I prefer these with a little marinara on top, it really pulls all the flavors together, but you can also serve them plain or top them with a slice of provolone cheese when you put them in the oven and let it melt on top. Mmmmm! I just can’t get enough of this dish.
You can store any leftovers covered in the fridge, but reheat in the oven, rather than the microwave, and they will come out tasting like you just made them.
· · · · · · · · · · · · · · · · · · · · · · · · · · · · · · · · · · · · · · · · · · · · ·
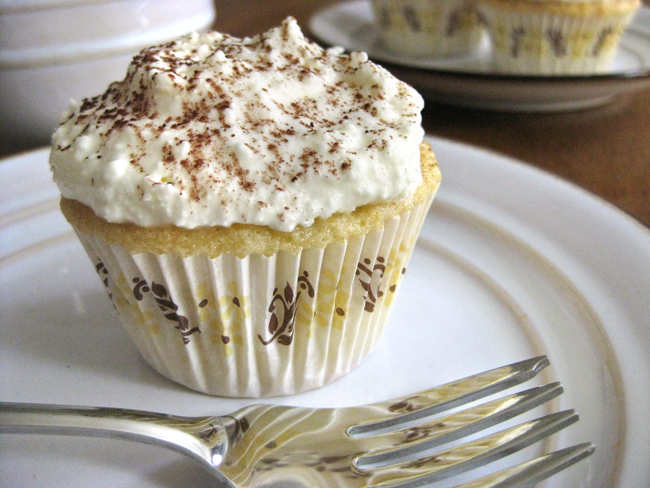
TIRAMISU CUPCAKES
Ingredients
1 1/4 cup cake flour
3/4 tsp baking powder
1/4 tsp salt
1/4 cup milk
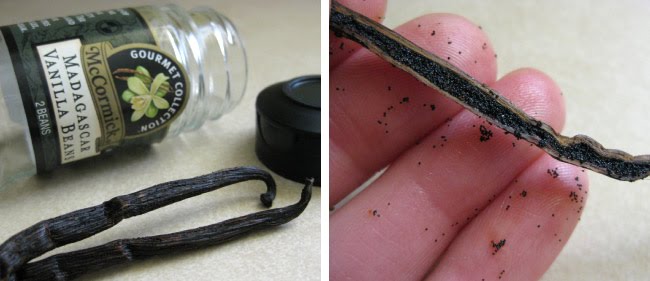
1 vanilla bean, halved and seeds scraped
4 Tbsp butter, room temp and cut into pieces
3 large eggs plus 3 egg yolks, room temp
1 cup sugar
Coffee-Marsala Syrup
1/3 cup plus 1 Tbsp strong brewed coffee or espresso
1 ounce sweet Marsala wine
1/4 cup sugar
Mascarpone Frosting
1 cup heavy cream
8 oz mascarpone cream, room temp
1/2 cup powdered sugar
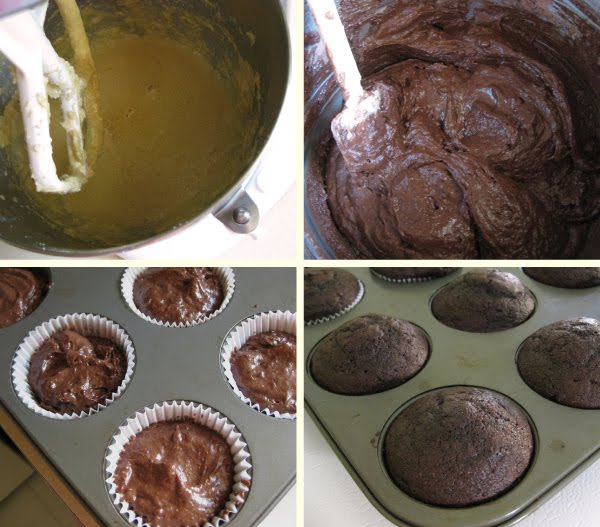
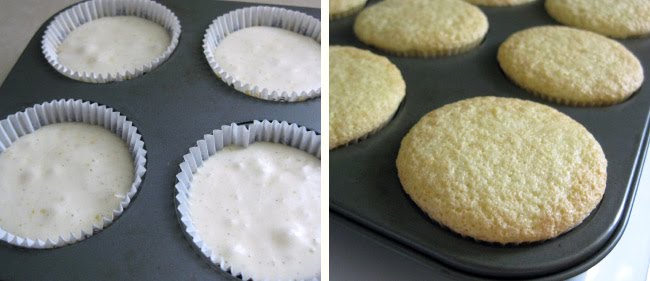
Preheat the oven to 325° and line 16 standard muffin tins with paper liners or grease and flour the cups.
If you’ve never used a vanilla bean, it will be a fun adventure. They are expensive and a little bit of work, but well worth the flavor in a dish like this.
Cut one vanilla bean in half lengthwise and scrape out the seeds, placing them, along with the empty pod, into a medium saucepan with the milk. Heat over medium until bubbles appear around the edges. Remove from heat and whisk in the butter until melted.
Let stand about 15 minutes and strain through a fine sieve or strainer into a bowl. Discard the bean pod and set the butter mixture aside.
Sift or whisk together the flour, baking powder and salt, set aside.
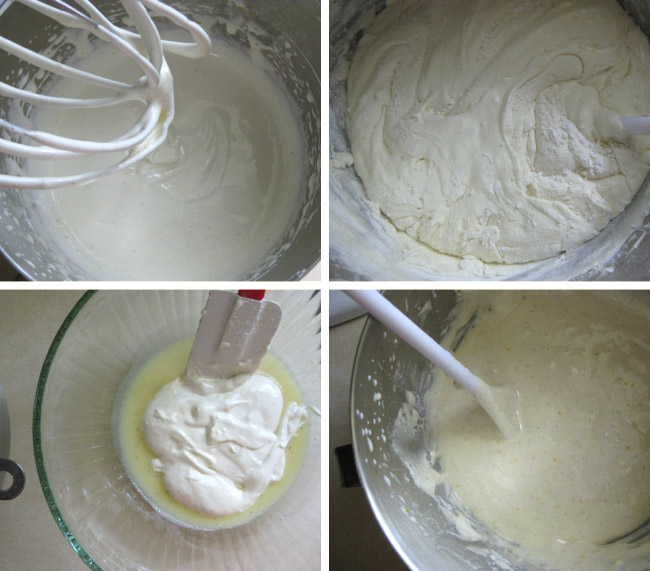
With an electric mixer on medium speed, beat together the whole eggs, egg yolks and sugar in a heat safe bowl until combined. Set the bowl over a pan of simmering water and whisk by hand until all the sugar is dissolved and the mixture is warm to the touch.
Remove the bowl from heat and beat again with the electric mixer on high until pale and fluffy and thick enough to hold a ribbon on the surface for several seconds.
Gently fold the flour mixture into the egg mixture in three batches. Stir 1/2 cup batter into the strained butter mixture then fold it back into the batter stirring gently until just combined.
Divide the batter among the cups, filling about 3/4 cup full and bake for about 20 minutes, rotating tins halfway through, until center is set and edges are light golden brown. Cool on a wire rack.
To prepare the syrup, stir together the coffee, marsala wine and sugar until dissolved. Brush the syrup on top of the cupcakes, repeating until all syrup has been used. The tops will get soggy, but they will be covered with frosting so it’s ok!
To prepare the frosting, beat the cream with an electric mixer on medium speed until stiff peaks form. In another bowl, whisk together the mascarpone cheese and powdered sugar until smooth. Gently fold the two together until thoroughly mixed.
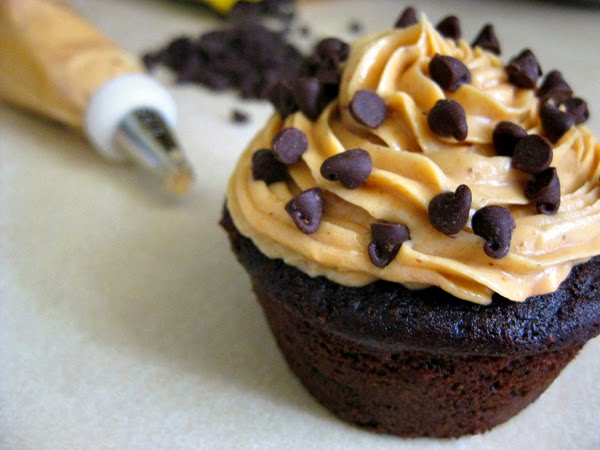
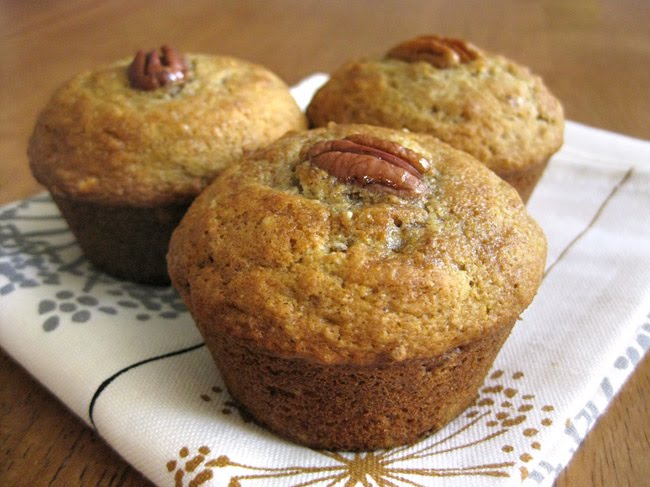
Dollop the frosting onto the cupcakes and dust with cocoa powder before serving. I guarantee everyone will be impressed by the amazingly light, spongy texture of the cupcakes and the rich creaminess of the frosting.
If you don’t plan on gobbling them all up at once, I recommend keeping the frosting and cakes separate and topping each before enjoying. They get a little soggy and the frosting starts to thin out after a day or two.
· · · · · · · · · · · · · · · · · · · · · · · · · · · · · · · · · · · · · · · · · · · · ·
I told you it was a lot of work, but this is definitely a meal to impress. I made it for my Dad on Father’s Day and plan to try it out on some chef friends of ours – it’s that good. At least I think so, and I hope you do to.
I’d love to hear what you think and how it goes if you try out any of these recipes! Have fun 🙂


