In the Kitchen: Banana Pineapple Cake

As promised, here is this week’s recipe just a few days off schedule! Today I have a delicious cake that I especially love during the warmer months because it is light and refreshing and a bit tropical. Most of the recipes I share with you are very easy to make, but this one really takes the cake. Yep, pun intended. You’ll find a link for a printable recipe card at the end of this post.

Prep Time: 20 min  |  Cook time: 30 min  |  Serves about 18
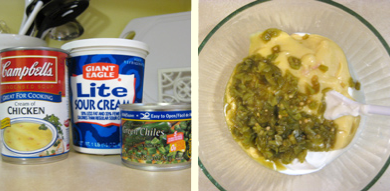
What you’ll need:
1 box yellow cake mix
3 bananas
1 large can crushed pineapple
1 tub cool whip

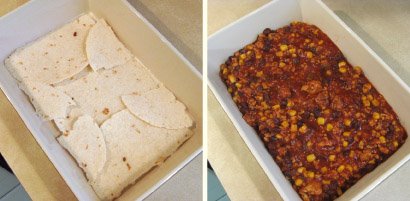
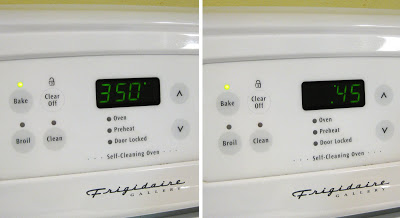
Prepare the cake mix as directed on package and bake in a 13×9 pan. Set aside to cool for about 20 minutes or so. You can also put it in the fridge to cool faster, if you are impatient like me.
In the meantime, drain the crushed pineapple well, reserving the juice in a bowl.
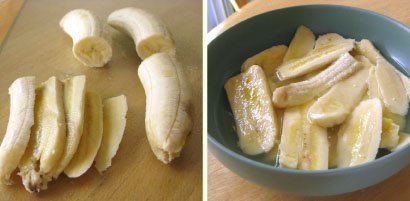
Slice the bananas into thin strips. I find it easiest to cut the banana in half first. You should need about 3 bananas but if they are smaller or you like thicker slices, you may need 4.
Soak the bananas in the pineapple juice (they don’t need to soak for long). This prevents the bananas from browning. (This also works on other cut fruit, too, as does lemon juice)
Lay the sliced bananas in a single layer across the cake. You can cut them or tear them into pieces to fill gaps if needed.
Next layer the crushed pineapple on top, followed by the cool whip and you’re done! Easy, right?
And since I’ve had such incredible luck lately (italics = sarcasm), I lost all the lovely pics I took of a finished slice of cake, so all you get to see is this whip cream. The inside shall remain shrouded in mystery, so you’ll just have to make it yourself!
This cake is perfect for a summer picnic and stores well for some time in the fridge. I actually find it gets better over time as the juices soak down into the cake. It’s also fun to make with the kids because its so easy. If you’re really adventurous, you can make this as a double layer cake with the fruit and whip cream in between and on top. Whoa doggy. I hope you give it a try and enjoy! Find more easy and delicious recipes here.

Crafting: Reusable Tea Bags

Last time I showed you two ways to make homemade tea bags perfect for gifts and favors, and as promised, here is part two, reusable tea bags. They are quick and easy to make, though you do need a sewing machine. These tea bags are great for the eco-friendly tea drinker and also make a great gift set when given with a few bags of loose tea.
What you’ll need for each tea bag:
4″ x 3″ piece of lightweight untreated fabric (muslin, cotton, etc)
14″ piece of cotton string (I use size 10 crochet thread)
With the fabric flat in front of you (back side facing up if patterend),
4″ wide x 3″ tall, punch two small holes on either side about 1/4″ in and 1/2″ down. You can use an awl, exacto knife or other sharp pointy object. Thread the cotton string through the holes as shown above. Fold the top fabric over the string and pin in place. Stitch along the edge as shown, this forms the drawstring.
Next fold the rectangle in half, inside facing out, and pin in place. Stitch along the bottom and the up the side, about 1/8″ in. Be sure to keep your drawstring ends toward the inside folded edge of the bag so you do not sew over them.
Flip the bags right side out and you’re almost done! The next step is to add a bead to the end of the drawstrings to keep them from coming out and to weight the tea bag.
I love using these metal tag-like beads I found at my local craft store but any bead with a large hole will do. First, loop the two strings over loosely, as if to tie the bag. Thread the two ends through your bead and double knot to secure. Trim any extra long ends.
Now you’re ready to fill with your favorite tea and enjoy! Here I’m brewing a homemade blend of green tea, chamomile and bee pollen.
When you’re done with the bag, loosen the draw string and hang it on the edge of your sink or elsewhere to dry. Once dry, you can easily dump the used tea and rinse if needed, though I often find it’s not necessary. It’s nice to have a half dozen or so on hand for company or to use while another is drying.
Aside from enjoying them yourself, a set of these with a few bags of loose tea and some homemade ‘recipe cards’ for blending suggestions would make a fantastic gift.
I promise one day soon I’ll have myself together and get some PDF instruction sheets available for download on all my Crafting posts, and I’ll be sure to let you know when they are ready. In the meantime, enjoy making some tea bags (I’d love to hear about how it goes!) and you can find other fun Crafting projects here.

In the Kitchen: Mexican Lasagna

I was going to share an easy and delicious recipe for banana pineapple cake with you today, but after a slight banana mishap, I am now sharing an easy and delicious recipe for Mexican Lasagna instead! Mostly basic ingredients, one skillet, a baking dish and 30 min in the oven makes you a hearty pan of stick to your guts goodness that is sure to please. You can easily customize this recipe to suit your tastes by adding or changing ingredients and any leftovers reheat well in the oven or microwave. You will find a printable recipe card at the end of this post.

Prep time: 20 min | Cook time: 30 min | Serves 6-8

What you’ll need:
1 lb. ground beef or turkey (I use turkey)
2 cans (8 oz) tomato sauce
1 can black beans, drained and rinsed
1 can whole kernel corn, half drained
1 small can chopped green chilies or jalapenos
2 Tbsp chili powder
2 Tbsp minced onion
1 tsp ground cumin
1 tsp garlic salt
1/2 tsp oregano leaves
6 small flour tortillas (soft taco size)
2 cups shredded cheddar cheese

Preheat oven to 350°. Brown the meat in a deep skillet, add the tomato sauce, beans, corn and chilies. Stir in the five seasonings. Bring to a boil and reduce heat. Simmer uncovered for 15 minutes.
In a 2 quart baking dish, coated with cooking spray, line the bottom with three tortillas. I place one whole tortilla in the middle then I tear about 1/3 off the other two, place the larger pieces on either end, tear the small strip in two again and fill the gaps. 
Top with half of the meat mixture.
Next top with half of the shredded cheese and repeat with another layer or tortillas, the remaining meat mixture and the remaining cheese.
Bake at 350° for about 30 minutes until mixture begins to bubble and the cheese melts. Let stand for about 10-15 minutes before serving to allow the center to cool and set. 
Though I’ve never made this recipe with chicken, I imagine it would be equally as delicious. You can also leave the meat out completely for a vegetarian dish. I serve it with my Fiesta Breadsticks and occasionally a side of spanish rice though it’s hearty enough to stand alone. It’s also good with a dollop of sour cream on top. Enjoy!

> Click here for a printable recipe card.

May Day Flower Cones

Happy May Day, everyone! May Day (May 1st) is celebrated in many places around the world. The traditions and stories surrounding May Day vary from place to place but there is one thing that is similar in most celebrations – the use of flowers! One of the most popularly known May Day traditions is to hang spring flowers and/or other small gifts on a neighbor’s doorknob. One fun and easy way to do this is by using homemade paper cones. Here I show you how to make a small one but you can easily adjust the size by starting with a larger piece of paper.
What you’ll need:
7″ square of paper (or larger if desired, 8″ – 10″ work well)
30″ length of ribbon (longer for bigger cone)
decorative edged scissors
hole punch
craft glue or glue stick
flowers – fresh, silk, even paper
Use the decorative scissors to cut a scalloped edge (or other design of your choice) along two sides of the paper. These will be the top.
Lay the square flat, face side down, in a diamond shape and apply a dab of glue to the left point. Begin rolling the cone using a pencil to shape the bottom point and hold the glue corner in place until secure.
Next you will punch the holes for the ribbon. Punch three in the front, one on either side and two in the back (see photos for reference). Begin threading the ribbon from the back, putting one end in each back hole, leaving a length to use as the hanging loop.
From the inside, thread the ribbon back out through the next holes, back inside through the outer front holes and finally both ends to the front through the middle hole. Tie a bow and you are done! This size cone will hold a small sprig or a handful of daises or tulips but you can start with a larger square of paper to hang a more impressive bouquet. About 10″ is the largest piece of paper you would want to use.
Now all you have to do is fill it and find a doorknob to hang it on! Wouldn’t it be a lovely surprise to come home to or wake up to tomorrow morning? And don’t worry if you are a day or two late, this May Day tradition can be celebrated through the weekend.
Find more fun and easy craft projects here.

In the Kitchen: Corn Casserole

This week we’re cooking up delicious Corn Casserole. It’s like cornbread with a twist and is really easy to make. Just a few basic, inexpensive ingredients cook up a big pan that’s sure to please. It’s a great side dish and perfect for a holiday meal or potluck. The leftovers also store well and can easily be reheated in the microwave or oven. You can even mix it up ahead of time and leave it in the fridge until your ready to bake. You will find a printable recipe card at the end of this post as well as some variations to spice up the dish.
Prep time: 15 min | Cook time: 45 min | Serves: About 8 – 12
What you’ll need:
1/2 C (1 stick) margarine, melted
2 eggs
1 tsp salt
1/2 tsp pepper
8 oz sour cream
15 oz can whole kernel corn, drained*
15 oz can creamed style corn
1 box corn muffin mix (I use Jiffy)
In a medium/large bowl, soften/melt the margarine, add the eggs, salt and pepper. Stir until mostly blended.
Next add the sour cream and both cans of corn. Mix again until blended.
Last, add the corn muffin mix, fold in slowly and mix until blended.
Pour into a greased baking dish of your choice. One batch will fill a 13×9 pan or you can use two round dishes, fluted pie pans, smaller rectangles etc. The baking time is usually the same regardless of what shape pan you use.
Bake at 350° for about 45 minutes. Top will begin to crisp and brown and the underneath will remain softer. Let stand about 10 minutes before serving for inside to set a bit. 
*If you would like this dish a little gooier inside, more of a ‘corn pudding’ with a bready top, do not drain the whole kernel corn. I make it both ways, and both are delicious. 
Aside from being easy and super yummy, what I love about this recipe is the versatility. Eat it as a side dish with herb grilled chicken or ham or top it with country gravy (yummmm). It’s also a great, hearty vegetarian dish when served with a salad or fruit. 
You can easily spice up this recipe or make it a meal in itself by adding ingredients such as cheese (cheddar or swiss work great), cubed ham, bacon, or cut veggies before baking. Just be sure any meat or veggies you add are precooked. Even simply adding additional seasonings such as garlic and onion powder or crushed red pepper will give it a different taste. I’d love to hear about what creative ways you find to change up this recipe or if you enjoy it just the way it is!

Looking for more yummy recipes? Click here to see all my previous In the Kitchen posts.

Crafting: Tissue Paper Pom-Pom Flowers

Welcome to the first in a new, highly-requested, How-To series! I’m still trying to think of some snappy little title, so that may change one day. Every other Tuesday I’ll be bringing you a new project and will cover a broad range of crafts and levels of difficulty. 
This week we’re making simple tissue paper pom-pom flowers. I’m highly addicted to making paper flowers of all kinds and will share a variety of others with you in the future but I thought this quick and easy project was a great starter!
What you’ll need for one 5″ flower:
4 pieces of tissue paper, 10″ x 5″
18″ piece of thin wire, floral or any other type
Scissors
Stack the four sheets of tissue on top of each other. Make 3/8″ accordion folds, creasing after each fold. I find it easiest to make one fold, flip it over, make the other, and repeat, so you are always folding up away from you and it’s easy to see.
Fold the 18″ piece of wire in half and slip over the center of the folded tissue. Twist the bottom closed. Using sharp scissors, trim the ends of the paper into rounded or pointy shapes. I chose rounded for this one.
Separate the four tissues layers, one at a time until the flower begins to take shape. Depending on what you will use them for, you can keep the bottom flat or you can puff them into a ball for hanging.
You can use these little flowers just about anywhere! I love using them as napkin rings for a summer picnic or when we have guests over. You can use them to decorate a basket or the back of a chair, make a bouquet for a vase or they are beautiful as a bow on a gift.
Try layering different colors of tissue for a beautiful effect or embellishing the centers with buttons or beads. You can also easily make other sizes by starting with different sized tissue. In the future I will show you how to make really big ones to hang from the ceiling. I hope you have fun making these pretty little flowers. I’d love to hear about what uses you find for them!
I’ll have a PDF instruction sheet that you can download or print 
available later today.

In the Kitchen: Creamy Chicken Enchiladas

This week I have an easy and delicious twist on chicken enchiladas. I’ve been eating these for as long as I can remember and they’ve never disappointed. This recipe makes four average sized enchiladas though the sauce can go farther. Simply increase the amount of chicken and tortillas to make more. You will find a link to a printable recipe card at the end of this post.

Prep time: 20 min | Cook time: 20 min | Makes 4 Enchiladas


What you’ll need:
skinless boneless chicken, 4 tenderloins or 2 breasts
4 burrito size flour tortillas
1 can (15 oz) cream of chicken soup
16 oz sour cream
1 small can diced green chilies
shredded cheese, cheddar and/or pepper jack

In a large bowl, mix the chicken soup, sour cream and green chilies until well blended. Heat the sauce in the microwave for one minute. This step is not necessary though cuts down on baking time a bit.

Cut thawed chicken into bite sized pieces and cook in a skillet until done. As I’ve mentioned before, I always cook with chicken tenderloins. We buy them in large bags and thaw them as needed. I use one tenderloin per enchilada though you can adjust this to suit your preference. 
Season the chicken while cooking with a few shakes each of onion powder, garlic powder, black and red pepper and cilantro, or the seasonings of your choice.
Lay a tortilla on a flat surface and spread a little sauce down the center. You can also add some chopped jalapenos if desired. Next add the chicken.
Top with shredded cheese, as much as you like. I use cheddar and sometimes also a little pepper jack. 
Begin rolling the tortilla tightly, one side at a time.
Roll the other side and lay them in a greased 13 x 9 baking dish. I use toothpicks to keep them closed while cooking. This also helps me indicate which have the jalapenos in them, because mine does not! 
As I mentioned, this recipe will make 4 average sized enchiladas. I only make three as you see above – two large ones for the man and one average size for me. A 13 x 9 pan will hold 4 side by side.
Pour the remaining sauce over the enchiladas and spread evenly. 
Bake at 375° for about 15 minutes or until sauce begins to bubble a bit. Remove from oven and add some shredded cheese on top, return to oven and cook for an additional 5 minutes.
I recommend an oversized spatula for removing them from the pan, as they are kind of floppy! Letting them sit for about 5 – 10 minutes after cooking also makes serving easier.

I like to serve them with spanish rice and black beans with a little sauce poured over the top – delicious!

If you make any of the recipes I post here, I’d love to hear about it!

In the Kitchen: Chocolate Cracker Toffee

After a week off for my Etsyversary giveaway, In the Kitchen is back with a new recipe and I thought it was time for a dessert! Since you’ve probably figured out I’m all about quick and easy, this week’s recipe is no exception. Some of you may have had this yummy treat or a variation of it, but I was first introduced to it only a couple years ago during an office cookie exchange – and it was love at first bite. You will find a link to a printable recipe card at the end of this post.

Prep time: 10 min | Cook time: 12 min | Makes about 36 pieces

What you’ll need:
1 sleeve rectangular buttery crackers
1 cup (2 sticks) butter (NO substitutes!)
1 cup brown sugar
2 cups chocolate chips

Preheat oven to 350°. Line a sturdy 10″ x 15″ baking sheet with aluminum foil and cover the surface with the crackers in a single layer, edges touching.
In a small saucepan, melt the butter, add the sugar and bring to a boil. Boil, stirring constantly with a wire whisk, for 2 minutes. The mixture will gradually combine and form a thick sauce. Be careful as it can burn very easily – keep whisking! This sauce is also delicious poured over plain popcorn to make homemade caramel corn.

Gently pour the sauce over the crackers and carefully spread it out with a spoon to cover all the crackers.
Bake the tray for 10-12 minutes or until the sauce bubbles all over
the surface.

Remove from the oven and immediately sprinkle with the chocolate chips. Return to the oven for 1 minute to melt the chips.
Remove from the oven again and, using the tip of a knife or spoon, spread the chocolate to cover the crackers.
Let cool completely (you can refrigerate) and cut or break into pieces. I find it easiest to lift the foil off the pan and peel it away from the toffee before breaking it into pieces. If you have any trouble with the foil sticking, you can spray it with non stick cooking spray before laying out the crackers, though I have never had a problem. It comes off pretty easy if you pull it slowly in one big piece.
I prefer to store this in the fridge to keep the chocolate from melting or getting too soft. Be warned, it’s highly addictive… but I’m weak.

In the Kitchen: Hashbrown Casserole

This week – Cheesy Hashbrown Casserole – if you like it at Cracker Barrel, you will like this! The hardest part about this recipe is finding a big enough bowl to mix it in. It’s delicious for breakfast but also makes a great side dish for dinner. This recipe could easily serve about 10 but it also stores well in the fridge. When I make a pan, we just heat up individual servings each morning for breakfast and it lasts through the week. You will find a link to a printable recipe card at the end of this post.
Prep time: 15 min  |  Cook time: 45 min  |  Serves: About 10
What you’ll need:
one bag frozen shredded hashbrowns
1/2 C margarine, melted
1 small can cream of chicken soup
8 oz colby cheese (cheddar works, too)
1 tsp salt
1/2 tsp pepper
1/4 C finely chopped onion (optional)

In a large bowl, mix the margarine, cream of chicken soup, cheese, onion (optional), salt and pepper until blended. I leave the onion out but use about 1/4 tsp onion powder instead.
Next add the hashbrowns and mix until coated. It helps to leave the hashbrowns out to thaw in the fridge about an hour before making this, or on the counter for about 30 min. If frozen, beat the bag on the edge of the counter before mixing in to help break them up.
Grease a 9×13 baking pan with cooking spray or butter and spread mixture evenly into the pan.
Cook at 350° for about 45 minutes or until top begins to bubble and brown. The potatoes will still look the same as they did when frozen, so you can taste it to make sure they are soft and cooked through. 
It’s also hard to over cook this, so it’s great to make for a party or potluck – just throw it back in the oven to warm it up before serving. It also reheats well in the microwave.
One bite and you will surely be addicted.

In the Kitchen: Roasted Red Pepper Alfredo

The base sauce for this meal is easy and versatile. I make it with chicken, mushrooms and spinach but it is also delicious without or you can add any vegetables you like. I serve it over cheese tortellini but it is good on any pasta or even grilled chicken or fish. This recipe will easily serve 4 people or 2 people twice and you will find a link to a printable recipe card at the end of the post.
Prep time: 15 min  |  Cook time: 15 min  | Serves 4

What you’ll need:
16 oz jar roasted red peppers in oil (1/4 cup used in recipe)
skinless boneless chicken, 3-4 tenderloins or 1-2 breasts
6-10 mushrooms
2/3 cup spinach, fresh or frozen
16 oz jar alfredo sauce
grated parmesan cheese (in a shaker is fine)
onion powder, garlic powder, salt & pepper
1 package cheese tortellini

The first step is to prepare the red peppers. Drain the oil from the 
jar and puree the peppers in a food processor or blender.
Once pureed, pour back into the jar for storing. You will only use a small amount each time you make this sauce so one jar will last for several meals (which also makes it easier next time!). It stores well in the refrigerator.
I always cook with chicken tenderloins which we buy in bulk – they are inexpensive and easy to use. You can also use breasts. I use 3-4 tenderloins for this meal but you can use as much or as little as you wish depending on how many you are feeding. I also like a lot of mushrooms.
Cut the chicken into bite size pieces and saute in a deep skillet. Season with onion and garlic powder and a little salt and pepper. 
For the amount of chicken I use, about 1/8 to 1/4 tsp is good. 
When the chicken is almost done, add the mushrooms and saute until cooked through.
Next, push the mixture to the sides and add a bit of margarine to the center of the pan. Add the spinach and saute until cooked through. I use frozen spinach but fresh works as well. 
Pour in the alfredo sauce and mix well. We like a little more sauce so I add 1/4 cup milk to the empty alfredo jar, shake well and pour into pan along with a few shakes of parmesan cheese.
Next add about 1/4 cup of the pureed red peppers to the sauce. You can use more or less depending on taste. Mix well and heat through.
Serve over cheese tortellini with garlic bread and enjoy!

> Click here for a printable recipe card.