In the Kitchen: Ricotta Zucchini Fritters

Chances are that you, like me, are always looking for new ways to use ALL THOSE ZUCCHINIS you have this time of year, whether from your garden or picked out of the overflowing baskets at the farmers market. I’ve been wanting to try something like this for awhile now and am so glad I finally did because seriously people, I’m tooting my horn over here on this one.
Ingredients
About 1 pound zucchini, shredded (2 medium or 1 large)
2 large cloves garlic, thinly sliced
3 large scallions, sliced (green and white portions)
zest of one large lemon (about 2 tsp)
1 tsp salt
1 tsp pepper
1/2 cup ricotta cheese
2 large eggs
1 scant cup flour
Oil (for frying)
In a large bowl combine zucchini, garlic, scallions, lemon zest, salt, pepper, ricotta and egg and mix well. Add flour and mix until just combined.
Heat 1/4″ oil in a skillet over medium high heat. Use about 2 T batter for each fritter, using the back of your spoon to spread into a thin cake once dropped in the pan.  
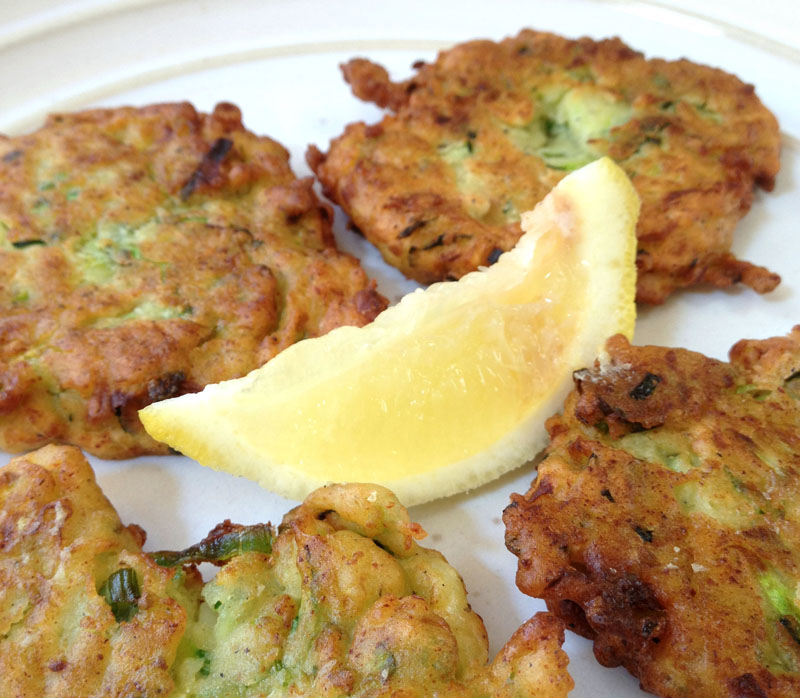
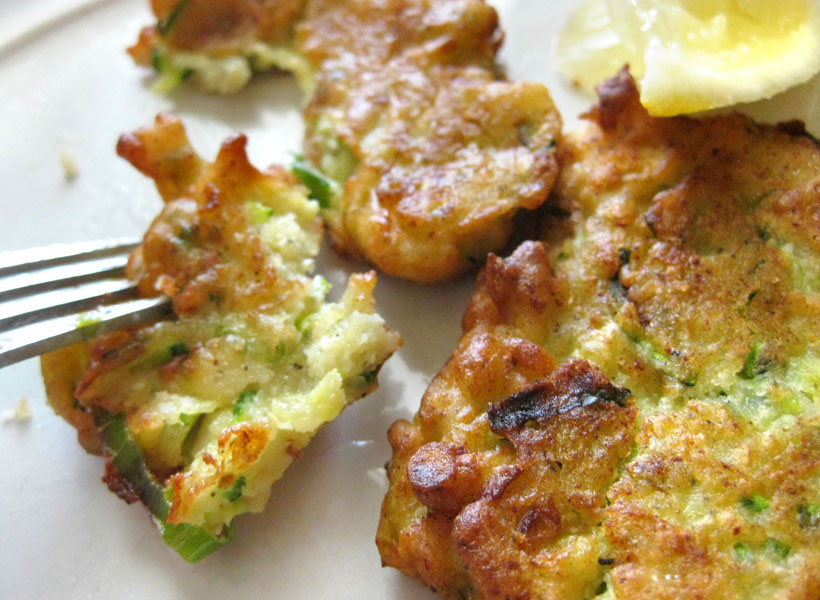
Fry for about two minutes on each side, or until golden brown. The middles will stay slightly mushy, which is ok! Set on paper towels to drain excess oil. Serve warm with lemon wedges and sour cream, if desired, and eat your brains out! 
This recipe makes about 12 three inch fritters and can easily be halved. You can keep fritters warm in a 250° oven while cooking if needed, but I have yet to try reheating any leftovers (because I ate them ALL, of course). 
I hope you enjoy these as much as I have (with every meal for the last two days), and let me know what you think!

In the Kitchen: Corn Casserole

This week we’re cooking up delicious Corn Casserole. It’s like cornbread with a twist and is really easy to make. Just a few basic, inexpensive ingredients cook up a big pan that’s sure to please. It’s a great side dish and perfect for a holiday meal or potluck. The leftovers also store well and can easily be reheated in the microwave or oven. You can even mix it up ahead of time and leave it in the fridge until your ready to bake. You will find a printable recipe card at the end of this post as well as some variations to spice up the dish.
Prep time: 15 min | Cook time: 45 min | Serves: About 8 – 12
What you’ll need:
1/2 C (1 stick) margarine, melted
2 eggs
1 tsp salt
1/2 tsp pepper
8 oz sour cream
15 oz can whole kernel corn, drained*
15 oz can creamed style corn
1 box corn muffin mix (I use Jiffy)
In a medium/large bowl, soften/melt the margarine, add the eggs, salt and pepper. Stir until mostly blended.
Next add the sour cream and both cans of corn. Mix again until blended.
Last, add the corn muffin mix, fold in slowly and mix until blended.
Pour into a greased baking dish of your choice. One batch will fill a 13×9 pan or you can use two round dishes, fluted pie pans, smaller rectangles etc. The baking time is usually the same regardless of what shape pan you use.
Bake at 350° for about 45 minutes. Top will begin to crisp and brown and the underneath will remain softer. Let stand about 10 minutes before serving for inside to set a bit. 
*If you would like this dish a little gooier inside, more of a ‘corn pudding’ with a bready top, do not drain the whole kernel corn. I make it both ways, and both are delicious. 
Aside from being easy and super yummy, what I love about this recipe is the versatility. Eat it as a side dish with herb grilled chicken or ham or top it with country gravy (yummmm). It’s also a great, hearty vegetarian dish when served with a salad or fruit. 
You can easily spice up this recipe or make it a meal in itself by adding ingredients such as cheese (cheddar or swiss work great), cubed ham, bacon, or cut veggies before baking. Just be sure any meat or veggies you add are precooked. Even simply adding additional seasonings such as garlic and onion powder or crushed red pepper will give it a different taste. I’d love to hear about what creative ways you find to change up this recipe or if you enjoy it just the way it is!

Looking for more yummy recipes? Click here to see all my previous In the Kitchen posts.

In the Kitchen: Hashbrown Casserole

This week – Cheesy Hashbrown Casserole – if you like it at Cracker Barrel, you will like this! The hardest part about this recipe is finding a big enough bowl to mix it in. It’s delicious for breakfast but also makes a great side dish for dinner. This recipe could easily serve about 10 but it also stores well in the fridge. When I make a pan, we just heat up individual servings each morning for breakfast and it lasts through the week. You will find a link to a printable recipe card at the end of this post.
Prep time: 15 min  |  Cook time: 45 min  |  Serves: About 10
What you’ll need:
one bag frozen shredded hashbrowns
1/2 C margarine, melted
1 small can cream of chicken soup
8 oz colby cheese (cheddar works, too)
1 tsp salt
1/2 tsp pepper
1/4 C finely chopped onion (optional)

In a large bowl, mix the margarine, cream of chicken soup, cheese, onion (optional), salt and pepper until blended. I leave the onion out but use about 1/4 tsp onion powder instead.
Next add the hashbrowns and mix until coated. It helps to leave the hashbrowns out to thaw in the fridge about an hour before making this, or on the counter for about 30 min. If frozen, beat the bag on the edge of the counter before mixing in to help break them up.
Grease a 9×13 baking pan with cooking spray or butter and spread mixture evenly into the pan.
Cook at 350° for about 45 minutes or until top begins to bubble and brown. The potatoes will still look the same as they did when frozen, so you can taste it to make sure they are soft and cooked through. 
It’s also hard to over cook this, so it’s great to make for a party or potluck – just throw it back in the oven to warm it up before serving. It also reheats well in the microwave.
One bite and you will surely be addicted.

In the Kitchen: Easy Fiesta Breadsticks

Welcome to a new series for 2009 all about the one thing I love more than making jewelry – eating! Well… and cooking, but mostly eating. Every other Tuesday, opposite my featured artists, I will feature a new recipe with how-to photos or fun kitchen related finds. You can easily access these posts anytime with the links under In the Kitchen Series in the right sidebar.
This week, easy Fiesta Breadsticks – they’re a yummy appetizer & snack or perfect with any spicy dish.
Prep time: 5 min  |  Cook time: 11 min |  Makes 4 breadsticks

What you’ll need:
• 1 package refrigerated crescent rolls
• taco seasoning
• shredded monterey jack cheese

On a small cookie sheet, unroll the crescent roll dough, keeping two wedges together as shown above. You will get 4 breadsticks from a standard package of 8 rolls. You may need to flatten or reshape the sections after unrolling. Also make sure the two wedges are connected well, you don’t want any gaps. You can overlap the two wedges a little and press them together along the seam if needed. 
Sprinkle with the desired amount of taco seasoning.
Next, add the shredded cheese down the center. I prefer monterey jack but these would be equally delicious with other types of cheeses as well. I like a good amount of cheese but if you use too much they are hard to close and break open when cooking. 
Fold each side of the dough up and press the seam closed. Be sure to also press the top and bottom closed or the cheese will leak out. Sprinkle a bit more taco seasoning on top.

Bake at 375° for 11 min. or until the dough begins to brown.
Serve warm and enjoy! These breadsticks have quickly become a favorite in my house. I always serve them with my Santa Fe Chicken, which I will feature next time on February 3. Be sure to stop back!