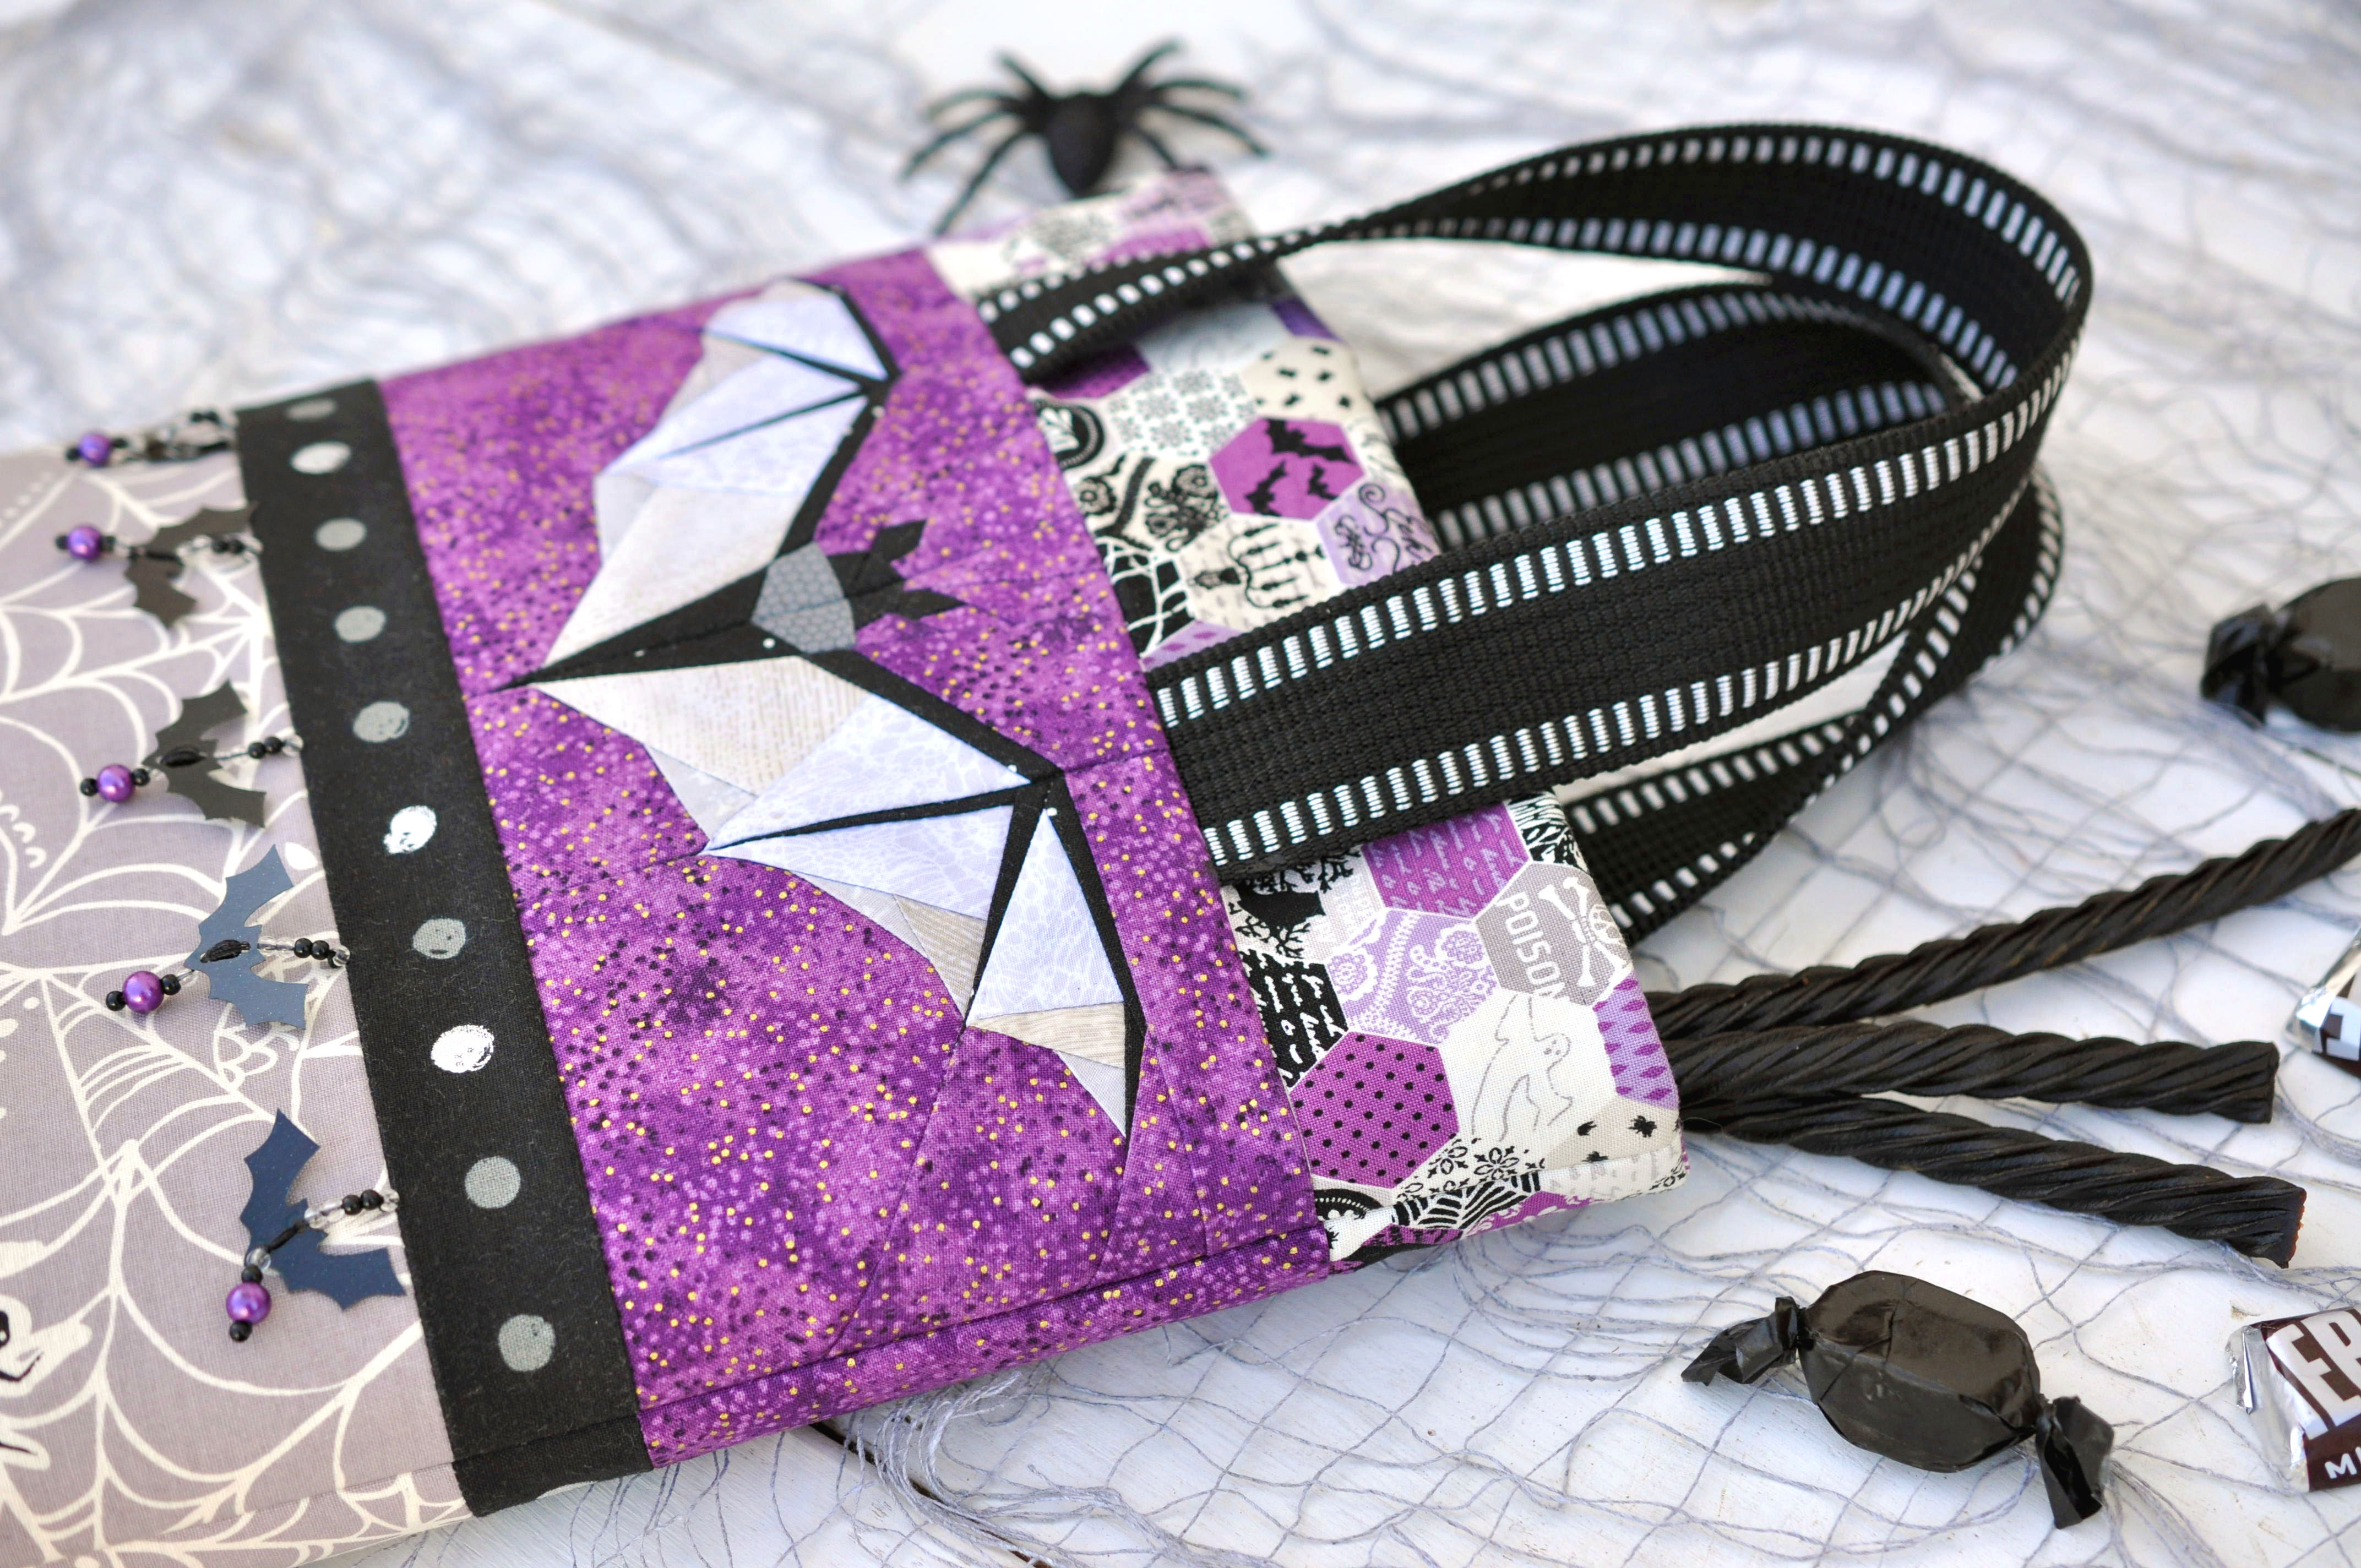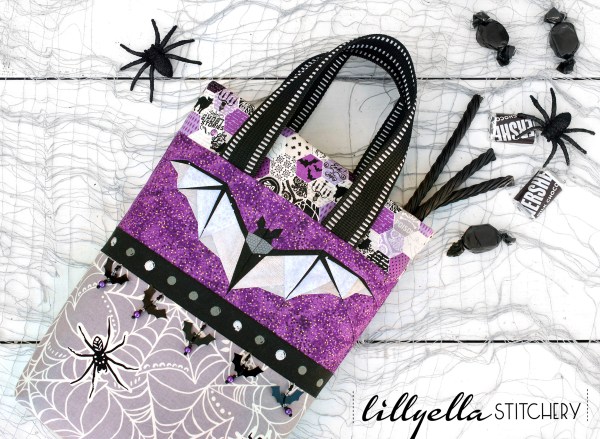
After falling in love with that hexie print, I found the matching purple fabric and there began my plan! When I pieced the 10″ Midnight Bite block, I just knew it had to become a treat bag. This project slowly came together as I found each new piece and it couldn’t have worked out better!
The handles are webbing I found in the trim section of Joanns, the silver is reflective so it’s perfect for night time candy hunting! Then there is the bat trim… I mean, come on! It’s even purple. No brainer. I also found this at Joanns. It’s made by Simplicity and was on an endcap of an aisle. There were spider pom poms too, which I also have big plans for.

This bag was quick and easy to make and can be customized in a variety of ways. You can use any fabrics, a variety of trims or fabric for the handles, and you can even adjust the measurements to modify the size for your preferences. It doesn’t even have to be just for halloween, it would make a perfect holiday gift bag!
This tutorial is really basic (because I have more bats to make!), but if you have any questions, just leave a comment below or shoot me an email. Please read thru the entire tutorial before beginning.
PREPARING YOUR BAG PANELS:
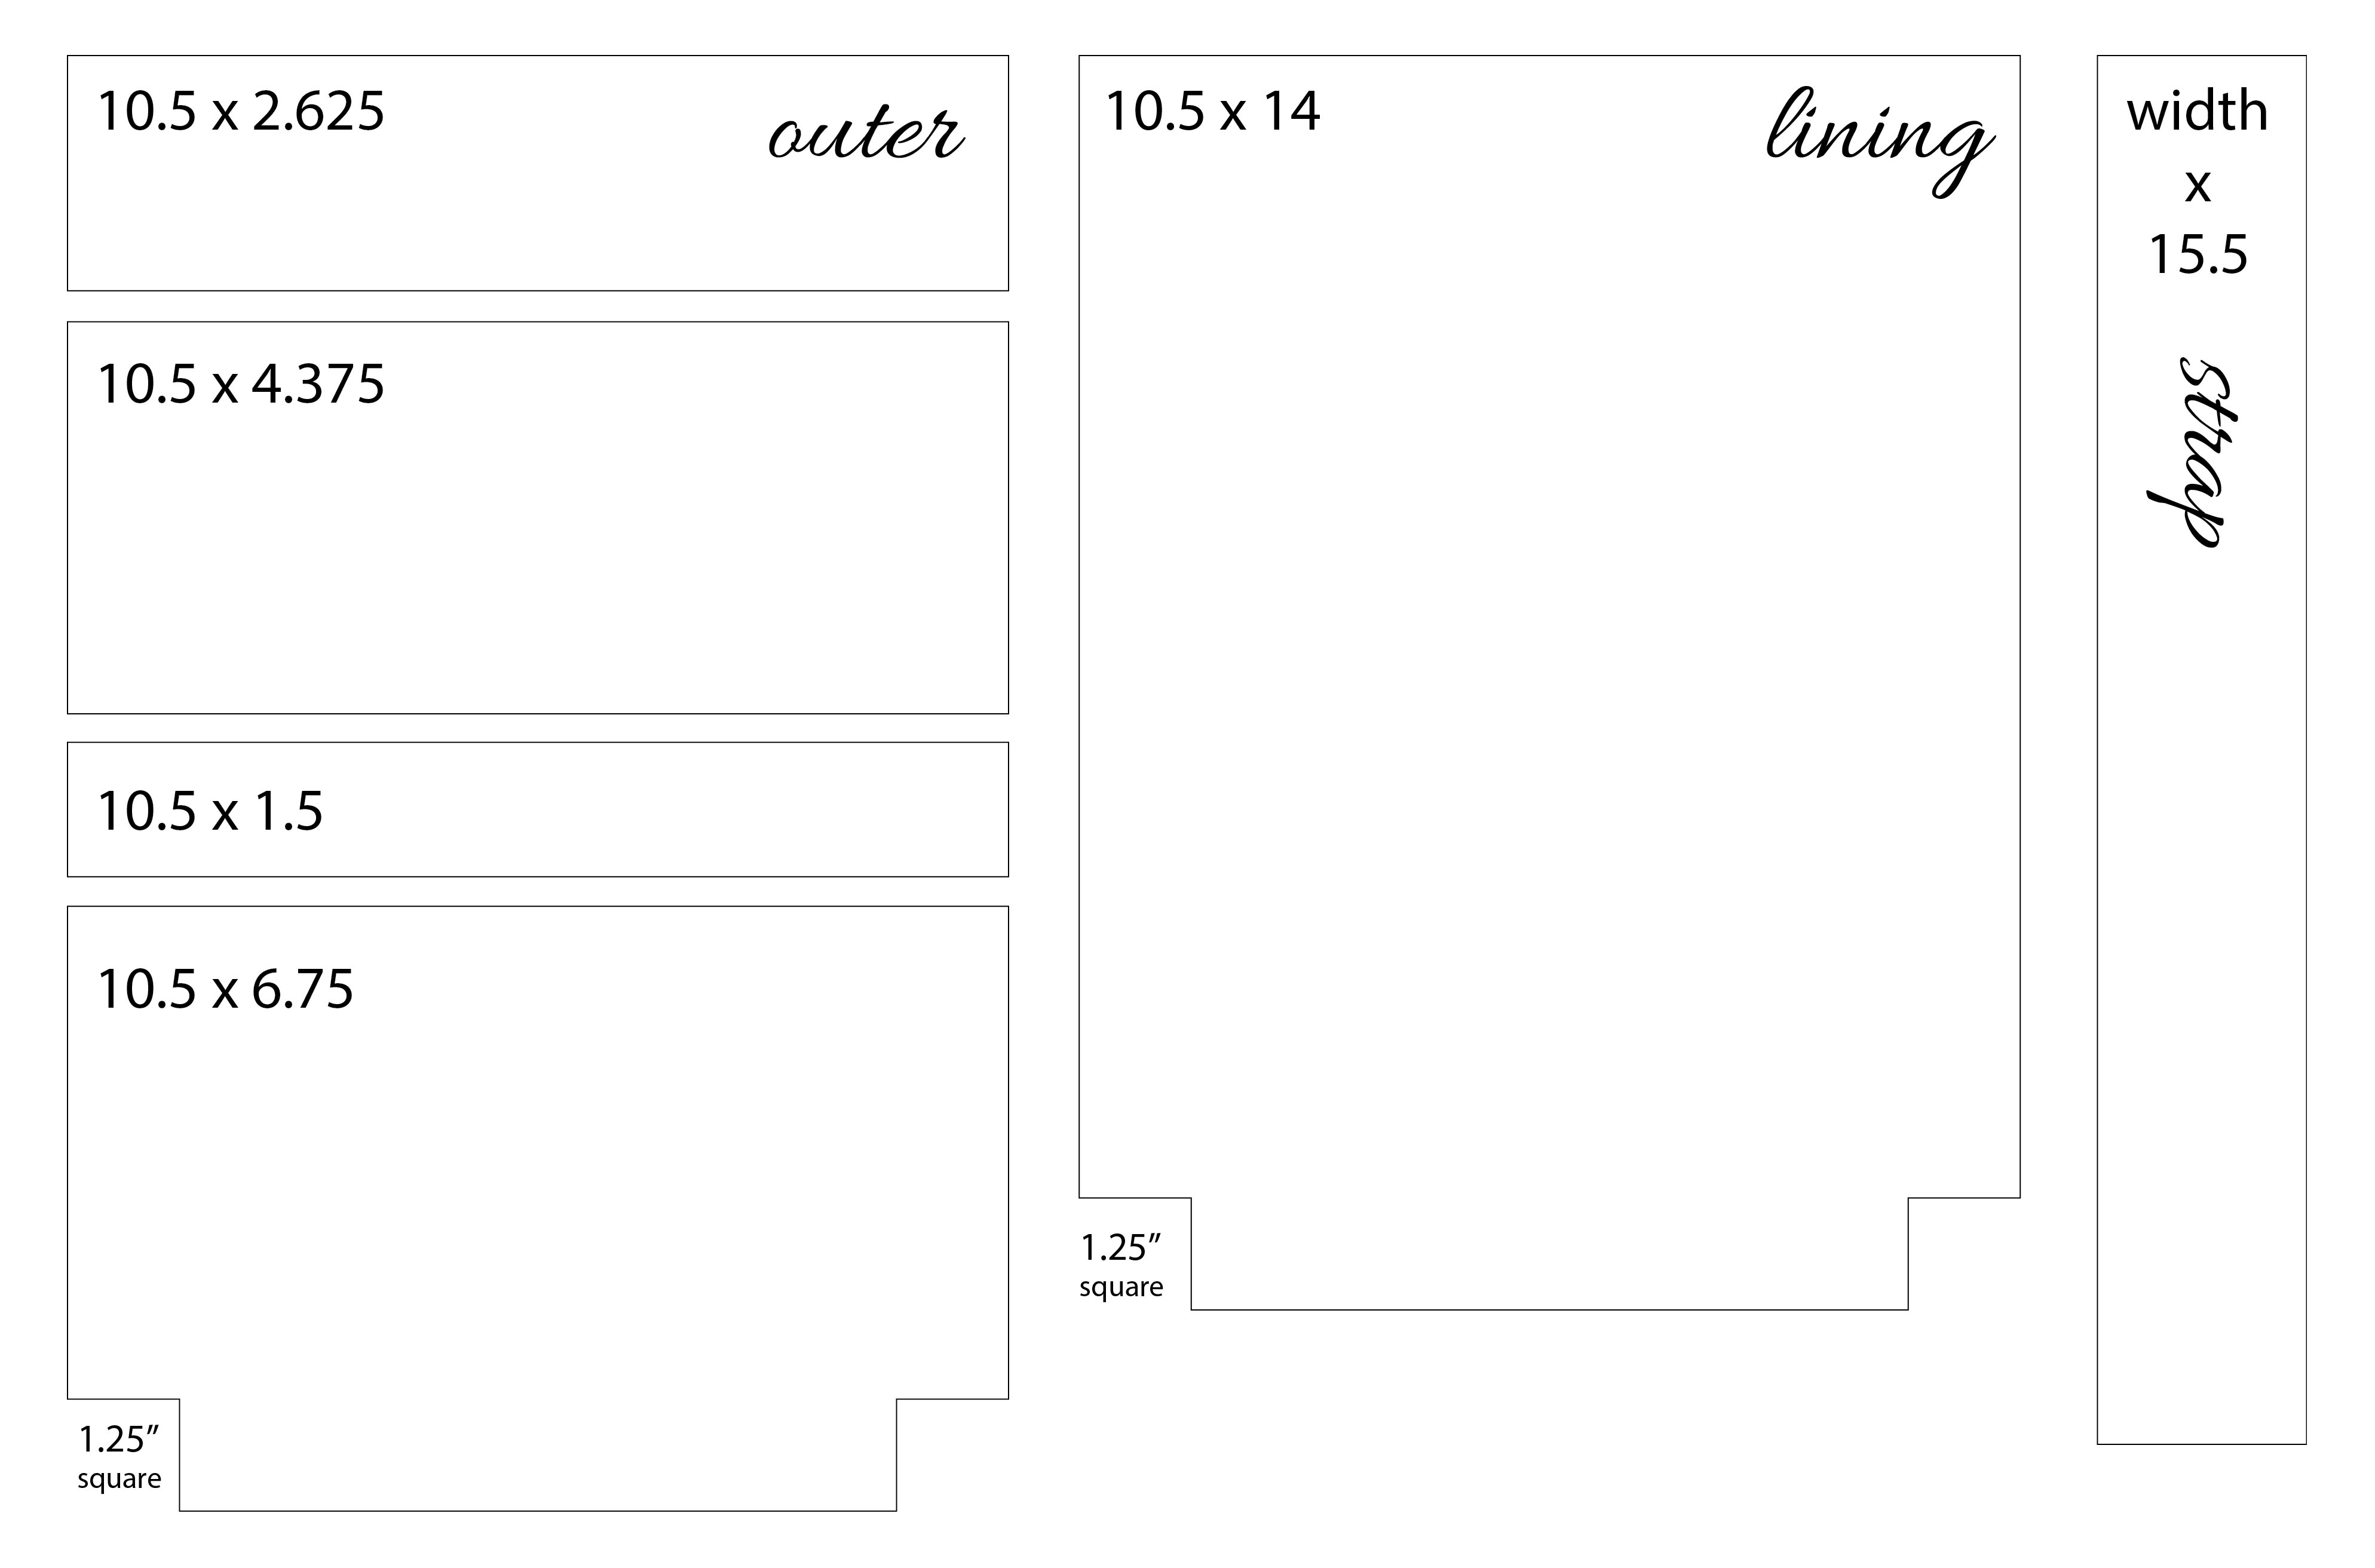
The finished size of this bag is 10″ wide x 12″ high x 2.5″ deep at the bottom with a 4.5″ drop. Below are the trim sizes for the outer pieced panels, the bag lining and the handles. You will need two of each piece. My handles are about 1.25″ thick but you can make them any size you wish.
My bag has a small boxy bottom. Simply eliminate the corner cuts if you don’t want a boxy bottom. You may also want to shorten your bag if you do this. I wanted my bag handles to be just long enough to slide over my hand easily and hang from my forearm, but not so long that the bag would drag on the ground if a little one was carrying it. You can adjust this measurement to be comfortable for you.

Begin by piecing the three bottom outer panel pieces with a 1/4″ seam. In my bag, this is the bottom spiderweb print, the strip of dots and the focal bat (*see ‘Adding Decorative Trim’ section below for options on how to add trim accents).

The focal bat panel is the 10″ block from my Midnight Bite pattern, the finished width is 10.5″ and I trimmed the height of the block to 4.375″. This odd measurement was simply based on how I visually liked the bat to be framed, you can make this focal panel any size, just be sure to adjust the lining measurement equally. The same applies to the top band of my bag (the hexie print), the measurement was based on the size of the hexies.
Next you will add the handle before piecing on the top band of fabric.
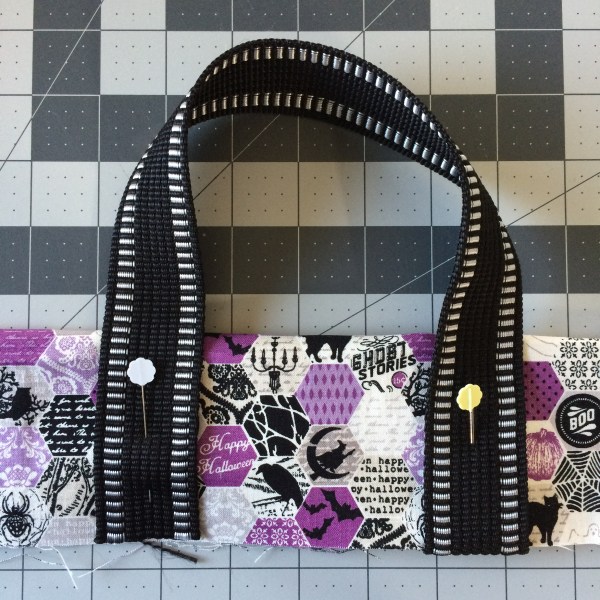
Lay your top fabric right side up, right reading. Lay your handle on top spacing the two ends equally from the center. You can line up your handles with the bottom edge of your fabric or drop the ends down about 1/4″ below your fabric to give a little extra grip in there. My finished bag has about 2.5″ between the handles (it’s shown a little wider in this photo which I took after the fact). Pin in place.
Next you will lay the pieced section of your outer panel right side down, upside down, on top of your handle piece, lining up the bottom edges. Sew along the bottom edge with a 1/4″ seam. I recommend going back over the handle areas a couple times and backstitching well on either side of them.
Press the larger piece down. NOTE: My handles could not be ironed, so be sure to test your material if you aren’t sure.

Repeat these steps for the other side of your bag. After my two outer panels were assembled, I used fusible fleece on them to stabilize my bag and I love the feel of it. You can also use batting and then quilt your panels or do some edge topstitching to hold it in place. If you’d like a lighter bag, you can use a medium weight interfacing, but I do recommend using some type of interfacing on the back of your outer panels. I did not use any interfacing on my lining.
CONSTRUCTING THE BAG:
Next you will take your two outer panels and place them right sides together. Sew with a 1/4″ seam down the left and right sides and across the bottom. You corner cut outs will be open. Repeat these steps for the two lining pieces, but leave a large gap in the bottom seam for turning. Just sew about 1/2″ in from either end.
To sew the boxed corners, keep your pieces wrong sides out. Open up the piece a bit and fold one inner side seam down to the inner bottom seam, lining them up and lining up both cut edges of your corner cut out. Sew along the edge with a 1/4″ seam. Repeat for the other side of your bag outside and your lining.
To sew in your lining, turn the outside of your bag right side out. Keep your lining wrong side out. Slide the outside of your bag into the lining, the two pieces will be right sides together. Line up the top edges making sure to match the side seams and sew around using a 1/2″ seam.
Turn your bag right side out through the gap in the bottom of your lining. Stitch the gap closed and turn your lining inside your bag. Press around the top and top stitch if desired.

ADDING DECORATIVE TRIM:
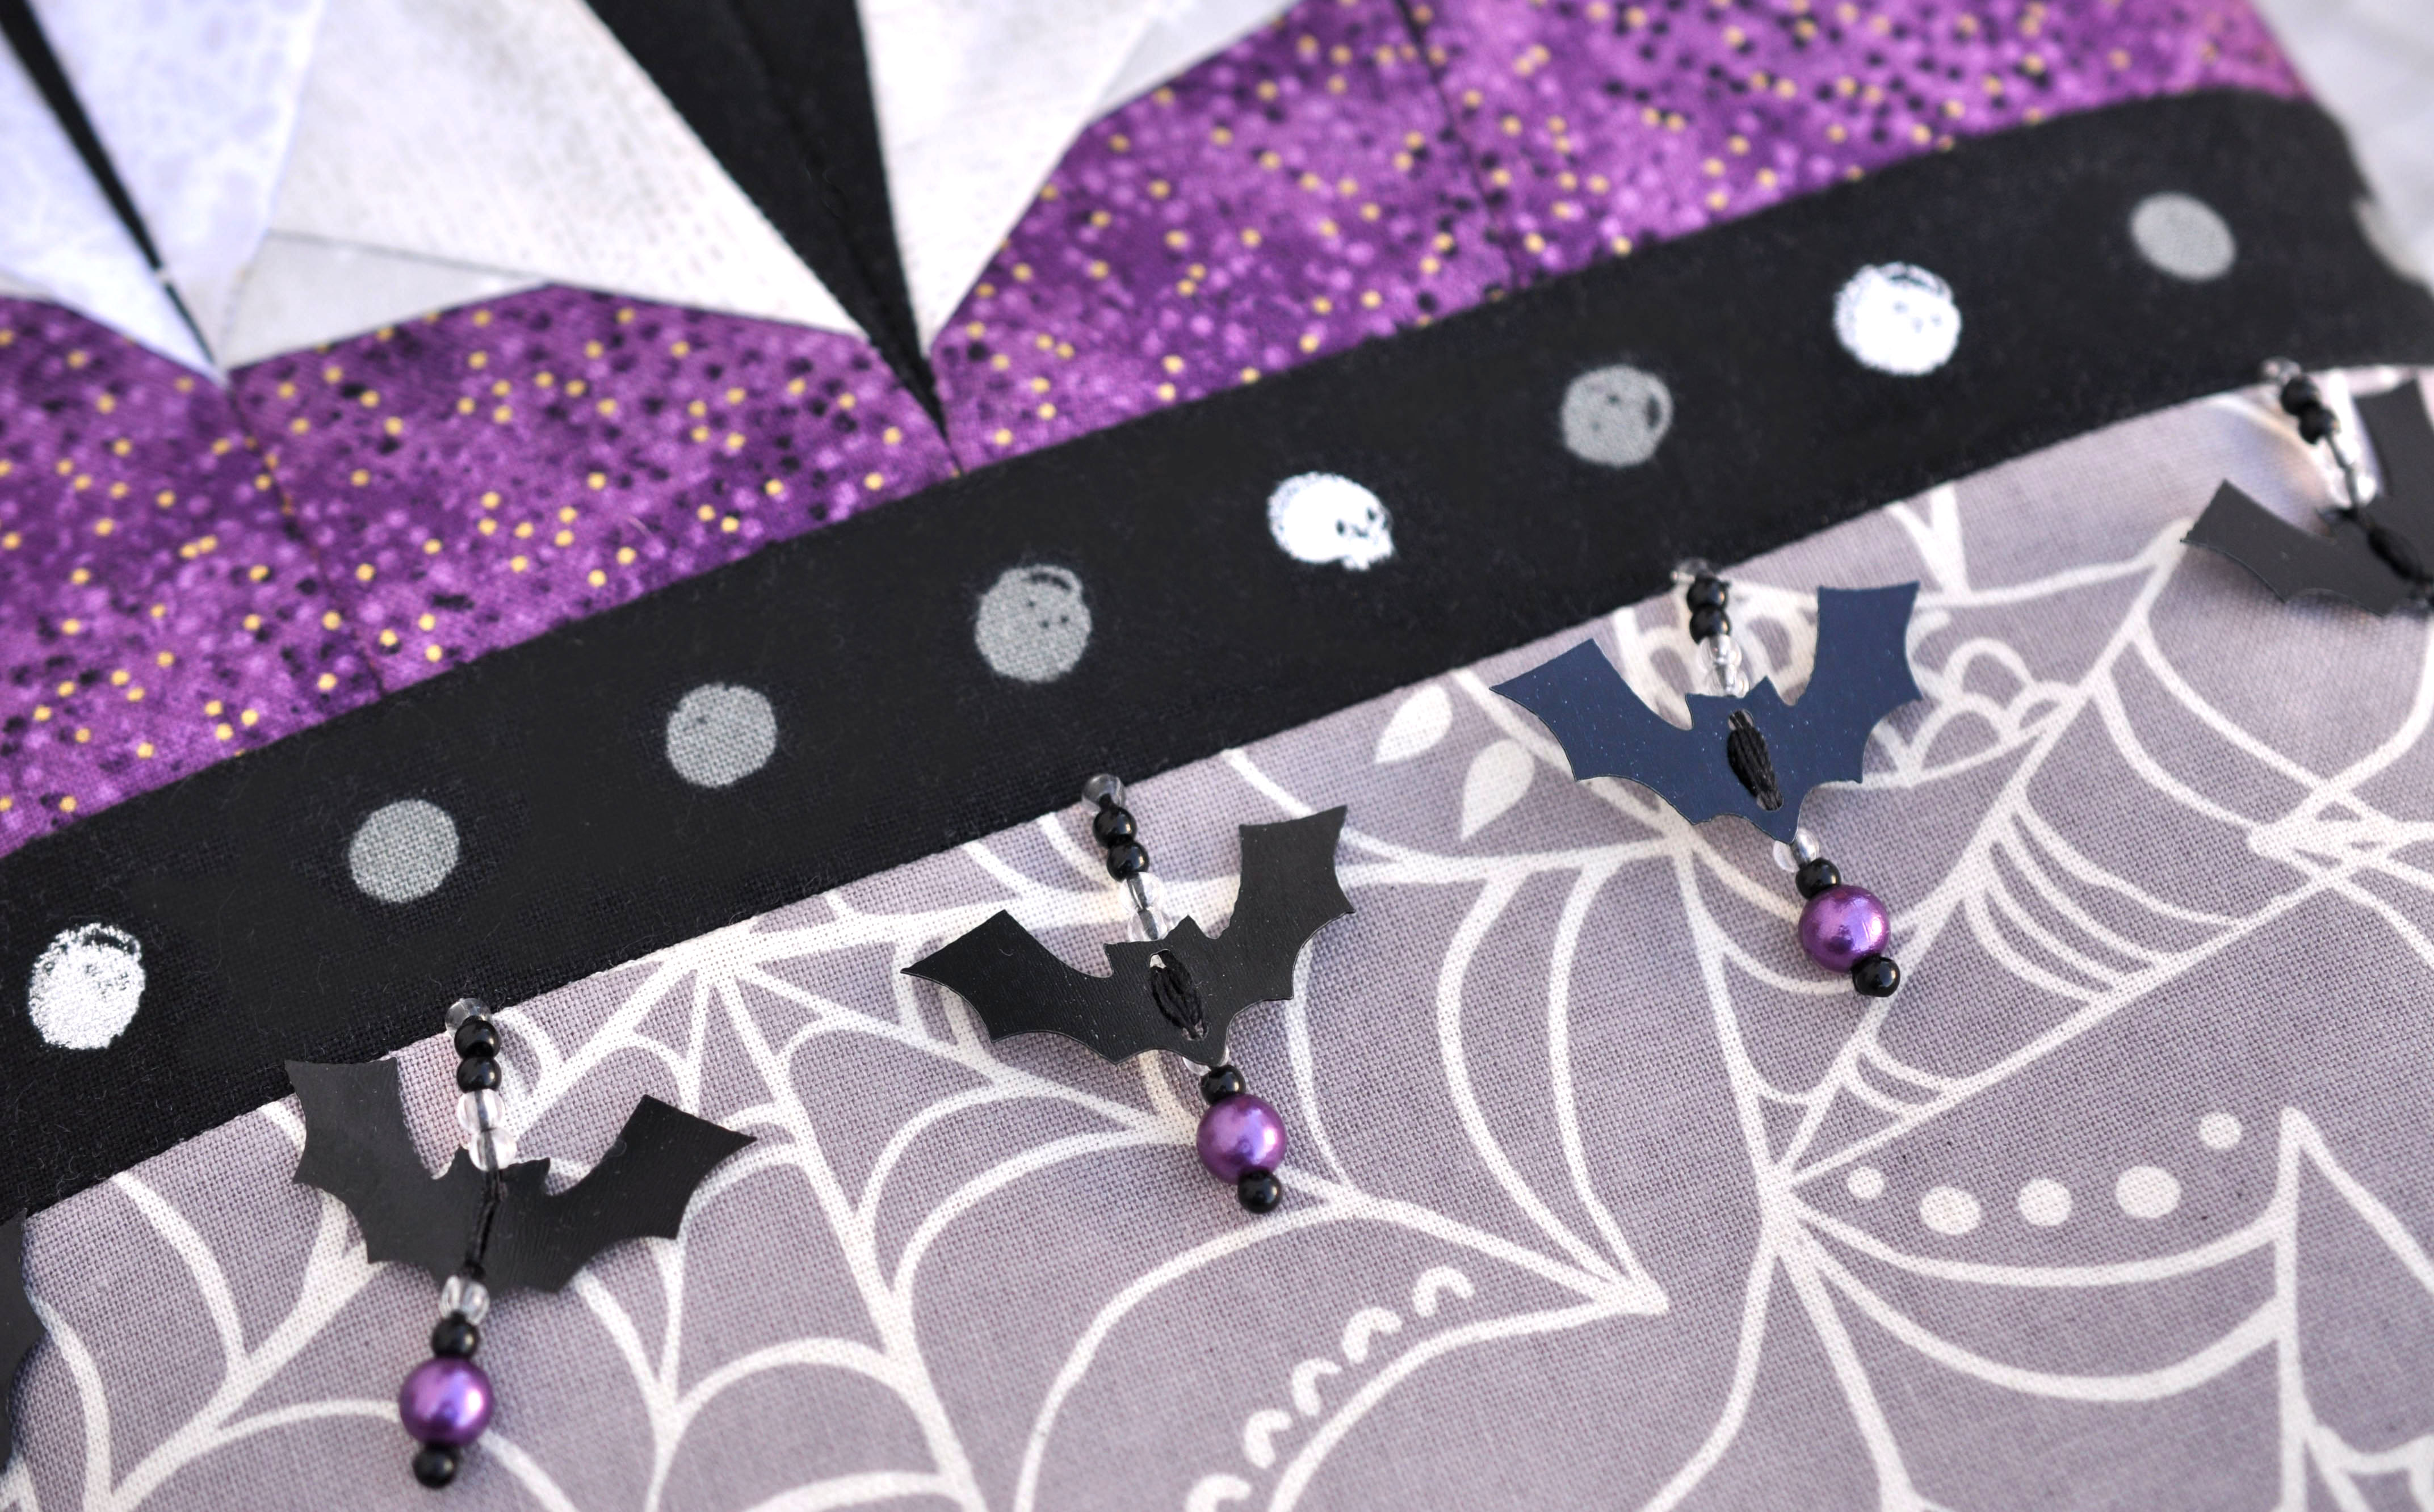
Once all the elements of this bag came together and I was planning the design (see a couple options I was tossing around below), I was going to stitch the bat trim onto the bag panels after they were pieced and then use a piece of woven striped ribbon on top. I liked the added design element but I also wanted to cover the satin ribbon the bats were on because it looked a little generic to me.

After texting about seven people for their opinions (ya, Im a high maintenance friend), I decided to keep it a little cleaner and just use the bat trim, but I did not want to throw off the balance of the black dotted fabric strip by having the black ribbon of the bats showing. Typically I would sew the trim into the seam, much like piping, but I was concerned about keeping it in place and hitting the beads with my machine foot. I also wanted the bats to fall evenly in line with my dots (OCD, I know). So I clipped the bats off the ribbon and restrung each one then sewed it in place on my bag panels. I did this after adding my fusible fleece to my pieced panels. Since there’s only five bats on each side, it went really quick.
FEATURED FABRICS:
The top hexie print is from the line Happy Haunting by Deena Rutter for Riley Blake (it also comes in orange and black!). I unfortunately have no idea what the purple background of my bat is. I grabbed it last minute at my LQS, but I’ll see if I can find it next time I’m up there. The Happy Haunting line has a purple print with tiny black spiders on it that would match and make a cute background, too. The black strip with the dots is Spellbound from Cotton + Steel and the bottom web print is from Spooktacular, Too (also in the newer Spooktacular Eve) by Maude Ashbury for Blend.
I hope you enjoy this tutorial, happy haunting, friends!