In the Kitchen: Caramel Apple Mini Pies

For the past ten years or so, my husband and I have gone apple picking on my birthday. The timing is perfect for us (October 15) because our favorite, braeburn, are pretty much the only thing left on the trees. We pick a lot of apples, so many we can hardly carry them all. I think we usually go back for more, too.

I spend the next few weeks making apple butter, apple sauce and apple jelly (my dad’s favorite), but we’ve actually never picked enough to leave room for making pie filling. Honestly, I’m not really a huge fruit pie fan, will the exception of cold soggy tart cherry pie, which any family member of mine will attest to.

This year we will not be picking apples on my birthday, because I’ve been picking them from my very own trees for the last two months! There are still a few left hanging and I still have buckets around the house and bowlfuls in the fridge, but I’ve already processed more apples this year than the last ten combined. That meant my first attempt at pie filling! It was almost a debacle. Actually, I think it does qualify as a debacle, but a salvaged one. In the end all it meant was the quarts I intended to have became pints. I’ve since been on a mission to come up with some mini dessert recipes that someone could easily make with a smaller amount of pie filling, and here’s my first! Did I mentioned those are marshmallows on top?

Ingredients
pie crust dough (homemade or store bought roll)
apple pie filling (homemade or store bought can)
caramel baking bits (in the baking aisle with the chocolate chips)
mini marshmallows

Aside from being quick and easy, the beauty of this recipe is you can make just a few or a whole baking sheet worth at a time. Leftover dough and filling can be stored in the fridge to make something else or bake more fresh later.

Preheat oven to 400°. Cut 4″ to 5″ circles from the dough, depending on what size you’d like the finished pies (I cut about 4.5″). Spoon one to two tablespoon of filling in the center (you can cut up the apples if you’d like or need to). Sprinkle the caramel bits on top of the filling (as few or as many as you’d like), then fold up and crimp the edges.

Bake for about 10 – 15 min until the crust edges start to brown. Remove from the oven and cover the top with the mini marshmallows. You can also cut up full size marshmallows if you happen to have those. I wasn’t sure if too many would make the pie’s too sweet so I went light on them as you can see in the photo, but they were amazing and next time I’m totally piling them on!

Return to the oven for about 3 – 5 minutes until the marshmallows start to puff and brown.

As hard as it will be, I recommend waiting about 10 minutes before serving for the marshmallows to set and the pies to cool a bit because they will be bubbling!

I made a few without the caramel bits and they were excellent as well. You can also drizzle caramel (or butterscotch) sauce over the top in lieu of baking with the bits. Hope you enjoy!

hobby #727 (and a little pillow giveaway!)

I just have to start by reminding everyone that it’s October! (As if anyone could forget.) It’s my favorite month and the start of my favorite season. Me and summer just don’t see eye to eye, I’m an overall better person when the air is cool and there are pumpkins everywhere! I’m extra excited about fall (and winter!) this year because I am finally out of the North Carolina climate and planted somewhere that actually gets cold. I mean single digits and below zero cold. Sorry NC friends, 30° is not cold! 🙂
So, onto the topic at hand, my newest hobby. I was destined to be a quilter, I could feel it in my bones, it was just a matter of the right time and place to jump in. It was at the top of my bucket list after the move and crazy enough, it all fell into place! I found a local shop that offers classes and took a beginners class about a month ago. Totally hooked! The class project was a 36″ square log cabin style quilt. The hardest part for me was choosing fabrics, but I just had to keep telling myself that it wouldn’t be my only quilt, so I picked something I loved and went with it.

It was a blast! Like anything, learning the basics and having the right tools make all the difference, but I do believe this is a craft of patience and the OCD perfectionist in me doesn’t hurt either. I’m still pretty slow at it, but now that I have a space to keep my machine and supplies out, it doesn’t matter! I can work when I have time and not stress about it. The hard part will be finishing a project before starting a new one, I already have four new quilts in the works and am out of work space!
GIVEAWAY TIME!
I had a ton of extra fabric strips leftover from my first project so I just kept sewing up more squares! I thought they would make an adorable little pillow, was I right? This also gave me a chance to practice actually quilting a piece on my machine and was my first experience with piping. I lost a chunk of my right index finger, but otherwise a smashing success (I promise, it’s not inside the pillow).
I thought it would be fun to give this little pillow away and brighten someone’s day! 
To enter, please leave a comment below telling me who you plan to give gifts to this holiday season (family, friends, co workers, etc) and what you are planning to give (homemade or bought). 

Just be sure your first name and email are included in your profile or your comment. I will draw a winner randomly on Monday October 7.

Happy October! ~ nicole

In the Kitchen: One Pan Pasta

My husband recently saw this recipe while browsing my Martha Stewart Living magazine (you can laugh at the visual, I do) and was for some reason obsessed! I could never claim to be mightier than Martha, but I have to admit that I’ve never been a huge fan of her recipes as they are written. I typically find they are missing something or need more flavor, more liquid, a touch of this or that, so I honestly would have passed right over this one if he wasn’t so darn persistent.

It seems to have become quite the rage ’round the interwebs these days and while I read many variations on this recipe, I (more or less) stuck with the original and loved it!

It’s simple (one pan, ten minutes people!) and surprisingly fresh and flavorful. I thought it would be dry, and even looks a little dry in photos, but was pleasantly surprised with the amount of sauciness. The taste was different than I expected (sweeter and spicier), but super delicious and easy to modify to your personal tastes, not to mention a beautiful way to put your garden harvest to use! (And an excitement Mr. Wizard type experience for your children, or husband, in my case…)

Here is a link to the original recipe on the Martha Stewart website and below is how I made it, what I learned and how I’ll change it next time:

Ingredients
12 ounces linguine
12 ounces grape or cherry tomatoes (halved or quartered)
1 yellow onion, thinly sliced
4 large garlic cloves, thinly sliced
1/2 teaspoon red pepper flakes
2 sprigs basil, chopped
2 tablespoons extra virgin olive oil
4 cups (32 ounces) vegetable broth
1/2 cup water
Fresh grated parmesan cheese

Combine all ingredients except the cheese in a large straight-sided skillet or wide dutch oven. You’ll need a pan that’s big enough for the pasta to lay flat and some room for the liquid to bubble.

Bring to a boil over high heat and continue boiling, stirring occasionally to prevent the noodles from sticking, for about 9 – 10 minutes until the pasta is al dente and most of the liquid has evaporated. And that’s it! You’re done! Spoon it into a bowl, top it with loads of grated parm and scarf it up.

I made mini beef meatballs that we mixed in before serving, and husband requested ‘those little balls of fresh mozzarella’, which I thought was a great idea!

Modifications
The original recipe calls for water and about 2 teaspoons salt (or more to taste). I used vegetable broth for some added flavor and a little water to make up the difference. Four and half cups of liquid worked perfect for me, which is what the original recipe called for. I thought being at a high altitude that I would need to boil it longer for the noodles to be done and may need more liquid, but I did not.

I was worried there would be too much onion (and I always cook with onion) or that the thin slices would be too big (as opposed to diced) but they cooked down nicely and I didn’t even notice them.

The 1/2 teaspoon red pepper added quite a kick, so lessen it if you’re not a fan of spice (we are!). If you look at the other photos of this dish, you will see the basil sprigs are whole. Not really sure how that works unless they took them out at the end? I chopped mine up so it could incorporate. You can also save some fresh to add when serving if you like it (yum!).

Next time I cook this dish, I will make a few changes…

I love mushrooms, so will add about 6 – 8 ounces fresh sliced along with the other ingredients at the beginning.

It made a ton! Dinner twice (for two) and then some. I think I will use 8 ounces of pasta instead, but keep the other ingredients the same. Most boxes of pasta are 16 ounces, so I measured out 12 for the original recipe, but will use half a box and save the other half for the next time. We typically eat whole wheat pasta which takes longer to cook, so I used regular linguine the first time around and it cooked well. Next time I will try using whole wheat angel hair. The whole wheat will take longer but the pasta is much thinner, so I think the cooking time to liquid ratio will balance out.

I will also wait to add the basil until about halfway through the cooking. I want it to cook with the dish a bit, but I think it looses too much flavor when cooked for the entire time.

Some other variations I read about on other blogs included using canned tomatoes and dried herbs instead of fresh, using chicken broth for the liquid, sweet or red onion instead of yellow and adding additional ingredients such as bell peppers, parsley and lemon slices.

I recommend trying this one close to the original and seeing how you like the flavors and amount of sauce, how the liquid and cooking time works out with your stove, etc and then start making modifications to suit your preferences.

If this is something you’ve been making for years or have already modified, I want to hear about it! And if its new to you, try it and let me know what you think!

In the Kitchen: Ricotta Zucchini Fritters

Chances are that you, like me, are always looking for new ways to use ALL THOSE ZUCCHINIS you have this time of year, whether from your garden or picked out of the overflowing baskets at the farmers market. I’ve been wanting to try something like this for awhile now and am so glad I finally did because seriously people, I’m tooting my horn over here on this one.
Ingredients
About 1 pound zucchini, shredded (2 medium or 1 large)
2 large cloves garlic, thinly sliced
3 large scallions, sliced (green and white portions)
zest of one large lemon (about 2 tsp)
1 tsp salt
1 tsp pepper
1/2 cup ricotta cheese
2 large eggs
1 scant cup flour
Oil (for frying)
In a large bowl combine zucchini, garlic, scallions, lemon zest, salt, pepper, ricotta and egg and mix well. Add flour and mix until just combined.
Heat 1/4″ oil in a skillet over medium high heat. Use about 2 T batter for each fritter, using the back of your spoon to spread into a thin cake once dropped in the pan.  
Fry for about two minutes on each side, or until golden brown. The middles will stay slightly mushy, which is ok! Set on paper towels to drain excess oil. Serve warm with lemon wedges and sour cream, if desired, and eat your brains out! 
This recipe makes about 12 three inch fritters and can easily be halved. You can keep fritters warm in a 250° oven while cooking if needed, but I have yet to try reheating any leftovers (because I ate them ALL, of course). 
I hope you enjoy these as much as I have (with every meal for the last two days), and let me know what you think!

Spotlight: The Frosted Pumpkin Stitchery

I can’t remember when I first learned to cross stitch, I just always remember doing it! I probably learned when my mom was working on this big americana sampler that we hanging in our hallway. I remember  what it looked like and watching her work on it so clearly, yet can’t think what my first project may have been. I kind of equate cross stitching with knitting and crocheting. They are all cathartic in a sense, portable, able to be done while doing something else (you all know how much I love multitasking!) and can be set aside for as little or as long as you want, waiting for you to return. I always have a project going and it’s so easy to pick it up whenever I need a break, have to sit somewhere for a long time, or just need to take my mind off of things. I even took one to Africa and worked a bit every night with a headlamp under my mosquito net.
For those who equate cross stitch with grandma, it’s time to check out what it’s all about these days! Don’t get me wrong, fabulous vintage patterns have their place (finally starting my Mad Men deer by the way, remember that hunt?!), but the patterns being created these days are just too cute to resist picking up this craft, or getting back into it.
latte love by the frosted pumpkin stitchery
Today I want to introduce you to a couple ladies I recently discovered through the workroom, Amanda and Ashleigh of The Frosted Pumpkin Stitchery! This BFF duo creates cute, one of a kind cross stitch patterns for stitchers of all experience levels. 
Some of you who follow me on facebook and 
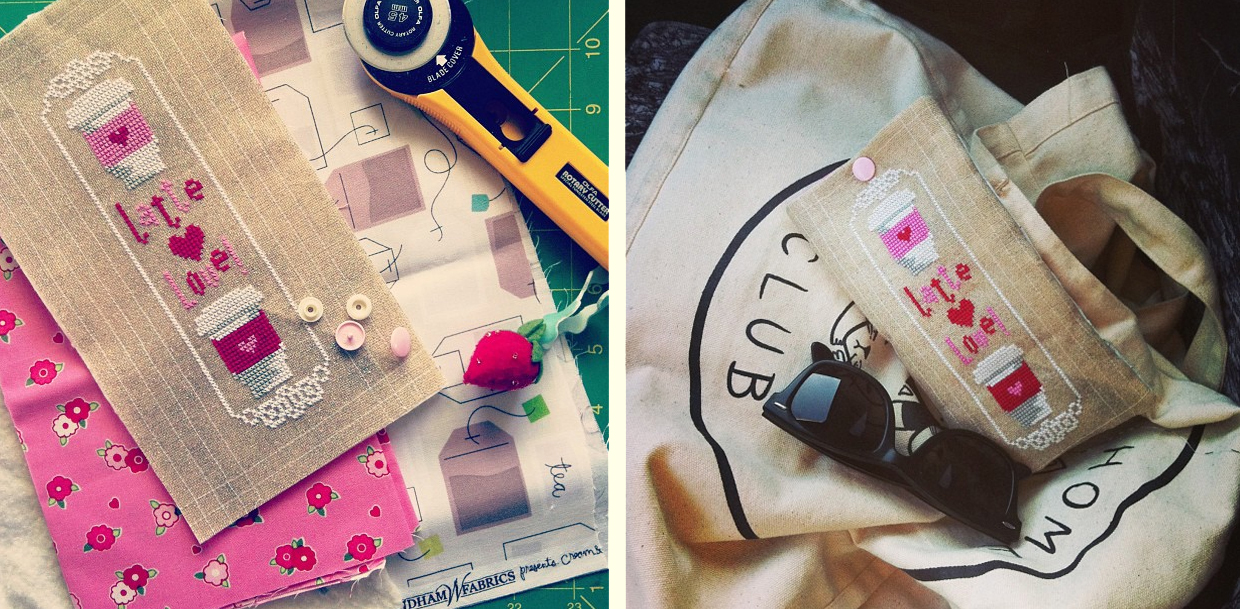
instagram have asked about the project I’ve been sharing (above top), which is the springtime sampler from the frosted pumpkin stitchery. Think of it as a virtual stitch-a-long! When you sign up during the sampler presale, you receive a color key and chart of all the sampler borders, then you receive  a chart every week for a month or so with the pattern for one row of the sampler.
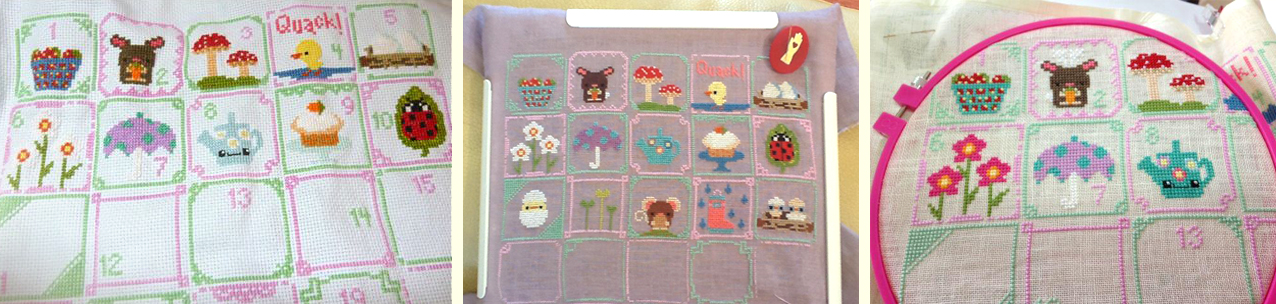
You can follow along on facebook, instagram and flickr to see everyones progress as you go (above bottom). The Springtime Sampler was released in April and while many people have completed, I’m way behind — but it doesn’t matter! 
· · · · · · · · · · · · · · · · · · · · · · · · · · · · · · · · · · · · · · · 
NEW SUMMER SAMPLER PRESALE STARTS TODAY!
Their first seasonal sampler was a winter wonderland and they will be continuing with summer and fall, too. In fact, the presale for their Summer Sampler begins today!! It is on sale for $12.95 through the end of this month with the first full week beginning with the start of summer, which gives you plenty of time between now and then to get all your supplies and prepare your borders! 
· · · · · · · · · · · · · · · · · · · · · · · · · · · · · · · · · · · · · · · 
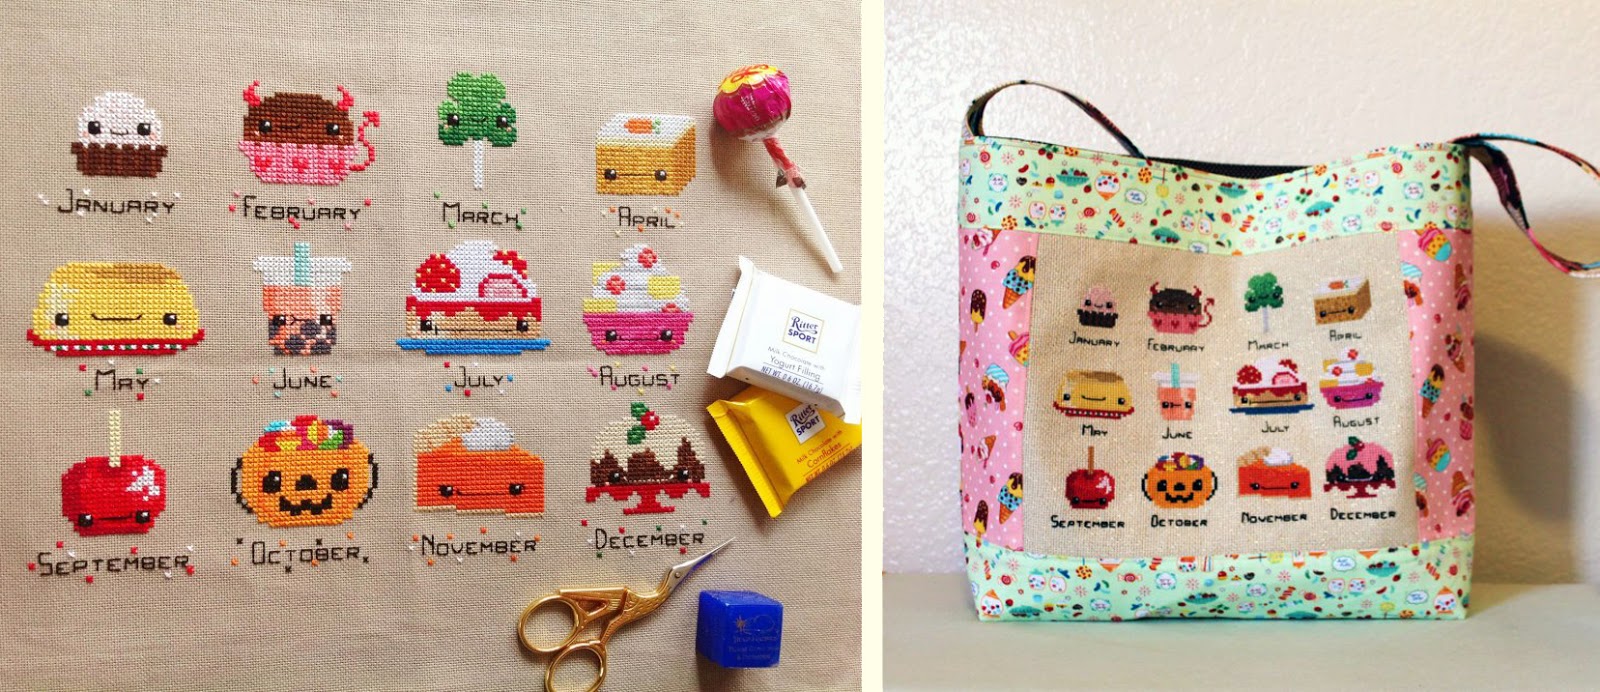
Some of their samplers are monthly, including their most epic pattern, the fruit of the month club (shown above)! There’s no way I can pass this one up, but it will have to wait until after the move! This pattern was released before as a year long stitch along, but was recently re-released as an entire pattern which you can find here.
Another monthly sampler that is currently in progress is their woodland sampler (shown below). How adorable is that?! It’s never too late to begin and get caught up! You can purchase this pattern at any time through the year and will receive the current and previous months initially, then receive each following month as they come.
· · · · · · · · · · · · · · · · · · · · · · · · · · · · · · · · · · · · · · · 
Want to learn more about the ladies behind the patterns? Read on!

Who is The Frosted Pumpkin Stitchery?

The Frosted Pumpkin Stitchery is Amanda & Ashleigh! We are two best friends!
Where do you currently call home?
We both live in Northern California
How long have you been operating?
Since 2011
Is Frosted Pumpkin a full-time adventure or do you have a day job?
Since the first of the year it’s become our full time job! Ashleigh works at a ceramic studio on the weekends and Amanda occasionally designs quilts.
How did you come up with your shop name?
We both love sweets and fall- our dream baked good is anything with frosting and pumpkins!
What, if any, formal training have you had in the arts?
Ashleigh has a degree in graphic design, Amanda went to school for printmaking
“This is how we work: Ashleigh designs a chart (this is the full summer sampler!) and we set up camp at Michael’s and pick colors!”

What made you decide to start your business?
We really loved to craft but it was hard to find kawaii cross stitch patterns!

Where do you sell and market your patterns?
Thefrostedpumpkinstitchery.bigcartel.com (you can also find some patterns on Kitschy Digitals)

Five things you love:
Amanda: I love Halloween, donkeys, camping, sock yarn & Porkchop!

Ashleigh: Road Trips, peach tea, my pups Zula & Panda, being crafty & Autumn
What is your favorite leisure time activity? 
Amanda: knitting socks!
Ashleigh: Crocheting or cross stitching
Favorite junk food?
Amanda: pickle chips! 
Ashleigh: Reese’s peanut butter cups

If you could trade places with any other person for a week, with whom would it be?
Amanda: Hermoine for sure! She’s my very favorite.
Ashleigh: I would have to say Tina Fey. I would love to be as witty and creative as that lady!

Share some of your favorite music 
Amanda: I alternate between the soundtrack to Animal Crossing, to Motley Crüe to Waylon Jennings. It really depends on my mood that day!
Ashleigh: Some of my favorites are Old Crow Medicine Show, Adele, Miranda Lambert, Billie Holiday and Mumford & Sons

What would you like to learn?
Amanda: I’d like to learn how to weave!

Ashleigh: I would like to learn play the violin (super random!)
What does the future hold for you and your creative endeavors? 
We are going to keep releasing new patterns, maybe an ebook! We have lots of ideas and hopes and dreams!

You can follow The Frosted Pumpkin Stitchery on facebook, flickr and on instagram with hashtag #thefrostedpumpkinstitchery. You can also visit Amanda’s blog, Hey Porkchop, for tons of other crafty adventures!

· · · · · · · · · · · · · · · · · · · · · · · · · · · · · · · · · · · · · · · 

So, are you ready to begin?! You can start with this FREE pattern of the Frosted Pumpkin mascots, Sugarloaf and Threadly, and sign up for the summer sampler here! Tell me, did I make a cross stitcher outta you? 🙂

Happy weekend, friends!

In the Kitchen: Ham and Broccoli Shells with Cauliflower Alfredo Sauce

I’ve been hoarding recipes. I know, it’s so selfish of me. My husband teases that I never learned to share because I was an only child, but what does he know. He is a boy, after all.

In all honestly, I’ve been trying to wait (impatiently) until I was out of my dark, poorly lit apartment kitchen and into my new, bright airy naturally lit kitchen so the photos could actually look appetizing, but it’s just taking too long!

Since we’re stuck here, packed and ready to go, with nothing else to do for the next three weeks, I thought I would put the time to good use and do a little much-overdo blogging! So, allow me to apologize for the ugly photos you are about to see, but I promise the deliciousness of the recipe will make up for it all.

This is one of those you-can-use-cauliflower-for-anything kinda recipes. Are you into those? You know, cauliflower rice, cauliflower tortillas. It seems to be the new world’s most versatile food, but I might just be behind on the times as I usually am!

The sauce for this easy, oven-baked casserole is made rich and creamy without having to use tons of cream, sticks of butter or tubs of cheese, but by using pureed cauliflower. I personally guarantee (should I create my own seal of approval?!) that no one (especially your kids!) would ever guess what it is made out of.

Ingredients
2 tablespoons extra virgin olive oil
1 head cauliflower, chopped
6 garlic cloves, roughly chopped
1/2 large white onion, chopped
1 teaspoon each salt and pepper
4 teaspoons flour
4 cups milk
1 teaspoon freshly grated nutmeg
8 ounces pecorino or romano cheese, grated
1/2 lb pasta shells
1/2 – 1lb ham, chopped
1 – 2 bunches broccoli, cut into florets 
Preheat oven to 400°. Heat oil in a large saucepan over medium heat. Add cauliflower, garlic, onion, salt and pepper and cook until slightly softened, about 10 minutes.

Sprinkle with flour, stirring to coat, then add milk and slowly bring to a boil. Reduce heat and simmer gently until cauliflower is very soft, about 15 minutes. Be sure to heat slowly and stir often to avoid burning the milk on the bottom of the pan.
Remove from heat and stir in the nutmeg (don’t leave this out!) and half the cheese. Puree until smooth in the pot with an immersion blender, or carefully transfer to a blender or food processor.

In the meantime while preparing the cauliflower sauce, cook the pasta until slightly tender but not fully cooked, about 5 minutes. Mix the pasta, ham and broccoli in a large deep casserole dish. I use about one full pound of ham cut into bite sized cubes and two good sized bunches of broccoli. 
Pour the sauce over top and stir gently to mix evenly. Sprinkle the remaining cheese on top and bake until bubbly, 20 – 30 min. Broil for 2 -3 minutes to brown top and let stand for 5 – 10 minutes before serving.

As I make it, this dish will easily feed six people (with a side dish) or a family of two to four at least twice. We have it with a side salad, if I’m feeling healthy, or cheesy garlic bread, if not 🙂

Though I have yet to try either, I see no problem with making this ahead and leaving it in the fridge for a day/overnight or freezing before baking.

Enjoy!

In the Kitchen: Stuffed Poblanos


Yeah, they’re kinda messy, but that means they’re good, right? I’ve made these three times now (so am finally confident that the recipe is ready to be shared), but have never had a chance to take good photos of them. They just get eaten too fast! Seriously. They are best right out of the oven, bubbly and hot. No time to find good light, pose my pepper and shoot. So, this is what you get. Take it or leave it.
I suggest you take it.
Ingredients
6-8 poblano peppers, depending on size
3 large or 4 medium tomatoes
1/2 medium white onion
2 large garlic cloves
2 tsp dried oregano
2 1/2 tsp cumin
1/4 tsp cinnamon
1/2 tsp salt
15 oz corn, fresh (cooked) frozen or canned (drained)
4 boneless, skinless chicken tenderloins or equivalent
1 cup cooked brown rice
2 cups shredded cheddar cheese
1/3 cup chopped fresh cilantro
Juice of 1/2 lime
To prepare the filling, in a food processor puree the tomatoes, onion, garlic, oregano, cumin, cinnamon and salt. Bring to a simmer in a large, deep skillet and cook for about 15 minutes over medium heat until some of the liquid evaporates and the mixture is thick and pulpy.
In the meantime, cook and shred the chicken, cook the rice and prepare the corn. If using fresh, boil the cob and cut off the kernels. If using canned, drain well. If using frozen, no need to thaw.
Once the mixture has thickened, add the corn, rice and chicken and cook until heated through. Remove from heat and stir in the cilantro, lime juice and 1 cup of the shredded cheddar.
To prepare the peppers, place them on a foil lined baking sheet and broil them on high, turning every few minutes, until they begin to blacken and the skins begin to bubble all over. Remove them from the oven and wrap them in the foil. Let them sit for a few minutes and then unwrap and let them cool.
Now you can easily peel off the skins. Be sure to handle the peppers carefully though, as they will be soft and can tear apart easily. Cut a slit up the middle of one side and cut out the seed core, scooping out any excess seeds, leaving the stem in place. I often rinse my peppers under light running water, I find it’s the easiest way to get all the seeds out!
Now you’re ready to stuff the peppers. Be generous! Don’t worry if it’s mounding up and over a little bit. Top with the remaining shredded cheese and bake at 350° for about 8 – 10 minutes. Broil for 2 -3 minutes to brown the cheese, serve with a side of black beans and enjoy!
This dish makes quite a hearty helping. Since it’s just my husband and I, I usually make the filling and then prepare, stuff and bake half the peppers, using half the filling. Then we’ll have it again later in the week or early the next. I reheat the filling a bit, prepare the peppers and pop them in the oven!
If you’d like to see step-by-step photos of this recipe, just leave me a comment below and I’ll be sure to take some next time I make it. You can see some pics of broiling and skinning peppers in my previous Cinco de Mayo recipe post from last year here. Only difference is you’re keeping the peppers whole, rather than cutting them into strips before broiling.
I’d love to hear what you think of this one, it’s a new favorite in our house!
p.s. I’m just too busy this week to get a recipe card done up for this right now, but I should have it up by early next!

In the Kitchen: Spicy Black Bean Pizza


Phew! It’s been a crazy few weeks. Don’t you hate when those paying jobs have to get in the way of the fun stuff, like blogging? Geez. I’ve been talking about this pizza for at least a week and here it finally is. Since I first made it about a month or so ago, it’s been on our menu three times and has become a household favorite. I’m just gonna simply say yummmmm. Yep, five m’s worth. Maybe even six.


Ingredients
Whole Wheat Crust:
1 envelope dry yeast
1 tsp sugar
1 cup warm water
3/4 tsp salt
2 Tbsp olive oil
1 cup whole wheat flour
2 – 2 1/2 cups unbleached white flour
Pizza:
15 oz black beans*
1 cup prepared salsa (homemade or store bought)
2 jalapenos or 1 serrano chile, cut rough chunks
2 large garlic cloves, smashed
1 cup diced bell pepper (red, green, yellow or mix)
1 cup fresh (cooked) or frozen (thawed) corn kernels
4 green onions, thinly sliced
1/4 cup chopped cilantro
1 cup shredded mozzarella
1 cup shredded cheddar
2 avocados, diced (optional)
Sour cream (optional)
*You can use dried or canned beans for this recipe. If using dried, soak about 200 grams and cook according to package directions (1 – 1.5 hours). If using canned, drain and rinse well before using.
To make the crust, combine yeast and sugar in water. Stir until dissolved. Add salt, oil, whole wheat flour and 1 1/2 cups unbleached flour. Stir well.
Add enough remaining flour to make a soft dough. Knead on a lightly floured surface until smooth and elastic, about 5 – 10 minutes. Place in a greased bowl, turning to coat top. Cover and let rise in a warm place until doubled, about 20 – 30 minutes.
If using a metal pizza pan, lightly grease it, or you can use a pizza stone. Stretch and pat or roll dough to a 15″ round. Bake at 400° for 5 minutes, until crust is dry and lightly browned. Set aside.
While the dough is rising and prebaking, you can prepare the pizza topping. In a blender or food processor, combine the beans, salsa, chile and garlic, and puree until smooth. Dice the peppers, green onion and cilantro and shred the cheeses.
Spread the bean puree over the prebaked crust and top with the diced peppers, corn, green onions, cilantro and cheeses.
Bake at 400° for 7 – 12 minutes until cheesy is bubbly and crust edges are browned. Allow pizza to cool for 5 minutes before cutting. I know, it’s very hard to wait…
Top with cubes of avocado and a dollop of sour cream, if desired, and dig in!
This pizza is perfect for the vegetarians in your life. It’s rich and hearty and the carnivores at the table won’t even miss the meat. However, chicken does pair perfectly with the other ingredients in this dish and gives this pizza a new life for the meat-eaters. Just add bite-sized chunks of cooked chicken on top of the bean puree with the other ingredients and bake as directed.
And find more delicious recipes here.

In the Kitchen: Chicken and Mushroom Macaroni and Cheese

I won’t try to tell you this is one of my ‘healthy’ meals because… not so much. I mean, it is macaroni and cheese, after all. I will tell you that it’s darn delicious though, unless you don’t like shrooms, or butter, or cheese. But if that’s the case, we may need to end this friendship now.
Ingredients
6 oz whole wheat elbow macaroni
Approx 1/2 lb chicken, cut into bite sized pieces (I use 4 tenderloins)
1/4 of a large yellow onion, diced
2 large cloves of garlic, diced
6 – 8 oz mushrooms, sliced
3 Tablespoons butter (divided use)
2 Tablespoons flour
2 cups milk (divided use)
1 3/4 cups shredded cheddar cheese (divided use)
1 teaspoon paprika
1 teaspoon salt
1/2 teaspoon pepper
Preheat oven to 350°. Cook the pasta according to the package directions. Drain and spread in an 8×8 baking dish.
In a medium skillet, heat 1 T butter, onion and garlic over medium high heat until it begins to sizzle. Add the chicken and continue cooking. When the chicken is about halfway done, add the mushrooms and heat until they are soft and chicken is completely cooked.
Add the chicken mixture to the noodles in the dish (including any pan juices) and set aside.
In a medium saucepan, heat 2 T butter over medium heat until melted, add 2 T flour and stir to combine. Add 1 1/2 cups milk, paprika, salt and pepper. Increase heat and bring to a gentle boil, stirring frequently until slightly thickened. Lower heat to a simmer and add 1 1/4 cups cheese, stirring until melted.
Once melted, remove from heat and stir in 1/2 cup milk. Pour sauce over chicken and pasta and mix gently to combine. Cook at 350° for 15 minutes. Remove from oven and spread remaining 1/2 cup cheese on top. Return to oven and cook an additional 10 minutes. Broil if desired to brown cheese. Serve and enjoy!
This recipes makes a hearty, but not ridiculous, amount. It will serve 2 – 4 people twice or 6 – 8 once, depending on how much you like to eat and what you serve with it. If you don’t like mushrooms, just leave them out! The cheese sauce is easy and delicious and can be used with anything you like. You can also easily double the recipe (entire thing or just sauce) which makes a perfect amount for a potluck!
And find more easy and delicious recipes here.

In the Kitchen: Gooey Peanut Bars

Today I have a simple treat that’s as easy as it is delicious. Three ingredients and 15 minutes is all you need to make these sweet and salty peanut bars.

Ingredients
2 cups coarsely chopped salted peanuts*
14oz caramel squares (about 50 pieces)
1 cup mini marshmallows
*Did you know that if a word such as chopped, diced, sifted, etc comes before the ingredient, you are to measure the ingredient after you prepare it as directed. If it comes after the ingredient, you first measure the ingredient, then prepare it. So in this case, you are measuring out 2 cups of already chopped peanuts, rather than measuring two cups of peanuts and then chopping them, which would read ‘2 cups peanuts, chopped.’

Lightly coat an 8 inch square baking dish with cooking spray. Line the baking dish with parchment paper, letting it hang over two sides, then lightly coat the parchment with the cooking spray. Evenly spread 1 1/4 cup peanuts across the pan.
In a heavy saucepan, combine 1 tablespoon water, the unwrapped caramel squares and the marshmallows. Cook over medium heat, stirring often, until the caramels and marshmallows melt and become smooth.
Pour the caramel mixture over the peanuts in the baking dish, then top with the remaining 3/4 cup peanuts, lightly pressing them down into the caramel.
Let cool until solid, about 2 hours. Remove the entire square from the pan using the parchment paper flaps and cut into bars. Store leftovers in a airtight container between layers of parchment or wrap individual bars in professional grade plastic wrap for a delicious grab & go snack!
p.s. The pot you melt the caramels in will be really sticky and the caramel hardens quickly on the sides after you pour it out. You may think that you’ll never get the pan clean, but just fill it with hot water, let it sit in the sink for about 10 minutes and it will all rinse right away!