
Love buttons? Who doesn’t?! Chances are, whether you are crafty or not, you have a stash of them laying around, or maybe an addiction to collecting vintage ones. Well today I have a simple project that will put them to good use, button bracelets! You can also use new buttons for this project, and these days there are so many cool ones available at your local fabric store, the design possibilities are endless.
What you’ll need:
Elastic, 1/4″ or 3/8″ thick
Buttons
Needle and Thread
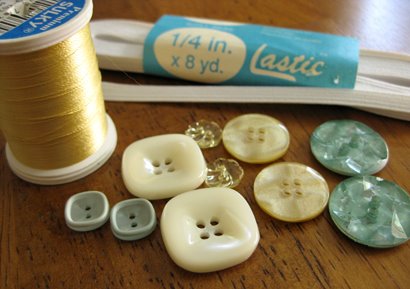
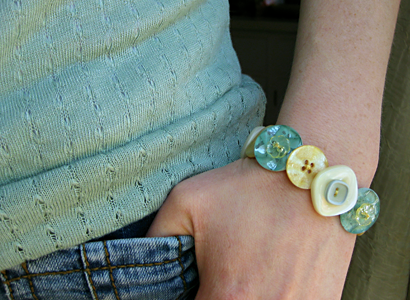
I decided on a yellow and seafoam green color palette for my bracelet, using a mix of some chunkier vintage buttons I have collected and a few new ones I purchased to match. You can use a repeating pattern or all one-of-a-kinds and I think it adds interest to stack some of them, so keep that in mind when choosing your buttons. I also chose a gold thread that I thought would be a nice pop, but you can match your thread to each button or even use clear nylon thread.

Start by wrapping the elastic loosely around your wrist where you would like the bracelet to sit. Cut it to size with about 3/4″ or so of overlap. Make a small mark on the elastic right past the overlap. I also find it helpful to mark the middle.
With the elastic laid flat as a guide, make a rough layout of your button placement to determine the design and how many buttons you will need. Do not include the end past your mark, see photo above for reference. You want the buttons to overlap each other a little so account for this when setting them out.
Once your layout is ready, you can sew the elastic together securely, forming the bracelet. I did this by hand but you can use a sewing machine if you choose.

Next, begin sewing the buttons in place, one at a time, starting at your marked center of the bracelet. Be sure to securely knot the thread after each button is attached. Above I show a method I find to be really easy and secure. Thread the needle up under the stitches, pulling the string through, then thread the needle through the resulting loop, under the thread closest to you and pull tight. Repeat this a few times.
As I mentioned, you want the buttons to overlap each other a bit so you do not see the elastic when you are wearing it. I find it helpful to just put one stitch through the button and try it on to make sure you like the way it is laying, then finish stitching it in place. As you go, you may also decide to change your button layout.
Continue adding buttons until you cover the bracelet and you’re done! It may take a bit of adjusting to get them to fit properly toward the end, but just be flexible with your design. You can always move or replace a button pretty easily if needed since they are all sewn on separately.

I love this project because it’s easy, inexpensive and a lot of fun. I also think these bracelets would make really sweet gifts, so if you’re on my christmas list, you’ll be getting one of these and some teabags!
If you try your hand at this project, I’d love to hear about it! I’ll also be starting a flickr group soon for sharing your own craft project photos, so I’ll keep you posted on that. In the meantime, have fun crafting your own button bracelets!

I would like to thank my own site to publish information of this kind of focus on such a topic is very beautiful.
LikeLike
I think you are right when you say this. Hats off man, what a superlative knowledge you have on this subject…hope to see more work of yours.
Abilene Roofing Contractors
LikeLike
Button Bracelet is really a nice option its easy to be ready in home, and look wise is ok too.
LikeLike
i saw one of these at a craft fair recently and almost bought one…but I thought, i could probably make one! and now I know i definitely can!
LikeLike
The one thing I don’t do – which I really should consider – is follow enough people. I’m one of the twitterers that wait for someone to follow her and then I decide if I’m going to follow them back or not. I should actually make more of an effort to search for like-minded individuals to follow of buy tazarotene cream, learn from and engage with on Twitter instead of simply waiting for them to get to me first.
LikeLike
Hello, I am very happy to read your blog. This is another fantastic blog post what I have read. There are so many tools available that it becomes difficult to know which will work. And how best to use them.
LikeLike
Adidas have unveiled their supercharged Elite Nike vapor soccer shoes, designed and engineered to provide new levels of performance. The SoccerBible is your first stop for full and exclusive images of the Nike CTR360 II ELITE. The Nike T90 Laser Elite are truly a stunning boot, both visually and in-hand. Set to be championed by Wayne Rooney at this summer's World Cup, the Nike mercurial vapor fg are almost a hybrid boot as they combine Laser technology and Nike mercurial vapor with the Vapor series!Nike Mercurial Superfly.
LikeLike
Just found your site. Thank you for posting the wonderful tutorial on the disappearing 9-patch. I'm looking forward to trying it.
LikeLike
hi there i stumbled upon your site searching around the web. I wanted to say I like the look of things around here. Keep it up will save for sure.
LikeLike
Nice post. Great blog. Keep posting. I follow you.
Web Design| Web Development| Web Development Company| Web Design Company|
LikeLike
Hello,
This is an amazing blog post… keep posting such an amazing blog post, Thanks a lot for the share. Thanks!
LikeLike
I have wanted to learn more about particular topics, but not many websites would help me out in informing me the way I expected. This left me with many question, but after reading your article, I got an answer to all my questions. You are too cool dude!!!
LikeLike
super cute! This would be a great use for some of those old vintage buttons from my grandma!
LikeLike