Who invented the hexagon, and why does bullying never end?

floor

Who invented the hexagon anyway? And are all quilters giving him or her credit? And while were at it, who invented the HST? I doubt that person is getting any royalties from all the HST pattern sales these days.

I am writing this post tonight after having an unfortunate interaction with another quilt artist that could have gone much differently.

deco hex rifle edit 1

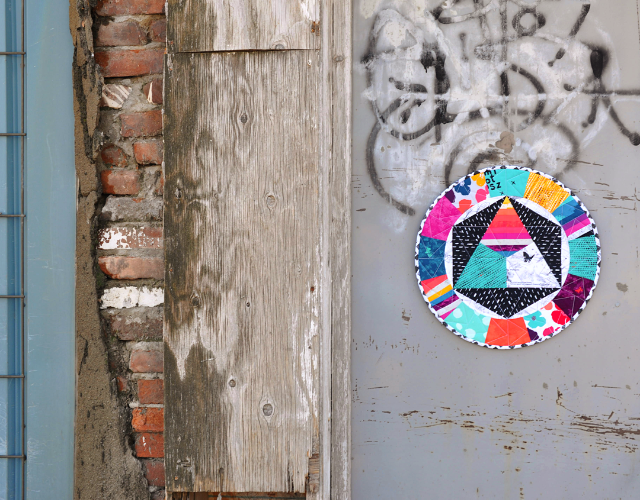
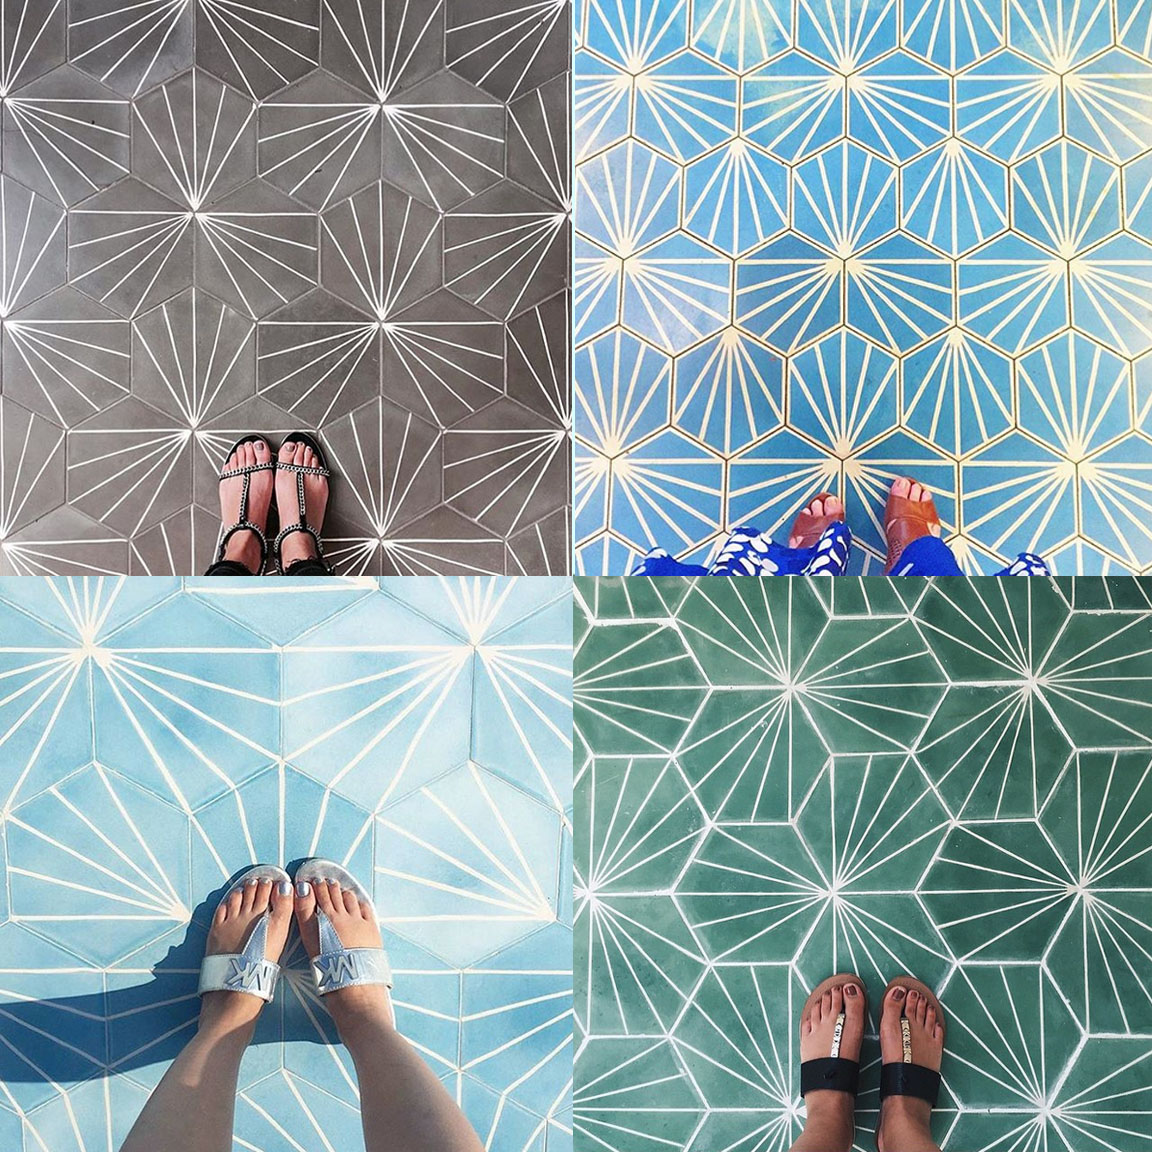
I recently shared the above quilt I’m working on, using a pattern I drafted based on a very common floor tile design, which you can see at the beginning of this post. Julie Hirt has a similar pattern for sale called Hexie Tiles. Heck, lets even call it the same pattern. It is a common, basic shape after all.

I do not follow Julie and am not familiar with her work. Since this began it was brought to my attention that I liked a photo posted on another feed of someone making a variation of her pattern, which looks much different than my finished piece. You can see it further below in the post.

Without attempting to contact me personally or privately in any way, Julie commented on my photo and then immediately posted this accusatory and defamatory post on her instagram feed, which included my photo, and my name in the picture, and I was also tagged on the photo so people could click over to my account:

pic

I immediately began receiving negative comments, personal attacks and losing followers. I messaged her privately and as soon as I sent it, a message from her popped up to me, but she had already posted the above on Instagram BEFORE messaging me in any way.

Here it is in a nutshell:

  1. A hexagon is a basic geometric shape.
  2. I was inspired by the floor tile photos at the beginning of the post, and Julie says she was as well.
  3. I liked a photo posted on the Stash Fabrics account showing a variation of Julies pattern last December. I do not memorize every photo I see on Instagram when I’m scrolling before bed. And even if I had, the patterns look amazingly different. You can see it below and decide.
  4. If I had been privately messaged by Julie before she posted and took this public, this would not be here not.
  5. Though people don’t want to believe so, I would have been open to seeing her pattern, comparing dimensions, construction methods (such as paper piecing vs templates, Y seams vs no Y seams, etc). And if they were alike, I would have had no problem sharing her pattern.
  6. None of those things happened. I was pinned as a horrible, guilty copycat before even knowing her pattern existed. Even after Julie and I began dialogue, she refused to discuss it privately or like responsible adults. I am now the big bad, bully because I chose to defend myself, and because I have a larger following. Those things should not even be connected, but these are the slams I am getting.

My problem with all this is her behavior and the way she handled the situation. Julie is privately messaging people who commented in my favor, maybe even some of my followers. I only know from those who inform me. I don’t know what she is saying, but its a fact she has lies on her own blog post about this.

I’m simply sharing facts here, and it’s silly for anyone to think I’m wrong in doing so. Julie can continue to spin this anyway she pleases, but I just have trouble being supportive of someone who behaves this way.

Though she is saying she removed her IG post before I shared this, she did not. She refused to remove her post until I credited her pattern, still accusing me of copying.

———–

first

Here is the photo that I “liked” that was shared on the Stash Fabrics feed (not Julie’s feed last December). This is Julie’s “proof” that I copied. You can choose to believe that I liked this photo last December and then copied it seven months later and turned it into my quilt on the right.

second

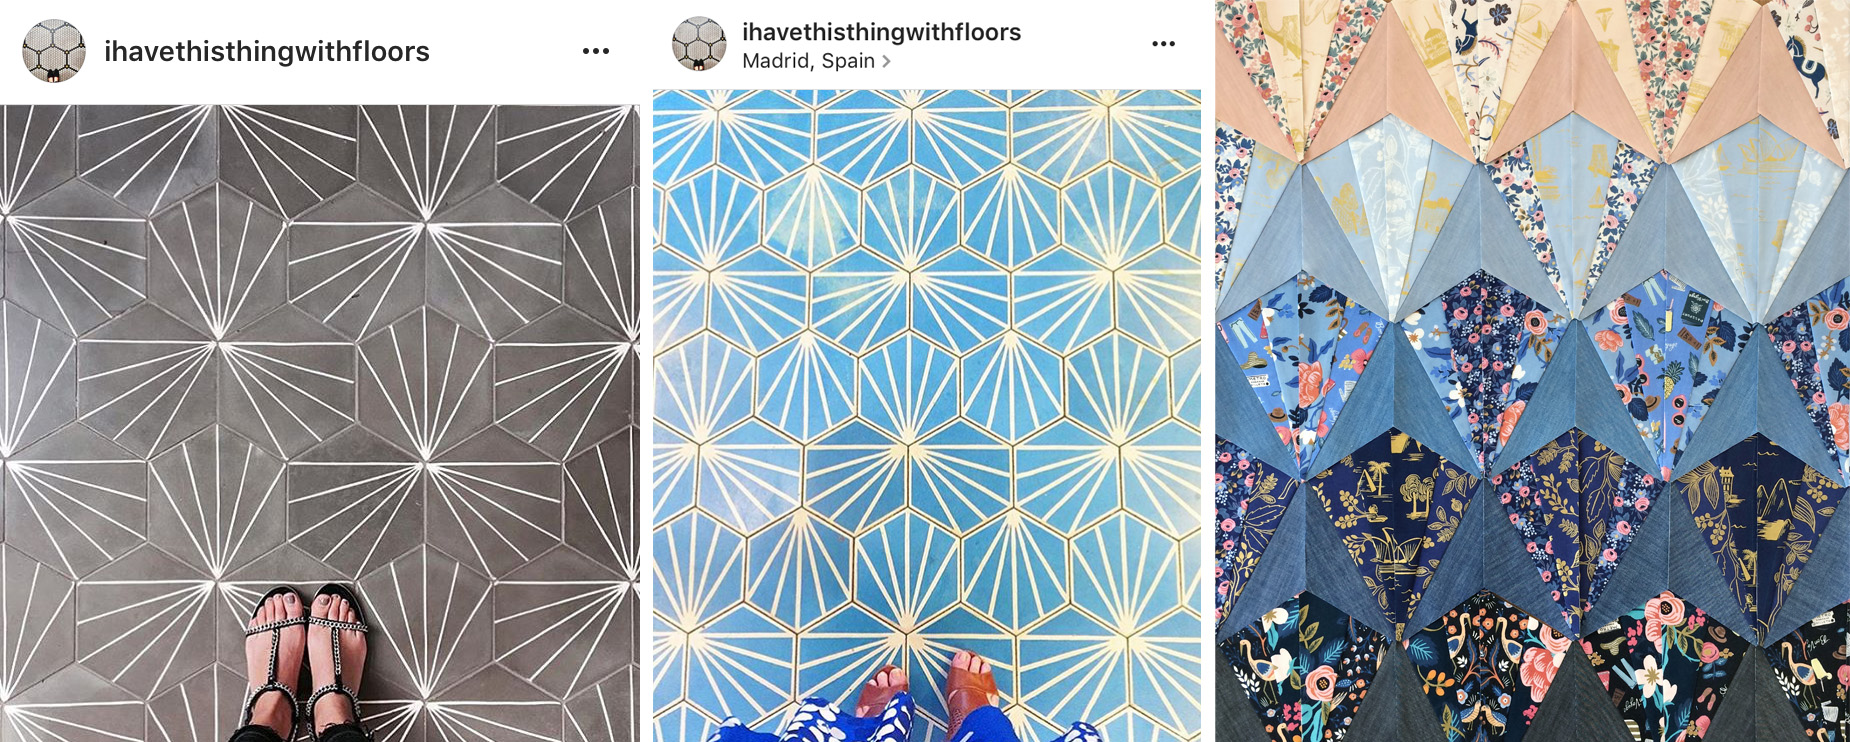
Or you can believe that I saw the above photos (and more) posted on the Ihavethisthingwithfloors Instagram feed from March through June of this year and then created the quilt on the right, without copying her pattern.

All you have is my word and her word, and you can chose to believe either.

———–

She can say I am defaming her here, but there are no lies or false, slanderous comments in my words. I am simply sharing her words and her actions. I did not ignore messages or attempts to talk to me, I was not given a choice. I did not force her hand to post something rude and accusatory.  Julie has posted our entire private conversation on her blog, which I find to be distasteful, but you can read it if you’d like. I am not embarrassed by anything I said.

Does sharing all this make me the same as her? Sure. Which is why I usually avoid this kind of thing, but it sadly happens too often and it gets old and tiring. People need to be accountable for their actions and choices.

And yes, I removed my Instagram post about this topic. Not because I’m hiding or embarrassed or afraid of comments, but because I said I would after she removed hers.

I appreciate the supportive words from friends who know me, know I have no reason to copy someone, and can see this situation and my actions for what they are. For those who think I’m in the wrong here, I’m sorry you feel that way and I’m not going to spend my time personally messaging you to convince you otherwise. To me, the facts are clear.

I sew for enjoyment, or at least I used to. I make patterns to share that enjoyment with others. I’m trying not to let things like this suck the joy from me, but I’m really struggling with that at the moment. I don’t know if I will even finish this quilt. The sight of it literally makes me sick to my stomach, but I will set it aside for now and see how I feel later.

Flex Frame Pouch & Write On Patterns

website main

A couple weeks ago I shared my Flex Frame Pouch pattern on fabric.com during their Passport to Summer series for a back to school project. Some of you may recognize this from Make Modern Magazine and the Swapaholics Retreat, and now you can download the free pattern, too. Flex frames are an awesome alternative to zippers and are super easy to use! You can find the 3.5″ frames used in my pattern on fabric.com, and you can also order bulk frames (10 or 50) in 3.5″ and 4.5″ (which I love) from ahkwokbuckles.com.

>> Click here to download the Flex Frame Pouch & Write On PDF Patterns <<

twoup

The pattern includes directions for making the tall pouch, which is perfect for glasses, pencils, or a rotary cutter, as well as the small coin pouch, both shown above.

Also included is the Write On pencils paper piecing pattern to create the options shown below. It can be used with the bottom accent or made into the full pouch. The pencils can also be used for a variety of other projects, too. It’s easy to resize the pattern or add more pencils or other elements to the pattern.

Pencils Hero 2

IMG_0283

In the pattern I talk a bit about how to customize the pouch to any size you wish, and wanted to share a few more variations here today, including how to make a perfect gift set for anyone of any age!

The set below shows the two sizes included in the pattern, plus a third size which is perfect for carrying cards and cash. To create this third size, cut the pieces for the top of the tall pouch as indicated in the pattern (6.5″), but do not include the bottom. Then just cut the lining pieces to the same height and assemble.

IMG_2080 edit

Consider personalizing the pouches with fun notions, such as stamped leather tags or decorative accents. Hmmm, I wonder who these are for?! I found the metal plate accent in the paper crafting section of Hobby Lobby. It is Tim Holtz brand.

Also, adding a short chain and key ring makes any pouch the perfect grab and go wallet.

blackdetails

black cards 3

I tried a few options and positions and decided that I preferred sewing the chain to the inside of the pouch right below the frame sleeves, as shown below. This way the chain and ring can be kept inside or pulled out through the top and the frame closing gives it some added security.

You can find a variety of chains and rings in the jewelry section of any craft store.

threeupsew

This is a fun pattern that can be customized in so many ways, with any of your favorite materials or patterns. Try a quilt block design you like, another paper piecing pattern, or even some selvedges. If you would like to use the 4.5″ frames (or any other size you may find), simply add the additional width to the cut sizes of your pieces. For example, if using a 4.5″ frame, vs the 3.5″ used in my pattern, simple add 1″ width to all your pieces.

heartvariation

I’ll be sharing more sizes, shapes, and ways to play with this pattern over the next months, too, so stay tuned! Please tag your pictures with #FlexFramePouch and #WriteOnPattern so I can see all your awesome creations!

Enjoy! ~ nicole

Aneela Hoey’s Foxglove Showcase

DSC_0312

I’ve been counting down the days until my stop on the Foxglove Showcase because I had so much fun working with this adorable new line, Foxglove, from the always amazing, Aneela Hoey. I mean, foxes and flowers? You can’t lose.

I really love the orange in this line. I feel it’s a color you don’t see enough of (like yellow!). Together with the rich blue and warm reds and pinks, it’s a gorgeous palette that can be played in so many directions – even for a boy quilt.

Foxglove by Aneela Hooey

All the flowers and the romping little foxes felt sort of picnic-y to me, in an almost non-traditional sense, so I decided the line was perfect for a set of my Wrap and Go Cozies designed for vintage Pyrex casserole dishes. This pattern is currently out with my testers and will be available within the next couple weeks or so, with other shapes and sizes to follow.

DSC_0356 edit

DSC_0361edit   lillyella stitchery | foxglove showcase

The set I made here is for the vintage Pyrex 475 and 474 lidded casserole dishes and will be the first released in the series. A layer of insulated batting helps keep your contents hot or cold for dinner parties, potlucks or picnics.

The handle straps are optional and you can see below that I left them off the smaller cozy so you can see the difference. Plus, I just adore that floral print and didn’t want to cover it up! 🙂

DSC_0417 edit

DSC_0399 edit

If you have never worked with Cloud 9 fabrics, you need to try them. I love the feel and the way they handle and press. They are soft, yet sturdy, and have just the right weight to them. They were perfect for a project like this and also make a dreamy quilt!

DSC_0445 edit

I hope you have enjoyed seeing this line in action! It is currently available from several online retailers if you would like to pick up some for yourself!

Aneela is sharing more details about this new line and the Foxglove Showcase on her blog, so make sure to stop by and check it out and see the rest of the amazing projects being created for the showcase!

I will be sharing more about my Wrap and Cozy pattern here and on my Instagram page over the next couple weeks, so stay tuned for that, too.

Thanks so much for stopping by!
~ Nicole

lillyella stitchery | foxglove showcase


Reusable Bowl Cap Tutorial

Reusable Bowl Cap Tutorial | lillyella stitchery

Help save the environment and look cute doing it! 😉

These reusable bowl caps are easy to make and customizable to fit any dish. You can use cotton alone for a washable cap, or add iron on vinyl for a more waterproof cap that can be wiped clean.

Reusable Bowl Cap Tutorial | lillyella stitchery

This tutorial includes directions for determining what size to cut your pieces, how to make bias binding, and how to construct the bowl caps.

Click here to download the free pattern.

The fabrics I used here are from the Little House on the Prairie line by Kathy Hall for Andover Fabrics and they couldn’t be more perfect! Those little florals mixed with the scenic prints are absolutely adorable.

Reusable Bowl Cap Tutorial | lillyella stitchery

I just love making these covers and find them handy for some many things. I always use old Pyrex and Fire King bowls that did not have lids, so using these makes me much happier than using plastic wrap! They also make great gifts. Pick up a cute bowl (or set) at a thrift shop, make a matching cover and give it as a housewarming or shower gift.

I hope you enjoy this tutorial! Share your project photos on Instagram & Facebook with #reusablebowlcap!

Reusable Bowl Cap Tutorial | lillyella stitchery

Paperie Blog Tour + New Love Story Pattern

IMG_2667 edit 1

It’s funny how things work out. The way life’s puzzle pieces always end up fitting together. I first designed the Love Story Pattern for my class at the Swapaholics Retreat last September. Amy Sinibaldi was also teaching and her debut fabric line, Paperie, had not yet been announced when I was prepping for the retreat.

Flash forward a few months to 2016. I’m amping up my pattern in preparation for release and Amy invites me to join her Paperie Blog Tour. I think you’ll see that her fabric and this pattern go together like sprinkles and donuts. And not that pink hearts are ONLY for Valentine’s day, but what perfect timing, wouldn’t you say?

Undercover Maker Mat featuring Paperie Fabrics | lillyella stitchery

As usual, I had trouble wrangling in all my ideas. I did know for certain that first I wanted to make my Undercover Maker Mat (download the free pattern here) using the 5″ Love Story block in place of the butterfly charm block used on the original. This mat is such a fun and useful project that sews up quick and lets you showcase your favorite fabrics.

I decided to make the secondary pockets on this one in solid prints, rather than the selvedges, so I could really show off the line.

Undercover Maker Mat featuring Paperie Fabrics | lillyella stitchery

I was torn between using the texty print or the hearts for the main body of the mat, but now that it’s all finished, I don’t know how it was even a question. The text is just perfect and the strip of hearts pieced in just plain makes me happy!

Undercover Maker Mat featuring Paperie Fabrics | lillyella stitchery

I then carried the heart print over to the removable thread catcher by piecing a strip into the front and using it on the lining. I think it really just balances it all out perfectly.

I used a delicate pink chevron trim on the pocket panel and added a bit of crochet lace on the secondary pocket – in true Amy style!

Undercover Maker Mat featuring Paperie Fabrics | lillyella stitchery

Thanks to the expert advice my official quilter, Sari, I went with a large chevron pattern for the quilting on the mat body. It echos the seams of the heart block perfectly (thank you very much) and also ties in the trim. I used a pale pink Aurifil thread that gives it just the tiniest hint of color and I couldn’t love it more!

Undercover Maker Mat featuring Paperie Fabrics | lillyella stitchery

I kept trying to find a way to use this pretty aqua trim on the pocket panel, but it just felt overpowering. It did, however, work out perfectly for the side ties!

So, what do you think? Is this mat your style? I’ll be giving it away on Instagram next week (and a bundle of fabric!), so stay tuned for that!

• • • • • • • • • • • • • • • • • • • •

Love Story + Cross my Heart Pattern | lillyella stitchery

Another idea that I just knew I had to run with was designing an X block that coordinated with Love Story. Like Xs and Os, but with a cute heart instead! I’m calling it Cross my Heart and you can download it for free here.

I thought it would be an adorable mini quilt with 4 blocks in a large square, or as a set of pillows (or a two sided pillow!) or a table runner, which is what I decided to make for my sample project.

Love Story Pattern | lillyella stitchery

My Love Story pattern includes two block designs – Poetry (the pink block) and Prose (the navy and white block). I wanted to showcase them both, along with the X, so I thought a little asymmetry would be fun! I used the 10″ blocks here, and the X pattern also includes a 5″ block (how about a set of heart and X coasters?!).

Love Story Pattern | lillyella stitchery

I love how striking the bold pops of pink and navy in this line are mixed with all the beautiful, soft low volumes. By random chance, I had a piece of my favorite chambray denim on my cutting table when I was feverishly trying to decide what to bind my runner with. It was a match made in heaven! The denim pairs so amazingly with this line, it started my mind racing with quilt ideas using Paperie and the new Art Gallery denim line that is coming out soon. SO EXCITED!

Love Story Pattern | lillyella stitchery

Love Story Pattern | lillyella stitchery

I’ll be sharing some design ideas and other fun Love Story projects (including a lap quilt pattern) here and on my Instagram feed over the next couple weeks. You can also check the hashtags #lovestorypattern and #crossmyheartpattern for more inspiration. As always, I can’t wait to see what you all create!

Love Story + Cross My Heart Patterns | lillyella stitchery

Be sure to check out all the other stops on the Paperie Blog Tour for all sorts of swoon worthy projects! You can find links and photos in Amy’s instagram feed and on her blog.

• • • • • • • • • • • • • • • • • • • •

Love Story Pattern | lillyella stitchery

Now I am in desperate need of a nap! So I will leave you with some more eye candy inspiration! Above is the original Love Story block as it was designed to fit my flex frame pouch project for the retreat.

For the pattern release, I squared off the block and made a coordinating reverse design where the heart is solid and the background is faceted instead. I love the possibilities this opens up for color play and layout ideas!

Love Story Pattern | lillyella stitchery

Here are just a few blocks that my amazing testers sewed up. I’ll be sharing their finished projects soon! You can pick up a copy of the pattern on sale for $6.50 now thru Valentine’s Day in my Payhip, Etsy or Craftsy shops.

happy stitching! ~nicole

Avantgarde Blog Tour – The Neo Quilt Series

Avantgarde Blog Tour

When Sari and I were invited to join Katarina Rocella’s Avantgarde Blog Tour, we had just wrapped our Sariella Retreat, Western Edition, where we started working on our first collaborative patterns, so we knew this was a perfect opportunity to work on some more!

We were both in love with the bold, bright colors and textural patterns in the line and the Bauhaus Dissection print was our favorite, so we decided to use it as inspiration for designing the patterns.

Neo Quilt Series | sariella

The next question was what to make… lap quilt, minis, pillows? In the end, we decided on all, of course! I have come to adopt my husband’s motto, anything worth doing is worth overdoing. I mean, he has a point…

After days (literally) of sketching, texting, facetime and phone calls, we had our plan. We both love versatility, so that’s what won in the end. We created a collection of panels, or blocks, that would go together into a beautiful (and customizable) lap quilt, but could each also be used independently to create mini quilts and pillows. Think of it as a create your own adventure pattern! And because we are mild overachievers and can’t contain all our ideas, we created an additional separate mini quilt pattern, too. Together, we’re calling it the Neo Quilt Series (#NeoQuiltSeries).

I’m so excited to finally share these patterns that we’ve been feverishly working on for weeks! Sari will be sharing the full quilt design on her blog tomorrow, but today I’m showing you some of the mini quilt and pillow patterns. They will all be headed to testers shortly and will be available in March, but we also have a free one for you today! And it is where I will begin…

NeoVolheader

NeoVol pattern | Sariella

This is NeoVol. Simple appliqué lends itself to a beautiful 18×20 mini quilt that is quick to sew and allows you to showcase a fun print. It also makes a darling pillow (shown a couple photos down) and can be resized to create a variety of different designs (another of which you’ll see used in the quilt reveal tomorrow).

You can download the free pattern here. We hope you enjoy it!

NeoVol Pattern | sariella

I kept the quilting simple (but awesome!) on this mini with a little rainbow explosion coming from the top corner. I continued the lines through the butterfly, but switched to a dark purple, and then picked the rainbow color up again on the other side of the butterfly.

I also did some random angled lines horizontally across the bottom and the dots to help hold them in place. My favorite part, by far, is the striped binding!

• • • • • • • • • • • • • • • • • • • • • • • • • • • • • • • • • • • •

NeoBurstHeader

NeoBurst Pattern | sariella

Another panel from the quilt design is NeoBurst, which will be part of the quilt pattern and also available separately as an 18×20 mini quilt pattern. It will include an 18″ square variation, which is shown here made into a pillow.

NeoVol Pillow | sariella

NeoBurst is another quick-sew block with simple paper piecing and the opportunity to really have fun with fabric placement. Together with the NeoVol pattern, shown above as a pillow, you have a perfect set.

• • • • • • • • • • • • • • • • • • • • • • • • • • • • • • • • • • • •

NeoSphereHeader

NeoSphere Pattern | sariella

Last, but certainly not least, from me for today is NeoSphere. My favorite piece from the Neo Series changes every few minutes, but this circle has a special place in my heart! How can you not love it?!

The pattern will include directions to make this 18″ circular mini, as well as a box edge pillow. It will also include an option to finish the block as a square to use in a quilt or simply as a square mini or pillow.

NeoSphere Pattern | sariella

NeoSphere Pattern | sariella

My favorite thing about this pattern is that it looks complex, but goes together quick and easy. Don’t fear the curves! The center is created using simple paper piecing and the curved border is cut with templates. the final piece goes together in six wedges.

You can also change the design of the center by placing the templates in a different order, or how about an appliqué NeoVol butterfly in the center of the triangle? So many possibilities!

Sari's Mini

Sari has informed me that she has an open spot on her wall reserved for this one, so it will be headed off to hang out with Hazel, Luminaria and the rest of the gang out in WV! But I’ll be there to visit it soon, for the Sariella Retreat, Appalachian Edition!

• • • • • • • • • • • • • • • • • • • • • • • • • • • • • • • • • • • •

Neo Quilt Series | sariella

Sari and I have had so much fun creating these patterns and working with this amazing line. You can see how these fabrics really add such a fun pop of color and life to a space. It’s impossible to not be drawn to them.

I really need a whole cloth quilt with those stripes!

NeoVol Pattern | sariella

I can’t wait to hear what you think of the designs and show you all the fun variations our testers create over the next few weeks.

Be sure to stop by Sari’s blog tomorrow for more about the Neo Series and the Neoteric Quilt reveal! And stay tuned to our personal Instagram feeds (@lillyellasworld and @sariditty), as well as our Sariella feed (@sariellastudios) for updates and giveaways, including the NeoVol mini and a few bundles of Avantgarde fabric!

NeoQuilt Series | sariella

You can also check out all the other projects from the tour on @KatarinaRoccella or under the hashtag #avantgardefabricsblogtour.

see ya soon!
~ nicole

Neo Quilt Series | sariella

Yarn Wrapped Wreaths

yarn wrapped wreath | lillyella stitchery

These wreaths are one of my favorite things to make! They are quick, easy and inexpensive, and can be customized in an endless numbers of ways to create a perfect gift for any age and any occasion.

This is technically a Christmas wreath for my mom (her tree is decorated in the same style with all nature themed ornaments and natural elements), but I love that it’s more of a winter wreath that can be displayed and enjoyed for longer.

yarn wrapped wreath | lillyella stitchery

The primary materials that I use are yarn and felt, but you can also use ribbon or fabric for wrapping or for the decorations. Get creative when it comes to the extras – check out the floral section of your craft store for little berries, twigs and greenery. Look in the wood aisle for things like the snowflakes shown above and the miniatures aisle is also great for finding little critters or themed extras. Also hunt outside for moss, pinecones, acorns, twigs and bark.

This is one of the simpler wreaths I have made. You can really go crazy with flowers and they look amazing, but I wanted the deer to take center stage on this one!

I typically use hard foam wreath shapes (found in the floral section of your craft store), but for this wreath I wanted something larger to balance the stag, so I used a straw wreath. I also found this is the floral section and it was wrapped in plastic, which I left on.

yarn wrapped wreath | lillyella stitchery

The first step is to simply start wrapping your yarn around the wreath. You can glue the end to begin or just wrap over it to secure. I typically smooth a good amount of glue over the area where my ends meet after I’m done wrapping. Since it’s on the back, it’s ok if you can tell where the glue is.

There are tons of excellent tutorials out there for making felt flowers. I’ve tried many different styles and typically stick with about four or five designs that I love most and are easy to make. The coiled roses are my favorite because they are really simple, don’t require any sewing, and look adorable.

Here are just a few links to get your started:
http://www.thecraftedsparrow.com/2012/04/felt-flowers-tutorials-5-to-choose-from.html
http://www.howjoyful.com/2011/06/felt-rose-tutorial-and-pattern/

DIY Favor Bags: Peony Pockets (Part Two)


http://www.notmartha.org/tomake/to-make-diy-mothers-day-corsage-felt-dahlia-flower-brooch/

yarn wrapped wreath | lillyella stitchery

When it comes to attaching all my doodads, I use Elmer’s Glue and occasionally some E6000, but most craft and fabric glues will work fine for the bulk of materials used.

I like to use a piece of ribbon or lace for hanging, which I usually just tie on and make a bow. For this one, I cut some wide burlap that was covered with lace and sewed the bow together because it was too stiff to tie. I looped a clear plastic ring underneath for hanging.

Trust me when I say that once you start making these, you might not be able to stop!

yarn wrapped wreaths | lillyella stitchery

Here are some supplies I’ve gathered to make a couple retro-inspired Christmas wreaths for myself. These are the foam wreaths I usually use. Both of the ‘yarns’ I’m using to wrap them were found in the yarn section of JoAnns, but are not your typical yarn. I actually have no idea what the green one would be used for. I found it on an endcap in this bulk bag and it’s the strangest stuff, but I think it’s going to be adorable!

Some other embellishments to think about include ornaments, beads, buttons, millnery birds and flowers, feathers, assorted trims & ribbons for accents, wood letter shapes to personalize with an initial or word or a small garland of bunting.

I hope I’ve added another project to your list! And wish me luck on finishing mine before next Christmas…

Undercover Maker Mat Pattern

Undercover Maker Mat free pattern | lillyella stitchery

This dual purpose sewing space organizer has double pockets and a removable thread catcher to keep all your notions at hand and your workspace tidy. It goes from under to {machine} cover when not in use with side ties to keep it in place.

Undercover Maker Mat free pattern | lillyella stitchery

Click here  to download the PDF pattern.

I also shared a pattern hack for adding a handle opening to this pattern, shown below, if your sewing machine has a carrying handle and you can find the directions for that here.

I have hosted several sew alongs for this pattern and you can find the previous posts here, they contain some additional tips, tricks and tutorial links.

If you have any questions about the pattern, feel free to contact me anytime. Tag your photos with #undercovermakermat so everyone can be inspired!

Festive Flutter Tree Mini Quilt Pattern

This festive mini quilt measures 22” x 26” and features my Butterfly Charm Block patterns with a little Gidget tree topper. It’s perfect for hanging on a door or anywhere you don’t have room for a real tree!

Click here or the image below to download the PDF pattern.

If you have any questions about the pattern, feel free to contact me anytime. Tag your photos with #festivefluttertree and #butterflycharmblocks so everyone can be inspired!

Festive Flutter Tree Pattern | lillyella stitchery

Dressed Up Hot Pad Tutorial

Dressed Up Hot Pad Tutorial | lillyella stitchery

This Dressed Up Hot Pad features my Forest Floor Paper Piecing pattern but you can use your favorite patchwork block or even a single piece of a fun fabric. It sews up quick and the accents make it extra special.

I purchased my grommet kit from Walmart in the craft section, but you can also find them at any craft store or online. If you don’t have any scrap leather on hand, try looking at a second hand store for an old bag or jacket which you can cut and repurpose.

Click here or the image below to download the PDF tutorial. I hope you enjoy it!

Dressed Up Hot Pad Tutorial | lillyella stitchery