Undercover Maker Mat SAL 2019

SALgraphic2019

It’s almost time! The 2019 Undercover Maker Mat Sew Along will kick off on October 7 and run thru October 23! Anyone is welcome to join in and sew along. There is no sign up or obligation and the sew along will be casual! You can download the free pattern here. I will be following the schedule below but you are welcome to sew at your own pace and join in any time!

There are many ways to customize this project and adjust it to your skill level, so please note that many specifics indicated in the schedule are optional. Before the SAL begins, I will share a blog post discussing some of these options, variations and customizations to help you plan. I will talk about sizing the mat to your specific machine and this year I will also be sharing a little tutorial on how to add a hole in the mat for a handle, if your machine has one.

UNDERCOVER MAKER MAT SAL SCHEDULE

October 7: Kick off! Make main body panel

October 15: Adding a machine handle opening

October 17: Pocket panels

October 18: Make optional thread catcher

October 28: Share your finished projects!

In the meantime, you can download the pattern and start thinking about your fabric pull. You can also check out the hashtag #undercovermakermat on social media to see oodles of inspiration! If you’ll be joining in, I’d love for you to share the top graphic from the post and tag me @lillyellastitchery and use the hashtag #UndercoverMakerMatSAL2019!

~ Nicole

DSC_0428 edit B

Sew-A-Long Tutorials for Beginners

Hello, my Sew-A-Long friends! Today I’ll be sharing a few tutorial links for those who are joining in the Undercover Maker Mat SAL, but may not be familiar with basic quilting or paper piecing (which is an optional element!). There are a lot of step-by-step photos in the pattern and many basic techniques, but it does require basic knowledge of making a “quilt sandwich”, binding a quilt, and paper piecing , if you choose. If you haven’t viewed my Instagram stories, please pop over and take a look. I’m saving all the SAL stories in a highlight which you can access anytime from my main profile. You can also turn on notifications for my posts and/or my stories so you don’t miss anything. I shared a few tips and examples yesterday on how to simplify or customize your mat, so this can help you with the planning stage.

Onto the tutorials! If you’re new to quilting, you will need basic knowledge of how to layer your top, batting and backing for the main mat body (aka the “quilt sandwich”), and how to do the quilting stitches. This tutorial from Suzy Quilts covers all the basics. It applies to a large quilt, so working with your main mat body will simply be a smaller and simpler version! Straight line quilting is a great design for beginners, or a crosshatch is a always a nice option, too. I’m not sure its mentioned in the tutorial, but I love using a Herra Marker (a bone folder or scoring tool also works similarly) to mark my quilting lines, especially for something like a crosshatch. Here is a video on using a Herra Marker.

Another quilting technique you will need to know comes at the very end of the project, but it is binding. This is the little edge “wrap” that goes around the entire piece and seals everything up. Here is a helpful tutorial from Craftsy.

Lastly, we have paper piecing. If you’d like to create the butterfly pocket panel as shown in the pattern, but have never paper pieced before, don’t be intimidated! This is a great time to learn! Cassandra Madge did a wonderful two-part tutorial for beginners using my Butterfly Charm Blocks pattern and you can find part 1 here and part 2 here.

As always, feel free to contact me anytime if you have questions along the way, and stay tuned for more helpful tips here and on Instagram!

Brimfield Meadows + EPP Tips

IMG_5812

Howdy, friends! Sheesh, this blog has been neglected. Some days I feel bad and others I don’t because most people have the attention span of a goldfish these days and blogs aren’t what they used to be. Still, I love to have a space to share more than a few words and one photo of something, regardless of who ever reads it!

Life has been extra crazy lately, but I squeezed in a few days of hand stitching recently because I needed to create something beautiful for myself. I stitched up the new Brimfield Meadows block from Brimfield Awakening and HOT DOG! I couldn’t be happier with it. It was quick and fun to sew, it came together like a dream and it’s such a unique and beautiful shape. I used Sleeping Porch lawn to match the bed quilt I’m working on and plan to make a pillow out of this block to go in my bedroom.

While I’m here, I just wanted to share a few things I loved about this pattern and how I sewed up the variation I chose. I’m also going to talk a bit about some of my favorite notions for English Paper Piecing, because I often get questions in my social media posts. I am by no means an EPP expert, but I have experimented with a variety of threads, basting techniques and stitching methods, and definitely have my favorites that I think yield nearly flawless results.

779D7210-5828-4922-9C9A-91A51BC2839B

Above are just a handful of the fabric placements I was playing with for this block. My final block matches the top left diagram above. You can see all the separate segments of the pattern and how I chose to combine two or three pieces in areas to create one larger piece. I love how you can do this to change the final look of there block, use larger fussy cuts, and make the stitching go quicker!

I simply taped some of the segments together to create the larger units. Note that the outer most tip of every “petal” is perforated on the paper so you can use them whole or split them as I did. Also, another design variation that isn’t shown above is different arrangement of those center “orange peels”. You can flip them 180° from how I used them, sew them up as one unit or even leave half or all of the segments out completely, letting your background show through. You can check out the hashtag #BrimfieldMeadows on social media to see some beautiful examples of all these variations.

While this photo above may look like someone’s unmade bed, it’s how I audition fabrics. If you look close you can see the method to my madness! I’m a total planner, so even when I say I’ll just “wing it”, I always end up making diagrams and taking pics of piles of fabrics to help me plan things, or at least start in the right direction.

· · · · · · · · · · · · · · · · · · · · · · · · · · · · · ·

TIPS & TOOLS

Basting curves was new to me, and it took me a couple tries to figure out the best order of basting down the sides, but once I did, it was really easy! I basted the concave edge first, then pulled the convex edge as needed to make it smooth, and did the two straight sides last. I cut small notches to help with the concave curves which you can see below. As I mentioned above, I used small pieces of tape to connect the paper pieces and create the larger units, which you can also see below.

IMG_0878IMG_0882

When I first started EPP, I would thread baste, mainly because I didn’t have glue basting supplies and didn’t feel like researching how to do it! I tried glue basting because it seemed to save time and it did not work for me AT ALL! The problem was that I was applying the glue all the way to the edge of the paper and I couldn’t grab my fabric to stitch it. I watched some amazing tutorial videos from the queen of EPP Karen the DIY addict and it changed my glue basting life! I watched her apply the glue a bit in from the edges and it was like a “why didn’t I try that?!” kind of moment, but it works like a charm and I’m all glue now! I prefer to use a glue pen (such as Sewline or Fons and Porter).

IMG_0901

When it comes to stitching all those pieces together, I also tried many methods and many threads! If you know me at all, you probably see what a perfectionist I usually am, so visible stitches drive me BONKERS! Though I have learned that sometimes this is on purpose to show consistency? Regardless, it’s not for me. Once again, Karen saved my EPP life with her flat back stitching tutorial. You can see in the photos above of the back of my block that my stitches are by no means consistent or perfect, but you can see directly above how they are not visible at all from the front. This is the only stitching method I use and while some people think it’s slower than others, I find it very easy and quick. It helps to line up pieces and I love that the stitches are hidden so well.

IMG_5744.JPG

Last but not least, my favorite thread and my favorite thimble! Hands down, I love InvisaFil thread from WonderFil. It is 100wt polyester and virtually invisible. I do double the thread over and sew with two strands simply because I like a secure thread on my needle, rather than a loose tail, but it’s strong enough to be used as a single strand. I have tried 80wt cotton threads and they also work well, but I’m a tight puller and am much more likely to break the cotton thread, but I’ve never broken the InvisaFil. I match my thread to my lighter fabric when possible, but as you can see in my detail shots, it’s not too important since you can’t see the stitches!

My favorite thimble, which I cannot stitch without these days, is the Natural Fit Leather thimble shown above which is from Clover. It comes in three sizes and I wear a small on my middle finger, but I have pretty tiny hands 🙂

So, that’s all I got for now! I hope some of these little tips and resources have been helpful to you. I’ll be sure to share my finished Brimfield Meadows pillow once it’s complete, and you may very well see more blocks popping up because I am in love with this pattern (which you can find here if you’re interested)!

happy stitching!
~ nicole

Maker Pin Co. Collaboration

dsc_2874-edit.jpg

I was so excited when Amanda at Maker Pin Co. asked me to be her next collaborative artist! It was really hard to decide which of my paper piecing patterns to turn into a pin and I knew that two patterns I had in the works, a honey bee and a luna moth, would be super cute options, so I quickly finished them and we put four designs up for a vote. But, in the end, no one else could decide either so we produced all four and I just received the first batch. Aren’t they the cutest?!

We just opened up a second round of preorders through August 30, so if you’d like to snag one of these pins for yourself or as a gift or swap extra, pop over to Maker Pin Co. here!

DSC_3001 edit

If you haven’t heard of Maker Pin Co. yet, let me introduce you! Amanda, formerly of Stash Builder Box, recently began this new adventure. She works with different artists to create enamel pins using their designs and, just like with Stash Builder Box, maker Pin Co. is all about helping those in need with $1 from each pin sale being donated to a charity of the artist’s choice.

DSC_3035 edit

The charity I chose is the Pollinator Partnership. Founded in 1997, the Pollinator Partnership is the largest nonprofit in the world committed to protecting pollinators and their ecosystems and promoting conservation efforts. The charity works throughout North America and globally to safeguard birds, bees, bats, butterflies, moths, beetles and other pollinators.

DSC_3046 edit

We donated $280 so far from the first round of preorders and I’m hoping we can more than double that! What do you think?

The Bee pin measures 1.5″ wide and the rest measure 1.25″, making them perfect for jacket lapels, hats, bags, pouches or as push pins on bulletin boards!

DSC_3111 edit

If you don’t follow me on social media, I’ve been a little behind on blogging lately (summer is so busy!) and you may be wondering about the Bee and Luna Moth patterns. They are new and coming soon! I typically don’t share my new designs until I’ve sewn them up myself, but I really wanted to include them in the pin designs, and am so glad I did!

DSC_3074 crop1

My goal is to have the Bee pattern, named Honey Maker, out in October or November, with the Luna Moth (Moon Dancer) released shortly after, but likely early in the new year. I hope you’re as excited about them as I am!

Thanks for stopping by today! Remember, pin preorders are only open through August 30, so head over there now and support our pollinators! Be sure to check out all the other awesome collaborative designs while you’re there, too!

~ nicole

DSC_3121 crop1

Fabric.com Fall Block Party

Print

Fall is officially in the air and I’m closing out the Fabric.com Fall Block Party with my contribution, Flutter By! If you’re just joining the party, you can find all the free blocks shown above on the Fabric.com blog here. This collection of quilt blocks is an excellent skill builder with traditional piecing, foundation paper piecing, english paper piecing, and appliqué.

DSC_0505 BLOG

Though many people typically associate Butterflies with Spring, some of my favorites appear as Fall blows in when the monarchs emerge and the Painted Ladies make their migration. Plus, we all know I love them, so I’m always game to share a new pattern 🙂

My Flutter By block is foundation paper pieced and sews up quickly with just three simple sections. The pattern includes the butterfly as shown and reversed so your butterfly can head East or West!

You can download the free pattern from Fabric.com here!

DSC_0493 BLOG

I wanted to use an unexpected mix of fabrics on my block, with a variety of prints and textures, and am so in love with the result! I started with the focal floral print, which is Liberty of London Lawn. Many people do not think about using Lawn when quilting, but it’s quite dreamy, especially when paper piecing because it is lightweight.

stack2.jpg

The pink stripe fabric is a woven from Loominous by Anna Maria Horner, dotted line coral. The stripes are raised and add such a lovely textural element. The remaining prints are quilting cotton from different designers – Indah Batiks Herringbone Coffee, Dear Stella Trail Mix Feathers Mustard, Dear Stella Honey Bee Scallop Dot Corn, and Cotton + Steel Ombre Pigment Aqua for the background. I love how the gradient of the ombre prints plays subtly in the background. It’s so perfect for sky!

DSC_0606 BLOG

I have a few fun quilt layout and other project ideas in mind for this block, so keep an eye here and on my instagram page for those! I hope you enjoy my contribution to the Fabric.com Fall Block Party! Please share your projects with the hashtags #flutterbypattern and #fabricdotcomblockparty!

DSC_0519 BLOG

Planning my Moonstone Quilt

blog4

Howdy, friends! I’m here today with a short post about planning my Moonstone Quilt. There is a high likelihood that all of this may only make sense in my own head, but planning this was a HUGE struggle for me, so I wanted to share my thought process in case it does happen to help anyone!

First, if you haven’t seen the Moonstone pattern by Giucy Giuce and Karen The DIY Addict, you must check it out! (You can find it here.) Moonstone is an English Paper Piecing pattern (aka hand sewing!) and it comes in a fantastic kit complete with all the pieces you need to make a quilt, or several small projects, along with acrylic templates for cutting your pieces. The kit and pattern are really well done and I think the design is just so striking! It was just recently released, but there are already a handful of really inspiring photos on social media under #moonstonequilt.

AAANNDDDD… there just so happens to be an AMAZING giveaway going on right now where TWO lucky winners will be flown to San Fransisco to hang out with Giuseppe and Karen for the launch of the Moonstone Sew Along! You can find all the details here.

Ok… onto my quilt!

blog7

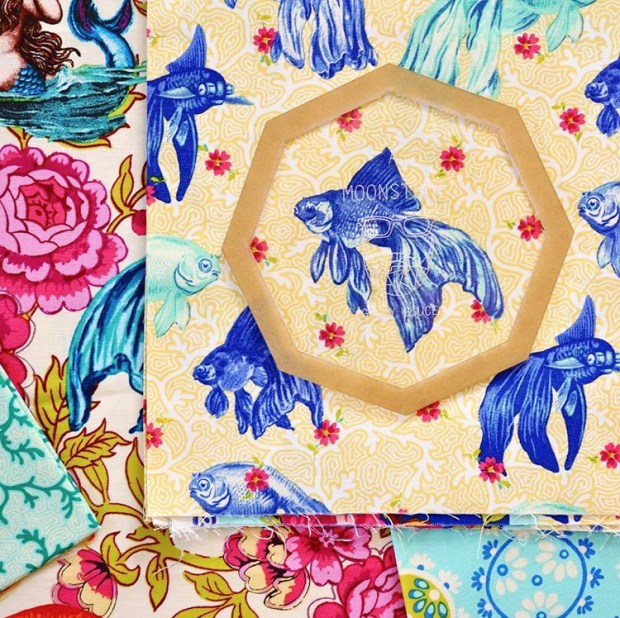
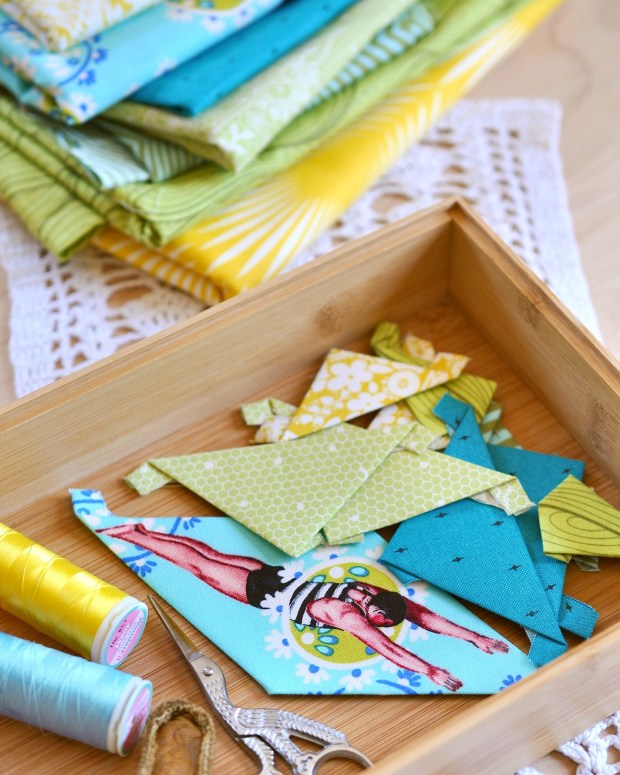
For my Moonstone quilt, all I knew was that I wanted to use the new line, Neptune and the Mermaid by Margot Elena (Tokyo Milk) for Free Spirit Fabrics. It’s absolutely dreamy and seems like it was just made for fussy cutting. That’s as far as my plan went. I couldn’t even decide what configuration of the pattern I wanted to use.

So I stared, and stared, and stared some more. I only chose a few of my favorite prints from the line, but was really struggling because there is a lot of variation in color in what I chose. As a whole, the line ties together, but when you just pick and choose some prints, not quite as much.

blog5

I started to pull some blenders in every color used in all the prints I had and decided that a Free Spirit Fabric designer mash up would be the way to go. I pulled what I could from my Tula Pink and Anna Maria Horner stash, and order a few more things by those two ladies, as well as Amy Butler and Heather Bailey.

I hadn’t really planned to use this many colors in the quilt, but once I saw them all together, how could I not? I had to figure out a plan. I organized all the blenders by color and took some photos. I spent a good amount of time looking at the photo of all my focals and then at the photo below of all the blenders. I stewed about it for awhile, as I usually do with projects. I kept hoping something would come to me.

And then I stewed some more. I mean, I stewed A LOT. I thought about while I walked the dogs, while I did dishes, I’m pretty sure I even dreamed about it.

blog8

Something that many of you likely already know about me is that I am a planner. Hard core. I so desperately wanted to start cutting and sewing, but knew that I had to figure out where it was going first.

So I thought about the focals and how I would fussy cut them. I took photos of all the parts I planned to use and thought about the main colors in each of those parts, then I made a list. This helped me figure out how many variations I had to work with in my design and how I may be able to organize them.

blog1blog3

I kept going back to the idea of a color fade. Perhaps diagonally across the quilt or something, but I couldn’t make that work. I ended up order some of the dark blue color way of the Neptune line because I felt like I was going to need it to balance everything out.

It was time to make some decisions. First, I had to pick a pattern configuration and then I just had to start playing.

I use Adobe Illustrator for most of my drawing and layout. I understand many people do not have this program, so these next steps may not be helpful for everyone, but it is a great program that anyone can use with a little patience and a few YouTube tutorials!

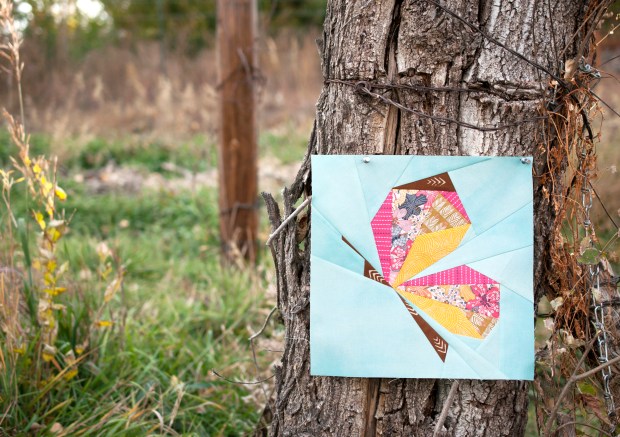
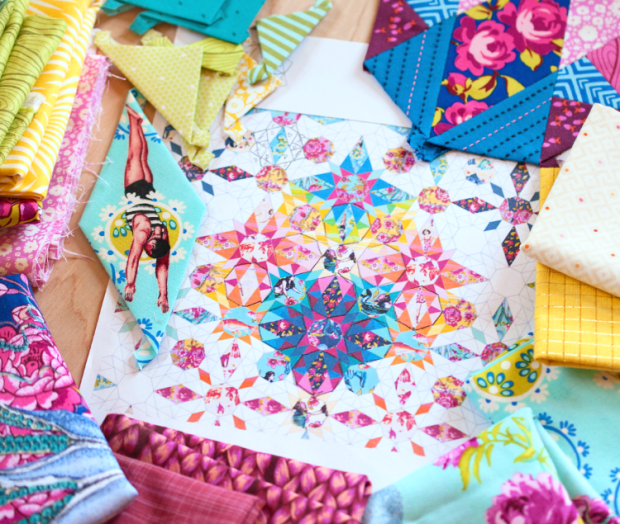
I really loved the Gems configuration of Moonstone because I love the four pointed stars it makes, but I wanted my fussy cut focals to run horizontally and diagonally because they are primarily people and fish, so I rotated the gems configuration 45° to what you see below. I drew up the pattern in Illustrator so that I could begin placing my fabrics and colors.

blog10

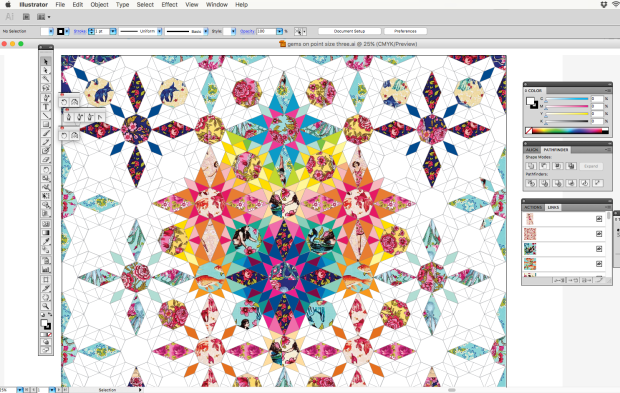
I input JPG swatches of the focal fabrics and turn them into pattern swatches so that I can place them into shapes. It’s not perfect, but it definitely does the job!

Once I had the pattern drawn up, I stared at the blank canvas for a bit until I decided which shapes I wanted to focus on. I settled on the large four-pointed stars that you can see around the outer edges and their center octagons. Everything would radiate from these. I started playing with those elements only and trying different repetitive color arrangements.

blog11

I was going a little crazy with all the possibilities so finally just chose my favorite and started filling in the spaces between. I still really wanted to achieve some sort of color gradation and began trying to do that between the stars. It took some time, but I finally felt like it was moving in the right direction!

Once I reached the point shown above, I felt confident enough about the direction that I could start sewing.

blog6

A good part of what I’ve already laid out will repeat around, but I do still have a bit more to work out. All in good time…

In the meantime, I can sew! I finished my first piece yesterday and have my second prepped. My plan is to work out from the middle of the quilt so that I can stop or keep going at any point. My current design plan is about 65″ square.

blog9blog10

There’s no question that this quilt will take me quite awhile to finish, but I know I’ll enjoy the process, and that’s what matters!

I may be underdressed, but at least I’m not late.

Earlier this year, Art Gallery Fabrics asked if I wanted to play with any of their new collections, and when I first saw Lower the Volume, I immediately knew I had to make a quilt. I have been wanting to make a low volume quilt for some time and this was the perfect opportunity to finally do it. Shortly there after, Mister Domestic asked me to be a part of his sewing party showcasing the new AGF Capsules and Fusions lines, to which I replied, “of course!”, seeing as I already had this plan in the works, and who doesn’t want to party?! But then I went into panic mode…

I knew there was no way I could finish this quilt “on time”. My thought was that I should make something else so I would have a beautiful finished product to show off when it was my day on the tour. This is what I typically do and how I always think. The problem with this is that I never let myself do the “big projects” that I really WANT to do, because I never have enough time to complete them.

I am a slow sewer, and I mean SLOW. This is partly because I just physically move slow and meticulously when I create, partly because I’m always working on about 13 things at once, and partly because I just don’t have a lot of time to sew, especially when spring hits and it’s time to tend to the land, or when my husband gets extra busy at work because sh*t is hitting the fan somewhere in the world.

So, there you have my little chunk of a quilt top in progress. I have no idea when I will finish it (though I’m super excited to because I am LOVING it!), because I’m not even done typing this blog post and already stressing about the new deadlines I have ahead of me next week.

Showing off this unfinished top for my day on the blog tour is painful and embarrassing for me. I’ve been feeling disappointed in myself all week and I know that’s just ridiculous, right?! We are always striving for a picture of perfection, even though every one of us knows that is never what life is actually like behind the scenes of social media. But, despite these feelings, I’m really glad that I chose to continue with this selfish sewing project, to let myself make something that I really wanted to, and to try and be more comfortable with being “less than perfect”. I do hope you like what you see thus far, though, and help cheer me onto the finish line!

· · · · · · · · · · · · · · · · · · · ·

ABOUT THE FABRIC & PATTERN

Lower the Volume is one of four new Art Gallery Fabrics Capsules collections, and I think its awesomeness speaks for itself! We all use low volumes in nearly every project we make, but what I love about this line is how it’s interesting and lively enough to stand all on its own. I originally planned to use the line exclusively in the quilt, but decided that a small pop of color would be a really nice accent.

I chose the fantastic plaid shown above from the new Mad Plaid capsule collection for the backing (because it matches my living room perfectly!) and pulled the accent colors from there, which are Art Gallery Pure Elements and Solid Smooth denims (my favorites!). Aside from a single row of blue and yellow hexies, the rest of the quilt will be all low volume.

The pattern I’m using is Sari’s and my Sariella Deco Hex pattern that we created for the April Stash Builder Anniversary box. If you saw the mini we originally made, you’ll see I’ve rotated the pattern 90° counter-clockwise here for use in the quilt. I also enlarged the pattern a bit. If you missed the pattern in the Stash Builder box, it will be available from Sariella later this year, so stay tuned! I will also share more about my process in making this quilt when I finish it.

· · · · · · · · · · · · · · · · · · · ·

STOP by the party!

Today wraps up week one of Mister Domestic’s Sewing Party, but be sure to check out the other posts from this week (shown above, links below), and also the Fusions portions of the tour beginning next week. I’ve already seen a few of the projects and they are legen… wait for it… DARY!

Capsules (April 17 – 21):
Monday: Cristy Stuhldreher (@loveyousew_) http://www.iloveyousew.com/
Tuesday: Kitty Wilkin (@nightquilter) https://nightquilter.com/
Wednesday: Sharon McConnell (@colorgirlquilts) http://colorgirlquilts.com/
Thursday: Stephanie Palmer (@latenightquilter) http://latenightquilter.com/
Friday: Nicole Young (@lillyellasworld) That’s me!

Fusions (April 24th – 28th)
Monday: Nicole Daksiewicz (@modernhandcraft) http://modernhandcraft.com/
Tuesday: Tara Curtis (@t_jaye, @WEFTYneedle) http://www.tjaye.com/
Wednesday: Melissa LeRay (@ohhowsweetco) http://www.ohhowsweet.com/
Thursday: Sarah Thomas (@sariditty) http://www.sariditty.com/
Friday: Jennifer Rossotti (@jennrossotti) http://gingerpeachstudio.com/

Have a fabulous weekend, friends!
~nicole

p.s. bonus points if you can guess what show I’ve been binge watching this week!

Maker Mat Sew-a-long Prizes!

I think we’ll all agree that the real fun is in creating our mats, but… prizes are really fun, too, right?!I have had some awesome and generous prize donations to share with you and have also put together a few things myself  🙂

I have now posted about all the steps in the pattern and you can find links to all the previous posts at the end of this post if you’re just joining in. I’m going to wait another week before drawing winners for the prizes to give everyone (including myself!) some more time to work on their projects. You do not need to complete your mat to be eligible to win, you just need to post at least one progress photo on Instagram or Facebook using the hashtags #undercovermakermatSAL and #undercovermakermat. If you do not use social media, you can email me your photos.

I will pick my three favorite completed mats to win a prize of their choosing, and then I will randomly draw the remaining prize winners from all the posts in the sew-a-long hashtag. How does that sound? Alright… onto the prizes!

prize-image-strip

First up, from Make Modern Magazine, I have five 6-month subscriptions! I love this mag, there’s always a great variety of projects and well-written, informative articles. Plus, it’s run by an awesome group of ladies!

Next, I have a three month subscription to Stash Builder Box! If you’re not familiar with Stash Builder Box, it’s a monthly subscription club where you receive fabrics, patterns, notions and other fun items and they donate a portion of the profits to help children in need. They also work to create quilts to send to different organizations. You can read more of their website. It’s a total win-win for everyone when you support them!

Last, but certainly not least, from our sponsors, I have a $25 gift certificate to Stash Fabrics! It’s no secret that Stash is my favorite fabric shop, they have such a a wide variety and they usually ship the same day. Can’t beat that! Beth and her team are also the sweetest. Friendly service means everything to me these days.

pattern-bundle

In addition to those awesome prize donations, I’m also giving away three bundles of all my patterns (shown above) and the little prize pack shown below with 12 fat quarters, rainbow wonder clips, colored pencils, graph pad, omnigrid ruler and more!

prizepack

Now get back to work, because I have to as well! ; ) And keep posting your photos!

Have a fabulous weekend!
~ nicole

—–

ADDITIONAL SEW-A-LONG POSTS:

Undercover Maker Mat Sew-a-long: All the details

PART TWO: September 6 – Kickoff, prizes and main body panel variations

PART THREE: September 8 – Accent Pocket Panels

PART FOUR: September 12 –Full Pocket Panel & Assembly

PART FIVE: September 15 – Optional Thread Catcher

Maker Mat Sew-a-long: Optional Thread Catcher

You guys. This sew-a-long has just been so awesome! I keep saying it, but it’s true. As always, I am blown away by your creativity! The best thing about designing patterns, for me, is watching other people bring them to life, and this one just has so much personality to it.

I was thinking about this while working on mine yesterday. I chose two sets of fabrics for two mats, with no thought but what do I want to look at everyday, and then I laughed when I realized how similar the two pulls were. I realized that my mats 100% represented me, my style and my personality, and that the same was true for every one being made. Of course this holds true for many quilts and other sewing projects, but there are so many ways to customize and personalize this project, that I just feel every one gives so much insight into the person who made it.

I’m still working on mine, but will share some pics tomorrow! Below is the mat I made for the Paperie blog tour earlier this year. Aren’t those fabrics gorgeous?

DSC_0490 edi

Some of you are just joining in and some are already finished with their projects. Today is my last post about the steps of the pattern, but there is still plenty of time to sew! Tomorrow I will be sharing some additional prizes, but will be waiting until next Friday (September 23) to draw winners. I will choose my two favorite finished mats to win prizes, but will draw the remaining prize winners from all the photos in the hashtag, so even if you’re just beginning, you’re still eligible to win! You just have to post your progress photos with the hashtag #undercovermakermatSAL on Instagram or Facebook. If you’re joining in and don’t have any social media accounts, feel free to email me some pics (nicole at lillyella dot com)!

—–

THREAD CATCHER

Onto today’s business. You’re either a thread catcher kind of person, or you’re a throw-it-on-the-floor-and-sweep-it-up-later kind of person! So, this step is optional. The thread catcher is designed to hang from a button on the far right pocket, but it will also stand on it’s own and can sit on your work table. If you choose to have it stand alone, you may want to shorten the height of it a bit to make it easier to use.

As with all the elements of this pattern, there are endless ways to customize the thread catcher. You can use a single fabric embellished with trim and selvedges or you can create any sort of patchwork design you like. Piece in a single accent strip, make the bottom half a contrasting fabric or use another paper pieced block. Here are a few examples:

catcher-close

originalcatcher

IMG_2643 edit2

tulacatcher

purebredcatcher

—–

OTHER USES

Outside of this project, the thread catcher alone is handy for a variety of other uses! I’m working on a set that will hang from hooks on the wall behind my sewing machine to hold tools and notions (I’ll share pics when I’m done!), or you could hang some in a bedroom or bathroom for jewelry, toiletries, hair accessories, etc! You can easily adjust the size by adding or subtracting equal amounts to all pieces.

—–

Just a handful of you have finished the thread catcher so far, but here are some pics from the sew-a-long hashtag!

catchers

—–

Remember to keep sharing your photos with the hashtags #undercovermakermatSAL and #undercovermakermat! Tomorrow I’ll be sharing some additional prizes up for grabs and I will also share more photos from everyone sewing along throughout next week!

ADDITIONAL POSTS:

Undercover Maker Mat Sew-a-long: All the details

PART TWO: September 6 – Kickoff, prizes and main body panel variations

PART THREE: September 8 – Accent Pocket Panels

PART FOUR: September 12 –Full Pocket Panel & Assembly

PART FIVE: September 15 – Optional Thread Catcher

Maker Mat Sew-a-long: Full Pocket Panel & Assembly

Happy Monday, friends! The sew-a-long hashtag is showing me that many of you made great progress on your projects over the weekend and I hope you’re having fun! Some of you have already finished your mats and some are just beginning, and that’s ok!

As I mentioned before, there’s no rush. I will talk about the last step (the optional thread catcher) later this week, but I will wait until the end of next week to draw winners for the prizes. This will give everyone some extra time to keep working (including myself!).

—–

Last Thursday I talked about creating the accent pocket pieces and this week we are onto piecing the full pocket panel and attaching it to the mat body. After this, your mat will be complete (woohoo!) and all that’s left is the optional thread catcher, which I will post about on Wednesday.

I have already covered some options and variations for the trim used when attaching the secondary pockets to the main pocket panel (you can read about them in my initial and third posts), but if you have any questions about this or need any help, just send me a message! I will, once again, include some example photos at the end of this post so you can see some of these variations in action.

I do have one additional design variation for the pocket panel that I want to cover today, and that is the binding across the top of the pocket panel.

Undercover Maker Mat | lillyella stitchery

I like the look of the binding on the pocket because I think it balances the piece nicely, but if you prefer, you can eliminate this step and instead attach the lining to the pocket panel just as you did on the small secondary pockets. Just lay your lining piece, RST, on top of your finished main pocket panel and sew across the top with a 1/4″ seam. Flip the lining to the back, press, and top stitch along the top edge. You can include the fusible fleece when you do this, add it after tucked up to the seam, or skip it all together and use some lightweight interfacing on one or both pieces instead.

pocket-binding

Above are a couple examples I saw on the #undercovermakermat hashtag on instagram that demonstrate this variation. If you have any questions about doing this instead of the binding, just let me know and I’m happy to help!

—–

Once your full pocket panel is complete, you will baste it to your mat body and bind the entire piece as covered in the pattern. BE SURE TO ADD YOUR SIDE TIES BEFORE BINDING! If you do not plan to use your mat as a cover, you can leave them off. I did forget to add them once and just had to unpick a little bit of my binding and tuck them in, which was not hard to do, so it’s not the end of the world if you forget, or even decide to add them later!

tie double

Just as with trim used to secure the secondary pockets, you can instead use a binding strip for your side ties, or even additional selvedges. If using a binding strip, simply top stitch along the folded edge to close it up. You can tie knots on the ends or stitch them closed.

cover

cover1

—–

I’m going to wrap up today’s post with a few more photos from the sew-a-long hashtag, you guys are KICKING BUTT!!

undercover maker mat sew-a-long | lillyella stitchery

ADDITIONAL POSTS:

Undercover Maker Mat Sew-a-long: All the details

PART TWO: September 6 – Kickoff, prizes and main body panel variations

PART THREE: September 8 – Accent Pocket Panels

PART FOUR: September 12 –Full Pocket Panel & Assembly