Undercover Maker Mat Sew-a-long

Undercover Maker Mat Sew-a-long | lillyella stitchery

Can we just call this a party? Because I’m so excited that it kind of feels like a party! And I want an excuse to eat party food. So… there’s that.

This sew-a-long will officially kick off on September 6 and I’ve included a schedule below that I will be personally following, but you are welcome to begin anytime and sew at your own pace. Everything you need to complete the project from start to finish is included in the free pattern, which you can download here.

September 6: Kick off! Make main body panel
September 8: Make paper pieced butterfly and selvedge pocket panels
September 12: Make full pocket panel, assemble to body
September 15: Make optional thread catcher
September 23: Draw prize winners!

tie double

Below you will find some notes about the materials used and ways you can modify and customize this pattern to your sewing level and taste, including photos of different mats made to help inspire you! I will be sharing a few tips and tricks, and photos of my progress a long the way based on the schedule, and I hope that you share your progress as you go, too!

Use the hashtags #undercovermakermatSAL and #undercovermakermat on your posts so we can all enjoy each other’s work as we sew-a-long!

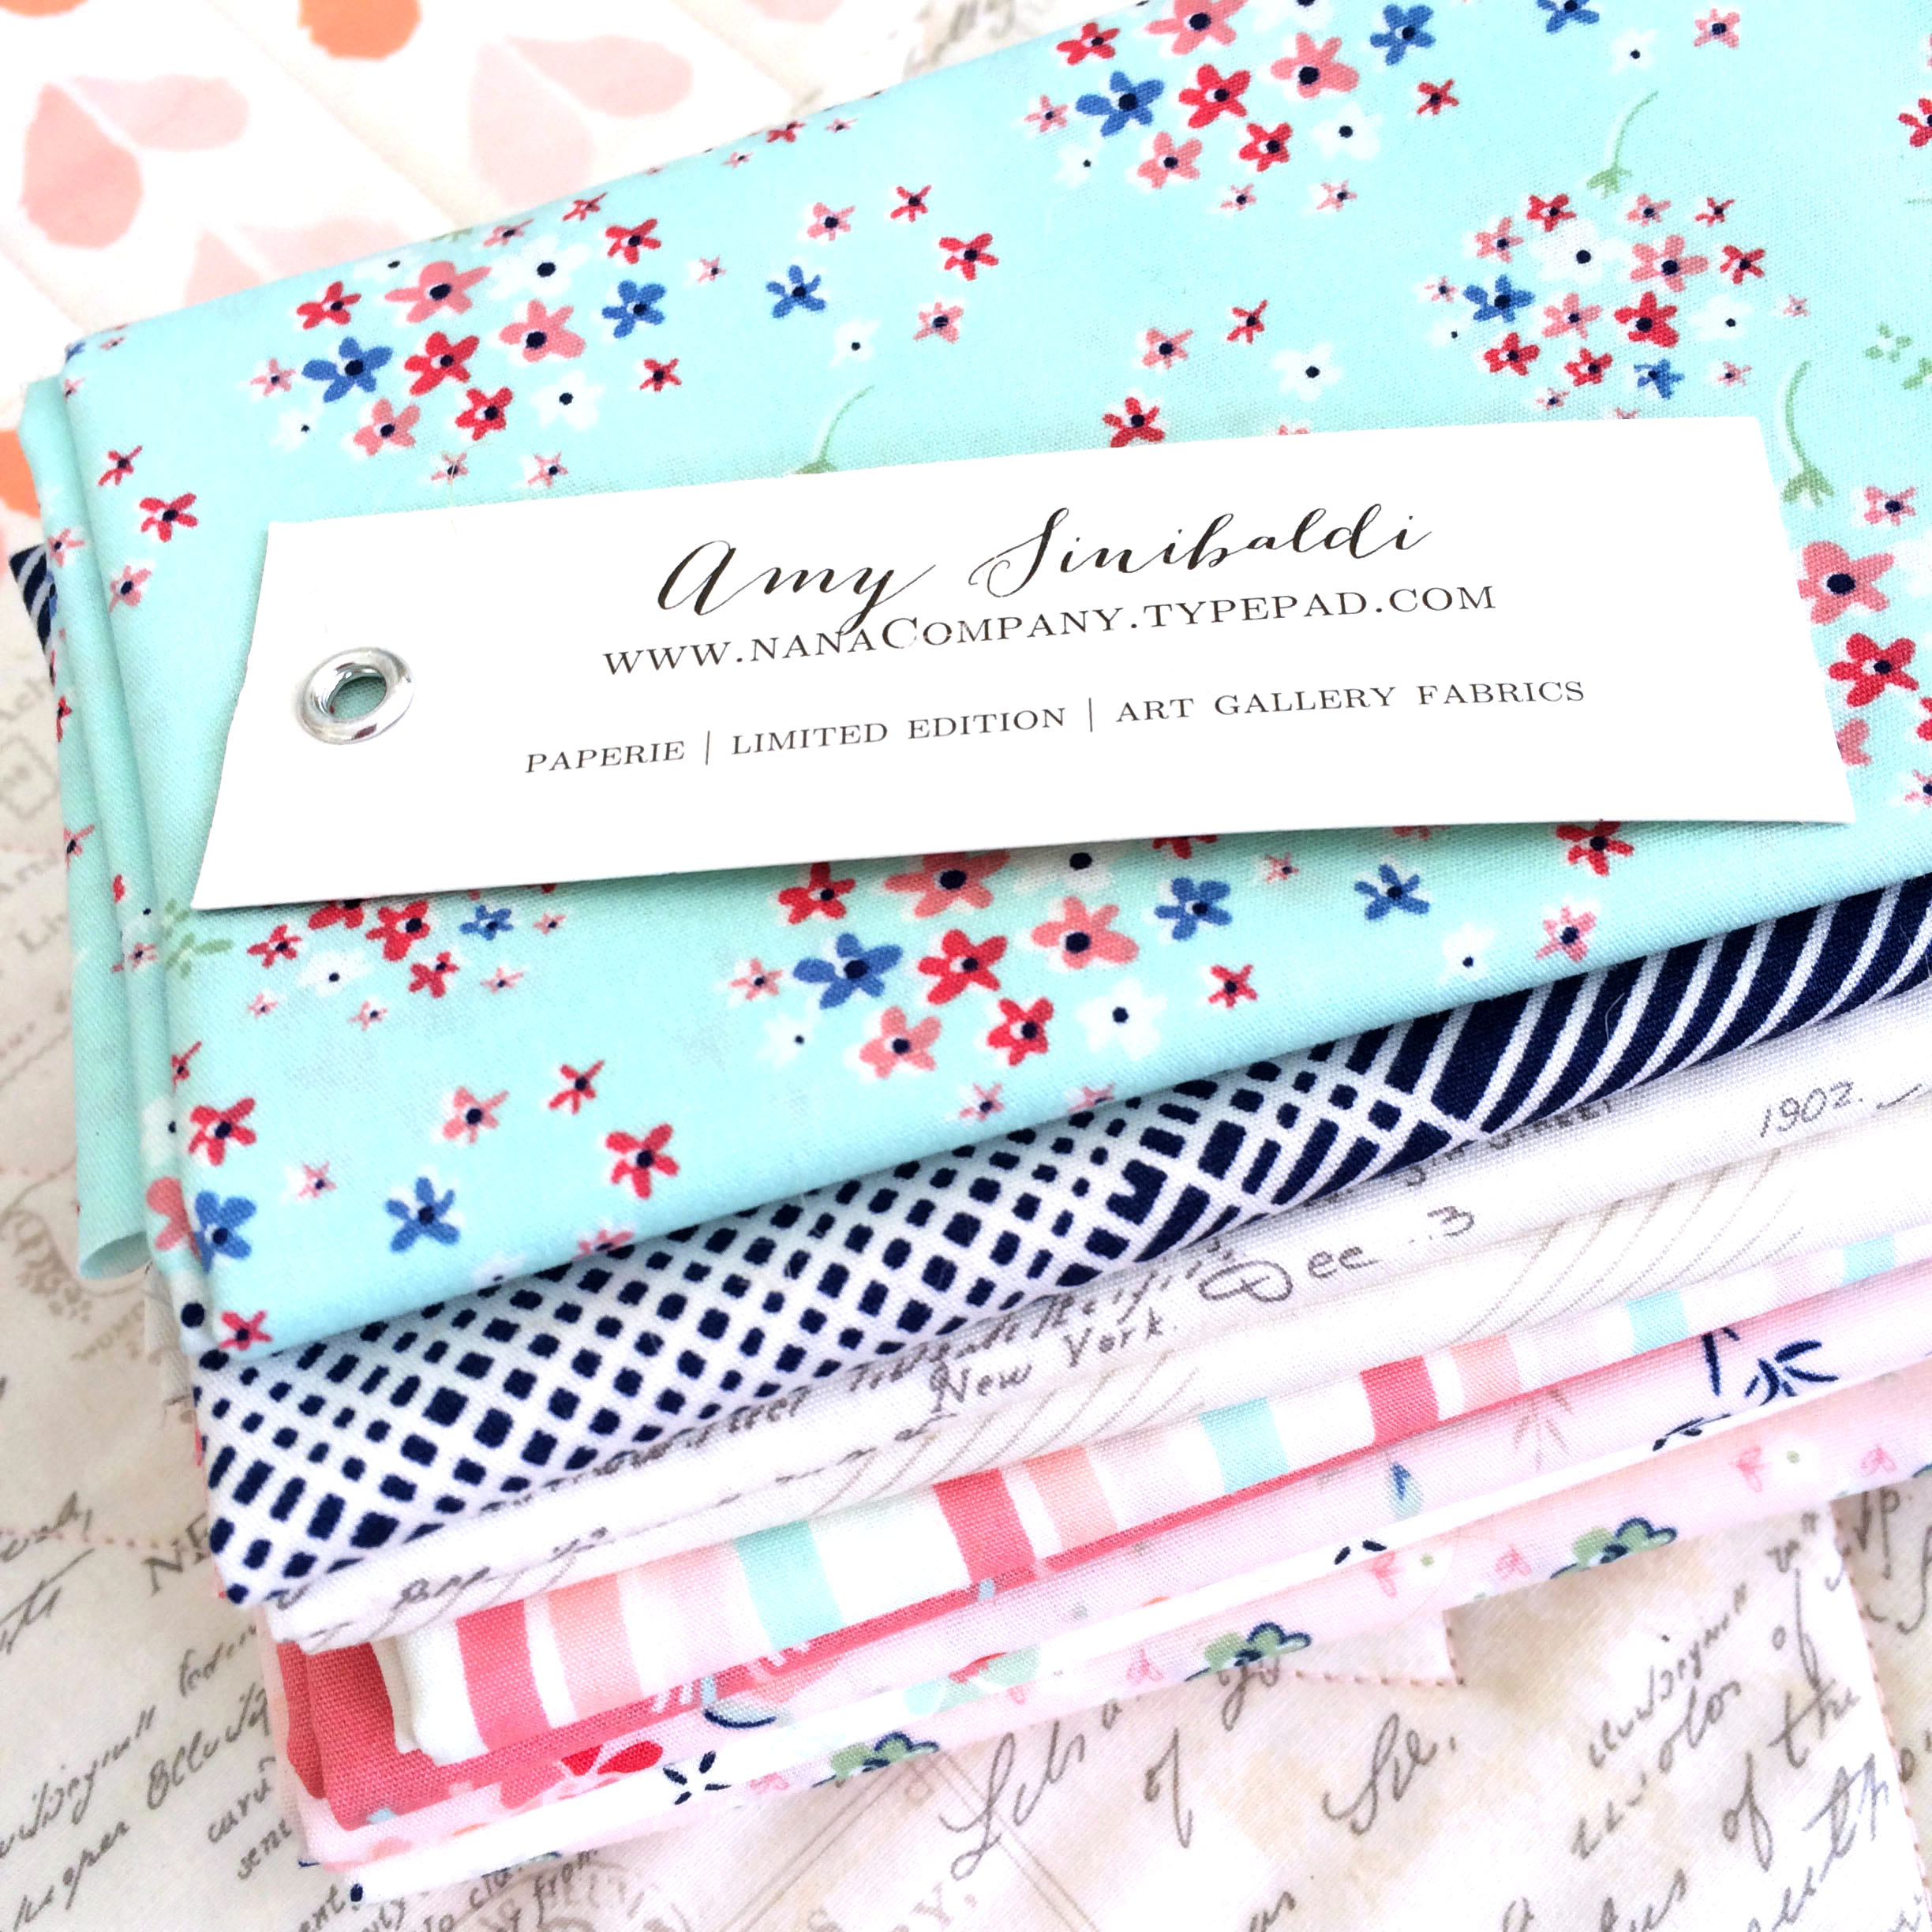
If you have any questions as you are preparing or sewing, please don’t hesitate to comment here, send me an email through my Contact page, or send me a direct message on Instagram. Once I decide on my fabrics (the struggle is real!), I’ll share my pulls, but here are a few notes on materials and plenty of inspiration photos to get you started!

Undercover Maker Mat | lillyella stitchery

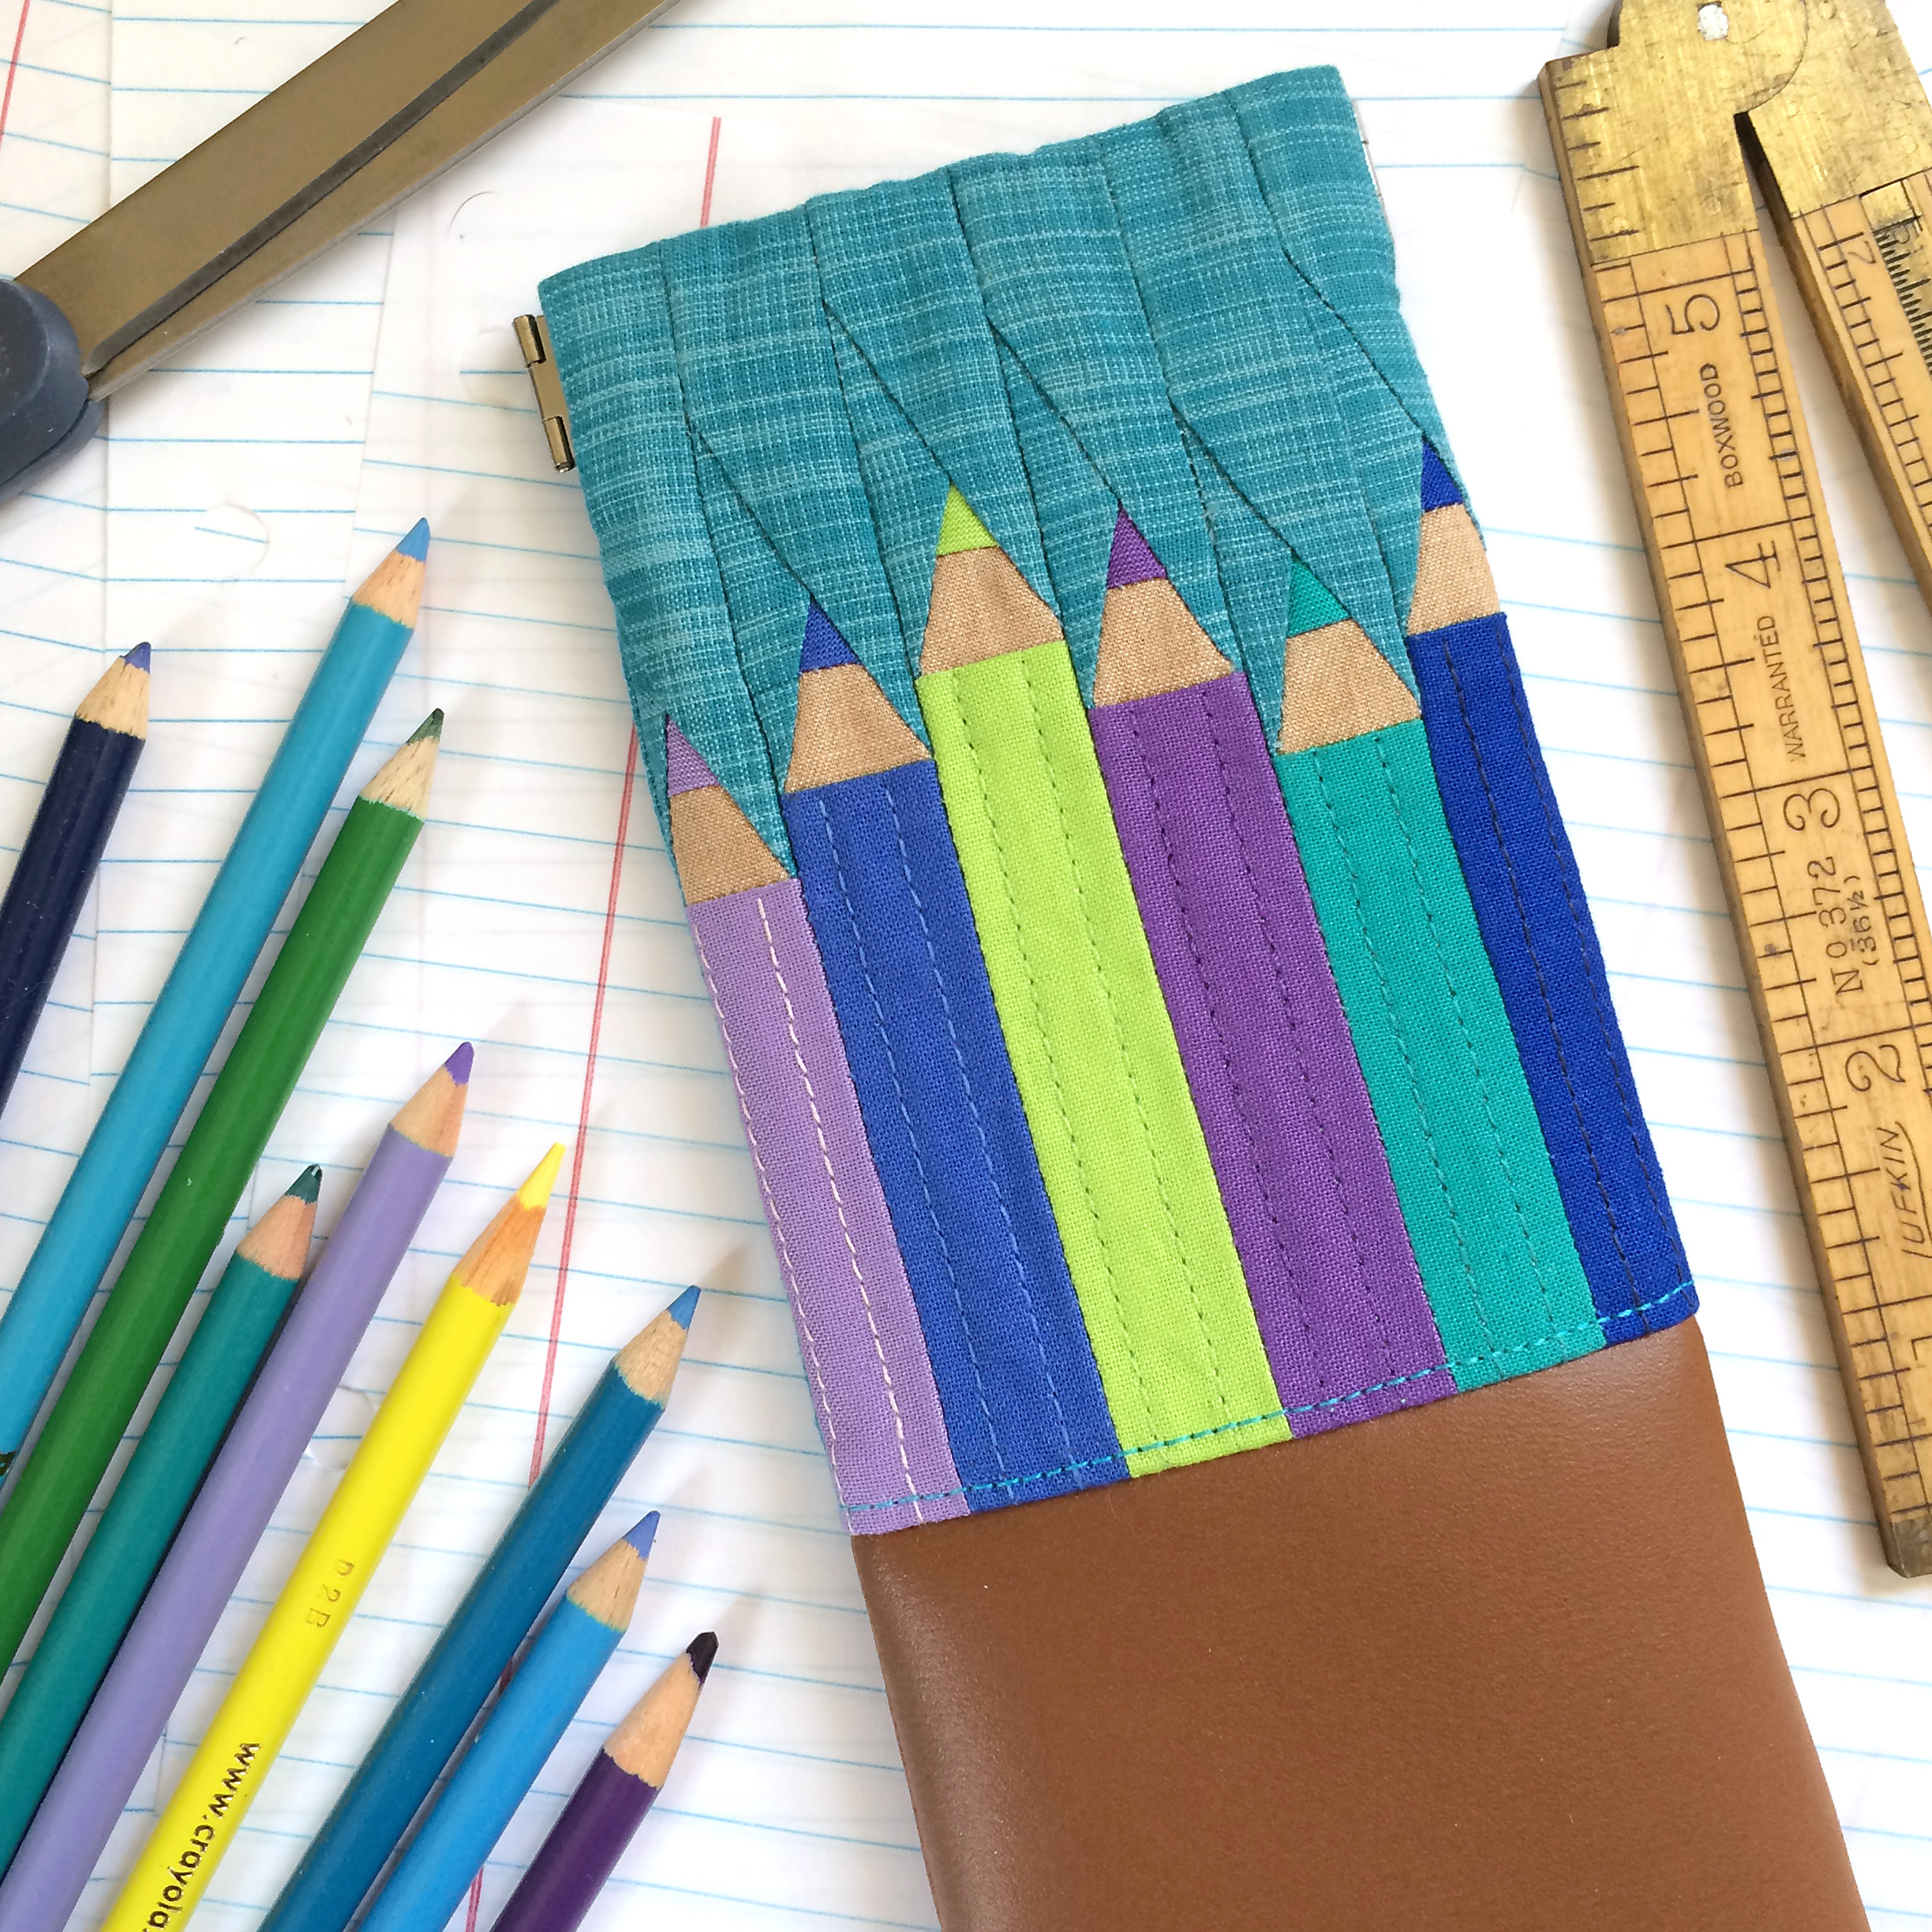
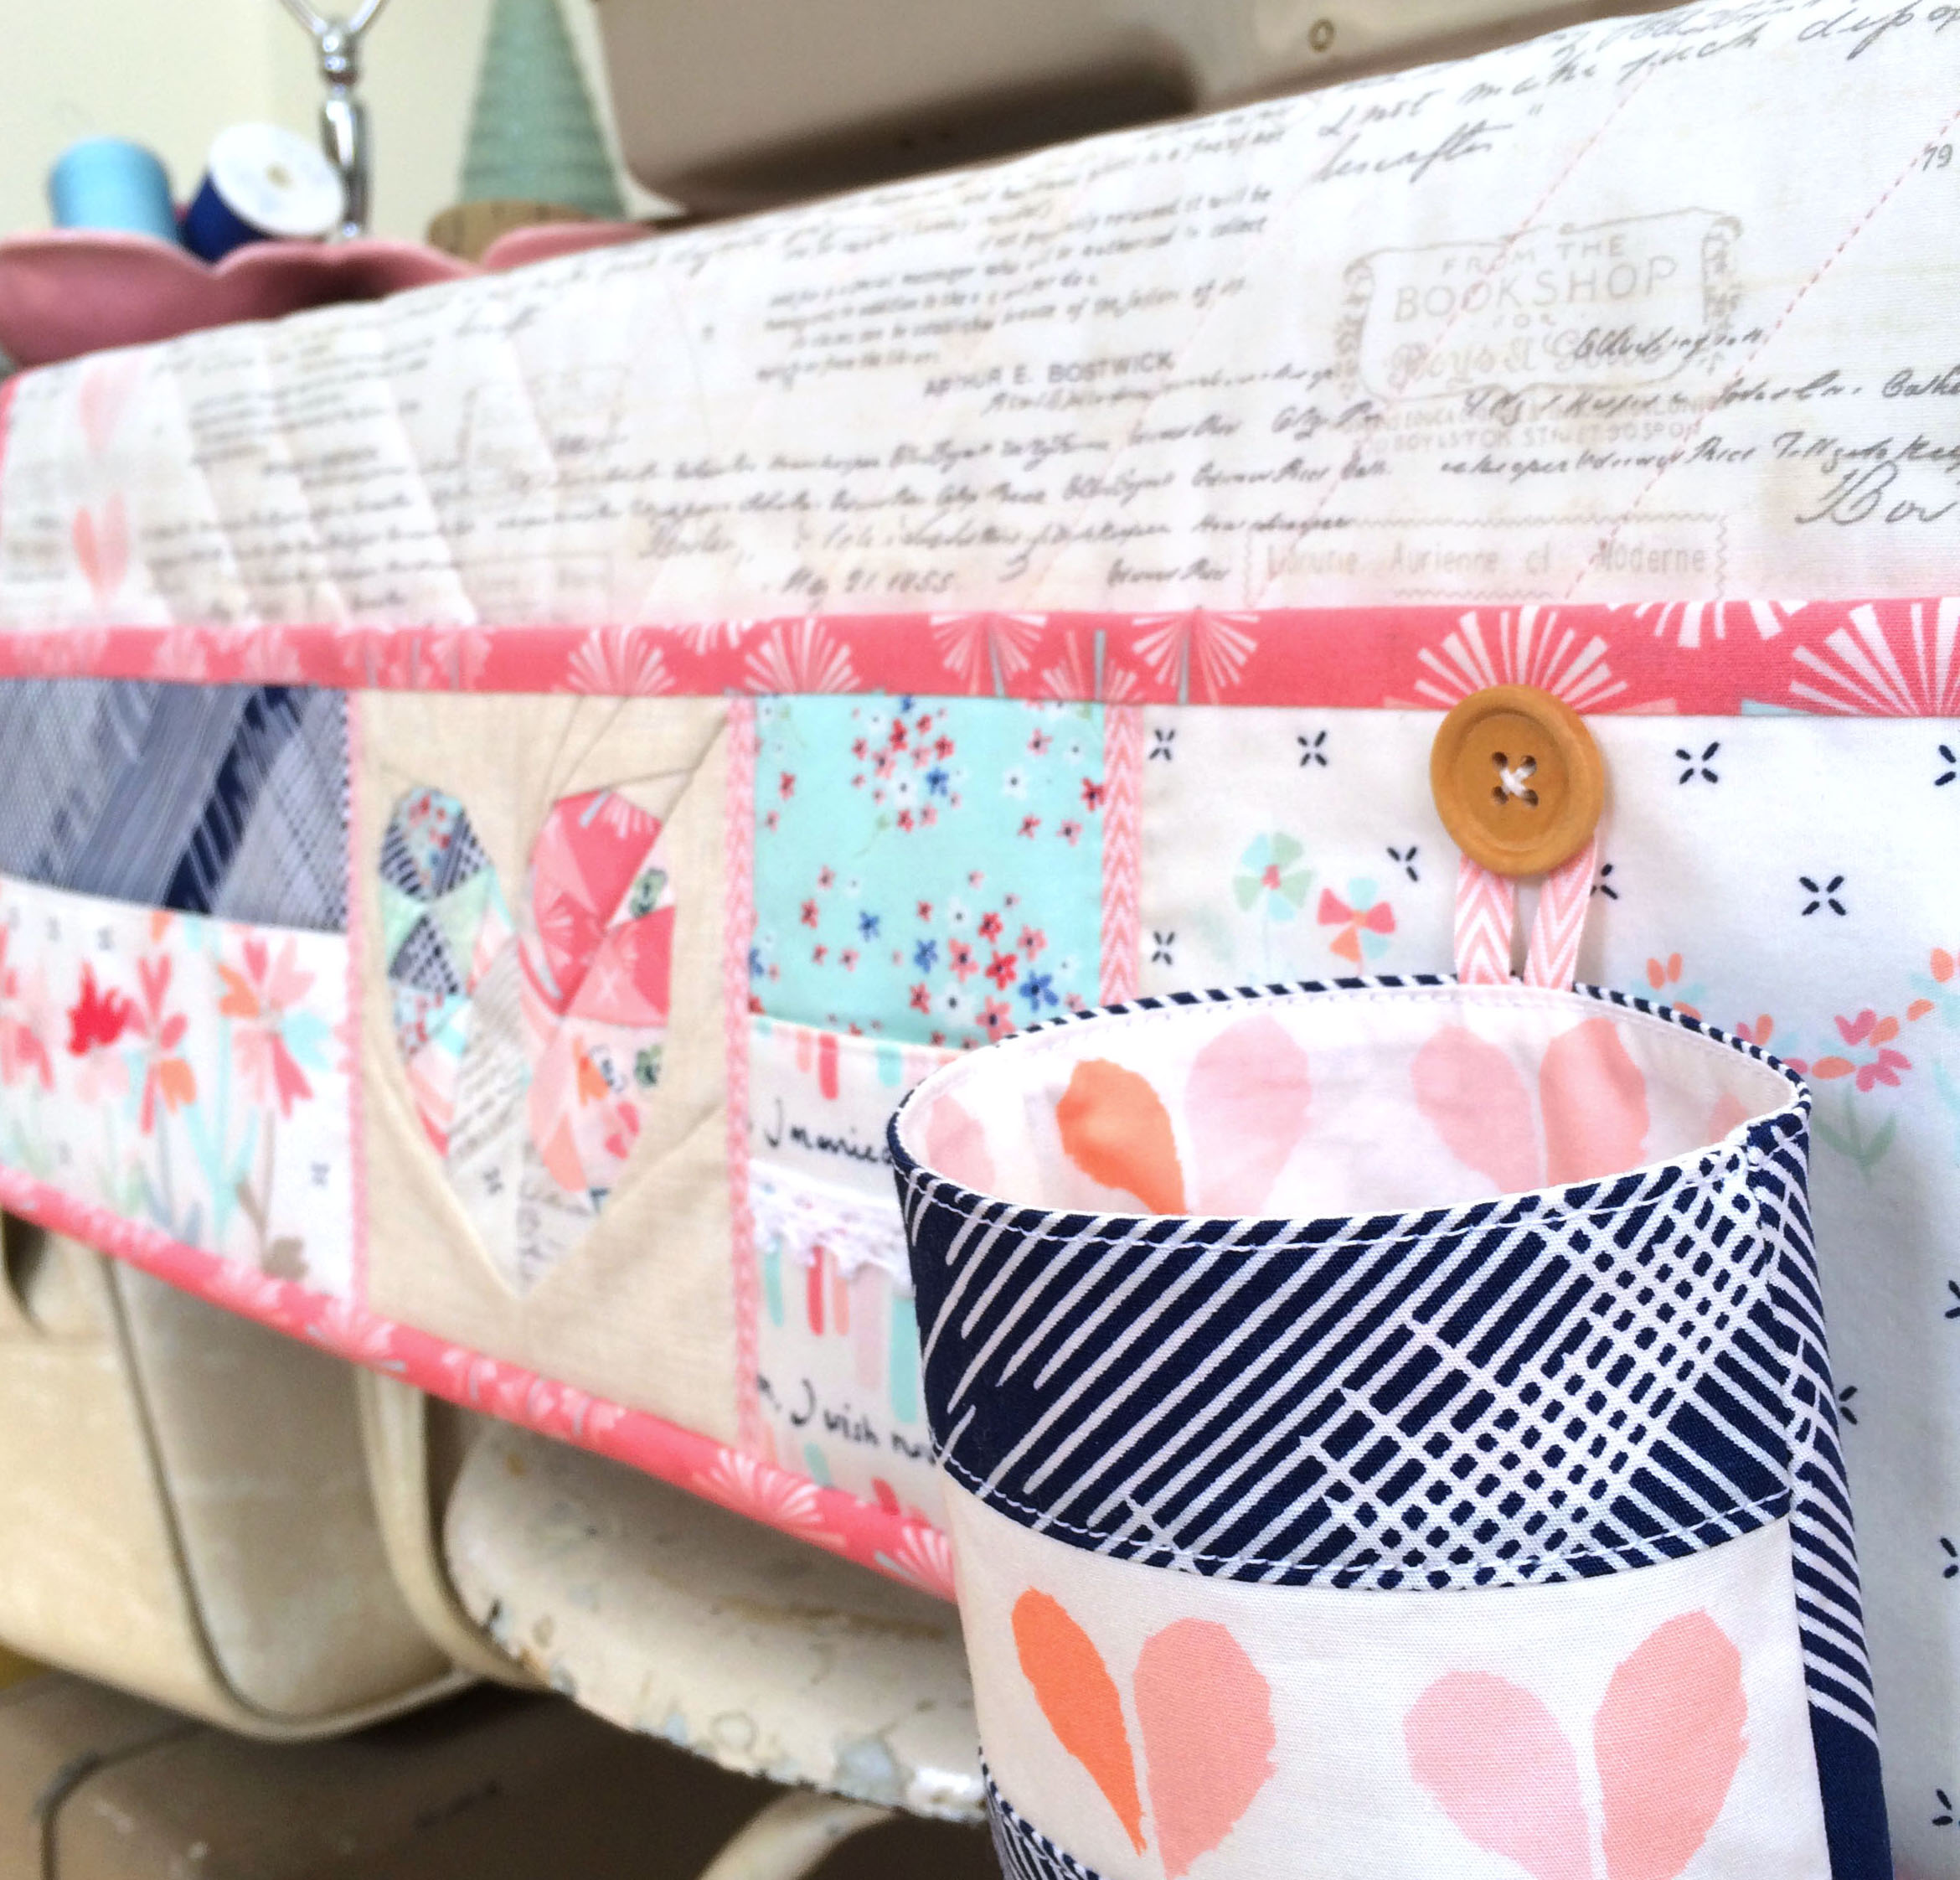
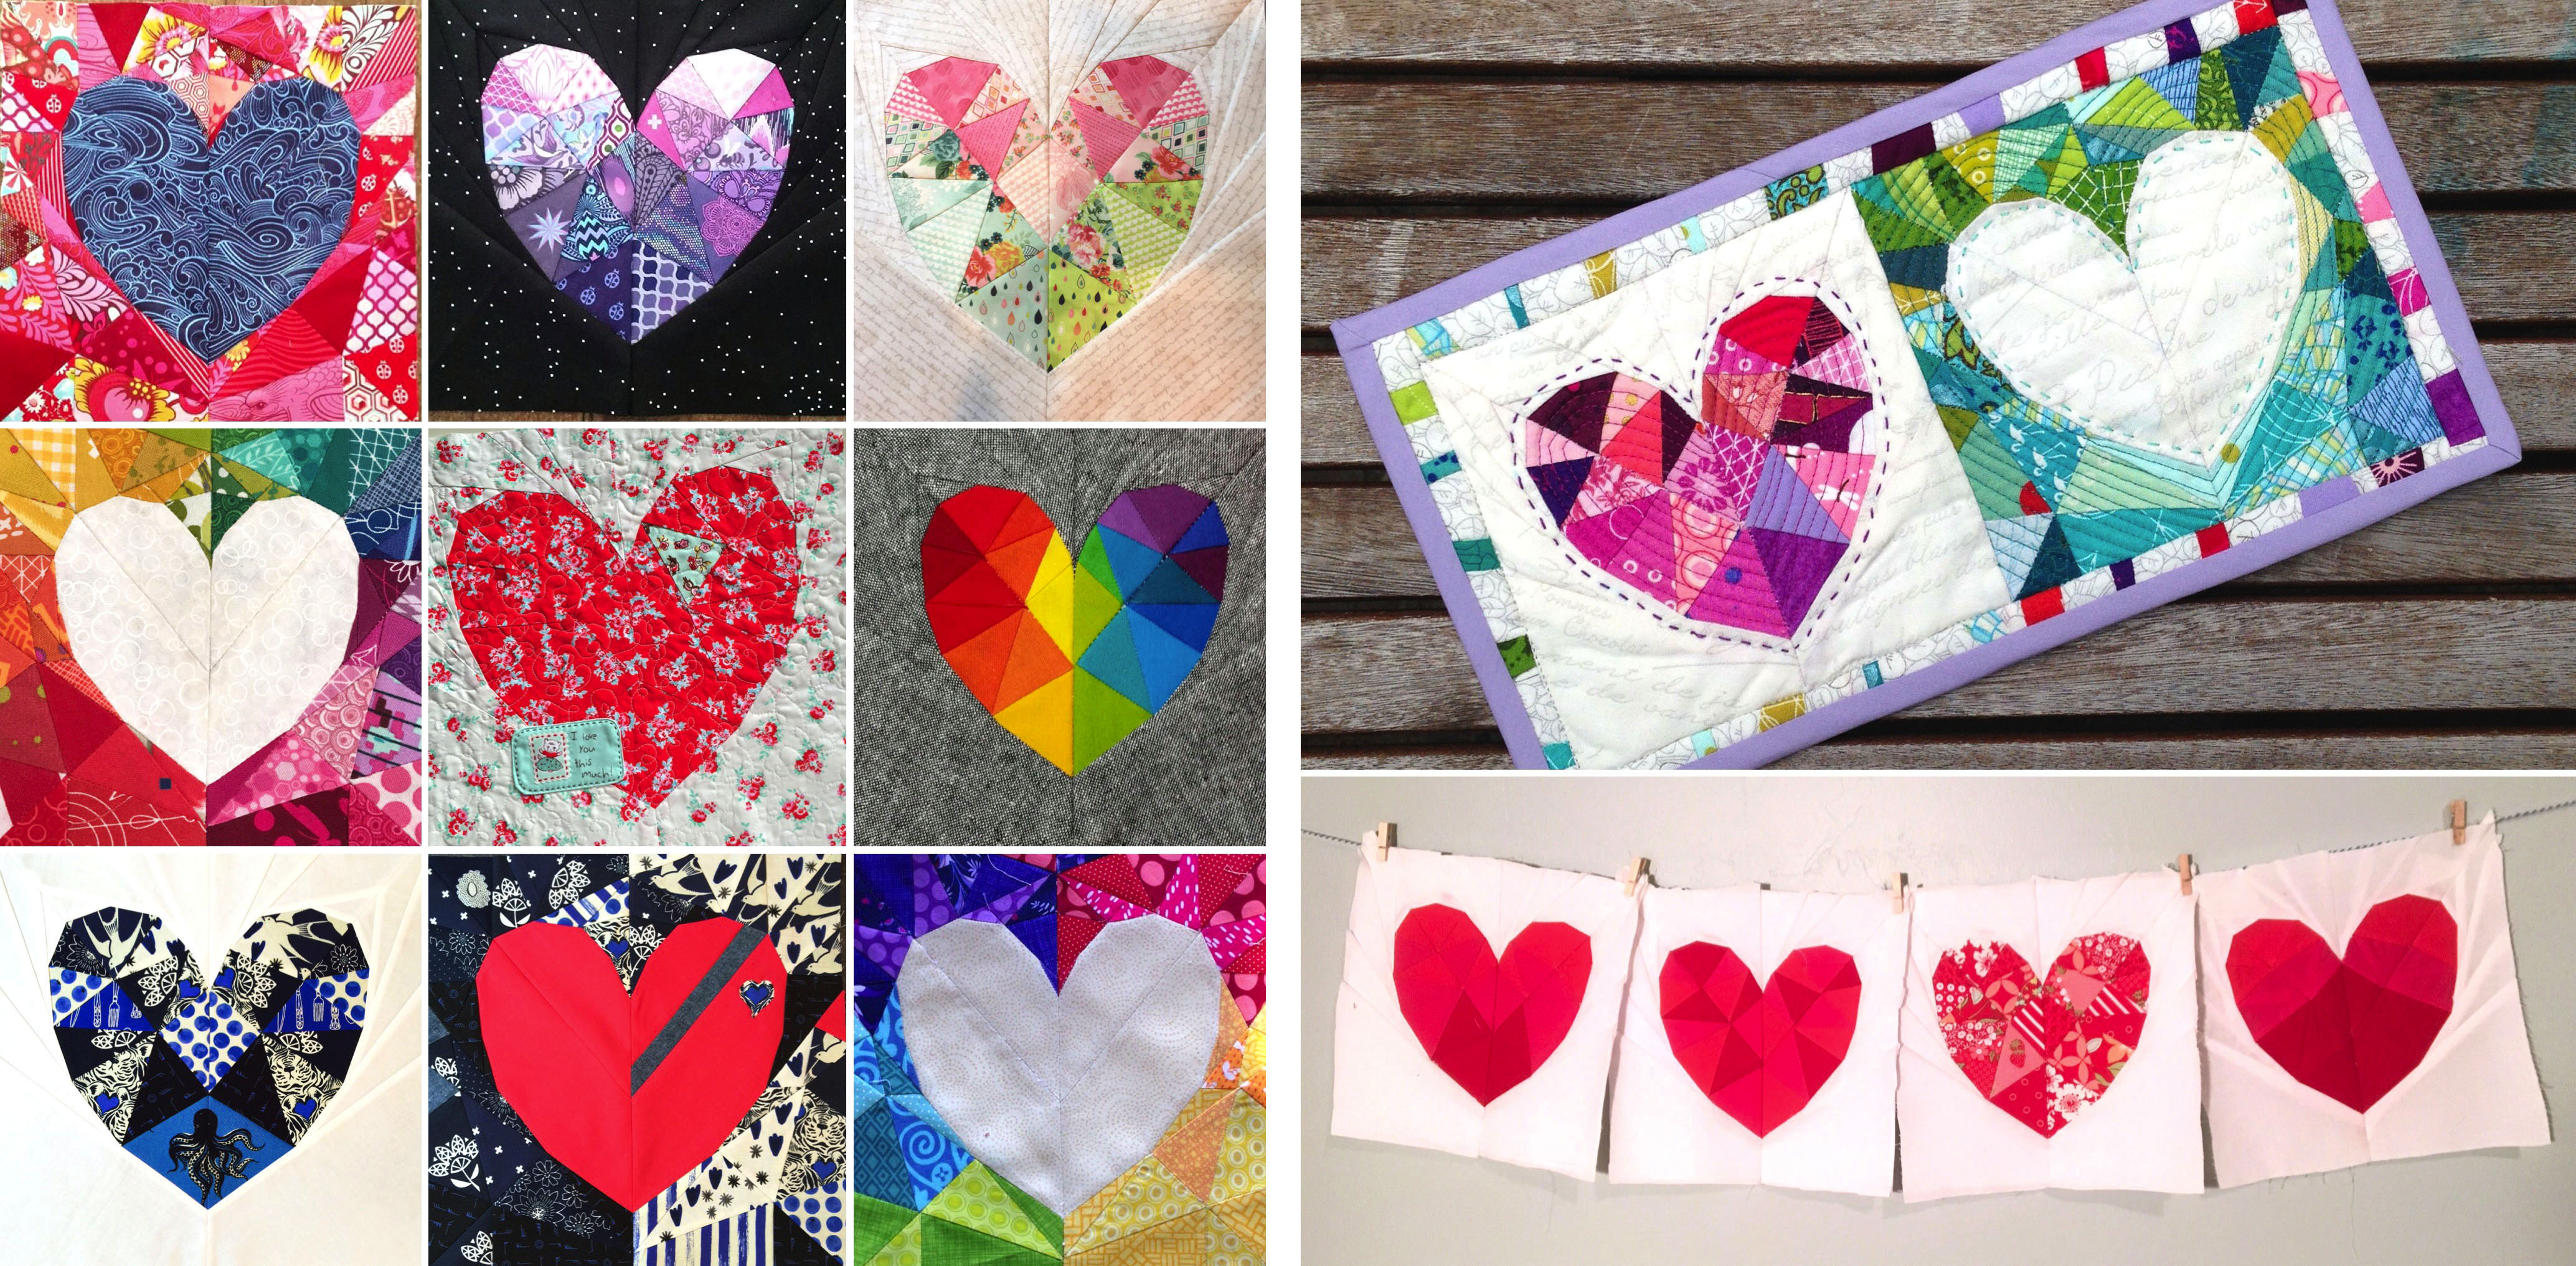
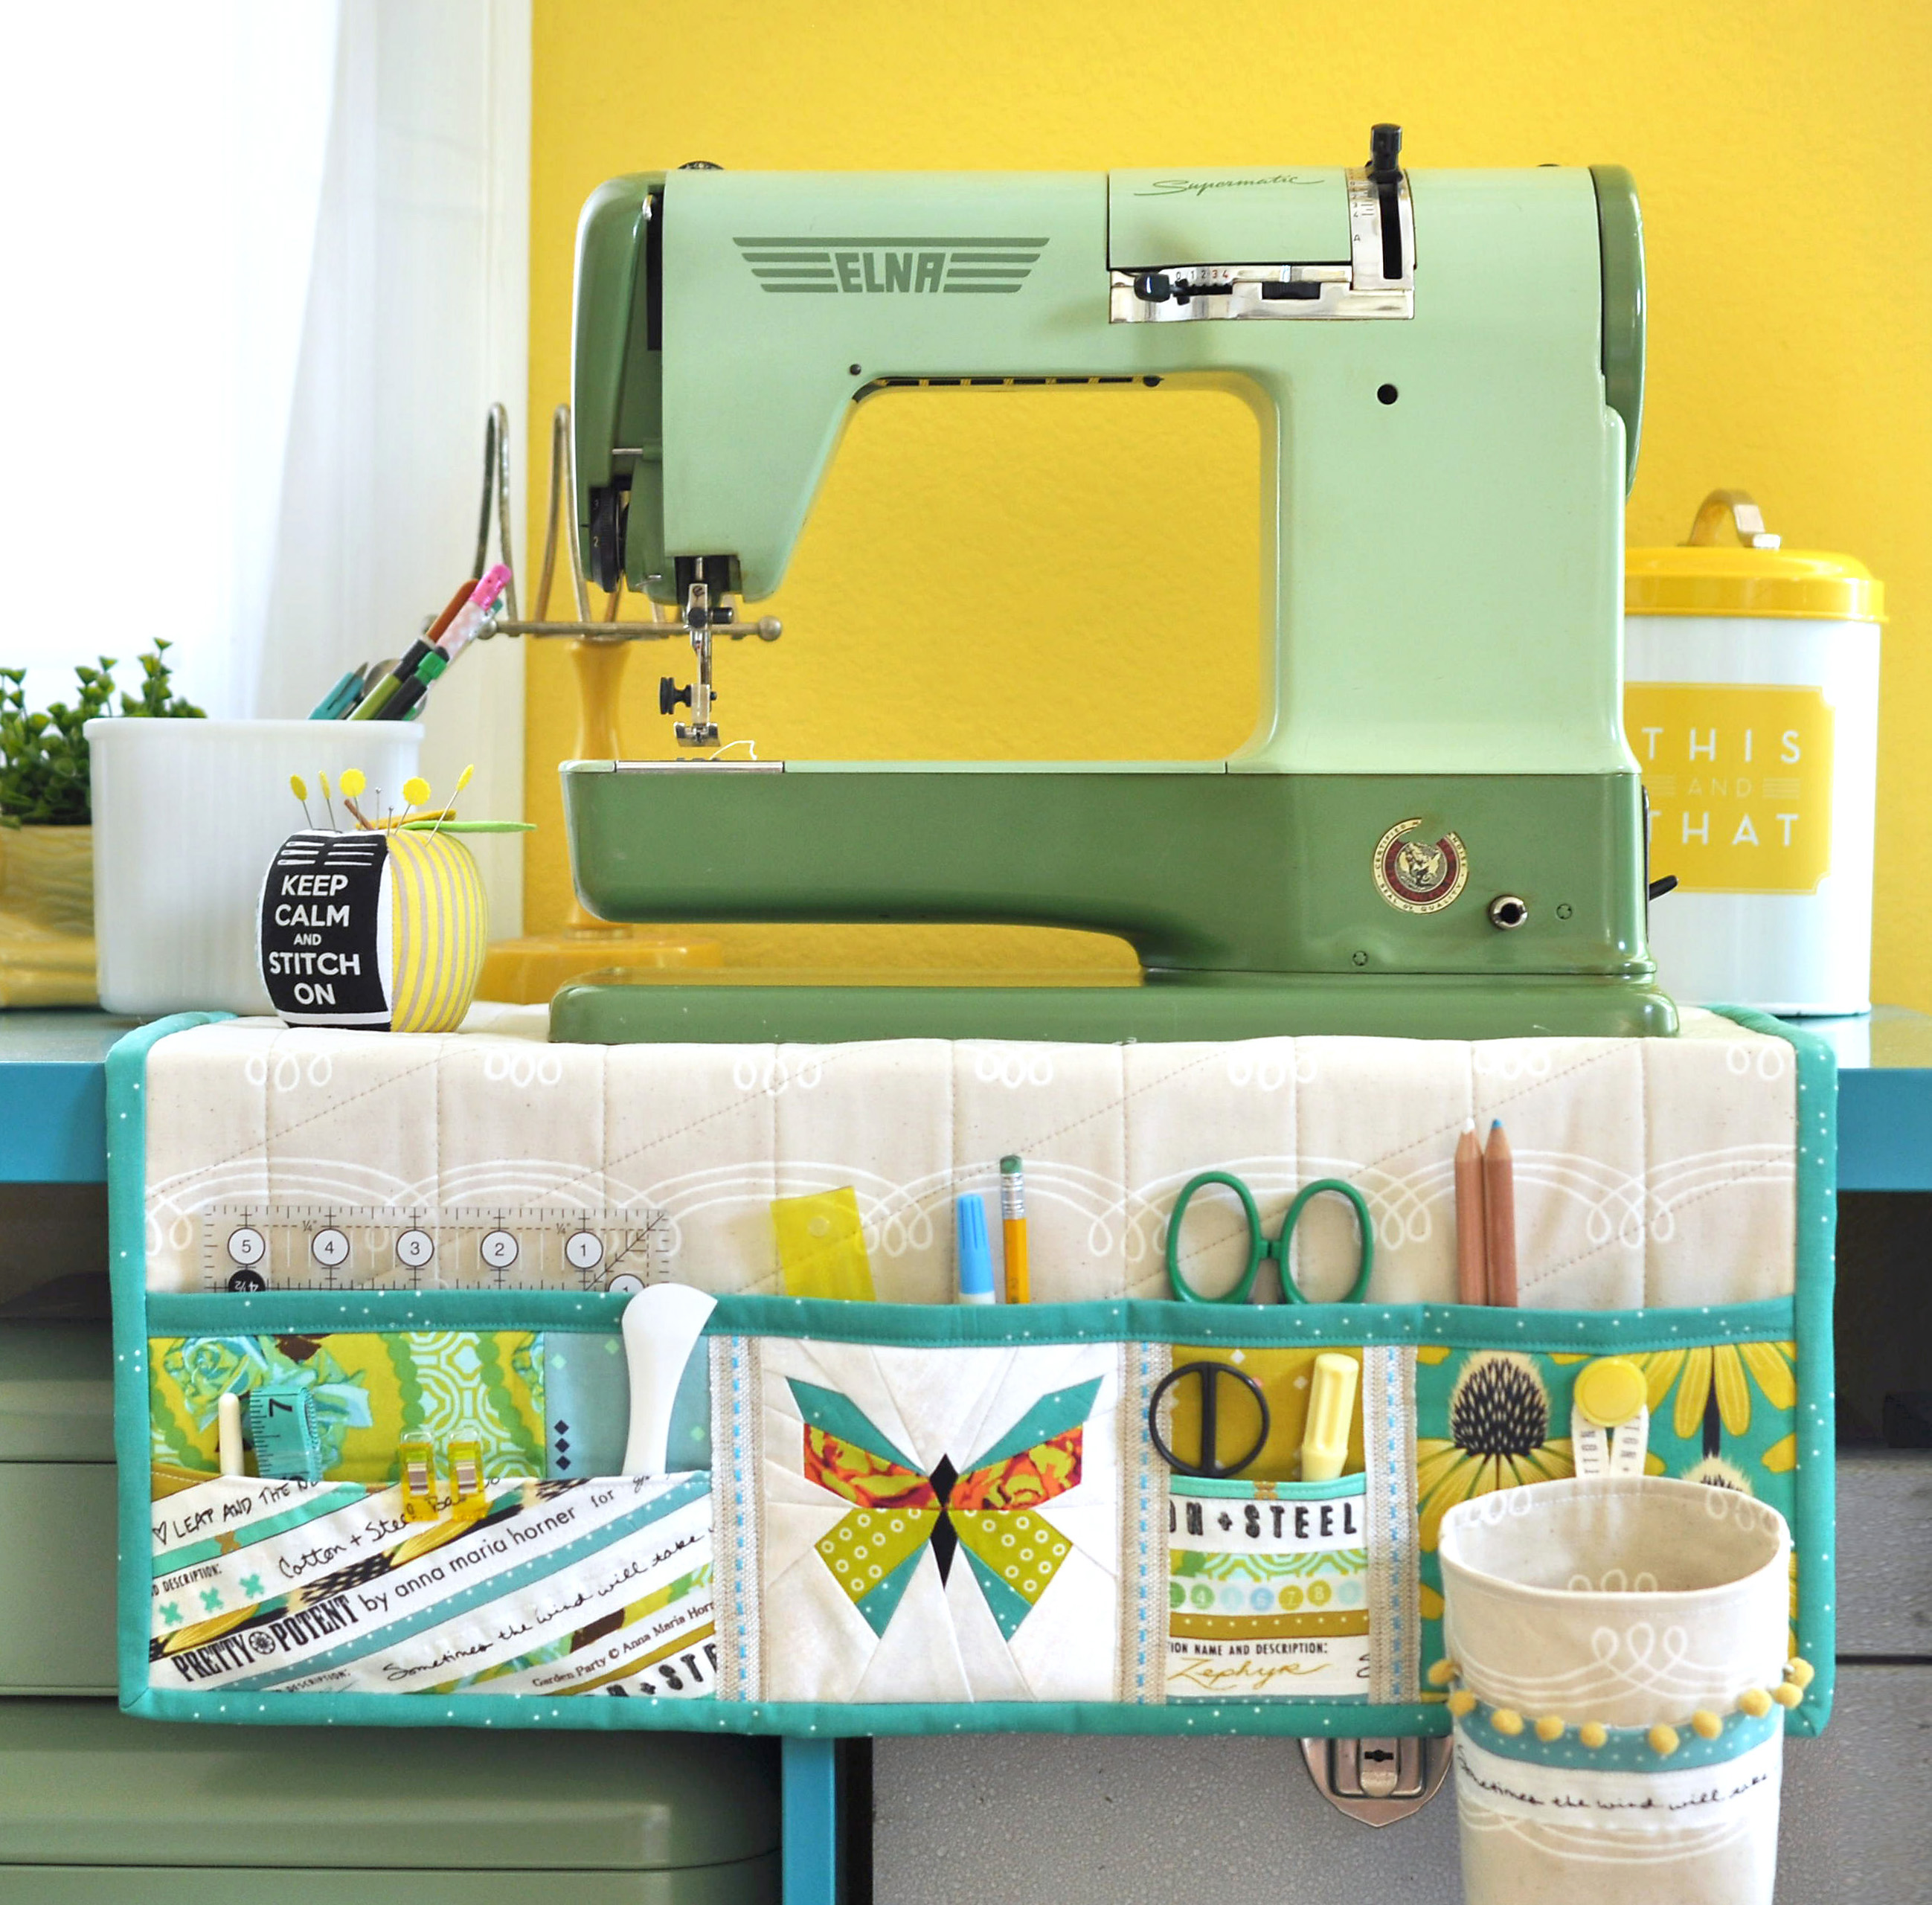
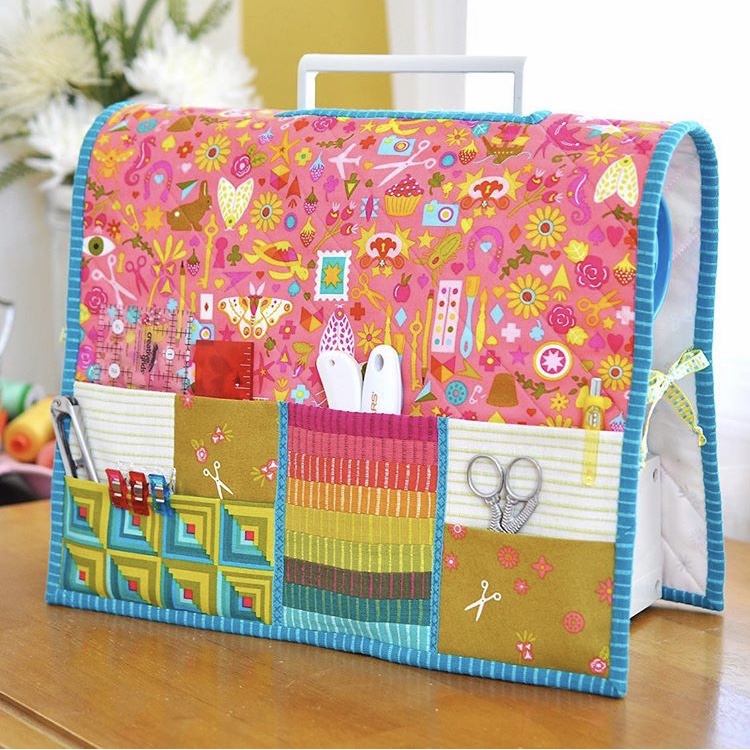
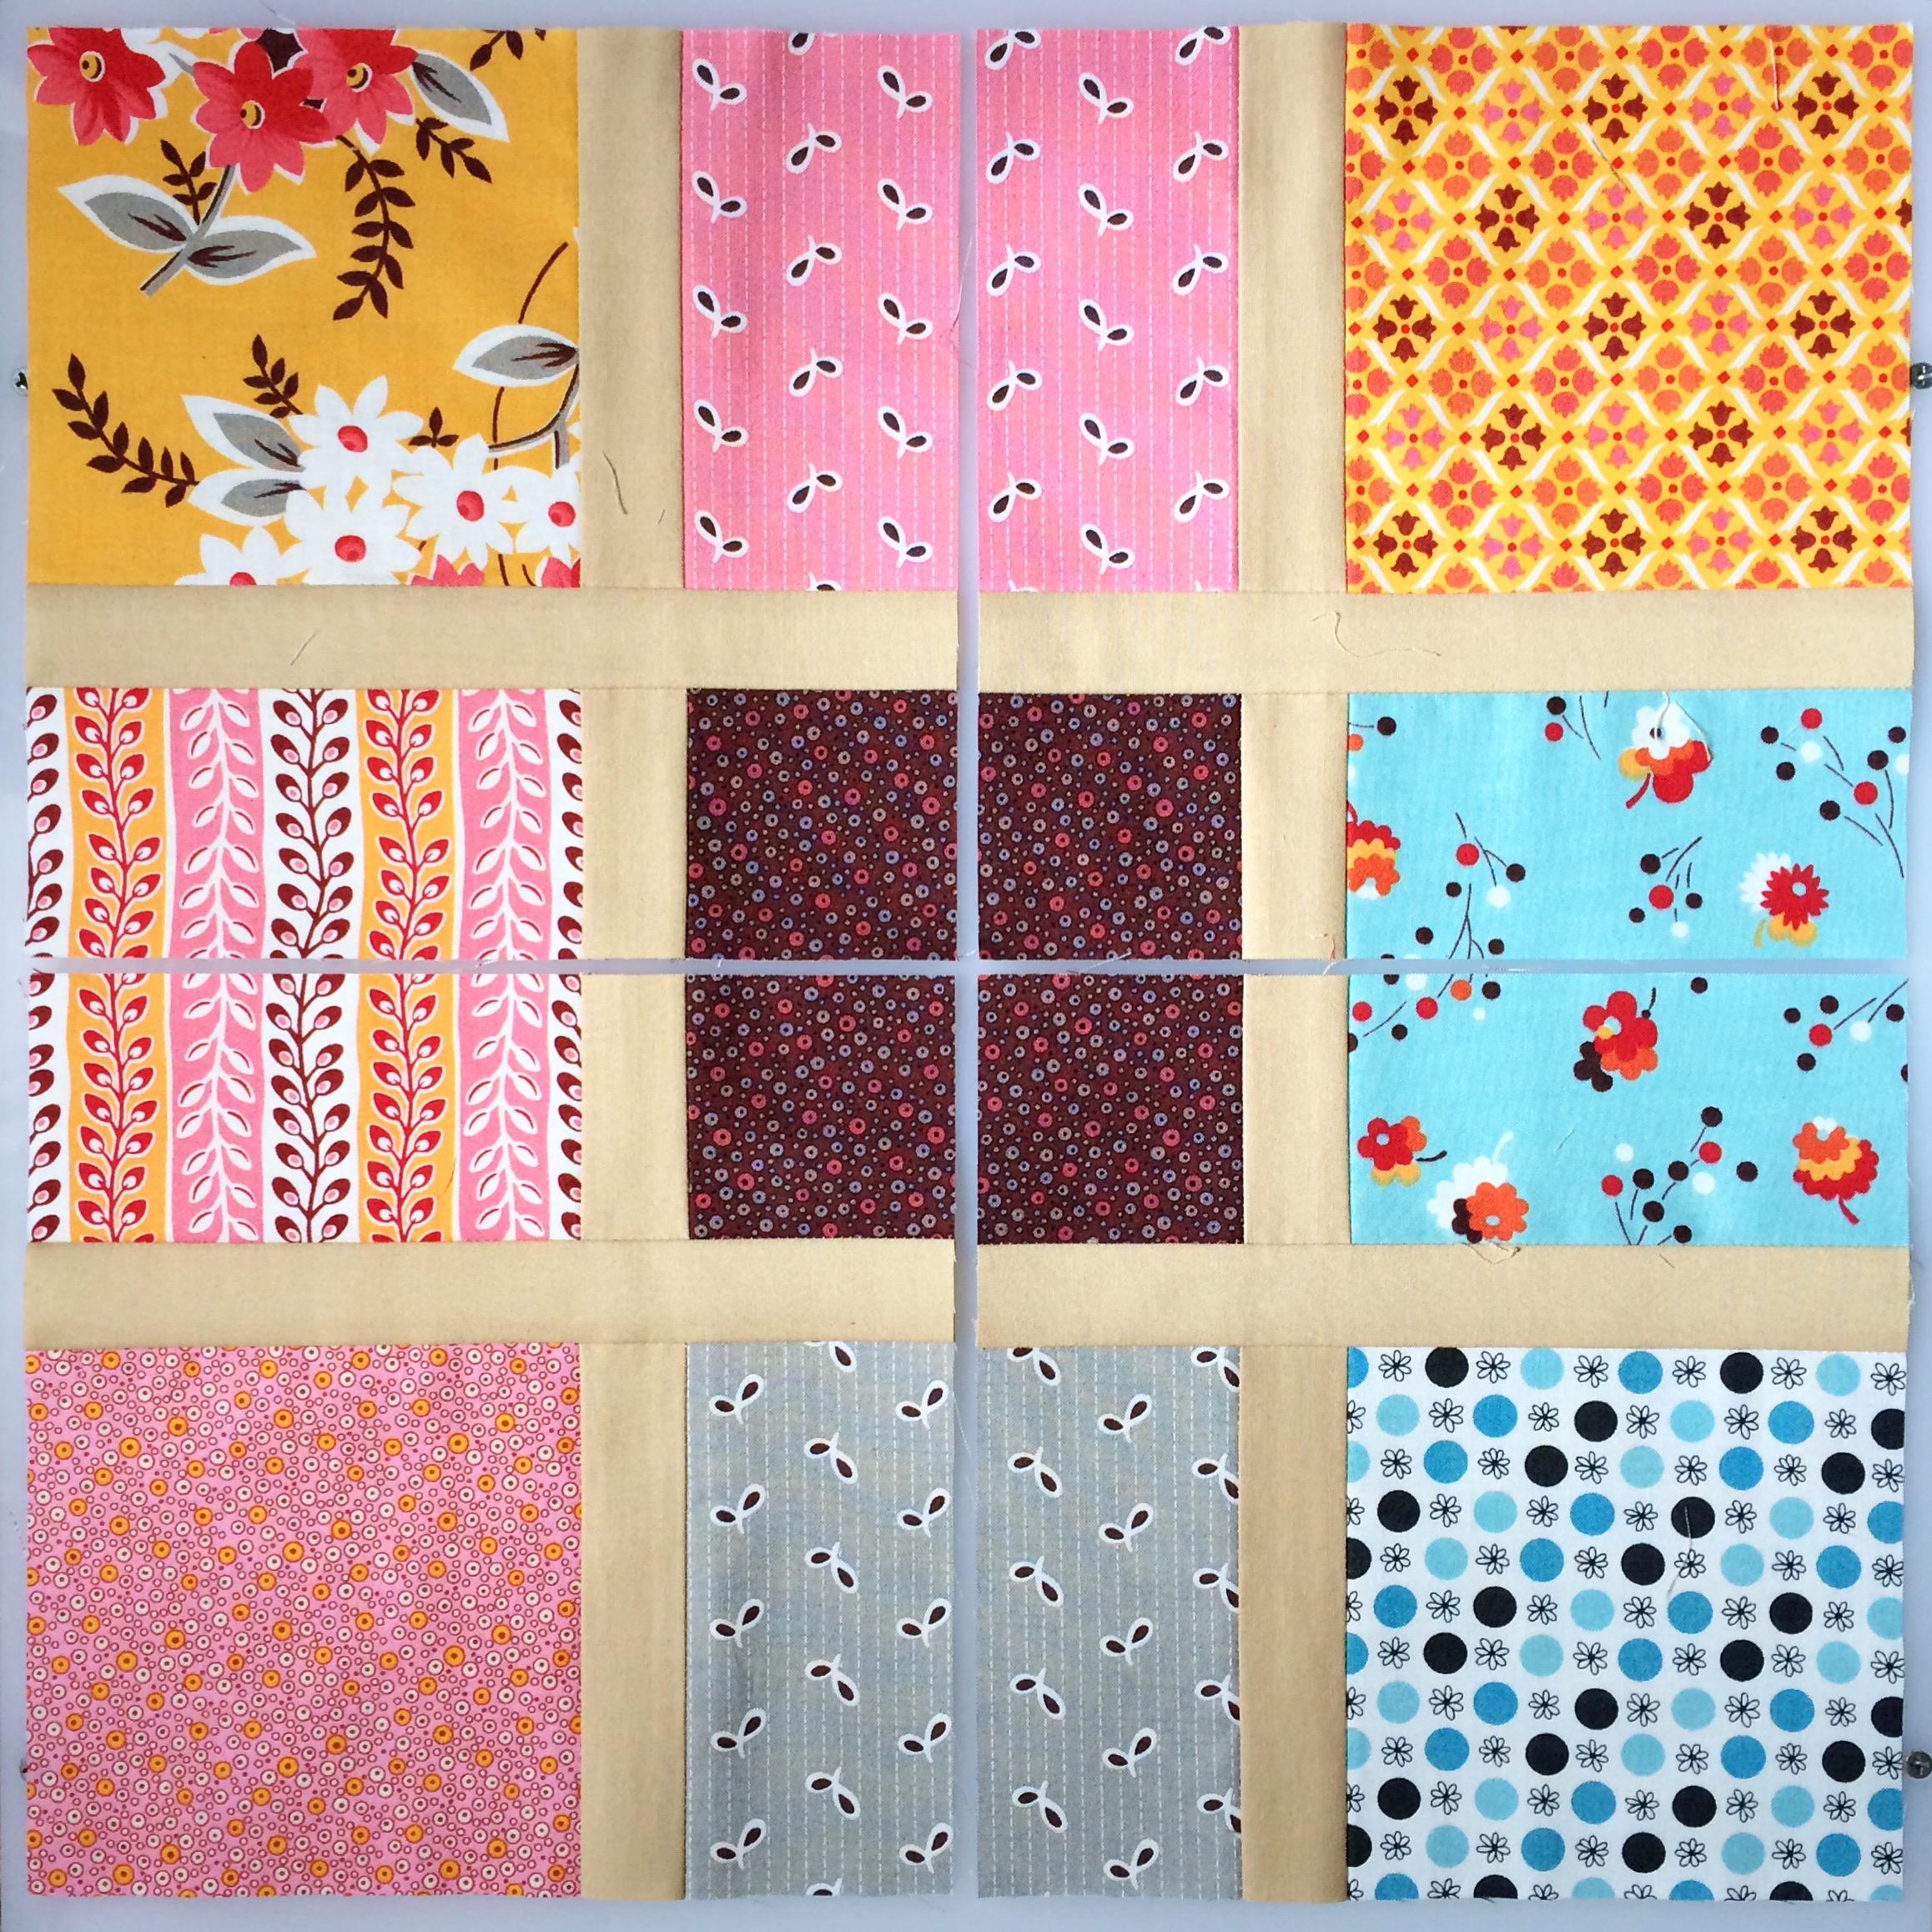
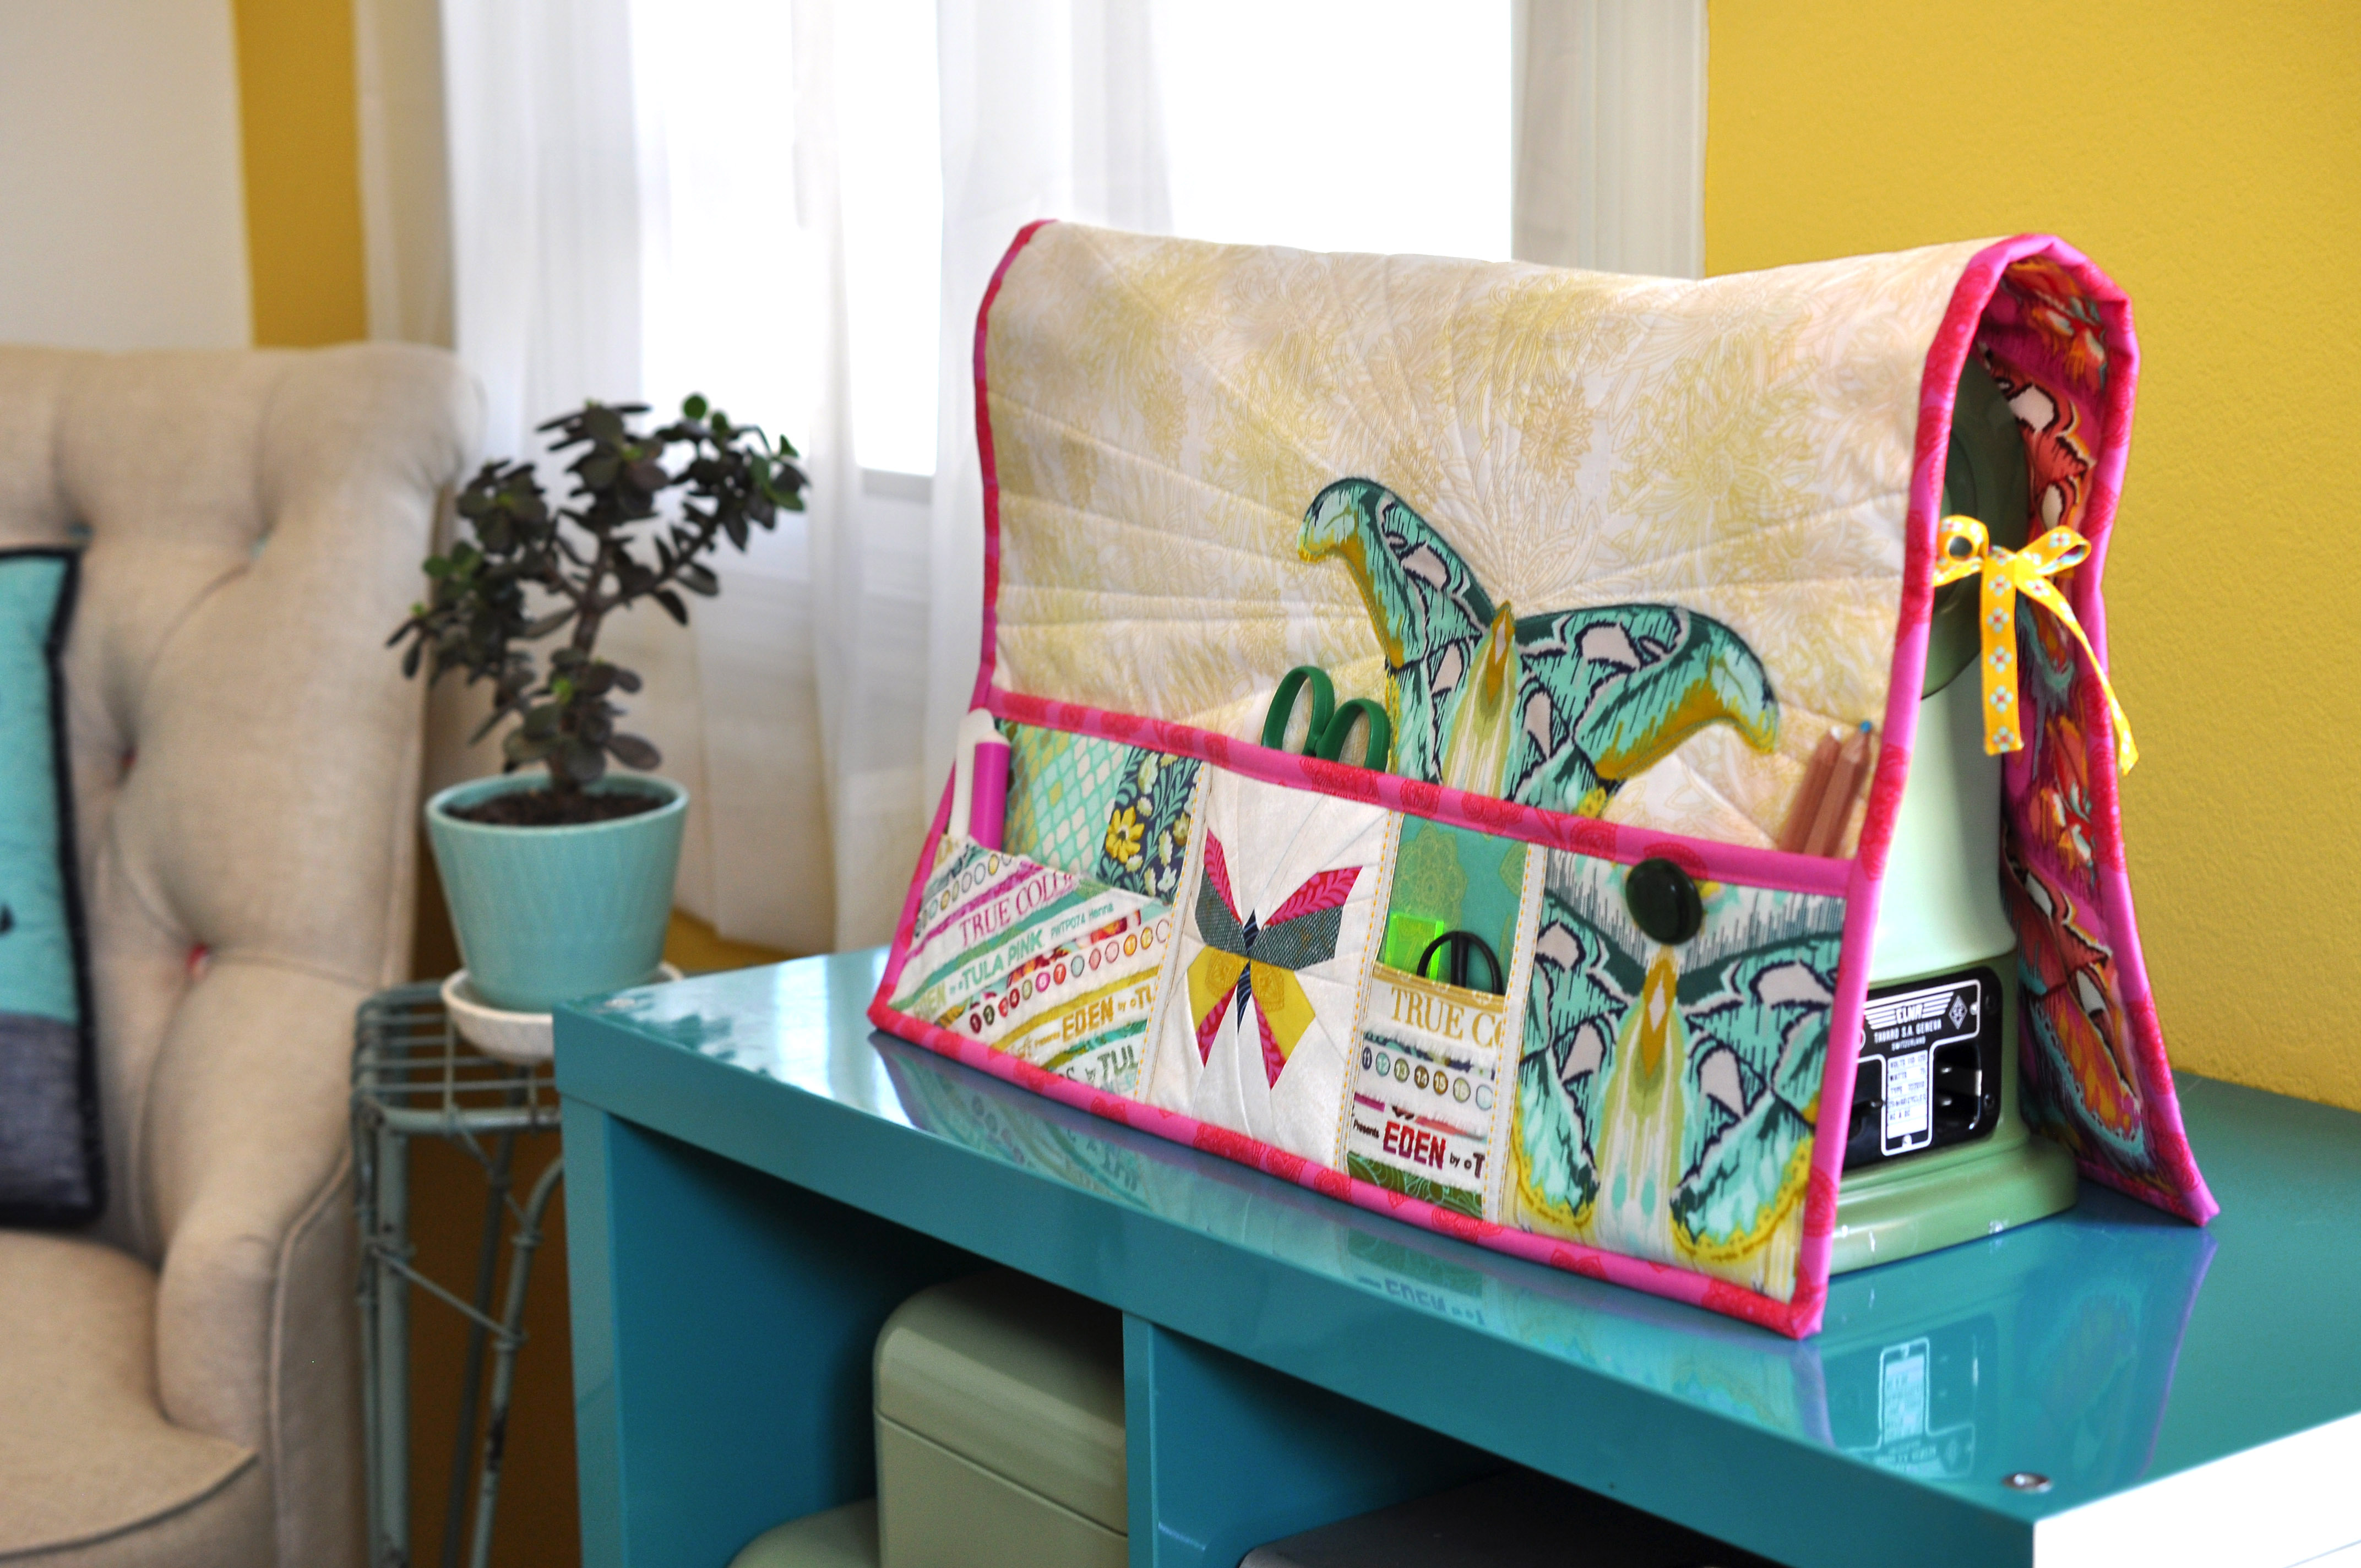
I will be making my mat as the original is designed with the paper pieced butterfly and selvedge pockets, but these elements can be changed to just solid fabrics or any patchwork design you like. You will see various ways they are done in the photos at the end.

SIZE
The finished mat, as it is designed, measures 20″ wide by 23″ long. This size is based off a couple machines I had on hand and what felt good to fit on a variety of tables. This size can be easily changed if you find that you need a larger or smaller mat to cover your machine or fit on your work surface. To change the length of the mat, you simple need to add more to your main body piece. If changing the width of the mat (the 20″ dimension), you will need to equally add or subtract measurements from the main body and the pocket panel pieces. The easiest way is to simple add on to one of the end pockets and keep the inner pocket dimensions the same, but you can, of course, adjust them any way you like. You can also choose to break up the pockets differently than I have hear to suit your needs.
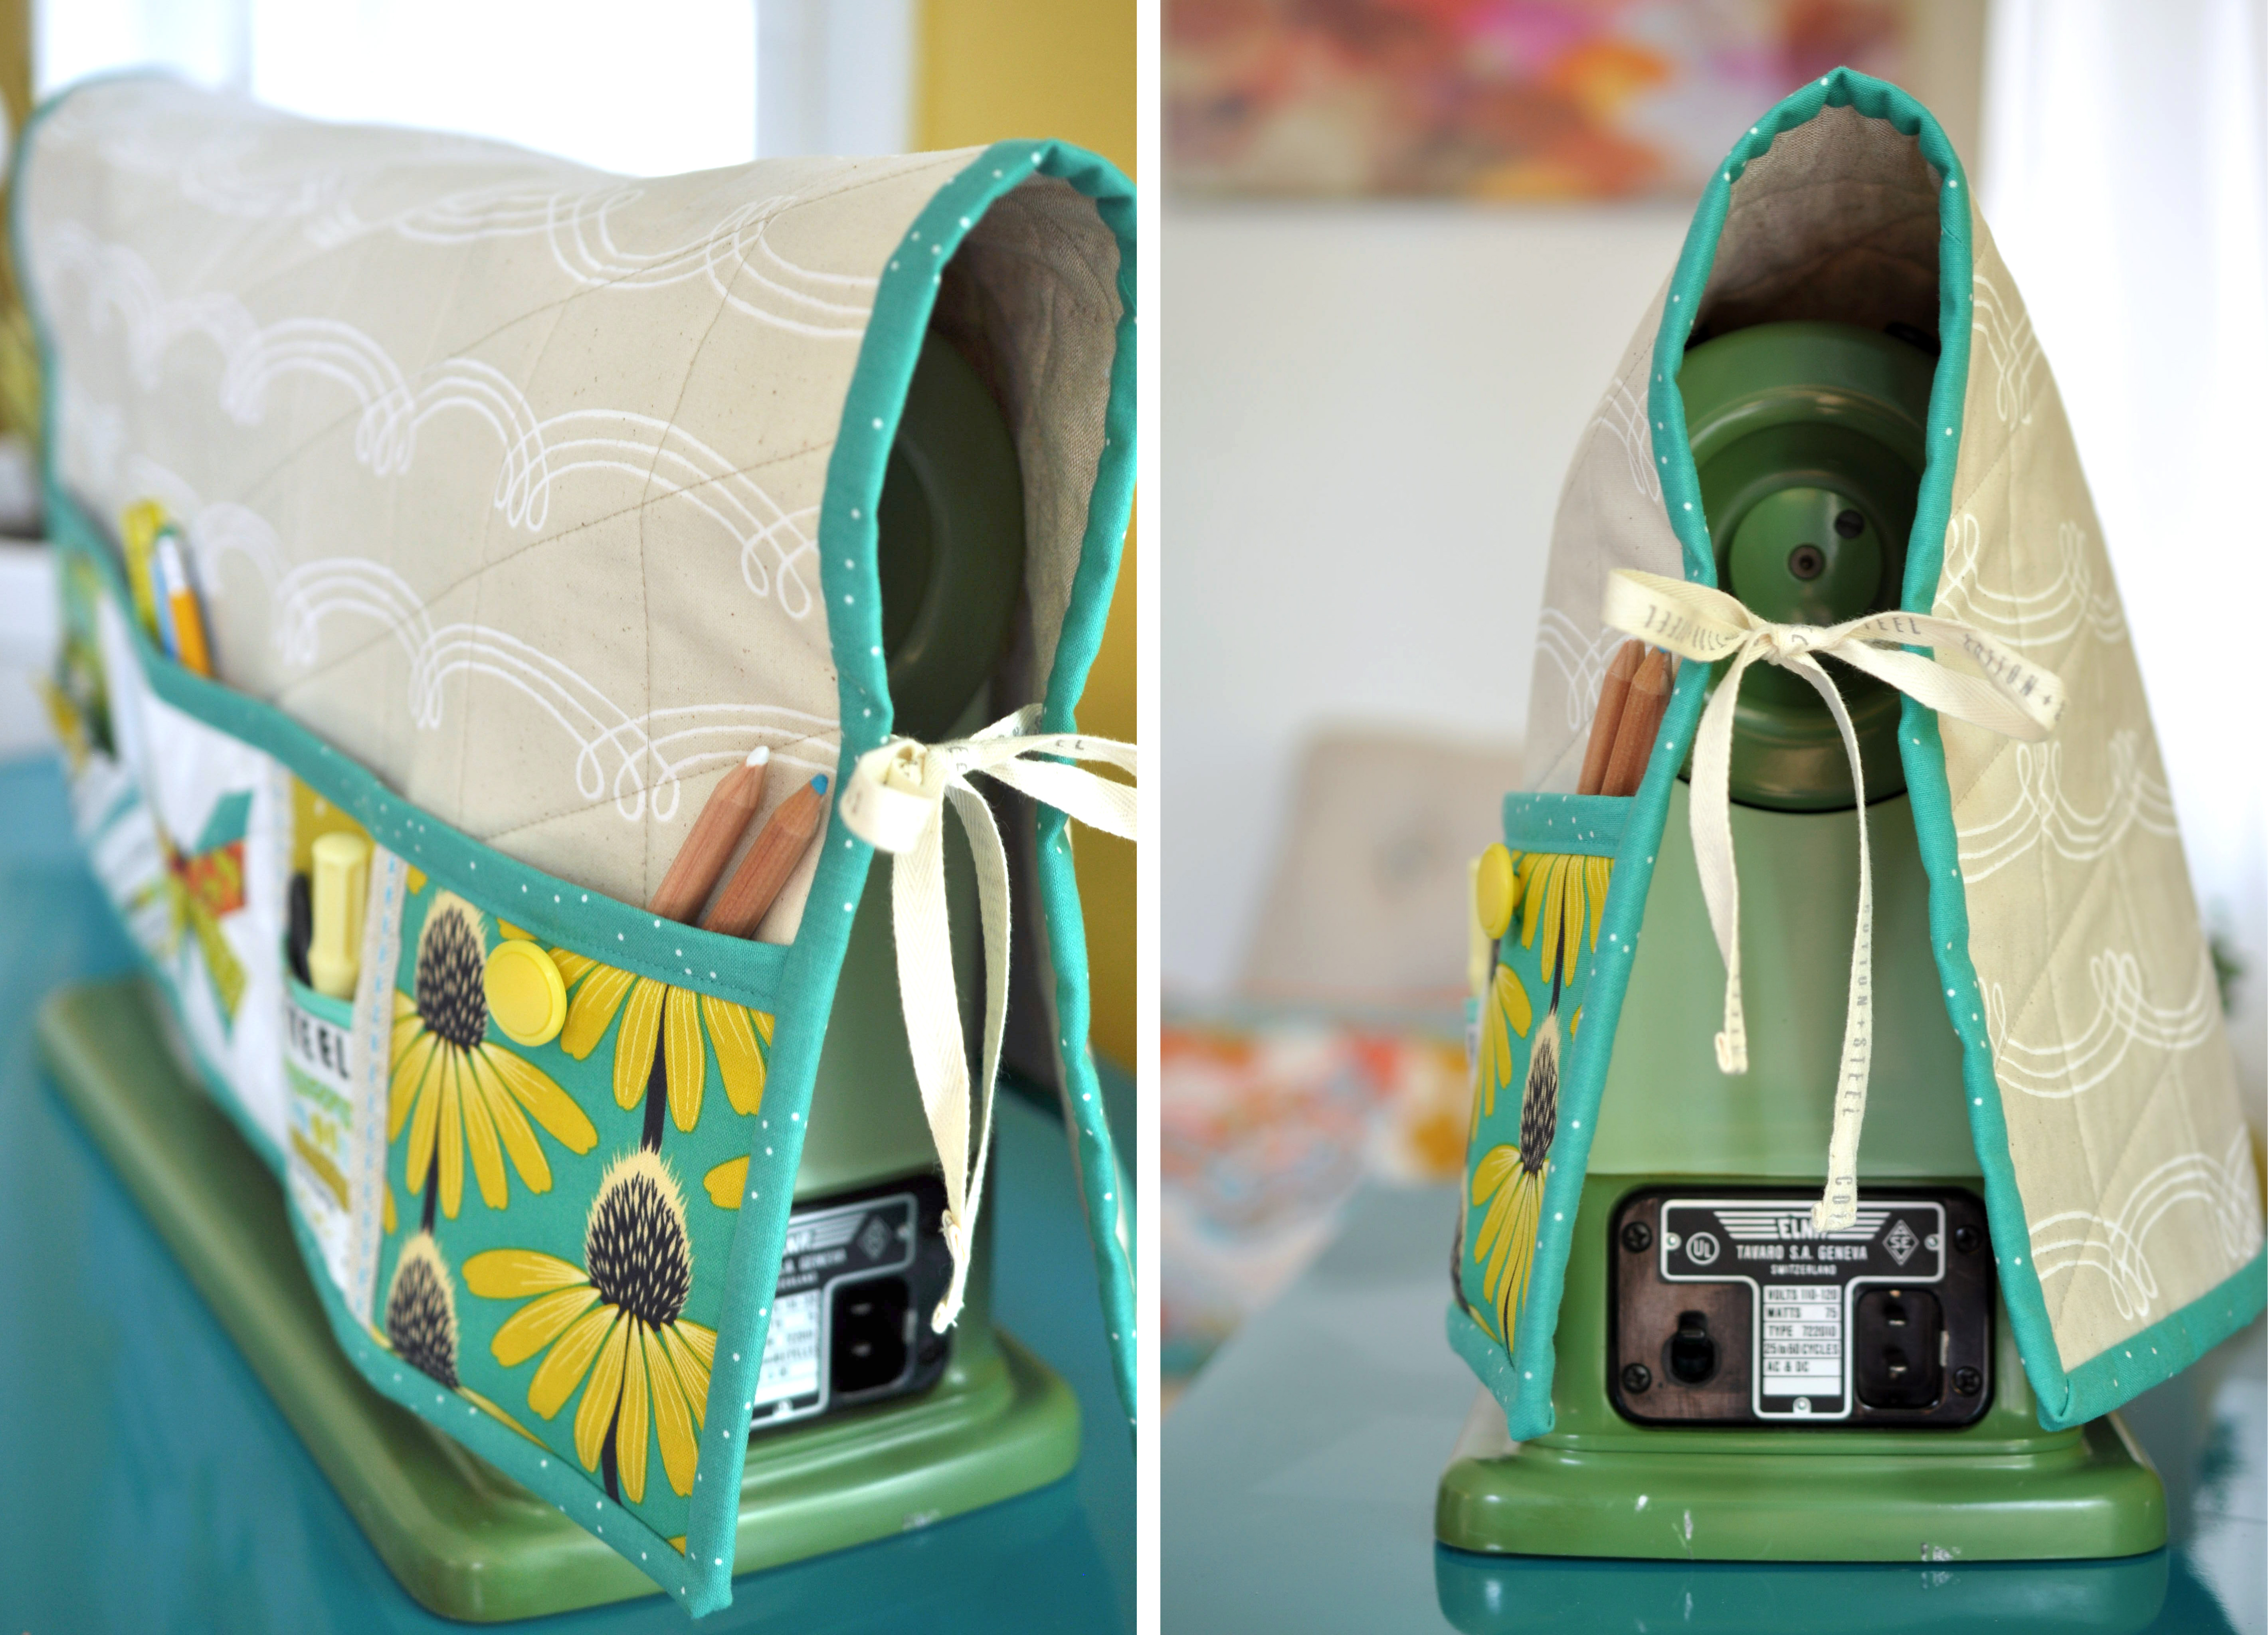
selvedges

SELVEDGES
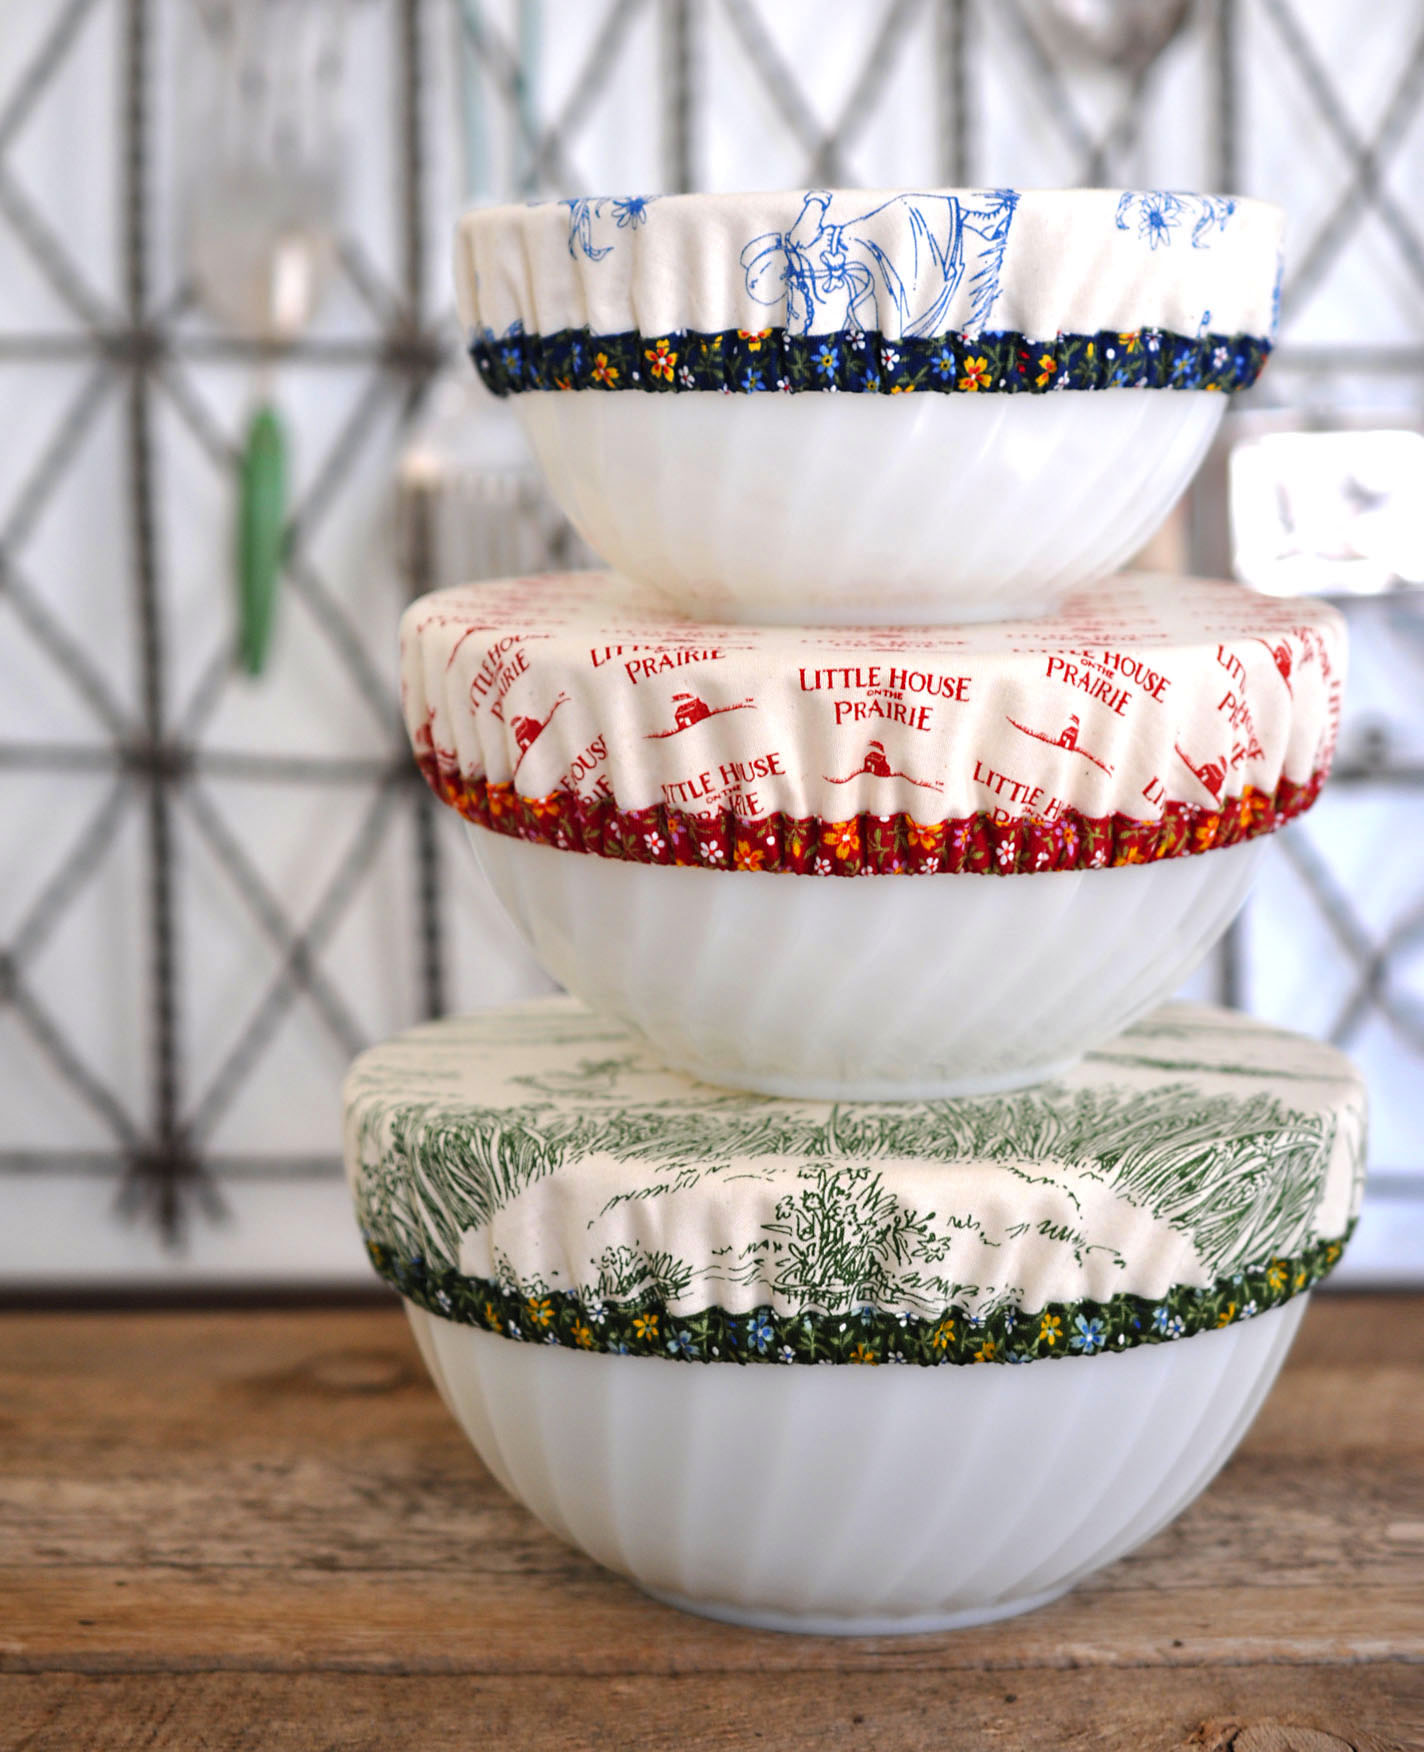
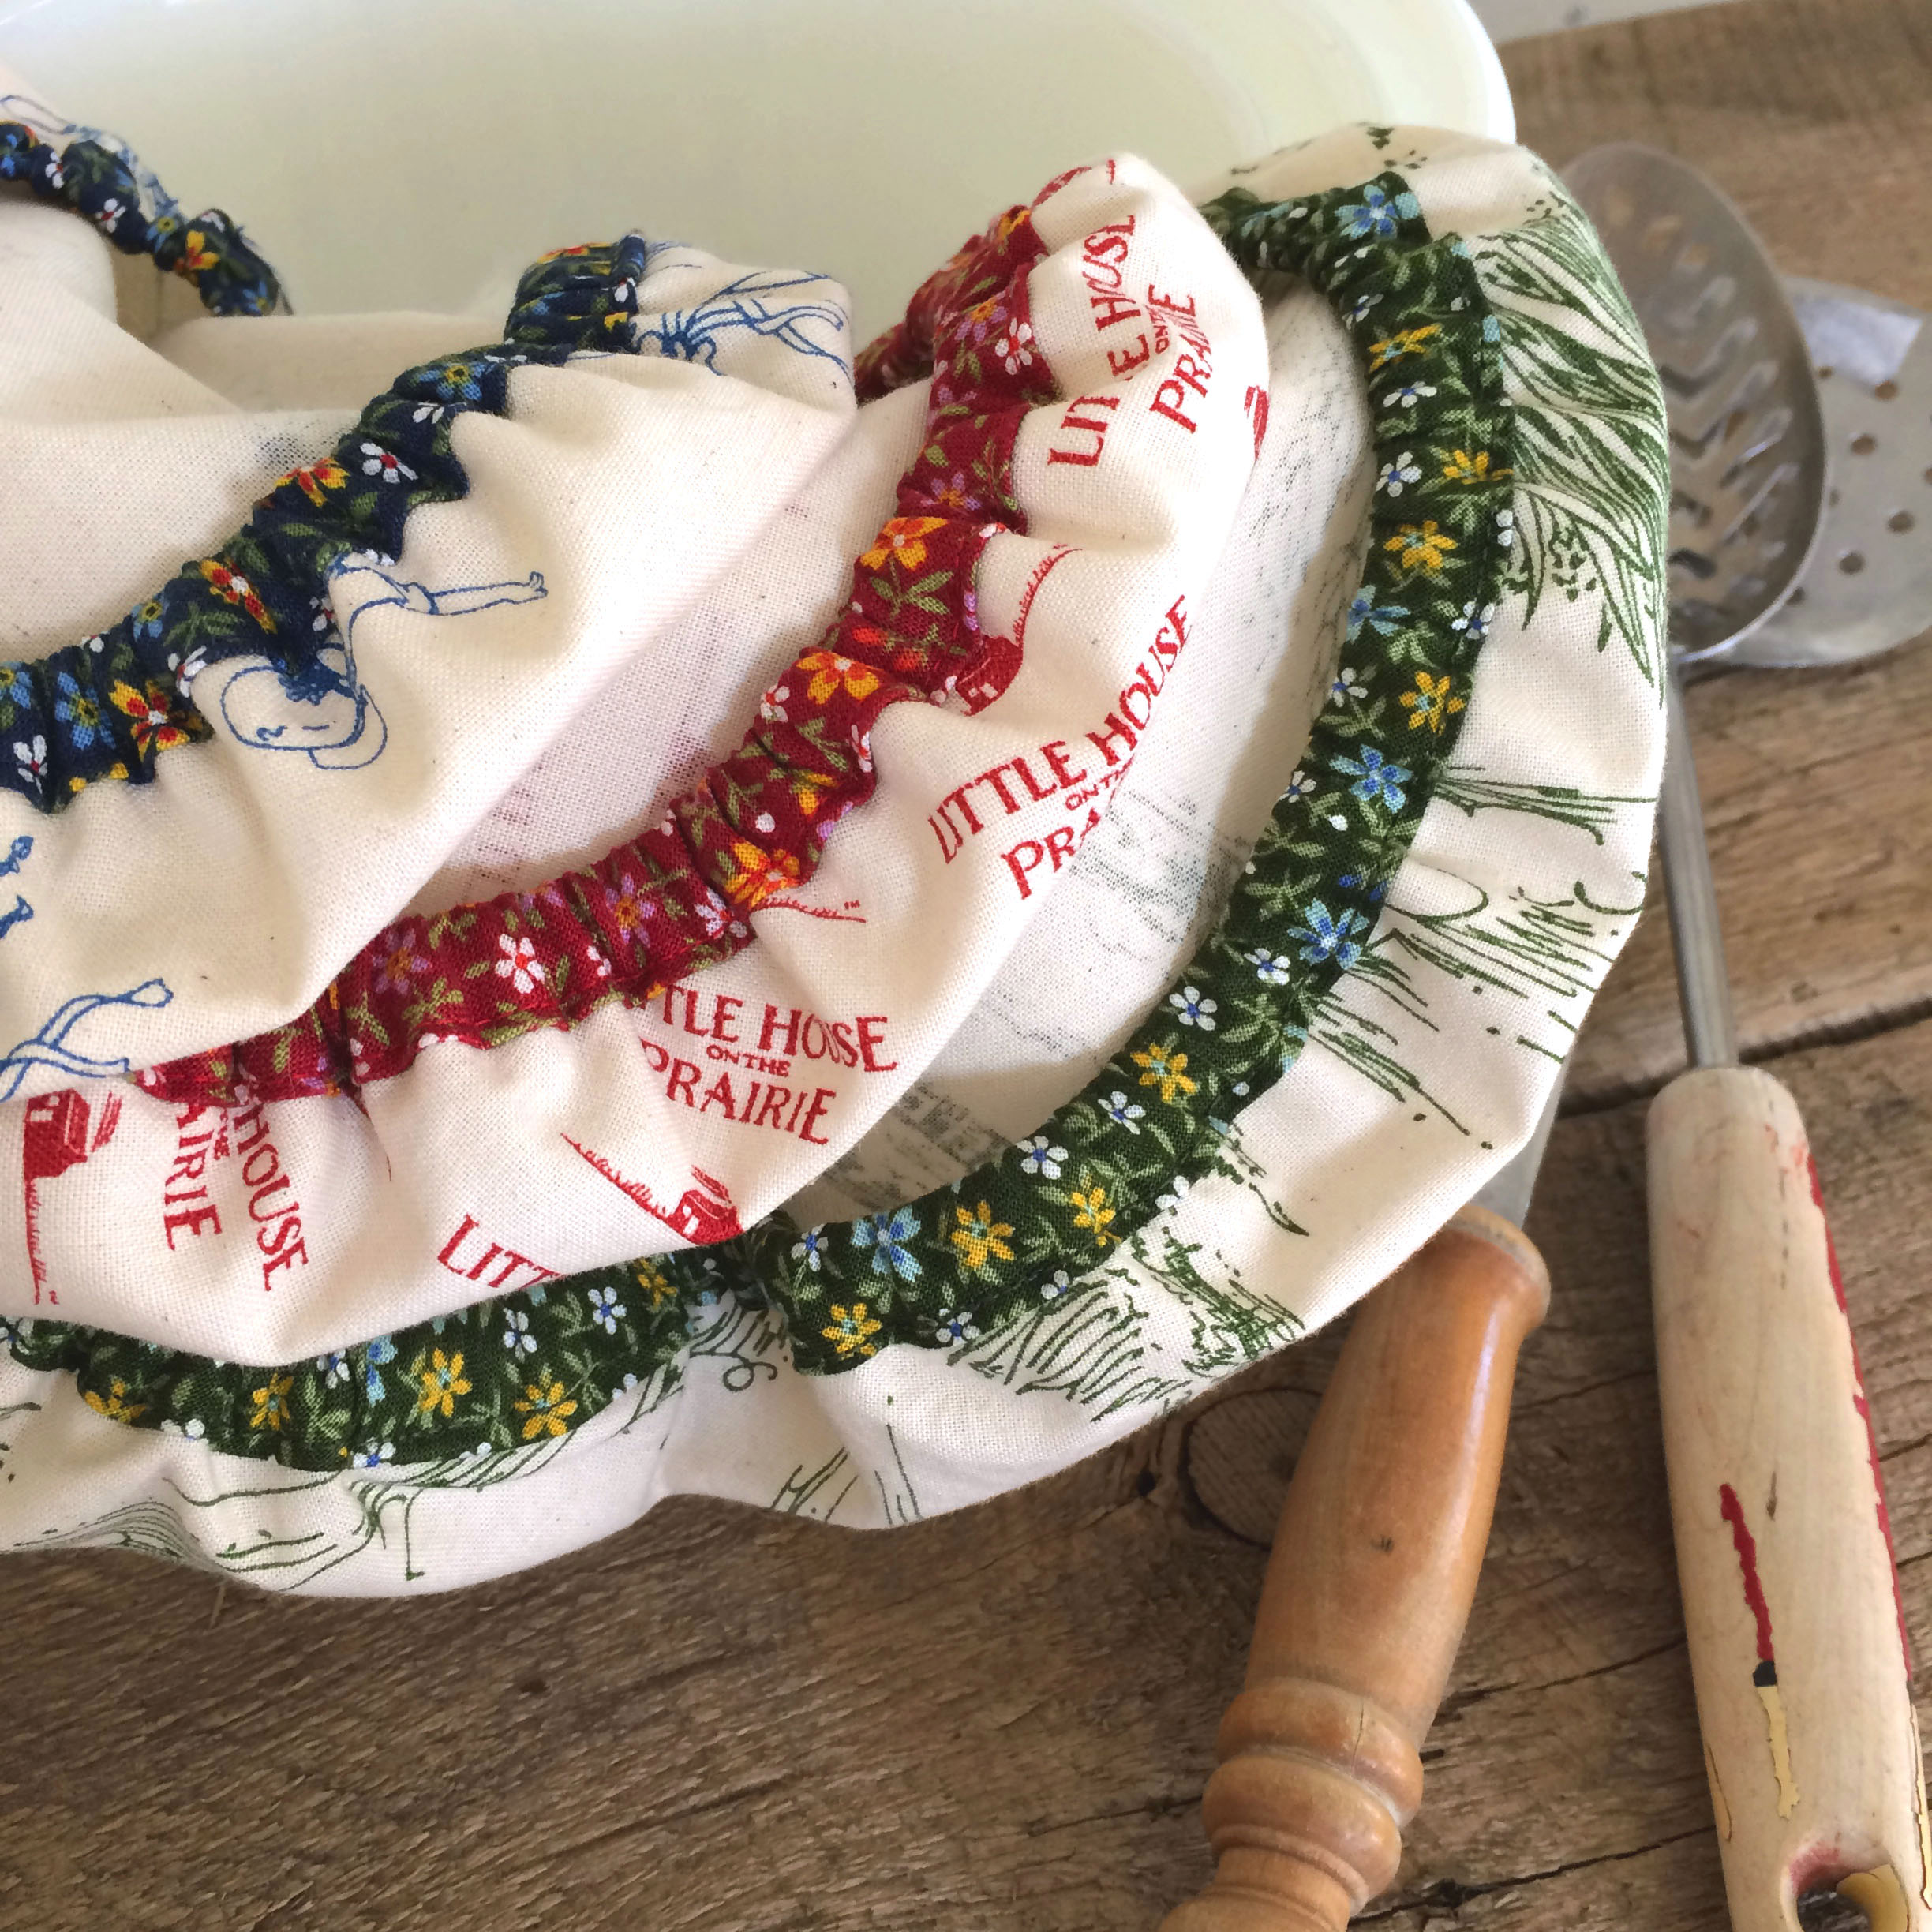
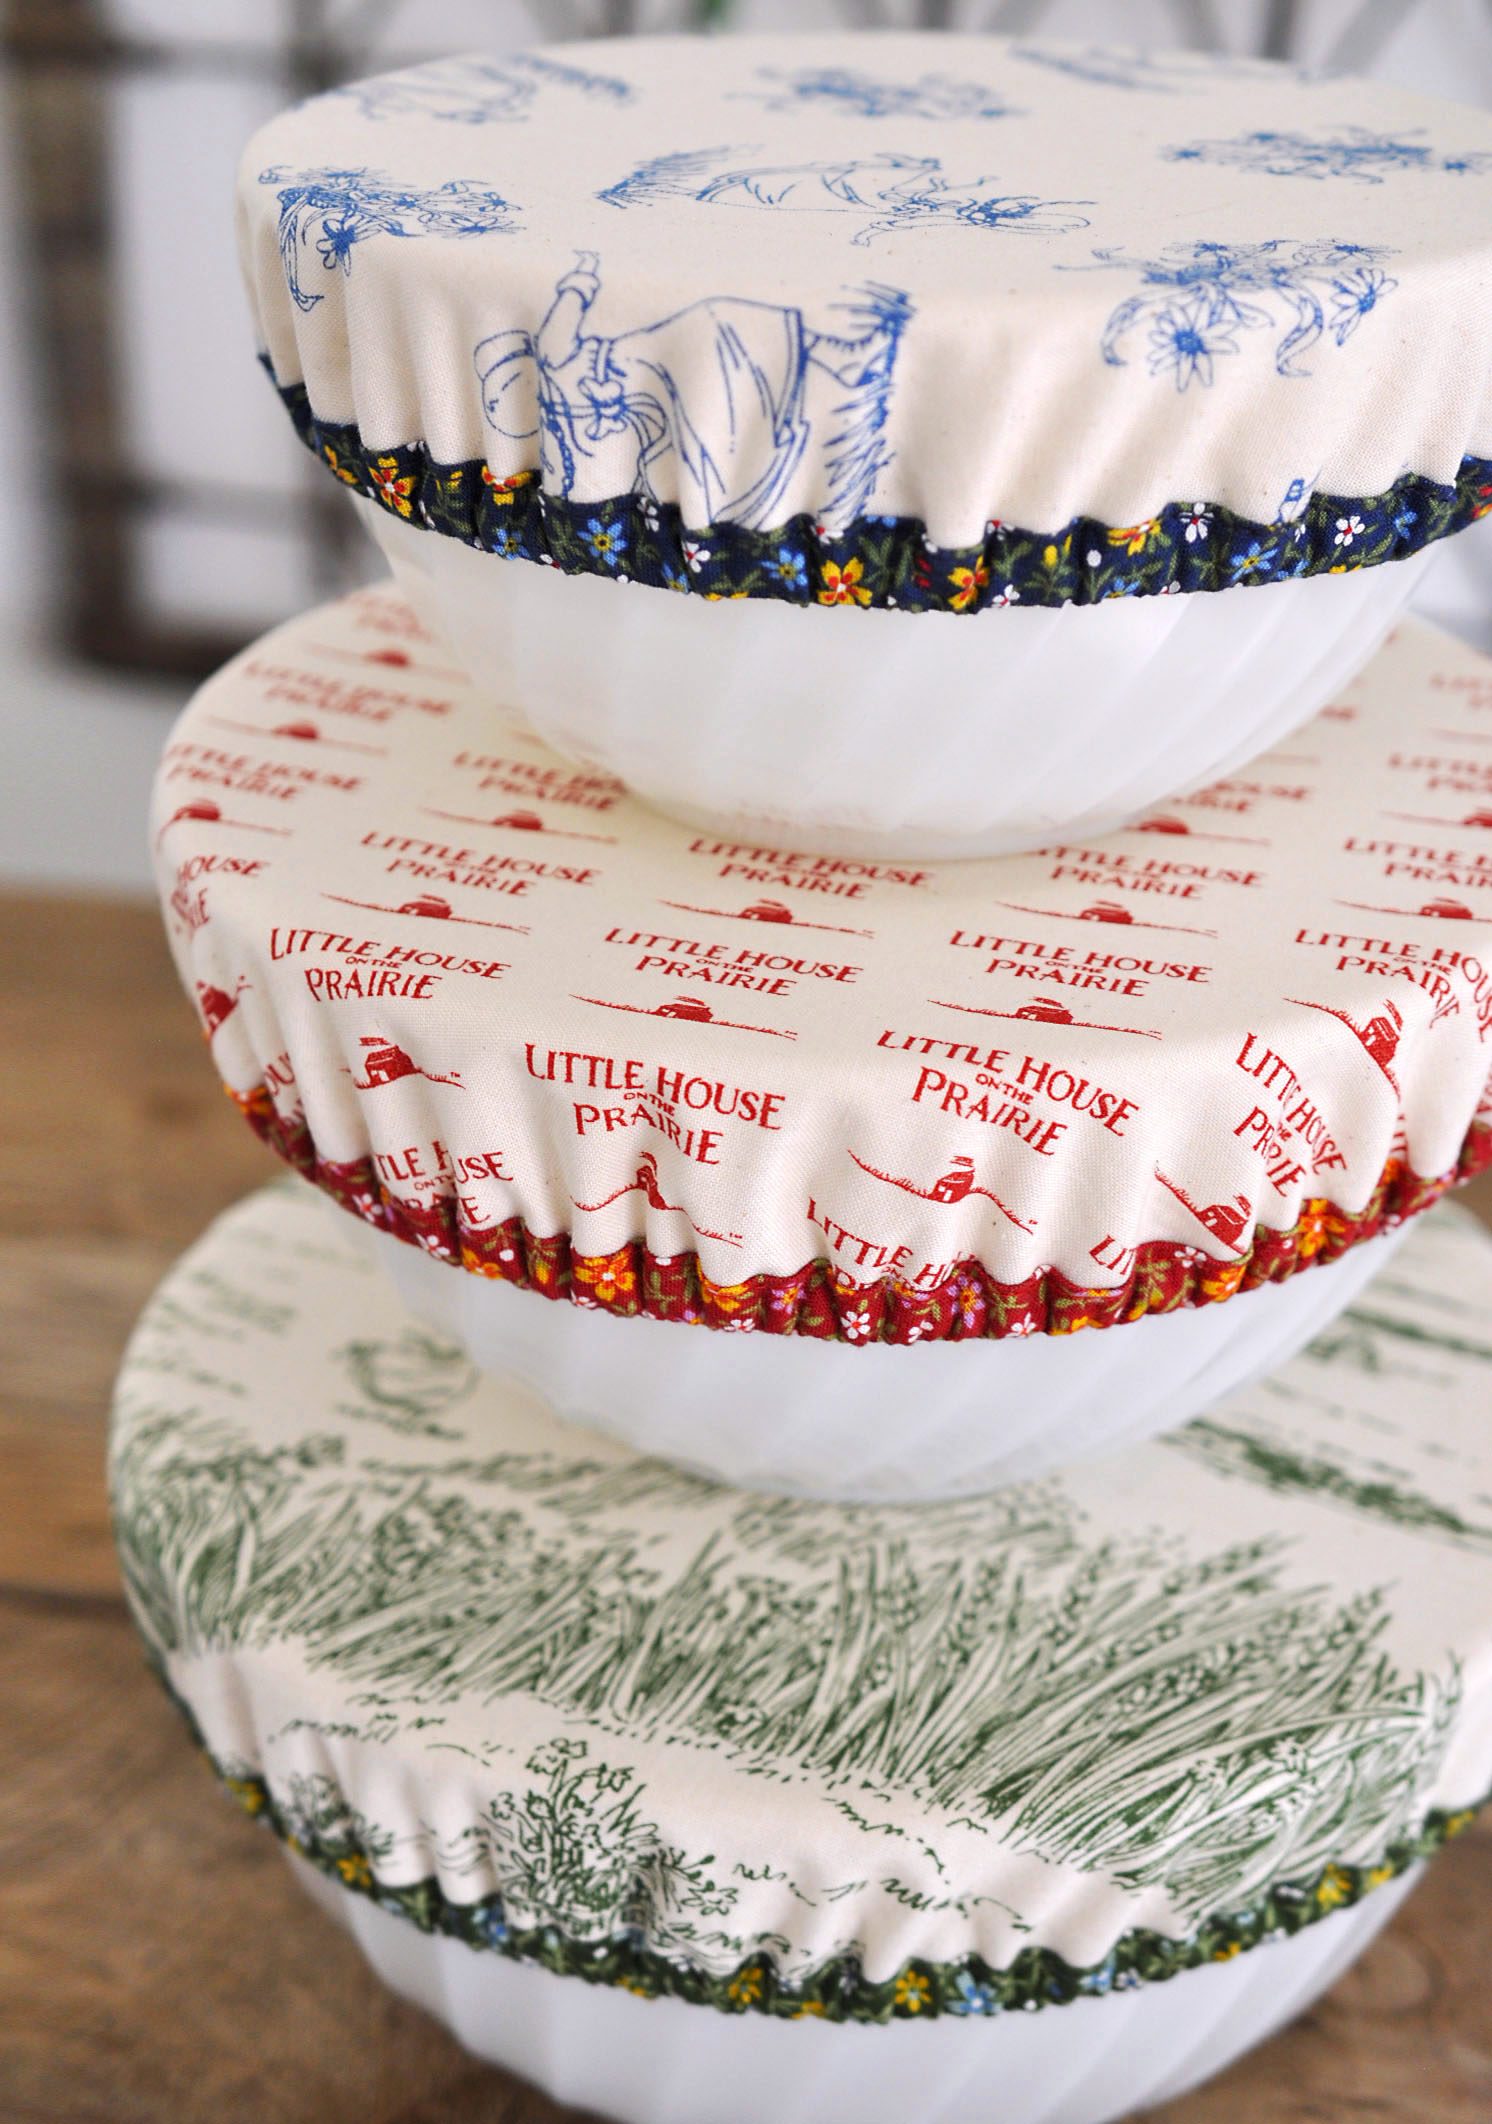
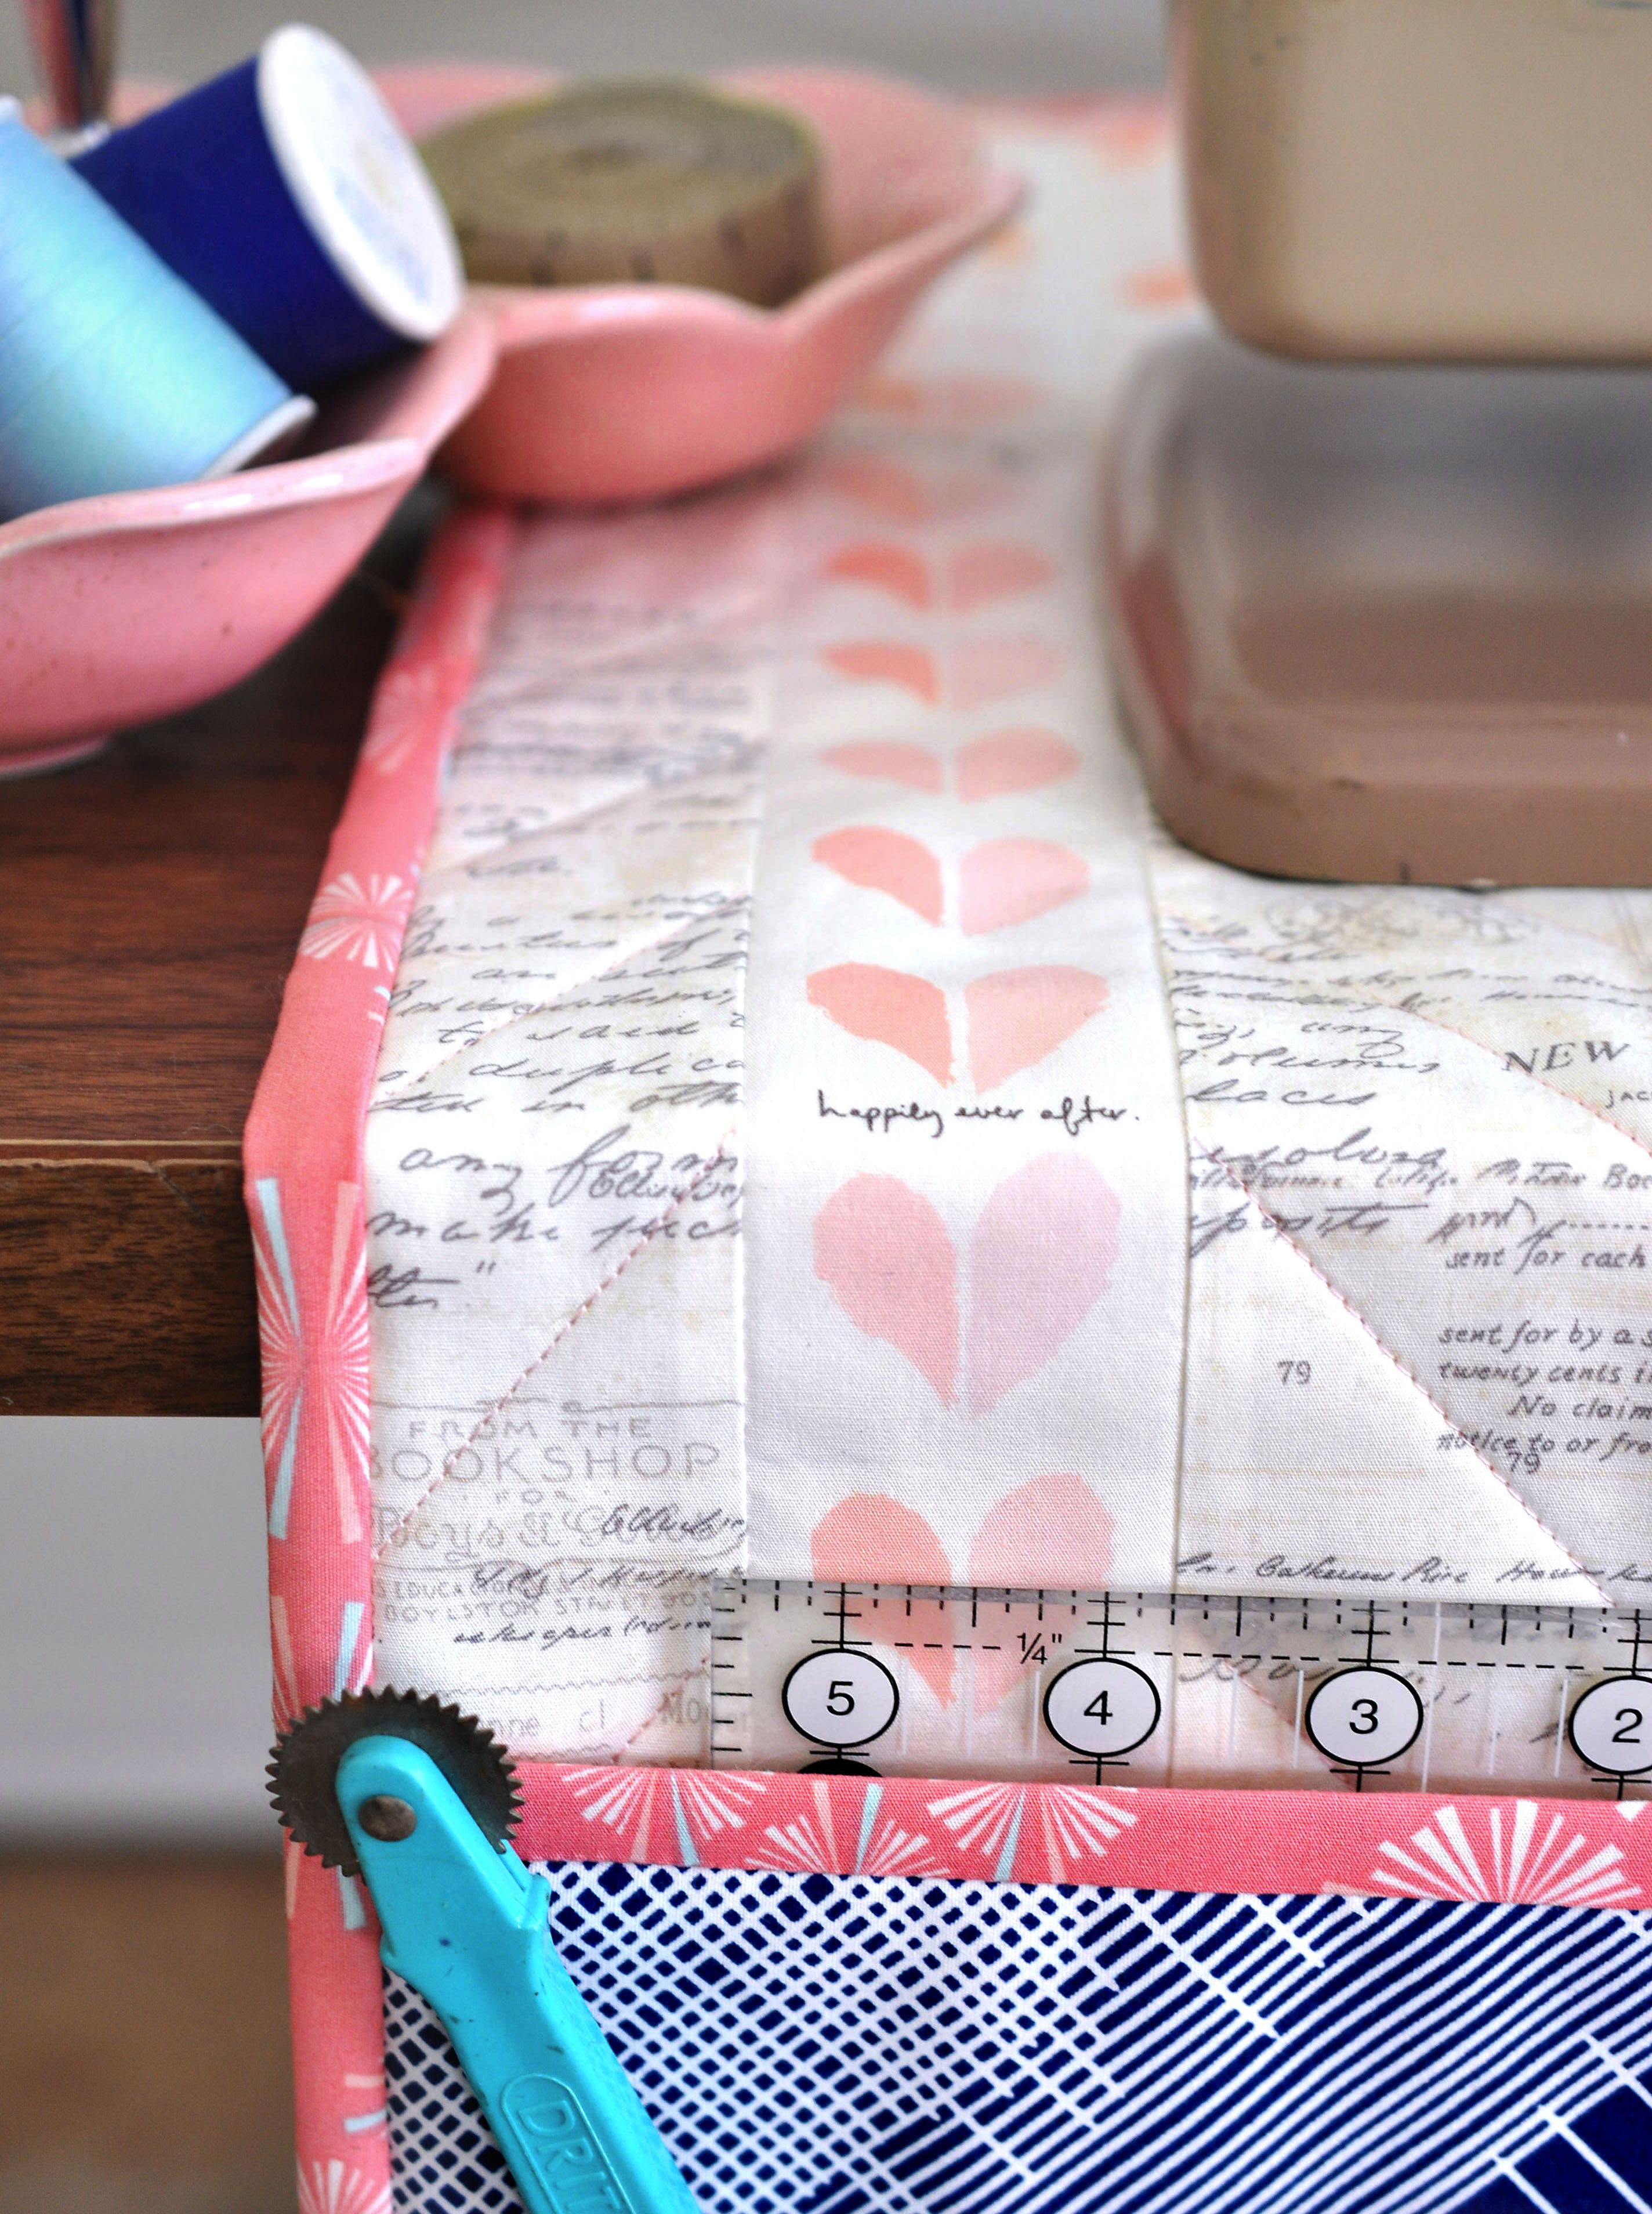
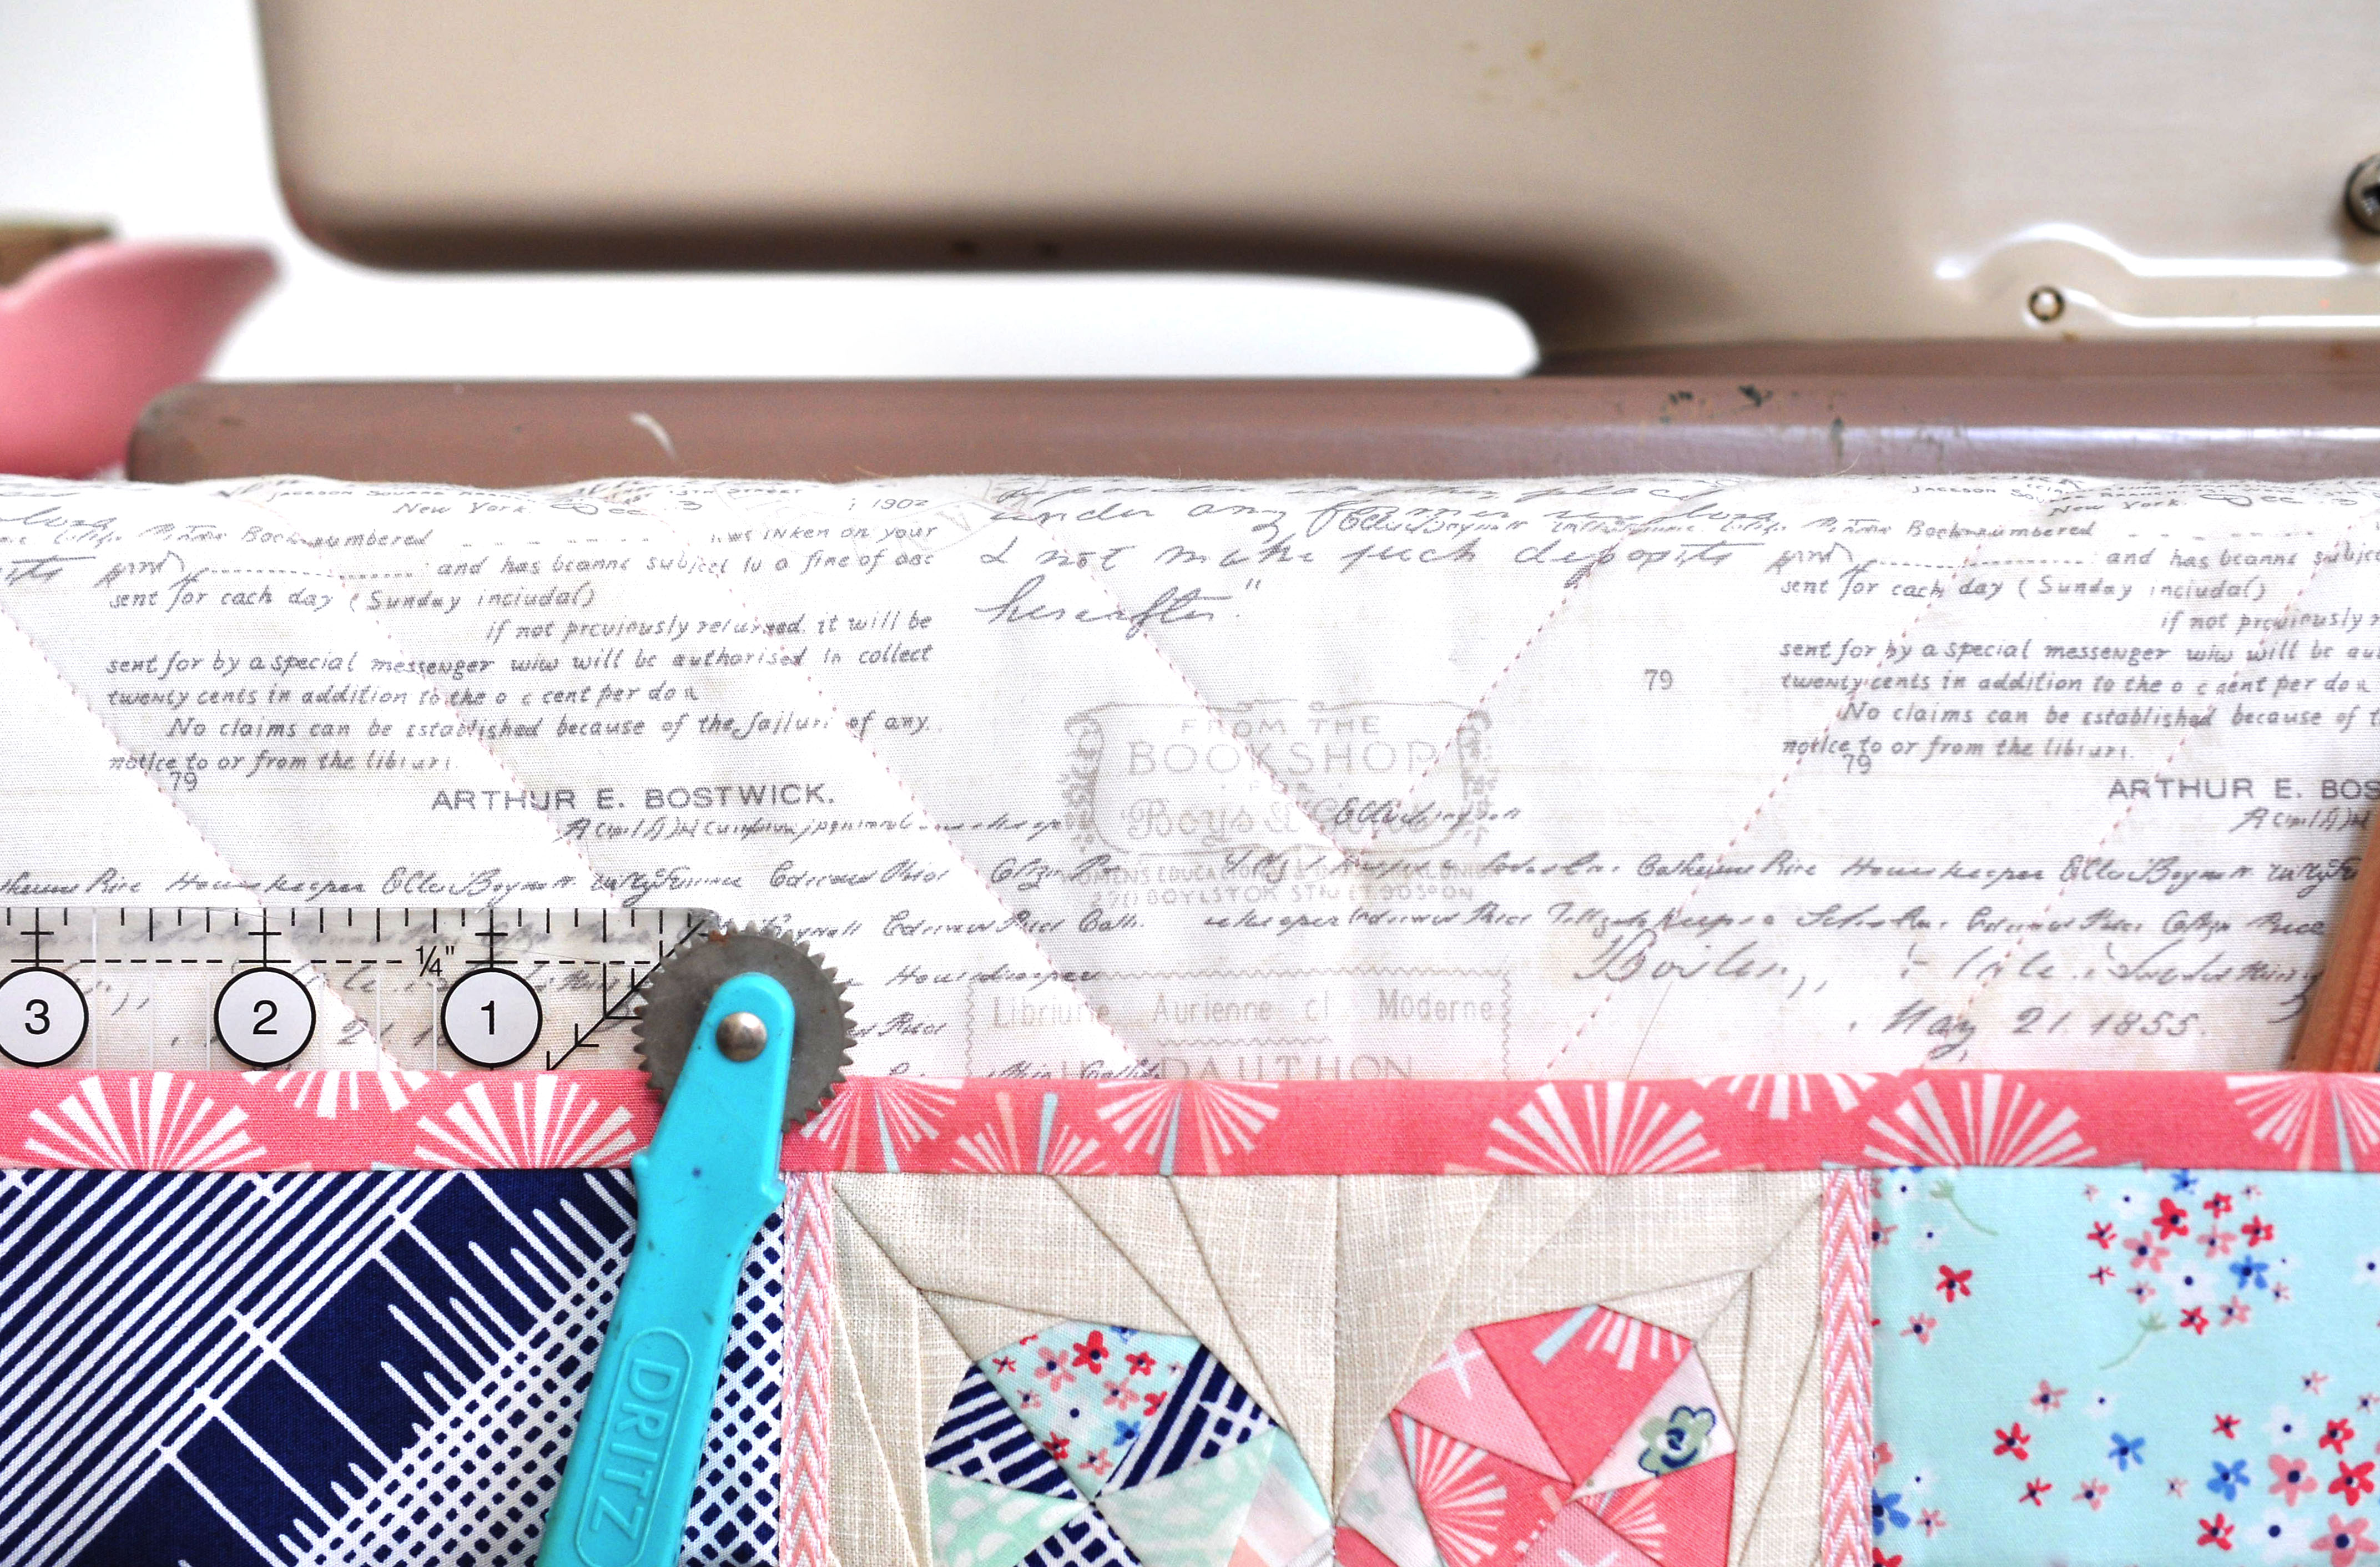
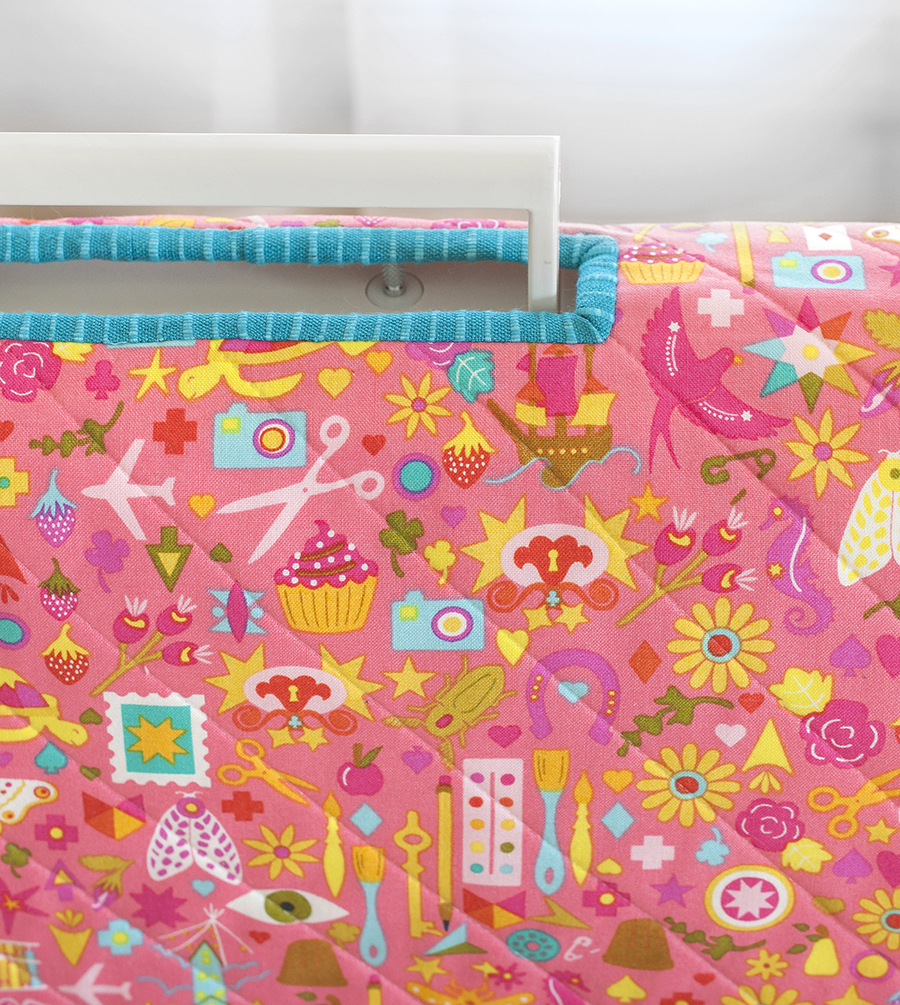
For those who are new to sewing or do not know what a selvedge is, it is the finished edge on a bolt of fabric. There are finished edges on both sides along the width of the fabric, but only one will contain printing and this is the side I use on this project. I cut my selvedges off with about one half inch to one inch or so of the fabric print included, just to make sure I always have enough extra to work with them. The directions on how to work with the selvedges to create the pockets are included in the pattern.
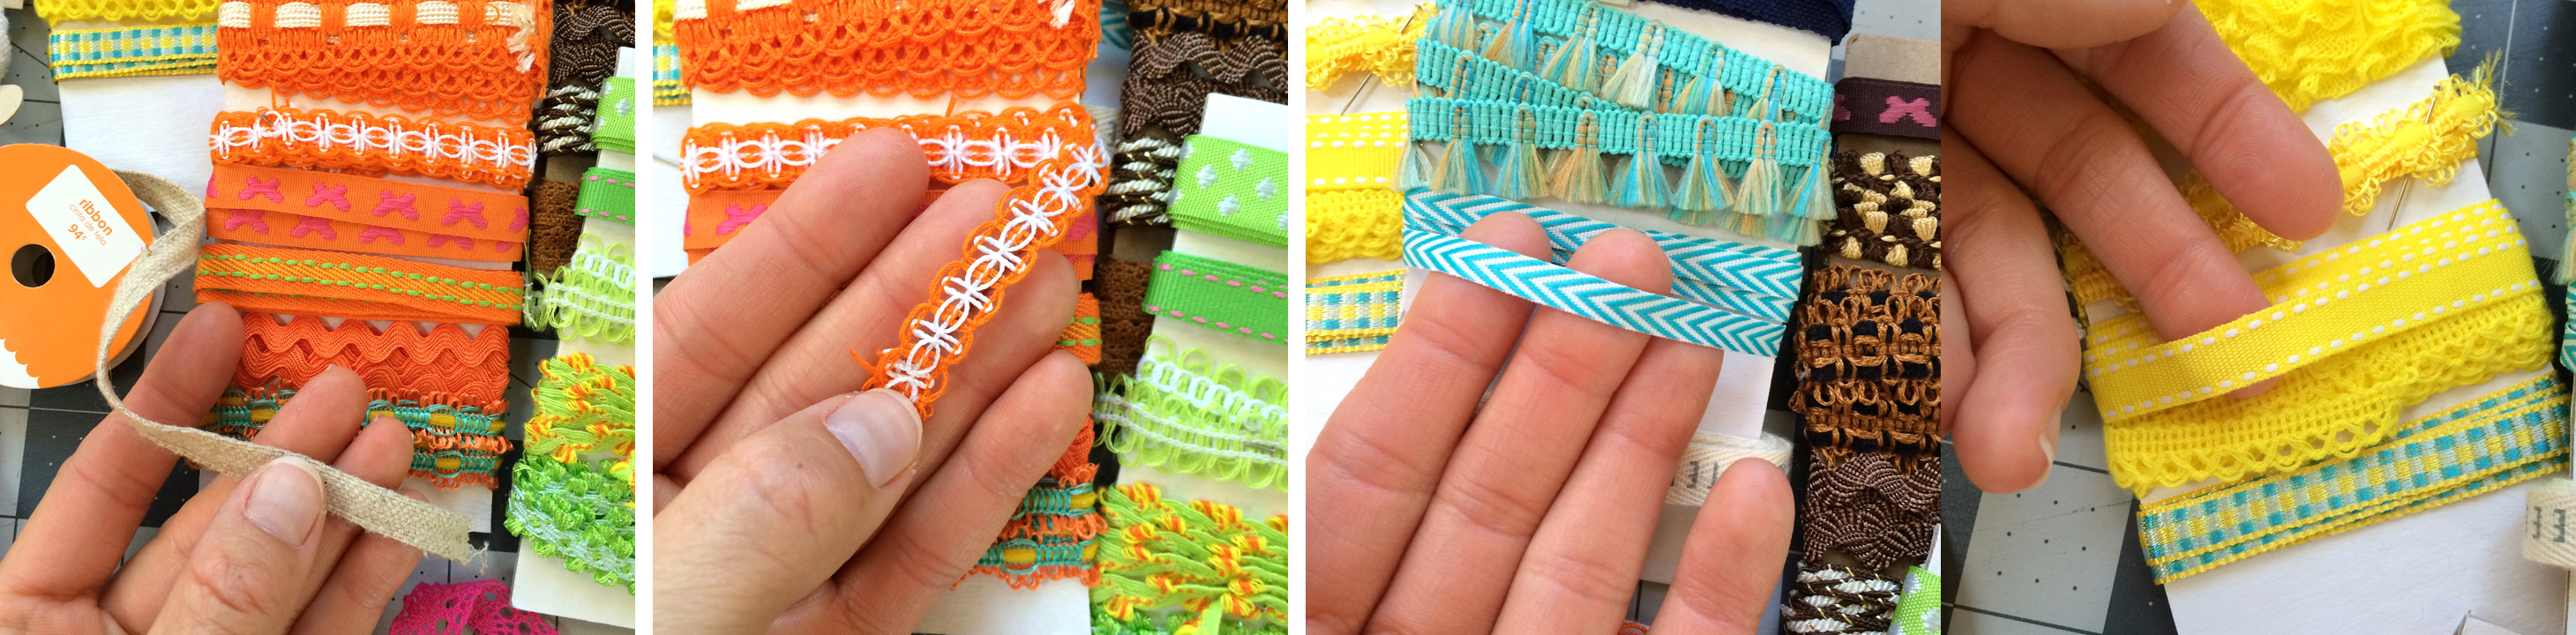
ribbons

TRIM
This pattern uses trims or ribbons for securing the secondary pockets and hiding the raw edges, and also for creating the side ties when using it as a machine cover. Below are some trims from my collection that I’ve found at Joanns, Hobby Lobby and even Walmart. Anything between 1/4″ to 3/8″ width is best. If it is too small then you will have trouble enclosing the raw edge of the pocket, any thicker and you cut into your pocket space. Trims that are more solid are best to hide the raw edges, but some lacier style trims can work ok, too.

If you don’t have any trims on hand, you can also use a thin bias binding strip instead. Start with a 1″ or 1.25″ cut strip, fold the raw edges into the center, then fold in half and press and use this as you would a piece of ribbon. You can also you another selvedge with the cut side pressed under. Lots of possibilities!

trims

—–

I think that covers it for now! As I mentioned before, if you have any questions, please don’t hesitate to contact me. I’ll now leave you with a few inspiration photos of other versions I have made and those made by others. You can also see oodles more with the hashtag #undercovermakermat on Instagram and Facebook. (All images are from the fore mentioned hashtag, I will credit all makers later tonight – gotta get the fields mowed now!)

cover1

DSC_0428 edit B

 undercover maker mat | lillyella stitchery

—–

ADDITIONAL POSTS:

Undercover Maker Mat Sew-a-long: All the details

PART TWO: September 6 – Kickoff, prizes and main body panel variations

PART THREE: September 8 – Accent Pocket Panels

PART FOUR: September 12 –Full Pocket Panel & Assembly

PART FIVE: September 15 – Optional Thread Catcher

Flex Frame Pouch & Write On Patterns

website main

A couple weeks ago I shared my Flex Frame Pouch pattern on fabric.com during their Passport to Summer series for a back to school project. Some of you may recognize this from Make Modern Magazine and the Swapaholics Retreat, and now you can download the free pattern, too. Flex frames are an awesome alternative to zippers and are super easy to use! You can find the 3.5″ frames used in my pattern on fabric.com, and you can also order bulk frames (10 or 50) in 3.5″ and 4.5″ (which I love) from ahkwokbuckles.com.

>> Click here to download the Flex Frame Pouch & Write On PDF Patterns <<

twoup

The pattern includes directions for making the tall pouch, which is perfect for glasses, pencils, or a rotary cutter, as well as the small coin pouch, both shown above.

Also included is the Write On pencils paper piecing pattern to create the options shown below. It can be used with the bottom accent or made into the full pouch. The pencils can also be used for a variety of other projects, too. It’s easy to resize the pattern or add more pencils or other elements to the pattern.

Pencils Hero 2

IMG_0283

In the pattern I talk a bit about how to customize the pouch to any size you wish, and wanted to share a few more variations here today, including how to make a perfect gift set for anyone of any age!

The set below shows the two sizes included in the pattern, plus a third size which is perfect for carrying cards and cash. To create this third size, cut the pieces for the top of the tall pouch as indicated in the pattern (6.5″), but do not include the bottom. Then just cut the lining pieces to the same height and assemble.

IMG_2080 edit

Consider personalizing the pouches with fun notions, such as stamped leather tags or decorative accents. Hmmm, I wonder who these are for?! I found the metal plate accent in the paper crafting section of Hobby Lobby. It is Tim Holtz brand.

Also, adding a short chain and key ring makes any pouch the perfect grab and go wallet.

blackdetails

black cards 3

I tried a few options and positions and decided that I preferred sewing the chain to the inside of the pouch right below the frame sleeves, as shown below. This way the chain and ring can be kept inside or pulled out through the top and the frame closing gives it some added security.

You can find a variety of chains and rings in the jewelry section of any craft store.

threeupsew

This is a fun pattern that can be customized in so many ways, with any of your favorite materials or patterns. Try a quilt block design you like, another paper piecing pattern, or even some selvedges. If you would like to use the 4.5″ frames (or any other size you may find), simply add the additional width to the cut sizes of your pieces. For example, if using a 4.5″ frame, vs the 3.5″ used in my pattern, simple add 1″ width to all your pieces.

heartvariation

I’ll be sharing more sizes, shapes, and ways to play with this pattern over the next months, too, so stay tuned! Please tag your pictures with #FlexFramePouch and #WriteOnPattern so I can see all your awesome creations!

Enjoy! ~ nicole

Reusable Bowl Cap Tutorial

Reusable Bowl Cap Tutorial | lillyella stitchery

Help save the environment and look cute doing it! 😉

These reusable bowl caps are easy to make and customizable to fit any dish. You can use cotton alone for a washable cap, or add iron on vinyl for a more waterproof cap that can be wiped clean.

Reusable Bowl Cap Tutorial | lillyella stitchery

This tutorial includes directions for determining what size to cut your pieces, how to make bias binding, and how to construct the bowl caps.

Click here to download the free pattern.

The fabrics I used here are from the Little House on the Prairie line by Kathy Hall for Andover Fabrics and they couldn’t be more perfect! Those little florals mixed with the scenic prints are absolutely adorable.

Reusable Bowl Cap Tutorial | lillyella stitchery

I just love making these covers and find them handy for some many things. I always use old Pyrex and Fire King bowls that did not have lids, so using these makes me much happier than using plastic wrap! They also make great gifts. Pick up a cute bowl (or set) at a thrift shop, make a matching cover and give it as a housewarming or shower gift.

I hope you enjoy this tutorial! Share your project photos on Instagram & Facebook with #reusablebowlcap!

Reusable Bowl Cap Tutorial | lillyella stitchery

Paperie Blog Tour + New Love Story Pattern

IMG_2667 edit 1

It’s funny how things work out. The way life’s puzzle pieces always end up fitting together. I first designed the Love Story Pattern for my class at the Swapaholics Retreat last September. Amy Sinibaldi was also teaching and her debut fabric line, Paperie, had not yet been announced when I was prepping for the retreat.

Flash forward a few months to 2016. I’m amping up my pattern in preparation for release and Amy invites me to join her Paperie Blog Tour. I think you’ll see that her fabric and this pattern go together like sprinkles and donuts. And not that pink hearts are ONLY for Valentine’s day, but what perfect timing, wouldn’t you say?

Undercover Maker Mat featuring Paperie Fabrics | lillyella stitchery

As usual, I had trouble wrangling in all my ideas. I did know for certain that first I wanted to make my Undercover Maker Mat (download the free pattern here) using the 5″ Love Story block in place of the butterfly charm block used on the original. This mat is such a fun and useful project that sews up quick and lets you showcase your favorite fabrics.

I decided to make the secondary pockets on this one in solid prints, rather than the selvedges, so I could really show off the line.

Undercover Maker Mat featuring Paperie Fabrics | lillyella stitchery

I was torn between using the texty print or the hearts for the main body of the mat, but now that it’s all finished, I don’t know how it was even a question. The text is just perfect and the strip of hearts pieced in just plain makes me happy!

Undercover Maker Mat featuring Paperie Fabrics | lillyella stitchery

I then carried the heart print over to the removable thread catcher by piecing a strip into the front and using it on the lining. I think it really just balances it all out perfectly.

I used a delicate pink chevron trim on the pocket panel and added a bit of crochet lace on the secondary pocket – in true Amy style!

Undercover Maker Mat featuring Paperie Fabrics | lillyella stitchery

Thanks to the expert advice my official quilter, Sari, I went with a large chevron pattern for the quilting on the mat body. It echos the seams of the heart block perfectly (thank you very much) and also ties in the trim. I used a pale pink Aurifil thread that gives it just the tiniest hint of color and I couldn’t love it more!

Undercover Maker Mat featuring Paperie Fabrics | lillyella stitchery

I kept trying to find a way to use this pretty aqua trim on the pocket panel, but it just felt overpowering. It did, however, work out perfectly for the side ties!

So, what do you think? Is this mat your style? I’ll be giving it away on Instagram next week (and a bundle of fabric!), so stay tuned for that!

• • • • • • • • • • • • • • • • • • • •

Love Story + Cross my Heart Pattern | lillyella stitchery

Another idea that I just knew I had to run with was designing an X block that coordinated with Love Story. Like Xs and Os, but with a cute heart instead! I’m calling it Cross my Heart and you can download it for free here.

I thought it would be an adorable mini quilt with 4 blocks in a large square, or as a set of pillows (or a two sided pillow!) or a table runner, which is what I decided to make for my sample project.

Love Story Pattern | lillyella stitchery

My Love Story pattern includes two block designs – Poetry (the pink block) and Prose (the navy and white block). I wanted to showcase them both, along with the X, so I thought a little asymmetry would be fun! I used the 10″ blocks here, and the X pattern also includes a 5″ block (how about a set of heart and X coasters?!).

Love Story Pattern | lillyella stitchery

I love how striking the bold pops of pink and navy in this line are mixed with all the beautiful, soft low volumes. By random chance, I had a piece of my favorite chambray denim on my cutting table when I was feverishly trying to decide what to bind my runner with. It was a match made in heaven! The denim pairs so amazingly with this line, it started my mind racing with quilt ideas using Paperie and the new Art Gallery denim line that is coming out soon. SO EXCITED!

Love Story Pattern | lillyella stitchery

Love Story Pattern | lillyella stitchery

I’ll be sharing some design ideas and other fun Love Story projects (including a lap quilt pattern) here and on my Instagram feed over the next couple weeks. You can also check the hashtags #lovestorypattern and #crossmyheartpattern for more inspiration. As always, I can’t wait to see what you all create!

Love Story + Cross My Heart Patterns | lillyella stitchery

Be sure to check out all the other stops on the Paperie Blog Tour for all sorts of swoon worthy projects! You can find links and photos in Amy’s instagram feed and on her blog.

• • • • • • • • • • • • • • • • • • • •

Love Story Pattern | lillyella stitchery

Now I am in desperate need of a nap! So I will leave you with some more eye candy inspiration! Above is the original Love Story block as it was designed to fit my flex frame pouch project for the retreat.

For the pattern release, I squared off the block and made a coordinating reverse design where the heart is solid and the background is faceted instead. I love the possibilities this opens up for color play and layout ideas!

Love Story Pattern | lillyella stitchery

Here are just a few blocks that my amazing testers sewed up. I’ll be sharing their finished projects soon! You can pick up a copy of the pattern on sale for $6.50 now thru Valentine’s Day in my Payhip, Etsy or Craftsy shops.

happy stitching! ~nicole

Yarn Wrapped Wreaths

yarn wrapped wreath | lillyella stitchery

These wreaths are one of my favorite things to make! They are quick, easy and inexpensive, and can be customized in an endless numbers of ways to create a perfect gift for any age and any occasion.

This is technically a Christmas wreath for my mom (her tree is decorated in the same style with all nature themed ornaments and natural elements), but I love that it’s more of a winter wreath that can be displayed and enjoyed for longer.

yarn wrapped wreath | lillyella stitchery

The primary materials that I use are yarn and felt, but you can also use ribbon or fabric for wrapping or for the decorations. Get creative when it comes to the extras – check out the floral section of your craft store for little berries, twigs and greenery. Look in the wood aisle for things like the snowflakes shown above and the miniatures aisle is also great for finding little critters or themed extras. Also hunt outside for moss, pinecones, acorns, twigs and bark.

This is one of the simpler wreaths I have made. You can really go crazy with flowers and they look amazing, but I wanted the deer to take center stage on this one!

I typically use hard foam wreath shapes (found in the floral section of your craft store), but for this wreath I wanted something larger to balance the stag, so I used a straw wreath. I also found this is the floral section and it was wrapped in plastic, which I left on.

yarn wrapped wreath | lillyella stitchery

The first step is to simply start wrapping your yarn around the wreath. You can glue the end to begin or just wrap over it to secure. I typically smooth a good amount of glue over the area where my ends meet after I’m done wrapping. Since it’s on the back, it’s ok if you can tell where the glue is.

There are tons of excellent tutorials out there for making felt flowers. I’ve tried many different styles and typically stick with about four or five designs that I love most and are easy to make. The coiled roses are my favorite because they are really simple, don’t require any sewing, and look adorable.

Here are just a few links to get your started:
http://www.thecraftedsparrow.com/2012/04/felt-flowers-tutorials-5-to-choose-from.html
http://www.howjoyful.com/2011/06/felt-rose-tutorial-and-pattern/

DIY Favor Bags: Peony Pockets (Part Two)


http://www.notmartha.org/tomake/to-make-diy-mothers-day-corsage-felt-dahlia-flower-brooch/

yarn wrapped wreath | lillyella stitchery

When it comes to attaching all my doodads, I use Elmer’s Glue and occasionally some E6000, but most craft and fabric glues will work fine for the bulk of materials used.

I like to use a piece of ribbon or lace for hanging, which I usually just tie on and make a bow. For this one, I cut some wide burlap that was covered with lace and sewed the bow together because it was too stiff to tie. I looped a clear plastic ring underneath for hanging.

Trust me when I say that once you start making these, you might not be able to stop!

yarn wrapped wreaths | lillyella stitchery

Here are some supplies I’ve gathered to make a couple retro-inspired Christmas wreaths for myself. These are the foam wreaths I usually use. Both of the ‘yarns’ I’m using to wrap them were found in the yarn section of JoAnns, but are not your typical yarn. I actually have no idea what the green one would be used for. I found it on an endcap in this bulk bag and it’s the strangest stuff, but I think it’s going to be adorable!

Some other embellishments to think about include ornaments, beads, buttons, millnery birds and flowers, feathers, assorted trims & ribbons for accents, wood letter shapes to personalize with an initial or word or a small garland of bunting.

I hope I’ve added another project to your list! And wish me luck on finishing mine before next Christmas…

Undercover Maker Mat Pattern

Undercover Maker Mat free pattern | lillyella stitchery

This dual purpose sewing space organizer has double pockets and a removable thread catcher to keep all your notions at hand and your workspace tidy. It goes from under to {machine} cover when not in use with side ties to keep it in place.

Undercover Maker Mat free pattern | lillyella stitchery

Click here  to download the PDF pattern.

I also shared a pattern hack for adding a handle opening to this pattern, shown below, if your sewing machine has a carrying handle and you can find the directions for that here.

I have hosted several sew alongs for this pattern and you can find the previous posts here, they contain some additional tips, tricks and tutorial links.

If you have any questions about the pattern, feel free to contact me anytime. Tag your photos with #undercovermakermat so everyone can be inspired!

Festive Flutter Tree Mini Quilt Pattern

This festive mini quilt measures 22” x 26” and features my Butterfly Charm Block patterns with a little Gidget tree topper. It’s perfect for hanging on a door or anywhere you don’t have room for a real tree!

Click here or the image below to download the PDF pattern.

If you have any questions about the pattern, feel free to contact me anytime. Tag your photos with #festivefluttertree and #butterflycharmblocks so everyone can be inspired!

Festive Flutter Tree Pattern | lillyella stitchery

Dressed Up Hot Pad Tutorial

Dressed Up Hot Pad Tutorial | lillyella stitchery

This Dressed Up Hot Pad features my Forest Floor Paper Piecing pattern but you can use your favorite patchwork block or even a single piece of a fun fabric. It sews up quick and the accents make it extra special.

I purchased my grommet kit from Walmart in the craft section, but you can also find them at any craft store or online. If you don’t have any scrap leather on hand, try looking at a second hand store for an old bag or jacket which you can cut and repurpose.

Click here or the image below to download the PDF tutorial. I hope you enjoy it!

Dressed Up Hot Pad Tutorial | lillyella stitchery

Midnight Bite Treat Bag Tutorial

Midnight Bite Treat Bag Tutorial | lillyella stitchery

After falling in love with that hexie print, I found the matching purple fabric and there began my plan! When I pieced the 10″ Midnight Bite block, I just knew it had to become a treat bag. This project slowly came together as I found each new piece and it couldn’t have worked out better!

The handles are webbing I found in the trim section of Joanns, the silver is reflective so it’s perfect for night time candy hunting! Then there is the bat trim… I mean, come on! It’s even purple. No brainer. I also found this at Joanns. It’s made by Simplicity and was on an endcap of an aisle. There were spider pom poms too, which I also have big plans for.

Midnight Bite Treat Bag Tutorial | lillyella stitchery

This bag was quick and easy to make and can be customized in a variety of ways. You can use any fabrics, a variety of trims or fabric for the handles, and you can even adjust the measurements to modify the size for your preferences. It doesn’t even have to be just for halloween, it would make a perfect holiday gift bag!

This tutorial is really basic (because I have more bats to make!), but if you have any questions, just leave a comment below or shoot me an email. Please read thru the entire tutorial before beginning.

PREPARING YOUR BAG PANELS:

The finished size of this bag is 10″ wide x 12″ high x 2.5″ deep at the bottom with a 4.5″ drop. Below are the trim sizes for the outer pieced panels, the bag lining and the handles. You will need two of each piece. My handles are about 1.25″ thick but you can make them any size you wish.

My bag has a small boxy bottom. Simply eliminate the corner cuts if you don’t want a boxy bottom. You may also want to shorten your bag if you do this. I wanted my bag handles to be just long enough to slide over my hand easily and hang from my forearm, but not so long that the bag would drag on the ground if a little one was carrying it. You can adjust this measurement to be comfortable for you.

Midnight Bite Treat Bag Tutorial | lillyella stitchery

Begin by piecing the three bottom outer panel pieces with a 1/4″ seam. In my bag, this is the bottom spiderweb print, the strip of dots and the focal bat (*see ‘Adding Decorative Trim’ section below for options on how to add trim accents).

Midnight Bite Treat Bag Tutorial | lillyella stitchery

The focal bat panel is the 10″ block from my Midnight Bite pattern, the finished width is 10.5″ and I trimmed the height of the block to 4.375″. This odd measurement was simply based on how I visually liked the bat to be framed, you can make this focal panel any size, just be sure to adjust the lining measurement equally. The same applies to the top band of my bag (the hexie print), the measurement was based on the size of the hexies.

Next you will add the handle before piecing on the top band of fabric.

Midnight Bite Treat Bag Tutorial | lillyella stitchery

Lay your top fabric right side up, right reading. Lay your handle on top spacing the two ends equally from the center. You can line up your handles with the bottom edge of your fabric or drop the ends down about 1/4″ below your fabric to give a little extra grip in there. My finished bag has about 2.5″ between the handles (it’s shown a little wider in this photo which I took after the fact). Pin in place.

Next you will lay the pieced section of your outer panel right side down, upside down, on top of your handle piece, lining up the bottom edges. Sew along the bottom edge with a 1/4″ seam. I recommend going back over the handle areas a couple times and backstitching well on either side of them.

Press the larger piece down. NOTE: My handles could not be ironed, so be sure to test your material if you aren’t sure.

Midnight Bite Treat Bag Tutorial | lillyella stitchery

Repeat these steps for the other side of your bag. After my two outer panels were assembled, I used fusible fleece  on them to stabilize my bag and I love the feel of it. You can also use batting and then quilt your panels or do some edge topstitching to hold it in place. If you’d like a lighter bag, you can use a medium weight interfacing, but I do recommend using some type of interfacing on the back of your outer panels. I did not use any interfacing on my lining.

CONSTRUCTING THE BAG:

Next you will take your two outer panels and place them right sides together. Sew with a 1/4″ seam down the left and right sides and across the bottom. You corner cut outs will be open. Repeat these steps for the two lining pieces, but leave a large gap in the bottom seam for turning. Just sew about 1/2″ in from either end.

To sew the boxed corners, keep your pieces wrong sides out. Open up the piece a bit and fold one inner side seam down to the inner bottom seam, lining them up and lining up both cut edges of your corner cut out. Sew along the edge with a 1/4″ seam. Repeat for the other side of your bag outside and your lining.

To sew in your lining, turn the outside of your bag right side out. Keep your lining wrong side out. Slide the outside of your bag into the lining, the two pieces will be right sides together. Line up the top edges making sure to match the side seams and sew around using a 1/2″ seam.

Turn your bag right side out through the gap in the bottom of your lining. Stitch the gap closed and turn your lining inside your bag. Press around the top and top stitch if desired.

Midnight Bite Treat Bag Tutorial | lillyella stitchery

ADDING DECORATIVE TRIM:

Once all the elements of this bag came together and I was planning the design (see a couple options I was tossing around below), I was going to stitch the bat trim onto the bag panels after they were pieced and then use a piece of woven striped ribbon on top. I liked the added design element but I also wanted to cover the satin ribbon the bats were on because it looked a little generic to me.

Midnight Bite Treat Bag Tutorial | lillyella stitchery

After texting about seven people for their opinions (ya, Im a high maintenance friend), I decided to keep it a little cleaner and just use the bat trim, but I did not want to throw off the balance of the black dotted fabric strip by having the black ribbon of the bats showing. Typically I would sew the trim into the seam, much like piping, but I was concerned about keeping it in place and hitting the beads with my machine foot. I also wanted the bats to fall evenly in line with my dots (OCD, I know). So I clipped the bats off the ribbon and restrung each one then sewed it in place on my bag panels. I did this after adding my fusible fleece to my pieced panels. Since there’s only five bats on each side, it went really quick.

FEATURED FABRICS:

The top hexie print is from the line Happy Haunting by Deena Rutter for Riley Blake (it also comes in orange and black!). I unfortunately have no idea what the purple background of my bat is. I grabbed it last minute at my LQS, but I’ll see if I can find it next time I’m up there. The Happy Haunting line has a purple print with tiny black spiders on it that would match and make a cute background, too. The black strip with the dots is Spellbound from Cotton + Steel and the bottom web print is from Spooktacular, Too (also in the newer Spooktacular Eve) by Maude Ashbury for Blend.

I hope you enjoy this tutorial, happy haunting, friends!

Midnight Bite Treat Bag Tutorial | lillyella stitchery

Disappearing nine-patch with sashing: a quick tutorial

DSC_0547 edit 2

When I first started quilting, I thought the disappearing nine-patch block was like magic! Before I knew anything about modern fabric or designers, I found a Flea Market Fancy 6″ charm pack at my very traditional LQS and got to work.

The traditional nine-patch was a little busy for me, but add some sashing and boom! I was in love. Quick, easy, and a perfect, fun block for charm packs or squares of any size.

Disappearing nine-patch with sashing: a quick tutorial by lillyella stitchery

So here’s a quick breakdown on how this goes together (and finishing this is high on my WIP list, so I’ll hopefully post a completed pic soon!)…

The charm pack I had was 6″ squares, but you can use any size squares, as well as any size sashing. My strips are 1.5″ cut for a 1″ finished sashing.

Disappearing nine-patch with sashing: a quick tutorial by lillyella stitchery

Start by sewing three rows of three squares each with sashing strips between.

Disappearing nine-patch with sashing: a quick tutorial by lillyella stitchery

Next you will piece the three rows together with sashing strips to create your starting block and then cut it in half both ways to create four blocks.

Disappearing nine-patch with sashing: a quick tutorial by lillyella stitchery

You can now piece these blocks together, with or without more sashing, in any arrangement you like. They can all go in the same orientation for a symmetrical look or you can vary them. (The above pic is just a mock up if you’re wondering why my seams look funny!)

DSC_0643 edit 2

So there you have it! This simple block has so many possibilities. Use bold colors and black sashing for a stained glass window effect or try using big prints in just the squares that don’t get cut and use solids for the rest of the blocks and the sashing.