Today is the day! Butterfly Effect is out in the world and I’m SO DARN EXCITED! This pattern has been a really long time in the making. I started and stopped and started and stopped and almost gave up on it a few times. I sketched dozens of options and fought with geometry for too many hours to count, but… TOTALLY WORTH IT!
The pattern finishes at 24” square as written (shown above), making it a perfect mini quilt or pillow, but you can continue to grow your piece to any size or use small sections of the pattern for other applications.
The pattern includes printable templates and pattern papers so you have everything you need to jump right in or you can order laser cut paper packs and acrylic templates at PinkDoorFabrics.com.
**UPDATE: Butterfly Effect Supplies (templates, paper packs and printed patterns) are now available from Paper Pieces HERE. Thank you!
• • • • • • • • • • • • • • • • • • • • • • • •
SUPPLIES
**UPDATE: Butterfly Effect Supplies (templates, paper packs and printed patterns) are now available from Paper Pieces HERE. Thank you!
• • • • • • • • • • • • • • • • • • • • • • • •
I believe that any level sewist can create this pattern, even EPP beginners! Complete instructions on EPP are not included, but many tutorials can be found online. You can also check out my Beginners Guide to EPP. Even if you are experience with EPP, you may find some helpful information in this post, plus links to all my favorite tools!
I will be hosting a Butterfly Effect Sew Along that will kick off May 3 where will we work step-by-step together, so if you’re a newbie but want to give this a try, I hope you’ll sew along! You can sign up by clicking here.
I hope you love creating this pattern as much as I have. Remember to share your projects and find inspiration with the hashtag #ButterflyEffectPattern on social media!
My new Butterfly Effect Pattern comes out TOMORROW (March 3) and I wanted to share ALL THINGS EPP with you today to help you prepare! Whether you are new to English Paper Piecing (EPP) or have dabbled in it before, I hope you find some useful tips and techniques here today. Below I’m sharing all the basics about EPP, as well as my essential (and favorite) tools and a variety of tutorials on basting, stitching and more.
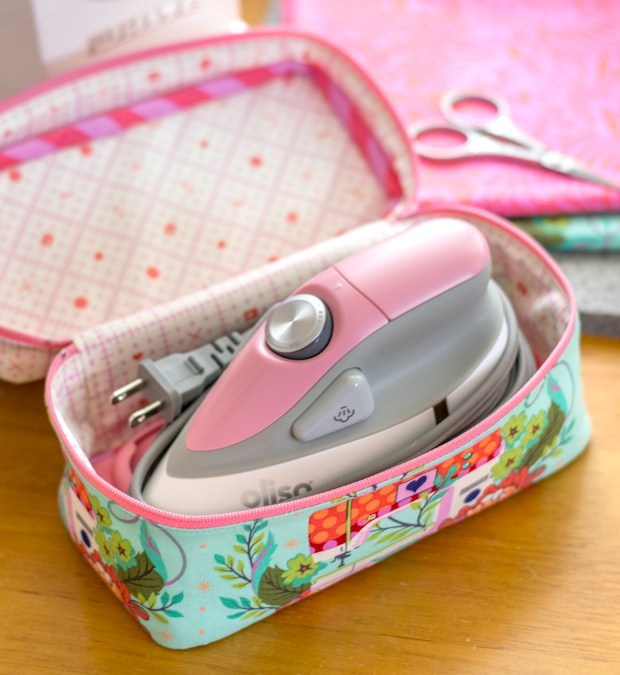
English Paper Piecing (EPP) is a hand sewing technique that uses heavy paper templates to create shapes and stabilize them for stitching. EPP allows you to create intricate designs that would be difficult or impossible to achieve through machine sewn seams. I, personally, find great satisfaction in creating a beautiful quilt with just my hands. Though the process can be slow and meticulous at times, it’s one that people often describe as therapeutic and rewarding. One of my favorite things about EPP is the portability. I like to be busy (you know what they say about idle hands…) and I can take EPP anywhere – on car rides, while waiting for appointments, to the park, on road trips – with minimal equipment. You can toss a few things in a little pouch and always have a project on hand.
Next I will be diving into tools and techniques for EPP. I will be sharing some detailed information and tutorial links, but this is still a surface level intro to help get you started. I will be doing a deep dive into all of this and more with my own photos and video tutorials during the Butterfly Effect Sew Along which will be scheduled later this Spring (probably early May), so stay tuned for that!
· · · · · · · · · · · · · · · · · · · · · · · ·
GETTING STARTED
There are a few tools that are essential for EPP and several others that are simply beneficial and make the process easier, more efficient and more accurate. These tools include papers, templates, needles, thread, a thimble, a glue pen, small scissors, a small rotary cutter, Friction pen, SewTites, washi tape, Clover Clips, and more. You can see many of these items above and I will discuss them all in more detail.
The first thing you need for every EPP project is paper templates. Some patterns have the option of printing the papers yourself on your home printer (or at a copy shop) using card stock and many patterns have pre cut paper packs available. My Butterfly Effect Pattern includes printable paper files if you’d like to print and cut them yourself or you can order precut paper packs from Pink Door Fabrics (shown below). They will be available for preorder March 3.
You baste your fabric to these paper pieces and then stitch them together leaving the papers in place until your project is complete (more on basting later in the post!).
The next tool in the EPP process is templates. These help you cut your fabric pieces to the right size and shape before basting them to your paper pieces. Templates are not essential to the EPP process, but they are extremely handy and helpful. With EPP patterns, you will use either a 1/4″ or 3/8″ seam allowance on your fabric pieces. This is often determined by the size and shape of your pattern pieces. You can use your paper pieces as a guide/template, cutting your fabric 1/4″ – 3/8″ larger all around or you can use templates. EPP templates are clear acrylic shapes that are the same size and shape as the paper pieces that you baste to, but include a seam allowance and allow you to easily fussy cut fabrics for your pattern, which is one of the great joys of EPP! Some EPP patterns will also include printable template files that you can print and cut from card stock just like the papers. You can use them whole or cut out the centers for easy fussy cutting.
My Butterfly Effect pattern includes printable templates and you can also order acrylic templates from Pink Door Fabrics. There are two options available. One includes a full set of templates for every piece of the pattern and the second is a mini set which includes acrylic templates for the butterfly and moth wings. You would then print and cut the other templates yourself.
Above you can see a set of acrylic templates from Pink Door fabrics. They ship with paper on the back that you peel off. I *always* fussy cut so I love acrylic templates. They are also beneficial because you can easily use them to cut your fabrics with a small 28mm rotary cutter. If you did this with paper templates, you could cut into your templates, so you would need to trace your shapes and then cut them with scissors. If you choose to trace shapes on your fabric, I love using a Frixion pen that erases with heat.
If you use acrylic templates, you may find No Slip Grip Dots helpful, especially if you’re using a small rotary cutter. You affix these to the back of the acrylic templates to help keep them from slipping around on your fabric when tracing or cutting.
You can also consider an EPP starter kit like this one!
· · · · · · · · · · · · · · · · · · · · · · · ·
BASTING
Basting is the process of attaching your fabric to the paper pieces in preparation for stitching them together. You can baste with thread or glue and this is a personal preference. I prefer glue basting. I find it to be quicker and to hold my fabric to the paper tighter which allows me to more accurately and easily stitch my pieces together. I like to use a Sewline Glue Pen because it’s small and accurate (don’t forget the refills!), but you can also use a glue stick.
Here are three great articles talking about basting that show various techniques. Check them out and experiment yourself to see what works best for YOU!
There are also oodles of videos on YouTube at your disposal if you search EPP basting.
· · · · · · · · · · · · · · · · · · · · · · · ·
Stitching supplies & techniques
My preferred basic stitching supplies – needle and thread – are Tulip needles and Invisafil thread. I have used Aurifil thread, but for me it sometimes breaks because I’m a little rough when I pull it. The synthetic thread holds strong and is practically invisible. I love it! I also use a thimble and my favorite is the Clover natural fit leather thimble. I can’t sew without it!
When it comes to stitching your pieces together, there are a variety of methods. None are right, wrong or better than another, it all comes down to personal preference. I recommend, once again, experimenting and finding what works best for you. Keep in mind, this may change with practice and over time or even with the specific project you are working on, so always be open to trying new things.
My preferred method of stitching is the flat back stitch. This is when you keep your pieces flat, butted up next to each other, and stitch across the seam. This is opposed to other methods where you place your pieces face to face and whip stitch or ladder stitch along an edge.
I like using a flat back stitch because I find it the easiest way to keep everything perfectly lined up and because your stitches are invisible! Above you can see that all my seams are neat, even and have no stitches showing. Below is a shot of the back where you can see my stitches. One thing to note is that invisible stitches is a preference. Sometimes different methods are used to intentionally see stitches.
I learned the flat back stitch from Karen the DIY Addict. She has a short video that I first watched hereand she also just released a fantastic master class on the flat back stitch which you can find below. This video also includes ample information about basting.
I will share more videos and details during the sew along, but when I flat back stitch, I use a generous amount of washi tape/painters tape and Clover Clips, but also totally rely on SewTites, specifically when my project gets bigger. They are a game changer!! (You can use code lillyella for 15% off on their site, too!). When I start joining multiple pieces together and have a lot of seams and folded fabric, I use tape, pins and SewTites to move things out of the way as needed.
If you’d like to try a traditional whip stitch method of joining your pieces, here is another great tutorial from Jodi Tales of Cloth.
Another method is the invisible feather stitch demonstrated by Pat Bravo of Art Gallery Fabrics in the video below.
Finally,here is an article by Amira The Little Mushroom Cap talking about five different stitching methods. Once again, you can find endless articles and tutorials with an internet search.
Play around with some basic hexagons or triangles and see what feels right for you!
· · · · · · · · · · · · · · · · · · · · · · · ·
additional tools
There are a few more tools that I use on the reg that really help me with my EPP (and all my sewing projects!). I will talk about them more in depth during the upcoming Sew Along, but here is a quick list with links:
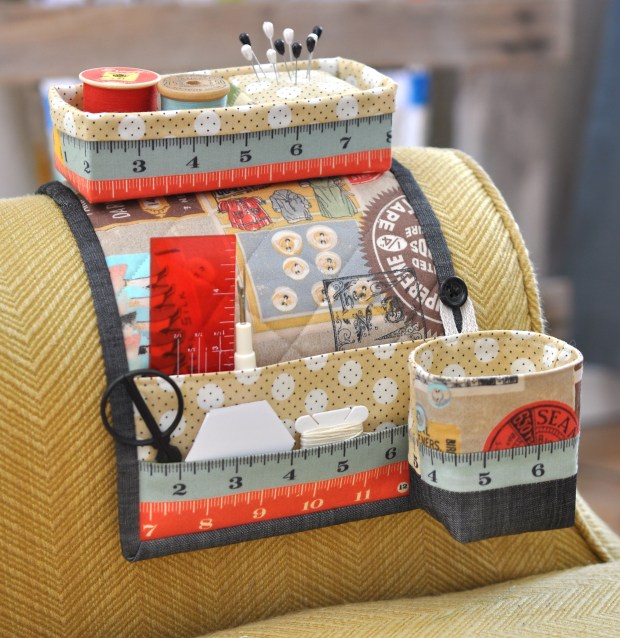
Last, but not least, I recommend making yourself a Mini Maker Station! This is one of my free patterns and it’s perfect for EPP! You can download the pattern here.
· · · · · · · · · · · · · · · · · · · · · · · ·
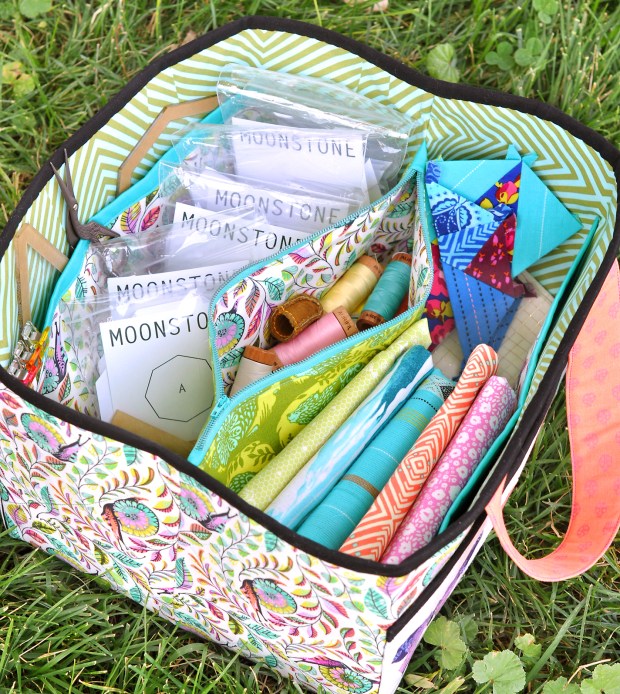
I also REALLY love the Sewing Date Traveler pattern for storing and toting around all my project supplies. You can download the free pattern here. I made this one a few years back and it’s constantly in use!
· · · · · · · · · · · · · · · · · · · · · · · ·
I hope you have found this post helpful and try your hand at some EPP!
I want to add, if you don’t love it at first try or get frustrated with perfection or techniques, don’t give up! Like everything, it can require some practice and finessing.
Stay tuned for my pattern release TOMORROW and I hope you’ll join in the upcoming Sew Along! I will post details here on the blog and you can also stay up to date with everything on my Instagram page and by joining my email newsletter here.
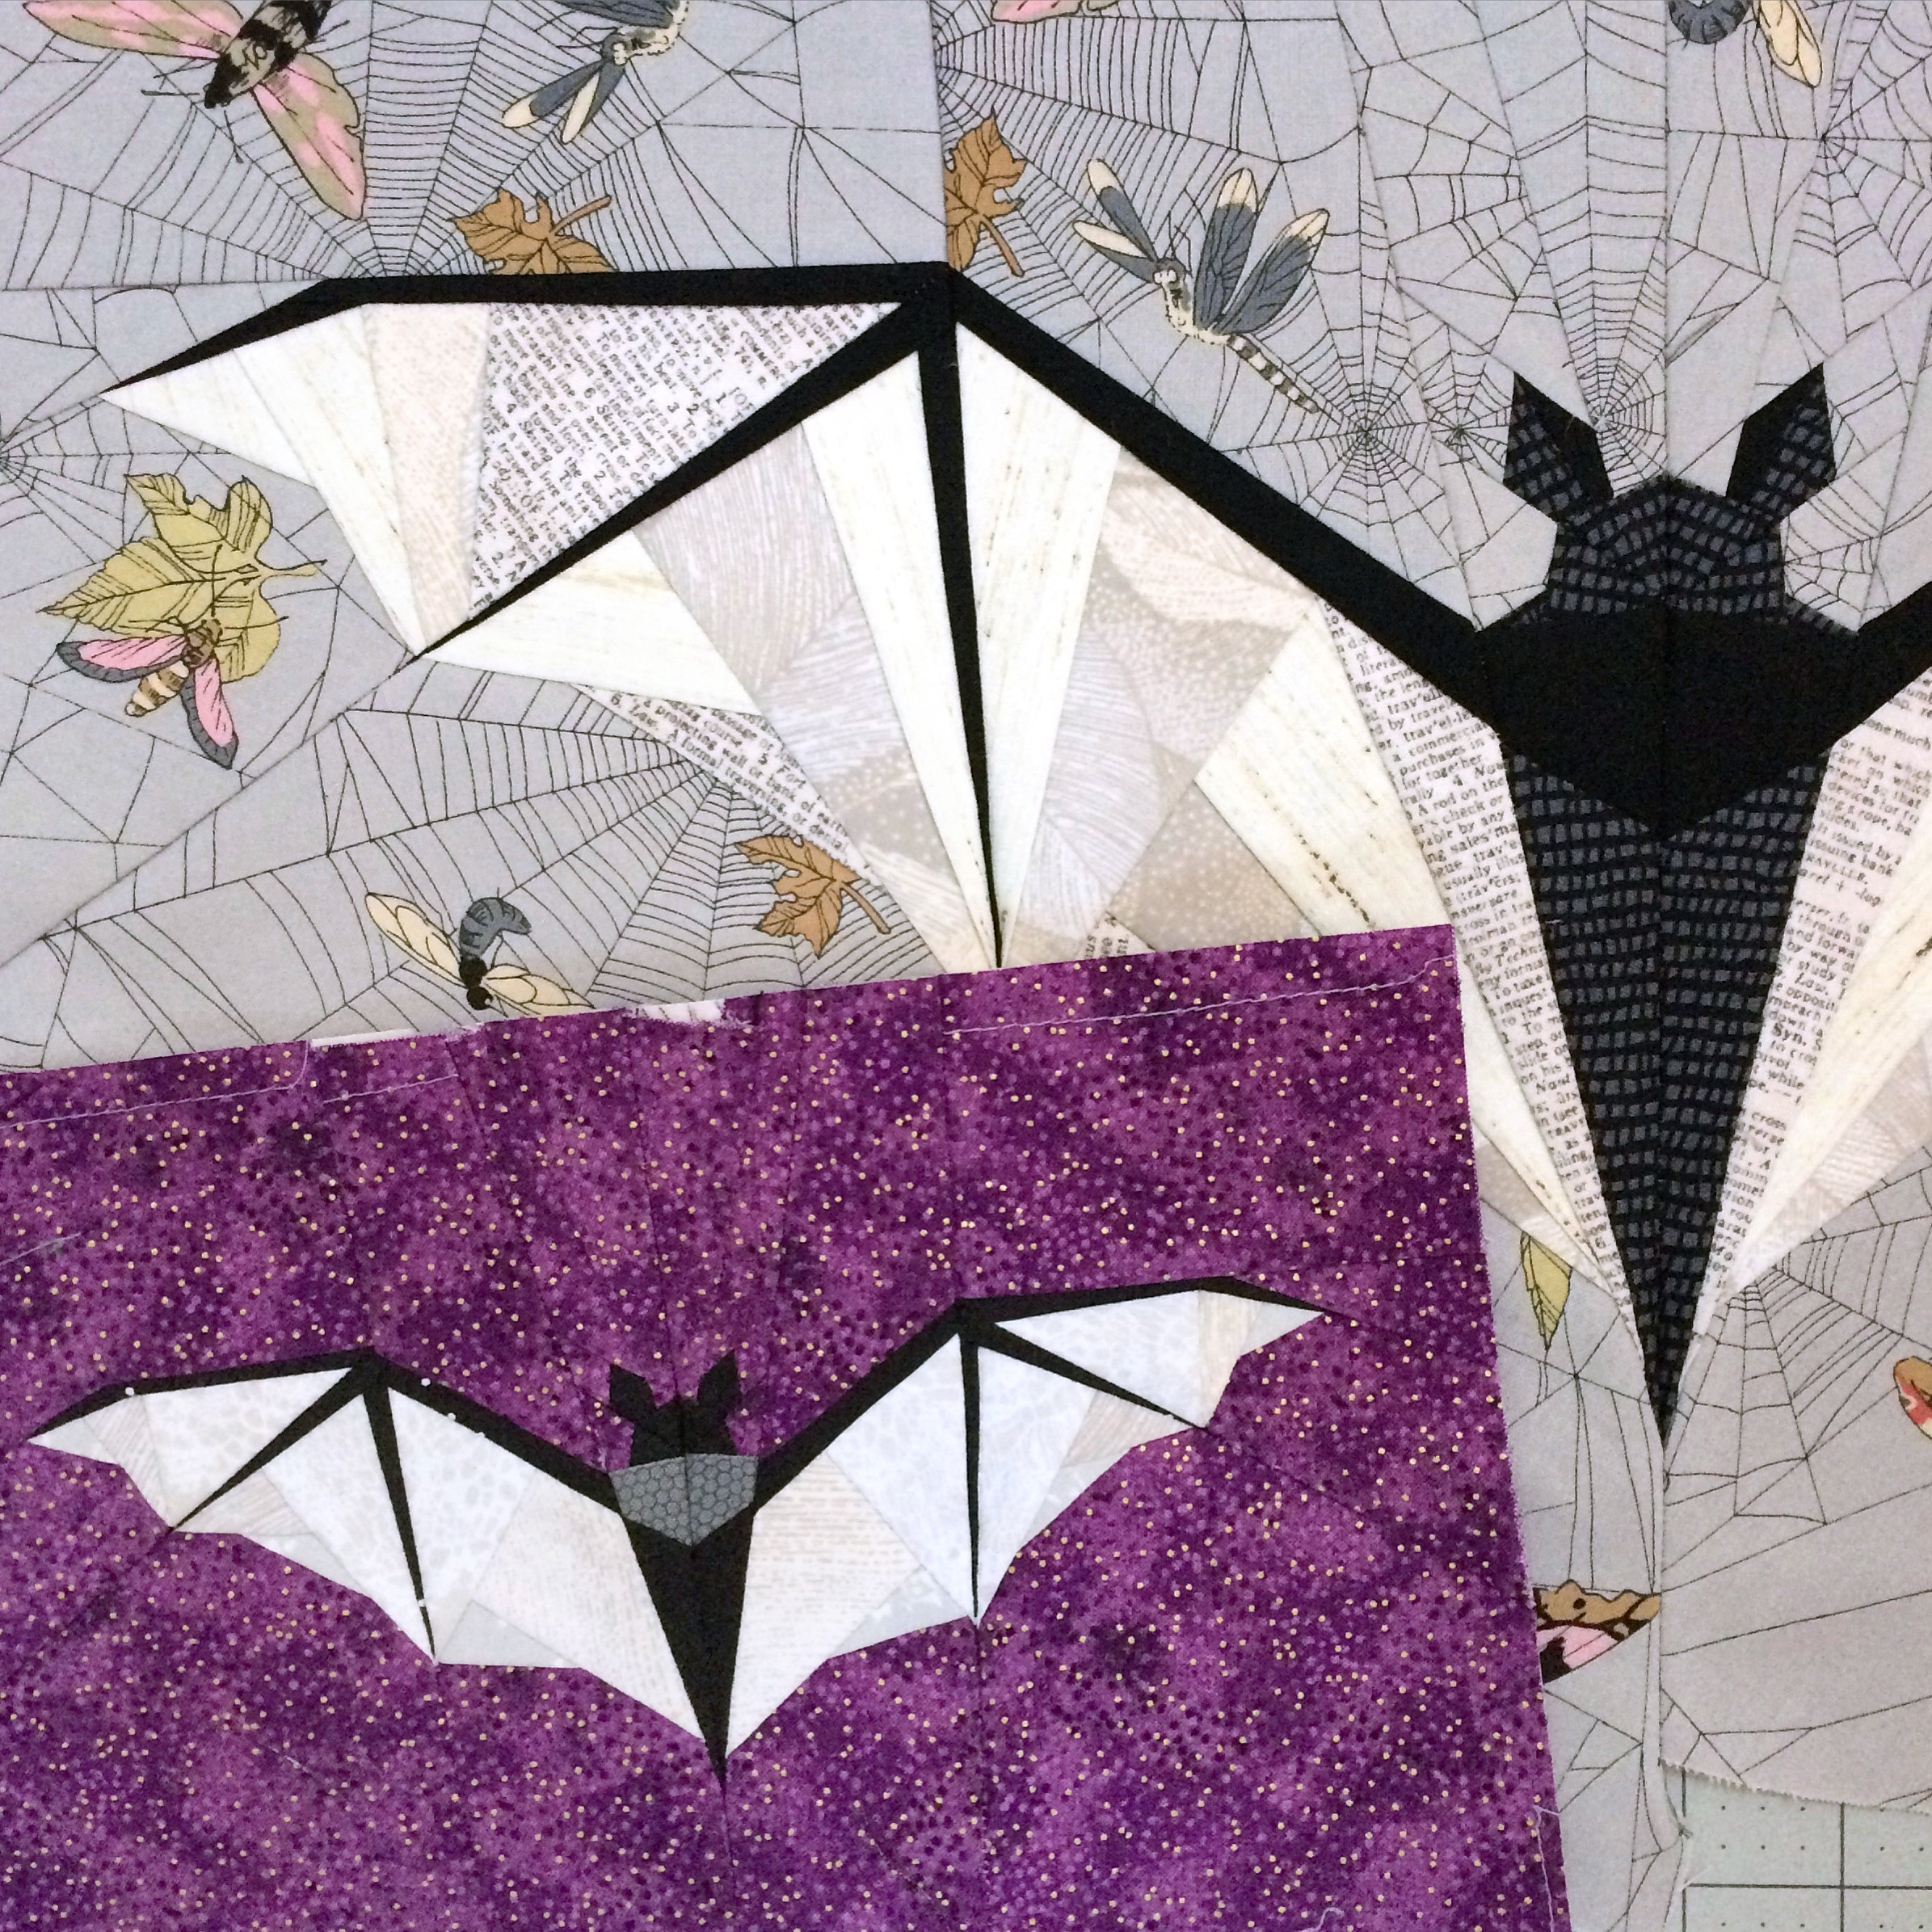
It’s time for the Midnight Bite Sew Along 2020! The sew along (SAL) will begin on October 9 and run through Halloween. Please read through this entire post carefully as everything you need to know is included – how to participate, what to expect, where to direct questions and more.
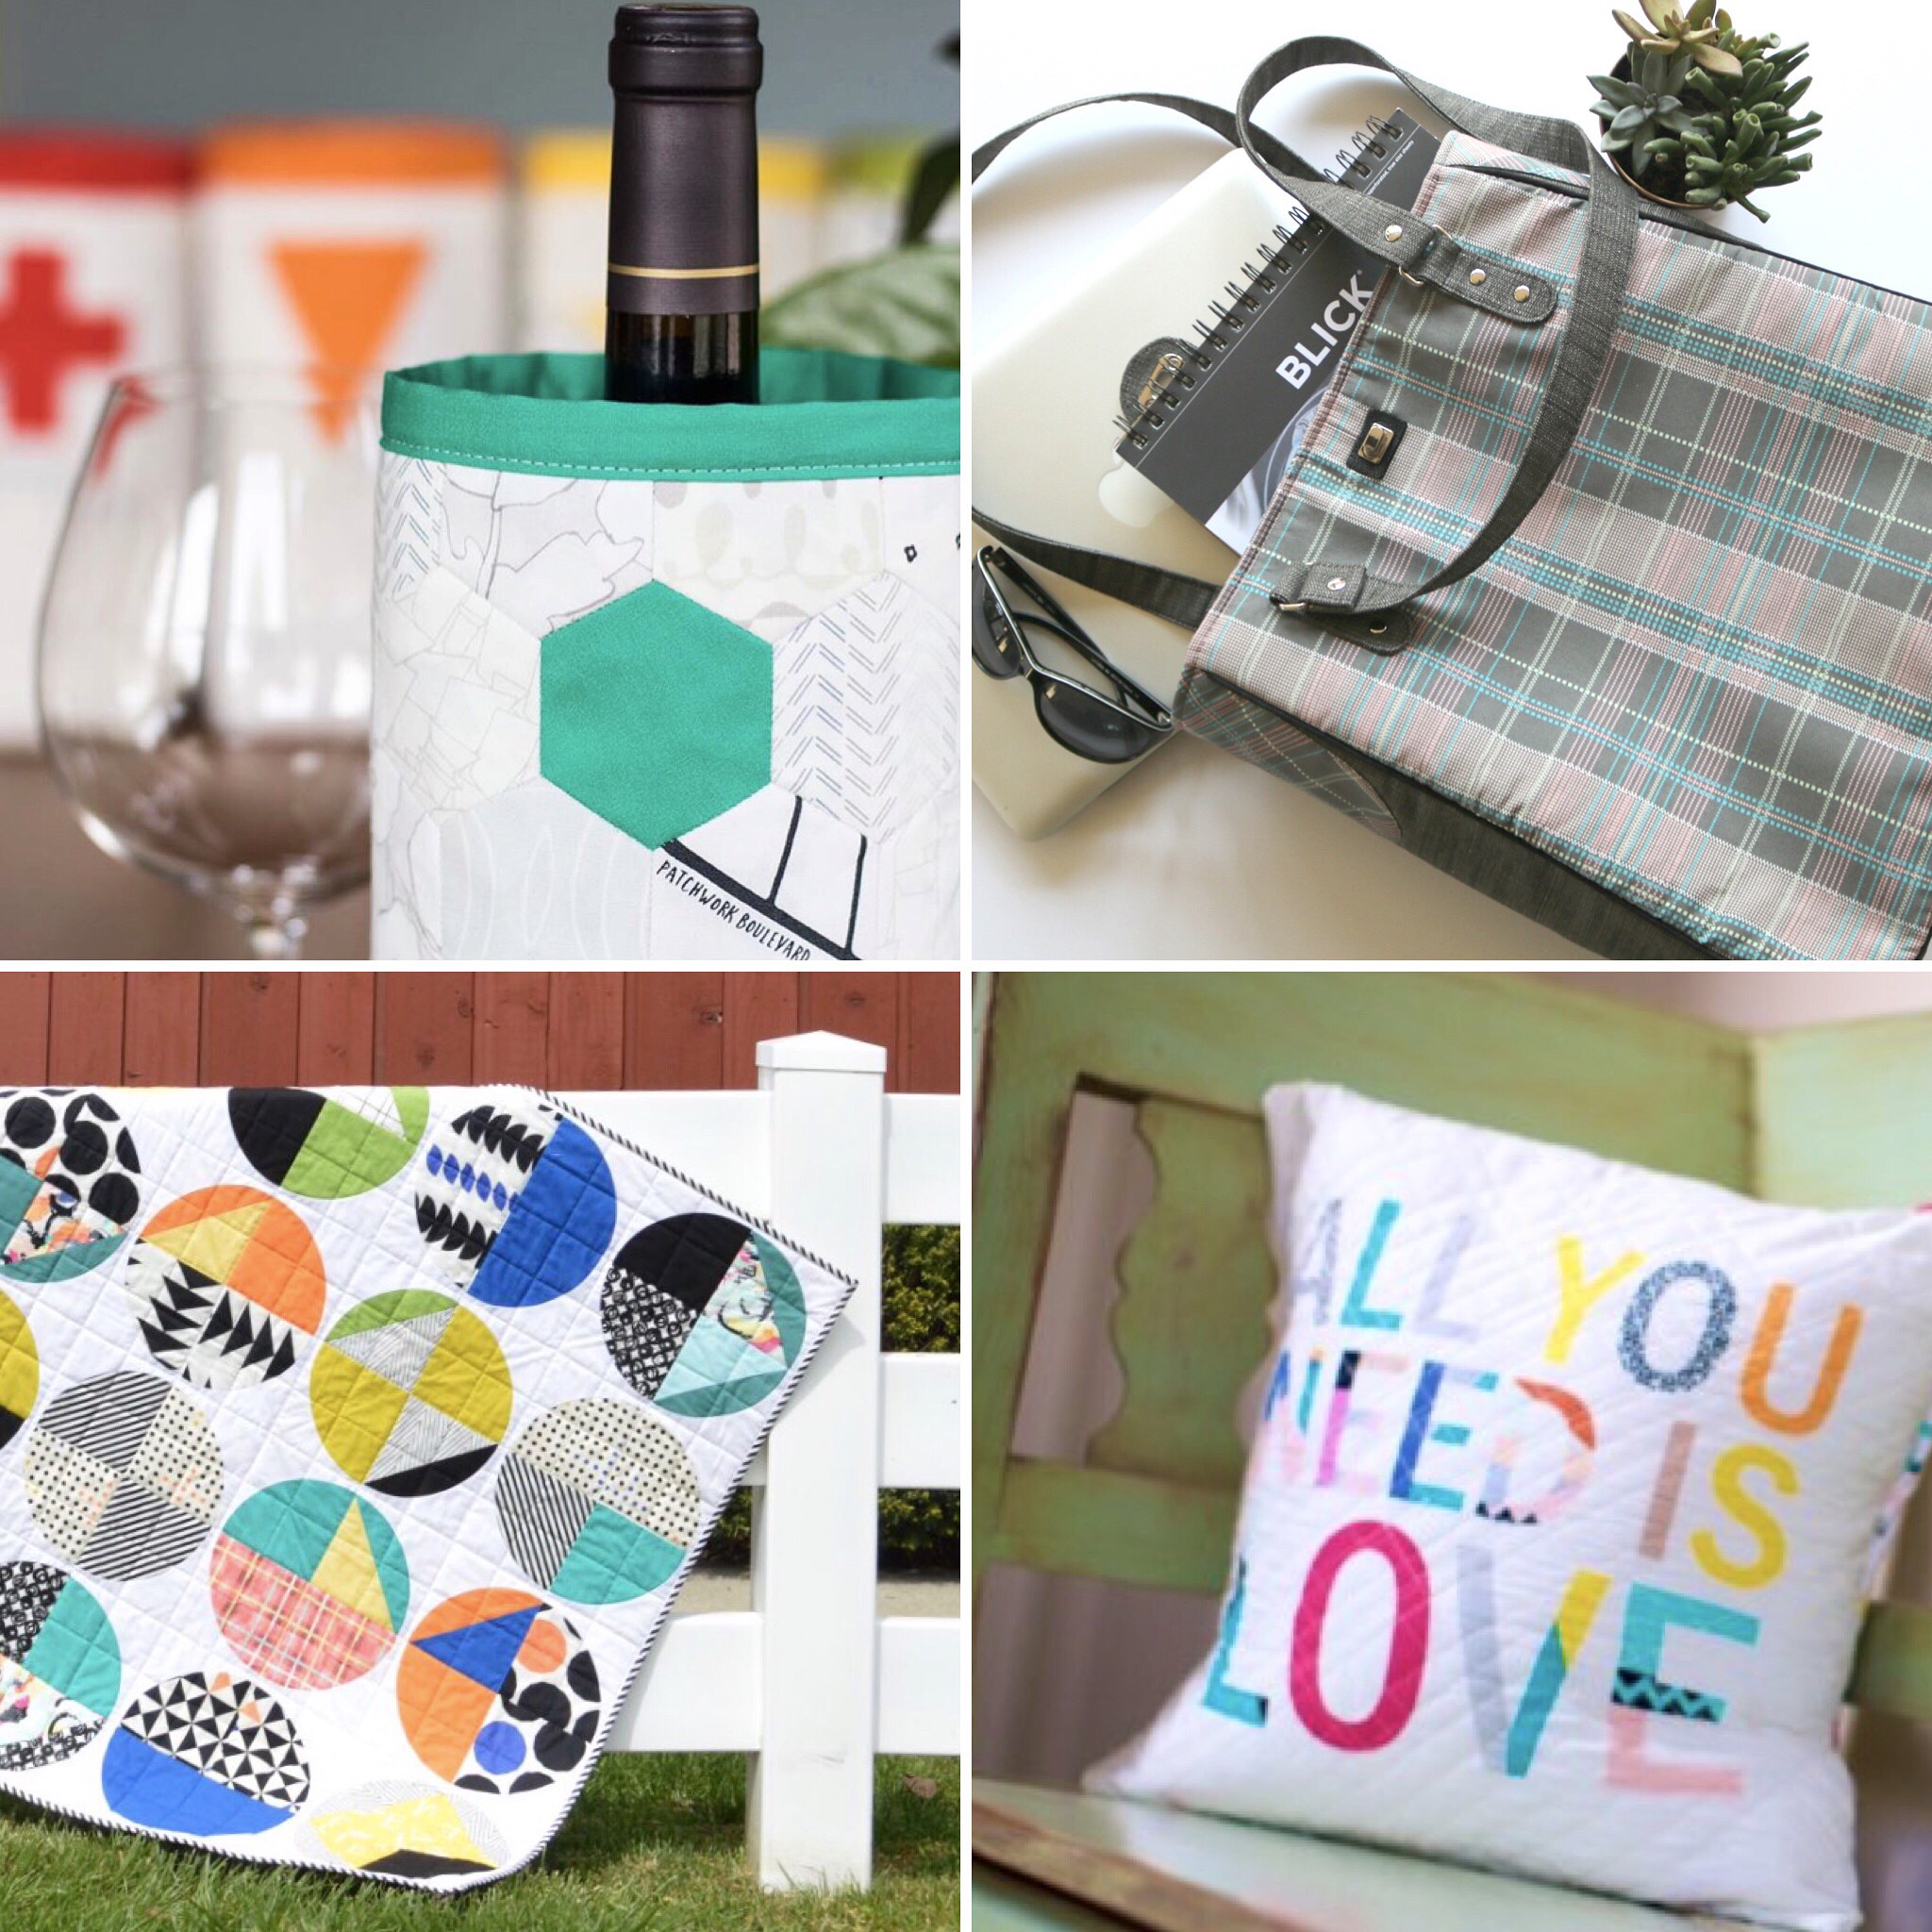
You can find the Midnight Bite bat pattern and Wicked Weaver spider pattern in my Etsy shop here. Both patterns include three blocks sizes from 8” to 24” so there are endless possibilities with what you can create using them! Throughout this post you will see a few variations of the blocks, as well as some finished projects made with them including the Midnight Bite Treat Bag and an improv wonky log cabin pillow.
Whether you’re a sew along fanatic or have never participated in one before, I hope you’ll join in! A sew along is essentially just what the name implies, a group of people sewing through a specific pattern “together” virtually over a set time period. Sometimes a SAL is very structured with a set schedule and specific prompts for sharing your work on social media etc, and sometimes a SAL is very loose with nothing shared along the way but what others choose to share as they work their own project. Sew alongs are typically most active on social media, such as Instagram and Facebook, where people share photos of their progress using specified hashtags so everyone participating can view each other’s work, answer questions, share tips & inspiration and more. The best part about a sew along is that it often gives someone the motivation to start or stick with a project and it’s also a fabulous opportunity to learn new skills and make new friends!
This is not a live event or class, all information will be sent via the email newsletter list (sign up below!) on scheduled days with links to blog posts found here. The posts will include pattern tips, tutorial links and videos to help you through your project. You are welcome to work ahead at any time or you can follow the schedule. Between posts, everyone works at their own pace and shares their progress on Instagram and in the Sew Along Facebook Group. If you’re not on social media, that’s ok! You can still view others posts and email me photos of your work.
For this SAL, I will not be sharing a complete step-by-step how-to on foundation paper piecing (we’ll do that in the Spring!), but I will share a variety of tutorials for those who are new to FPP. I will, however, be sharing tips and videos on how I prepare my pattern, cut my fabric (including fussy cuts and directional fabric), join sections with accuracy, and more, and I think many of these tips and tricks will be new and helpful to even experienced paper piecers! Below you will find more information on option tools and materials for this project.
Throughout the sew along, I ask that you direct any questions you may have to the Sew Along Facebook group rather than emailing or contacting me through social media. I will be checking these things, but chances are someone has already asked the same question and you will get a much faster response than I can provide! The FB group also has a search feature, so it’s easy to look for answers. I will be taking a cross country road trip during this sew long (crazy, I know!), so I will have limited internet access.
· · · · · · · · · · · · · · · · · · · · · · · ·
SEW ALONG SIGN UP
I have created an email newsletter sign-up as an easy to communicate with everyone participating in the sew along. Emails will only be sent during the sew along and the list will be deleted after it’s over. Please click here to join in! Be sure that you see the confirmation after joining and then look for a welcome email. If you do not see it, please check your junk/spam folders and if you still don’t receive it, please try signing up again.
· · · · · · · · · · · · · · · · · · · · · · · ·
SEW ALONG SCHEDULE
There aren’t too many steps in the process of foundation paper piecing, but I will cover pattern and fabric prep, general piecing and finally joining on sections. I will move quickly through the schedule for those who work fast, but there’s plenty of time during the sew along to work on your block, so don’t worry!
October 9: Pattern prep and cutting fabric. I will share helpful tips, my favorite tools, and a few videos on how I do this. There may be some surprises and helpful information for even experienced paper piecers, so I suggest you wait for this post to begin!
October 12: Begin piecing sections. I will share a variety of foundation paper piecing tutorials showing different methods and talk about what I prefer. I will also discuss trimming sections in preparation for the next step of joining them.
October 19: Joining sections. I will share videos and tips on how I join my sections with perfect accuracy and talk about ways to use your block in projects.
October 26: Final post and time to begin sharing finished blocks!
· · · · · · · · · · · · · · · · · · · · · · · ·
· · · · · · · · · · · · · · · · · · · · · · · ·
tools and materials
Though it’s not necessary, I use an Add-A-Quarter 12″ ruler for foundation paper piecing and will be using that in my demonstrations and tutorials. I also print my pattern on newsprint or foundation paper and this is what I recommend using if you’d like to pick some up. I will talk more about the benefits in the first blog post.
· · · · · · · · · · · · · · · · · · · · · · · ·
Until we kick things off on October 9, you can check out the #midnightbitepattern and #wickedweaverpattern hashtags on Instagram to get your creative juices flowing! You can start pulling fabric and share a snapshot on social media with the hashtags #MidnightBiteSAL and #MidnightBitePattern (for the bat) or #WickedWeaverpattern for the spider and in the Sew Along Facebook group!
Hello, Hello! If you are just joining the sew-a-long, please scroll down a few posts to find the kickoff and all the tips shared in previous posts or scroll to the bottom of this post for direct links.
So far we’ve worked on the main body of the mat and how to add a machine handle opening, and today I’m going to talk about the pocket panels. If you’re just getting started on your mat, don’t worry, there’s still plenty of time!
Before you begin your pocket panels remember that if you changed the size of your main body, you will need to also adjust the size of the pocket panels! You can do this by changing the size of one pocket or adjusting all the pockets equally. Don’t forget to think about seam allowances when calculating cutting sizes.
One thing to note about the pocket panels is that there are SO many ways you can customize this entire project, but especially this part. You can adjust the sizes, add more or less pockets, you can piece them all with any block you love or you can eve use one solid cut of fabric to make it really quick and easy. Be sure to check out the #undercovermakermat hashtag on social media to see tons of creative inspiration!
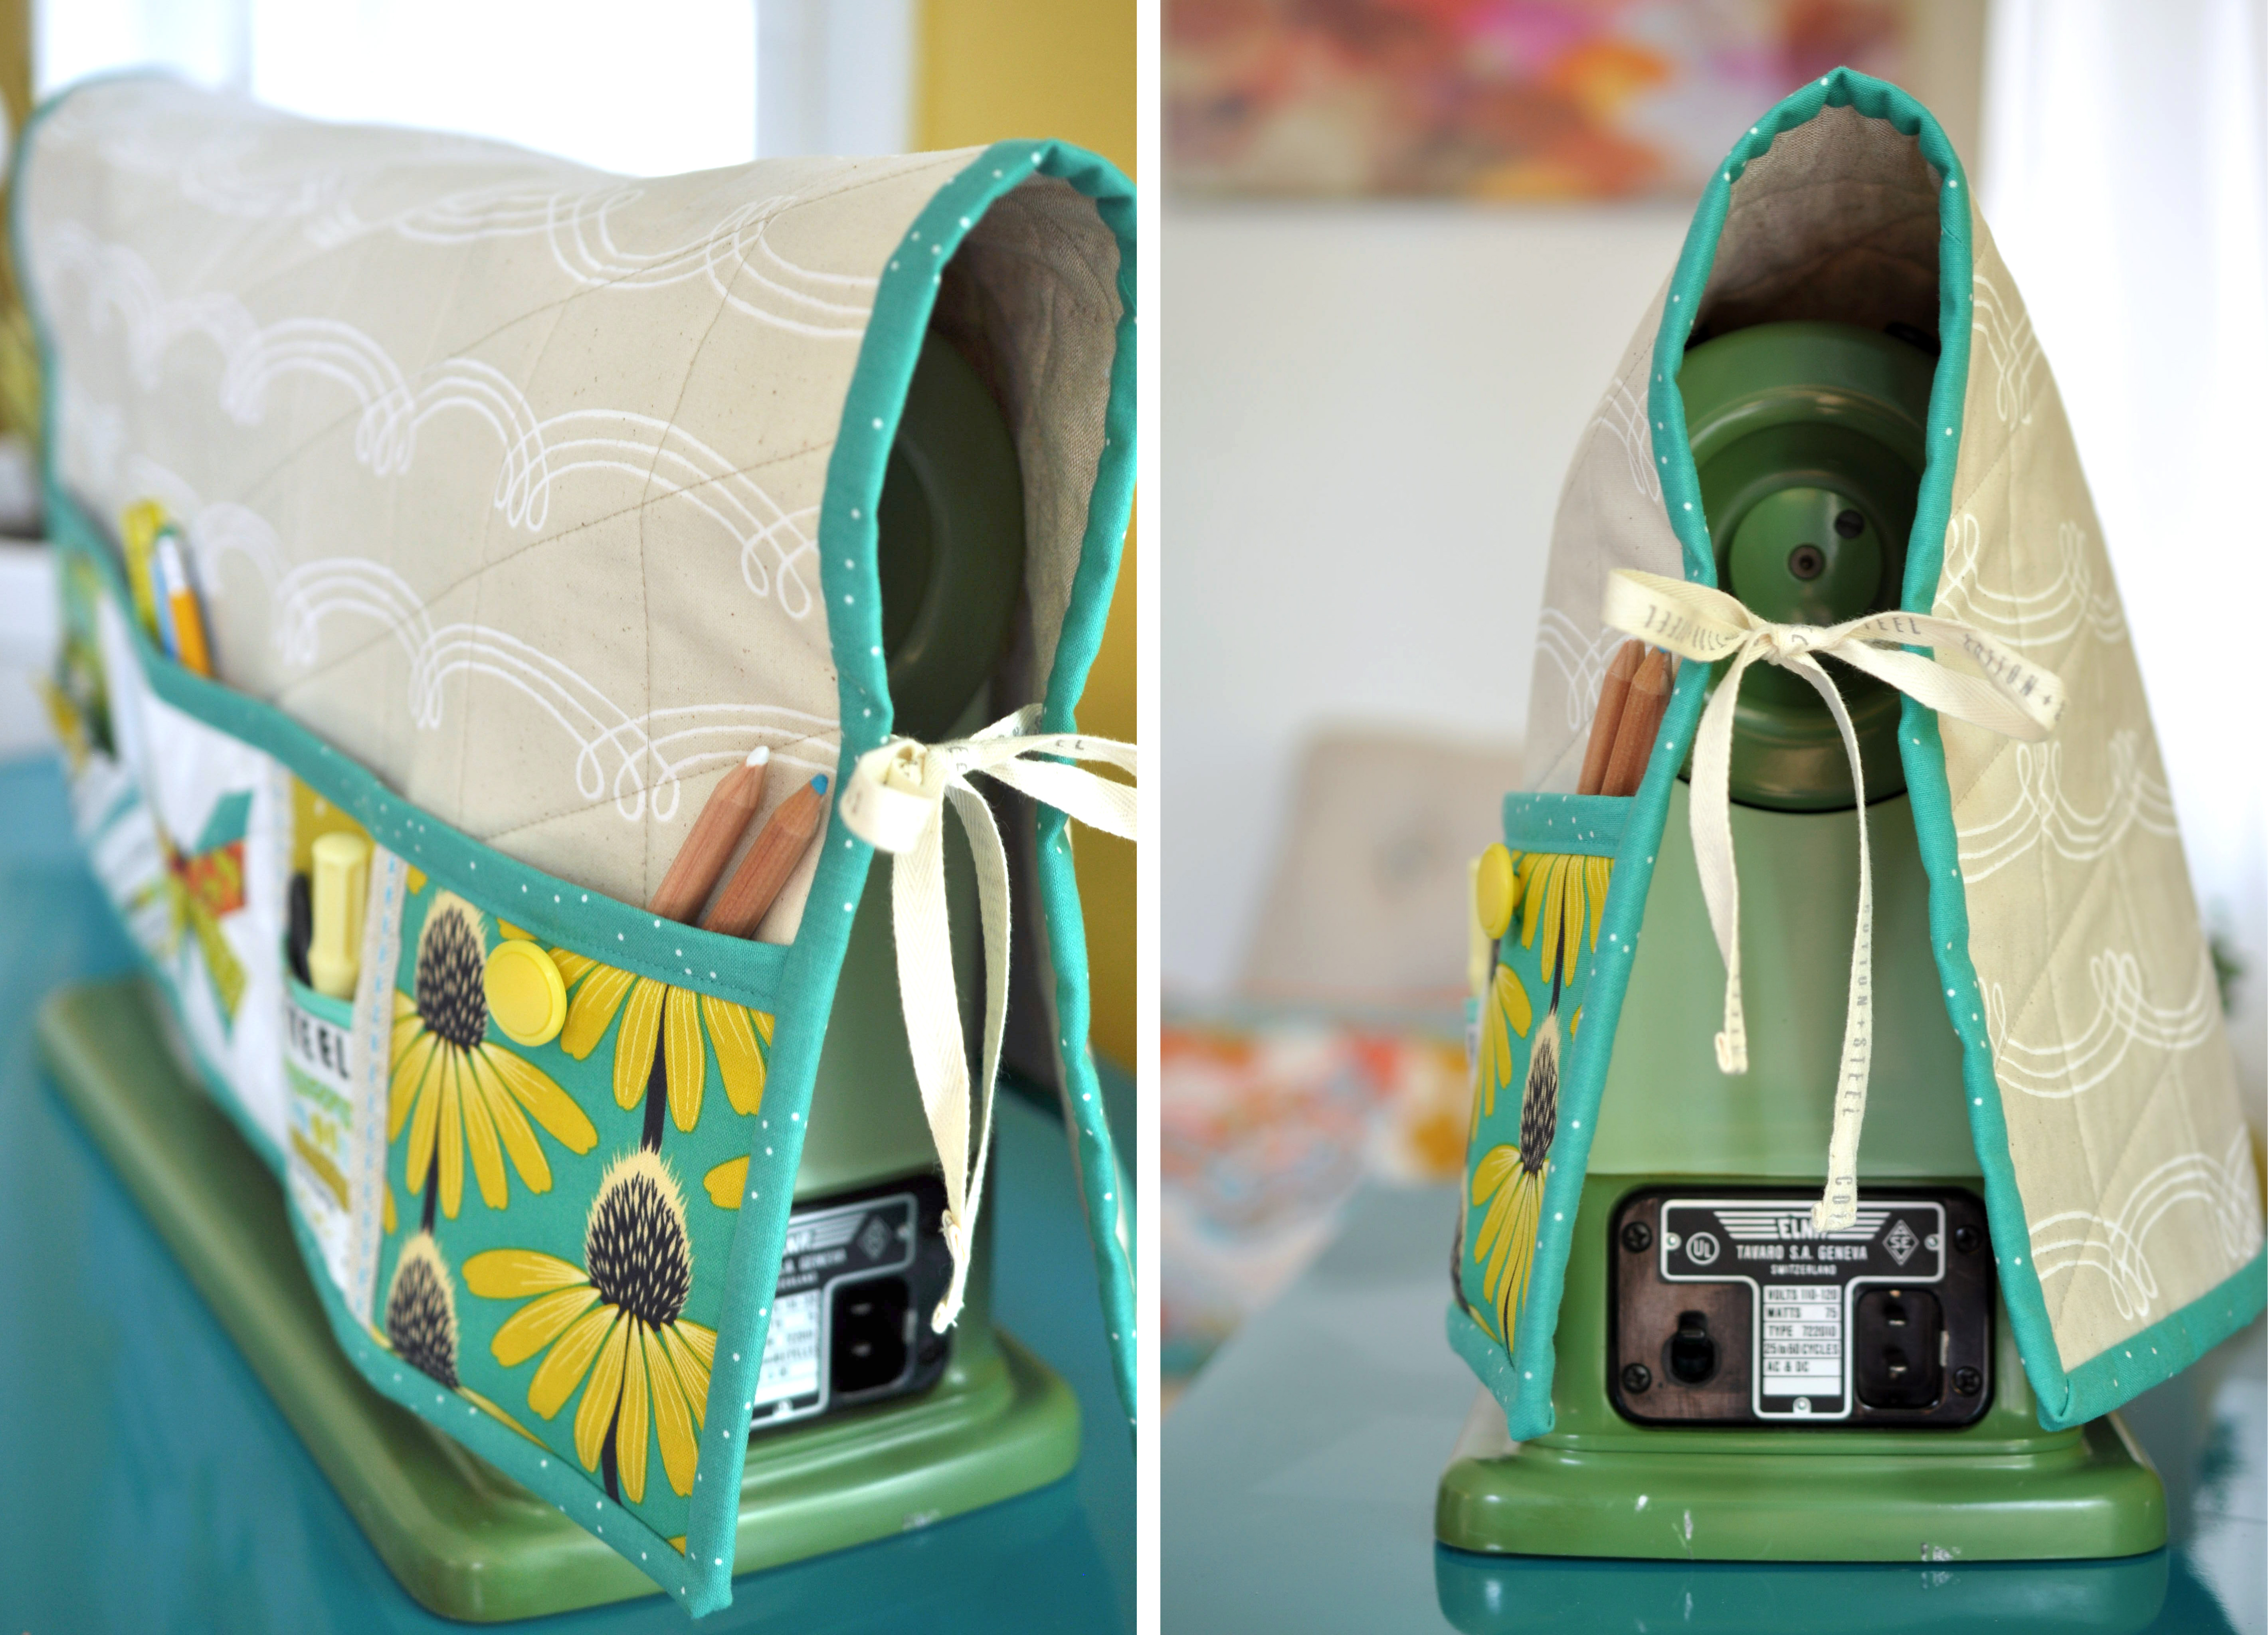
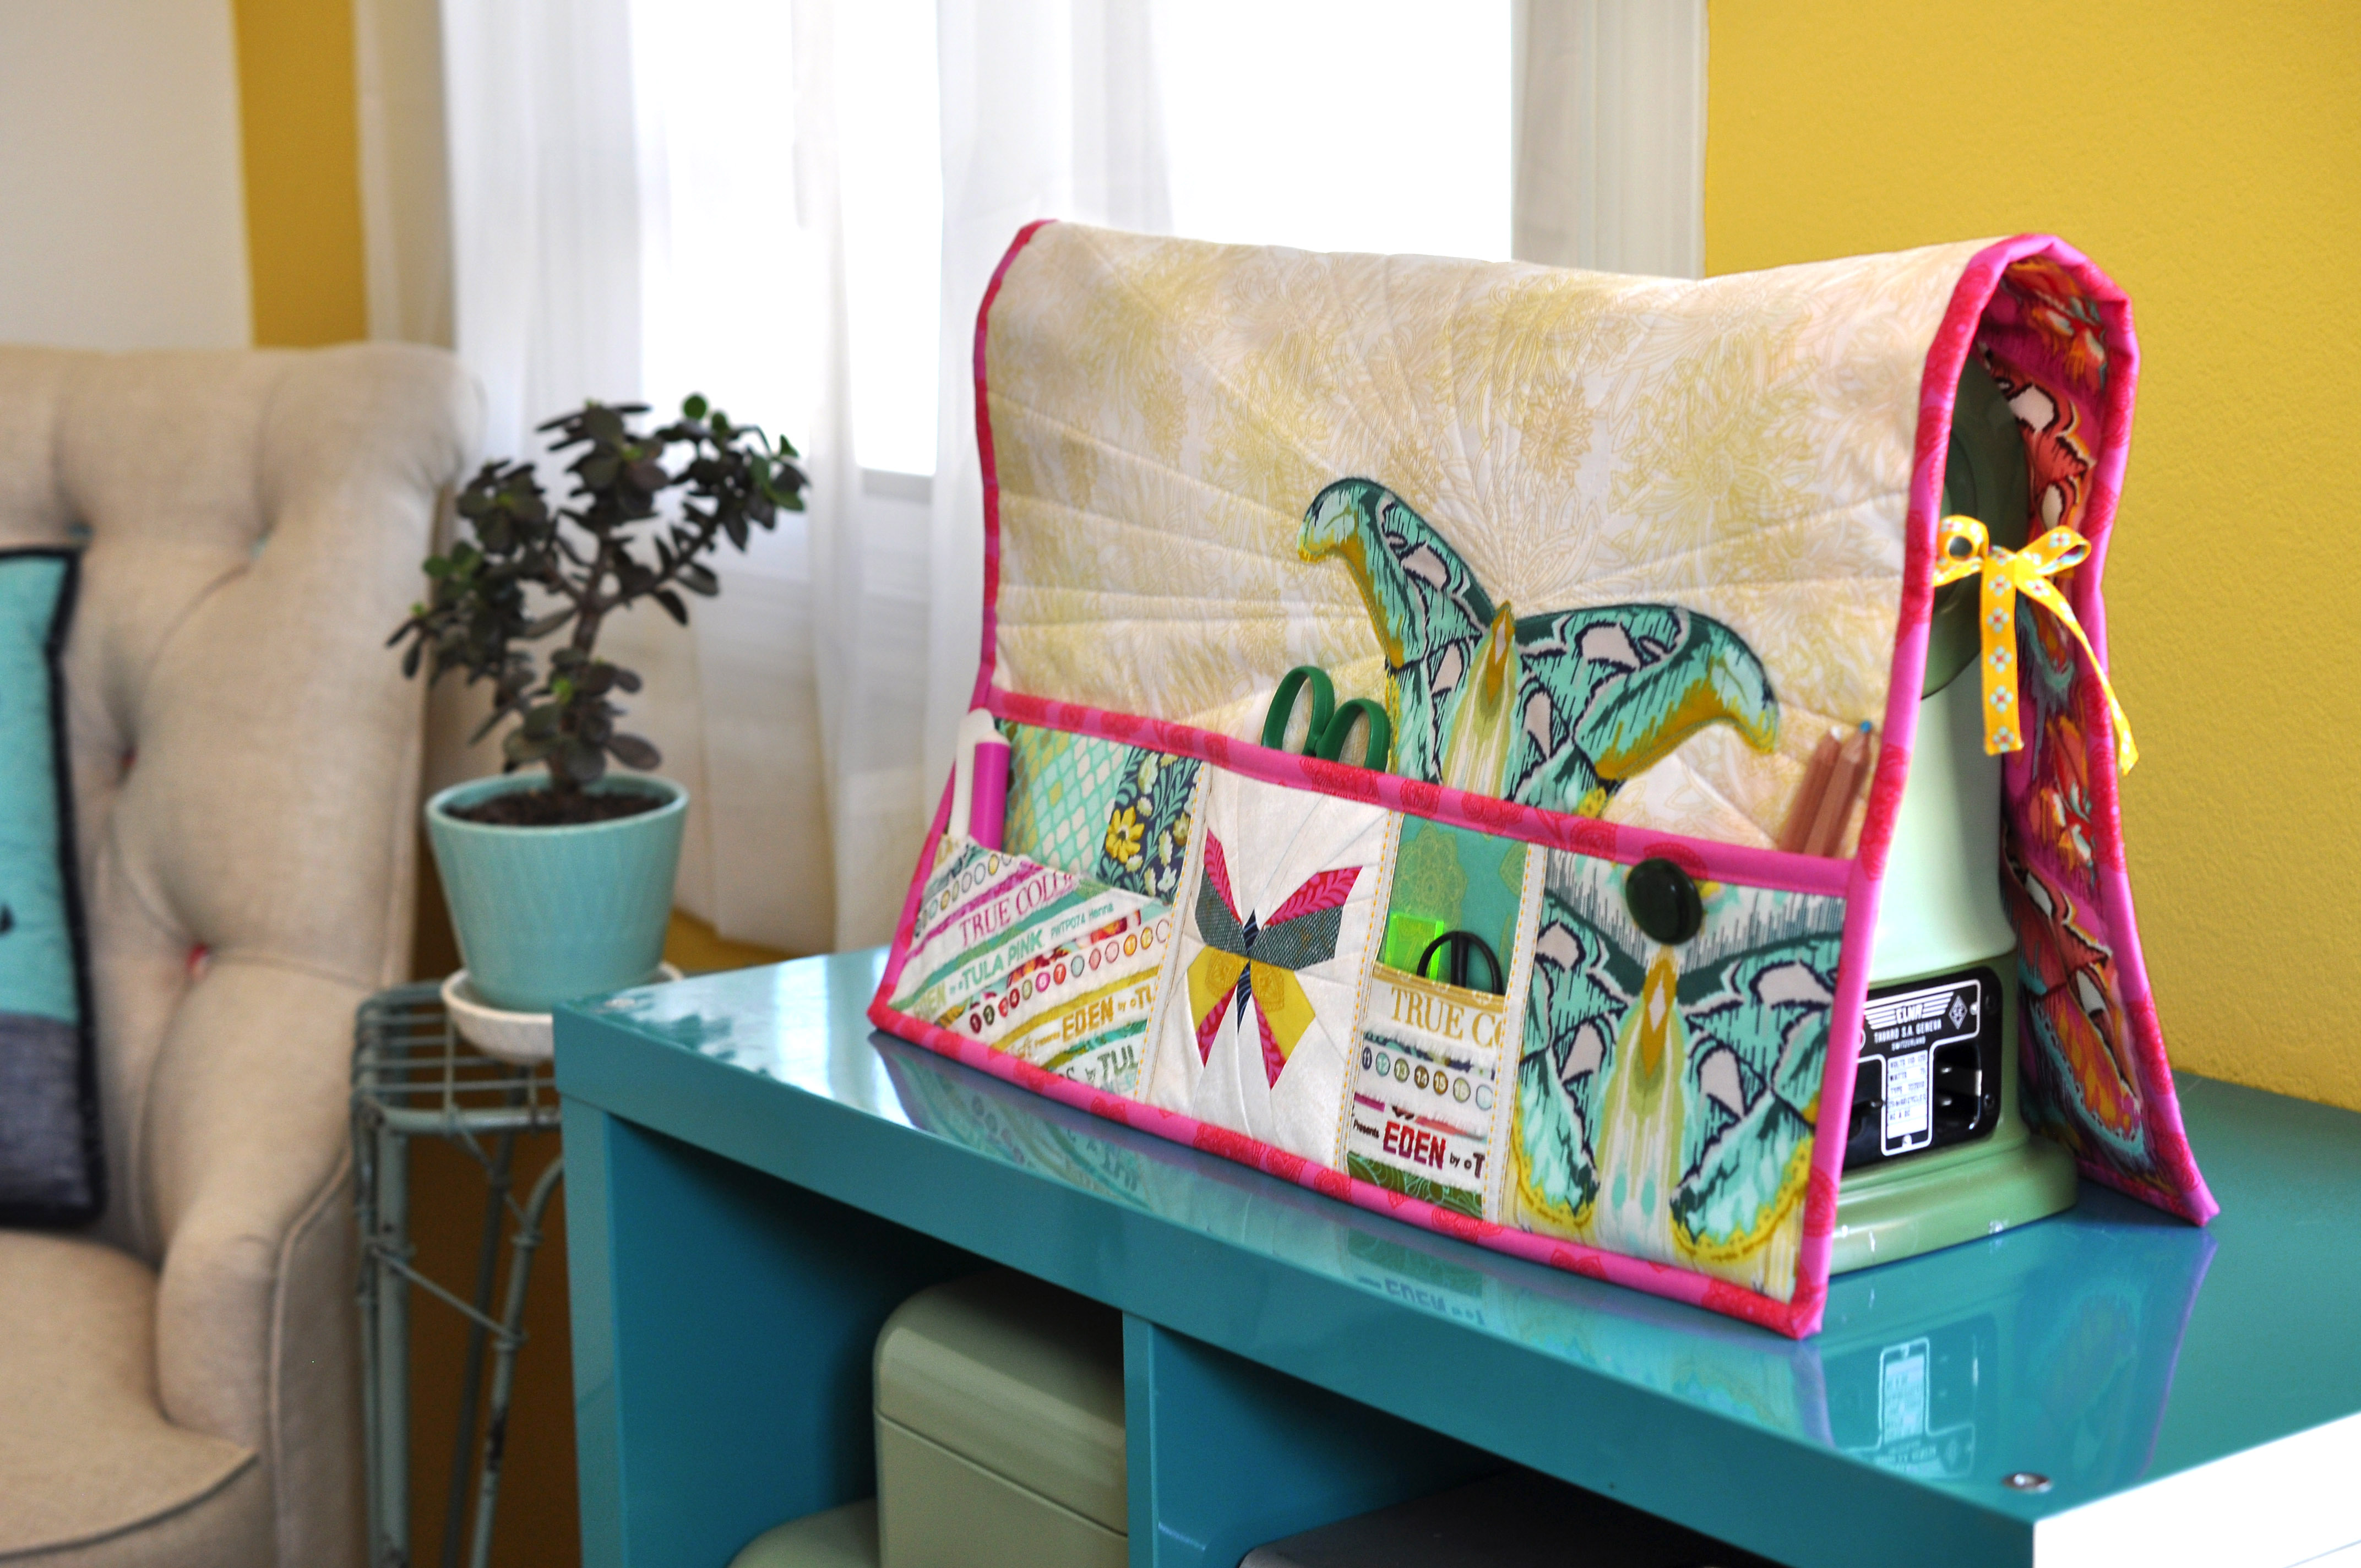
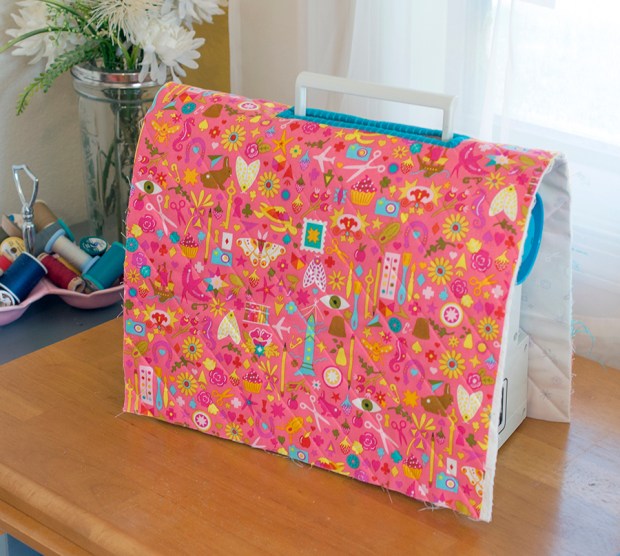
Above you can see just a few variations from mats that I’ve made in the past. The top left follows the pattern as written, which the bottom left follows the same sizing and layout, but uses full cuts of fabric (rather than piecing) with cute fussy cuts! On the right, there is a little mix of both. I substituted my Love Story pattern block for the butterfly and then used solid fabric cuts for the other pockets with some added lace trim details.
First I’m going to share some tutorials and tips on creating the accent pocket panels which are the paper pieced butterfly and the selvedge pockets, then I’ll cover a bit more details on piecing the panels and trim options.
All the information you need to create the accent pocket pieces is included in the pattern (including a link to a tutorial on making the butterfly for beginner paper piecers), but I will go into a bit more detail here and include some additional tips and photos, as well as design variation ideas.
• • • • • • • • • • • • • • • •
PAPER PIECING TIPS
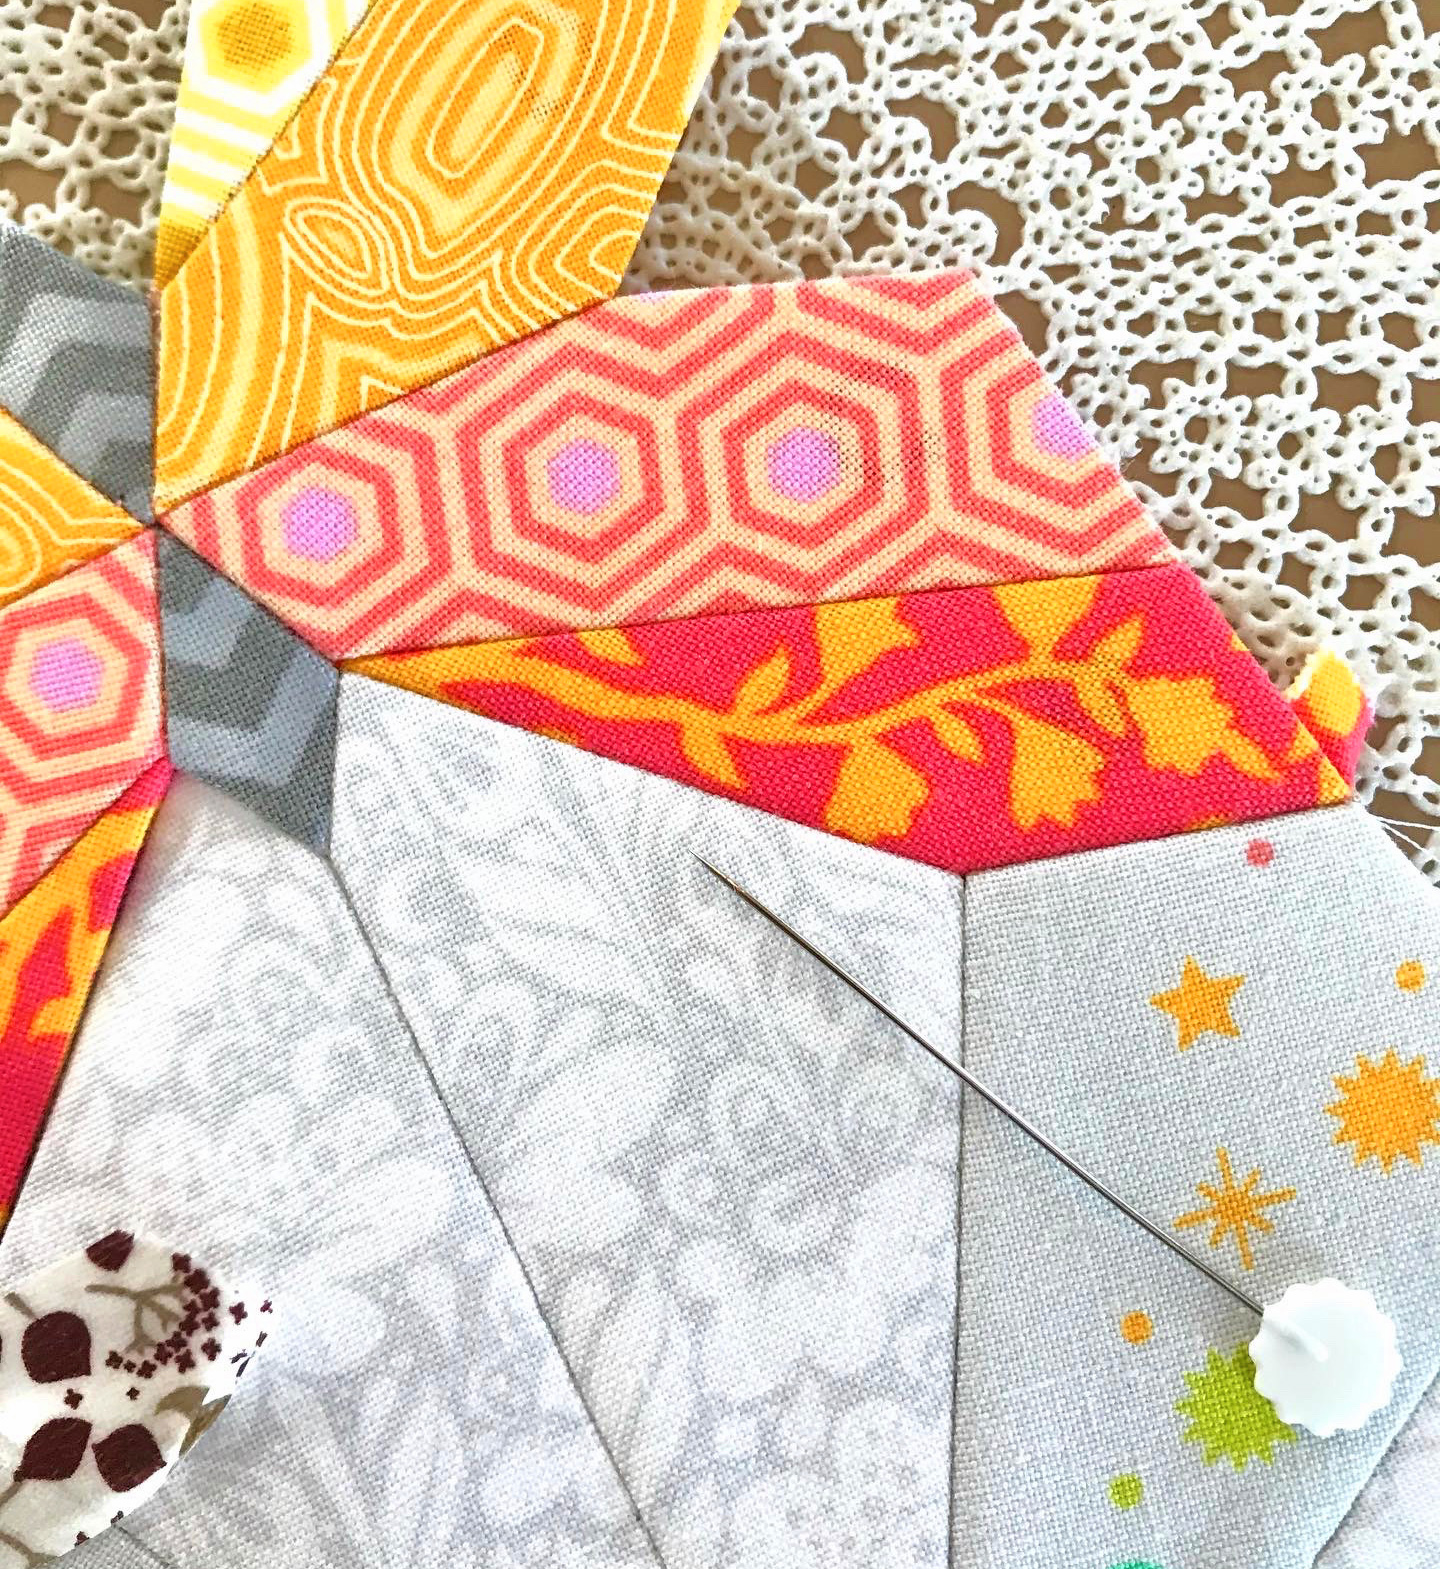
You can find the pattern for my Butterfly Charm Blocks here. All three butterfly designs are the same size and any can be used. The foundation paper piecing tutorial link included in the pattern is from Cassandra Madge and you can find it here. It was so sweet of her to use my pattern as the example for her tutorial!
Our methods of paper piecing are very similar, with just a few differences. I like to use the Add-A-Quarter Ruler, rather than a standard quilting ruler. It does the same job, but is just one of those tools that takes away some room for error. Another paper piecing tutorial I often direct people to is this video from Connecting Threads. You can see the Add-A-Quarter ruler being used.
When I paper piece, especially small blocks, I like to use Foundation Paper. You can buy one from Carol Doaks or you can use any thin newsprint. Someone recently mentioned they found this pack from Dick Blick, and you can’t beat the price! I also apologize that I don’t remember who tagged me on that, please let me know if it was you! It is essentially just a thinner paper that creates less bulk and allows for easier removal. You can use any paper for paper piecing, but the thinner you can find, the easier it will make the process.
Another thing I ALWAYS do is to trace the pattern onto the back of the sheet. It does not have to be perfect because you will only be using it for reference, but it helps in a multitude of ways. I use a lightbox, but you can also use a window. Since this is the side where you will place your fabric, you can use these lines as a guide for cutting your fabric pieces. You can still use the printed side, but you have to work with your fabric upside down at that point, and I like to see the prints and placement.
After tracing and selecting fabrics, I also note my fabric selections or color accordingly on this side. Then I always know I’m placing the correct piece. These lines also help you as you sew to make sure a fabric cut will cover a segment. Place the fabric where you would for your next seam, but before sewing, hold the fabric approximately where your seam will be and fold the fabric over as you would when pressing it after sewing. You can then see if your piece is large enough to cover everything it needs to. You can then sew your seam with confidence, because unpicking a paper pieced seam is NO FUN!
Lastly, I find having these lines helps prevent you from missing a segment, which is something I see a lot in paper piecing. When you have the pattern lines on the side where you are placing fabric, you will notice if you’ve missed a piece. You still have to pay attention, but it’s definitely better than flying blind!
In Cassandra’s tutorial, you will see her talking about adding some basting stitches to you sections to help when piecing them together. This is important and something I always do as well, however, I put my stitches in the seam allowance as you can see above in the left photo.
Another tip is that when trimming sections to the seam allowance after piecing, do not trim any sides that are on an outer edge (above right). This way you can trim your final block to size after it is completely pieced. It is not uncommon to lose a little bit in each seam, so this ensures you can have the correct sized block in the end, and also lets you trim the block to a slighty larger size, if desired.
After piecing sections, I always remove the paper from the seam allowance only before sewing sections together. This just helps with bulk and allows you to press a flatter seam before adding the next section. You can also see this in the above right photo.
• • • • • • • • • • • • • • • •
SELVEDGE POCKETS
For those who are new to sewing or do not know what a selvedge is, it is the finished edge on a bolt of fabric. There are finished edges on both sides along the width of the fabric, but only one will contain printing and this is the side I use on this project. I cut my selvedges off with about one half inch to one inch or so of the fabric print included, just to make sure I always have enough extra to work with them. The directions on how to work with the selvedges to create the pockets are included in the pattern.
• • • • • • • • • • • • • • • •
VARIATIONS
Below are more variations from makes on Instagram to help inspire you!
• • • • • • • • • • • • • • • •
TRIM
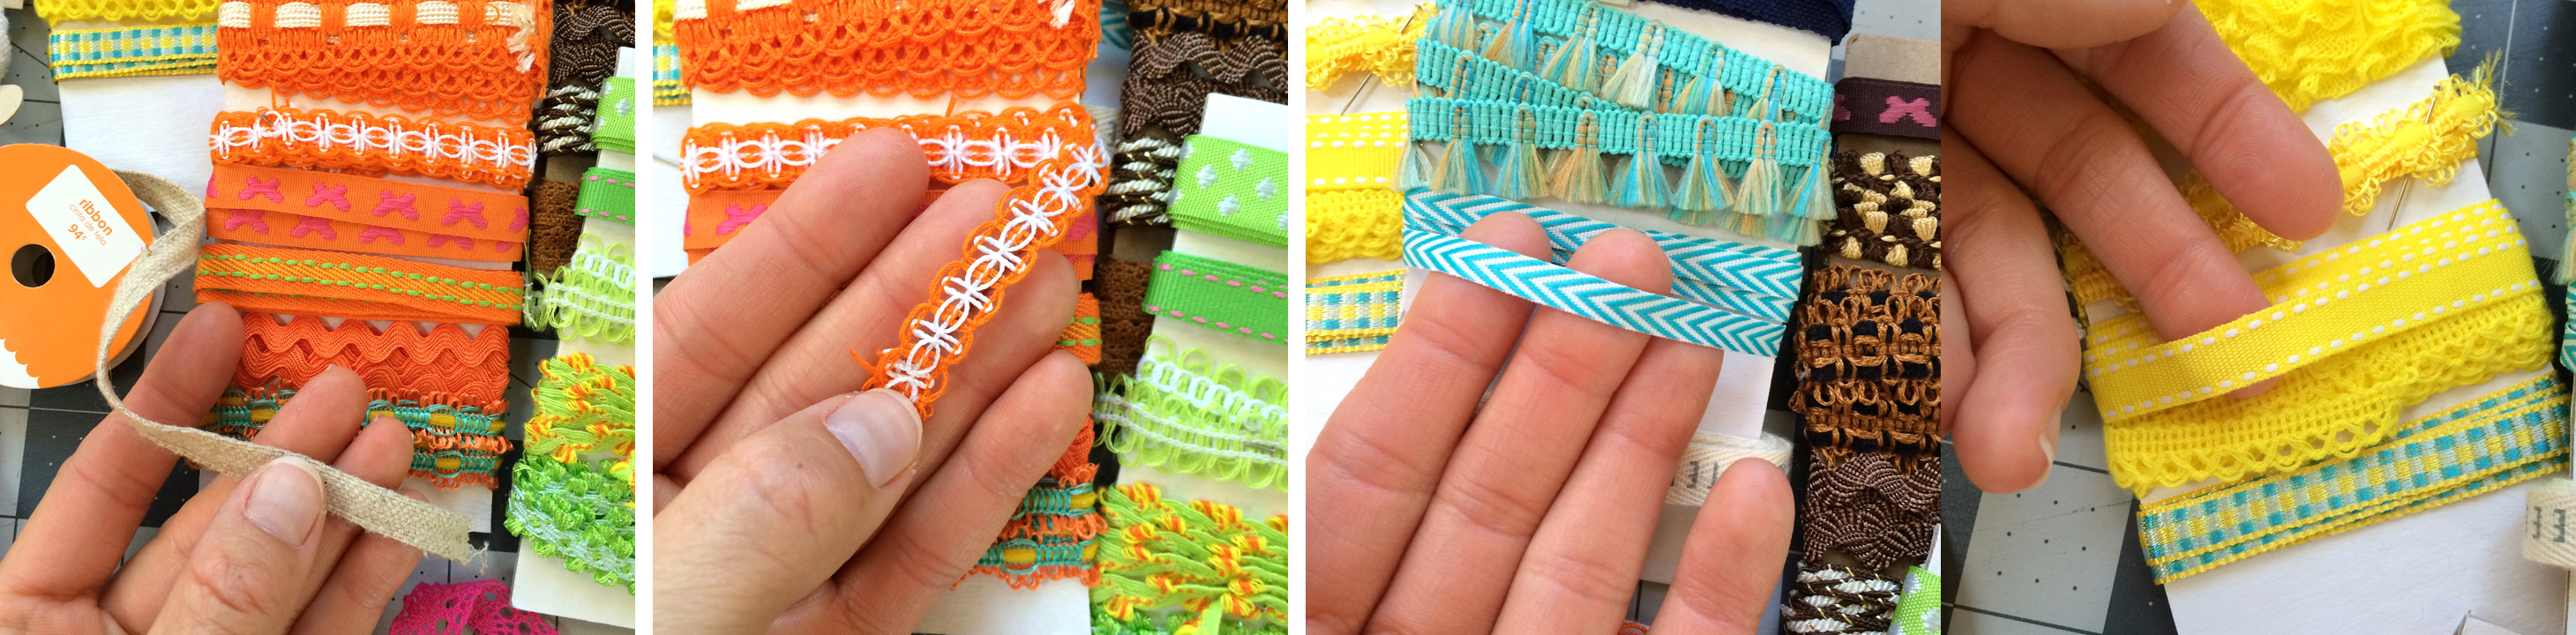
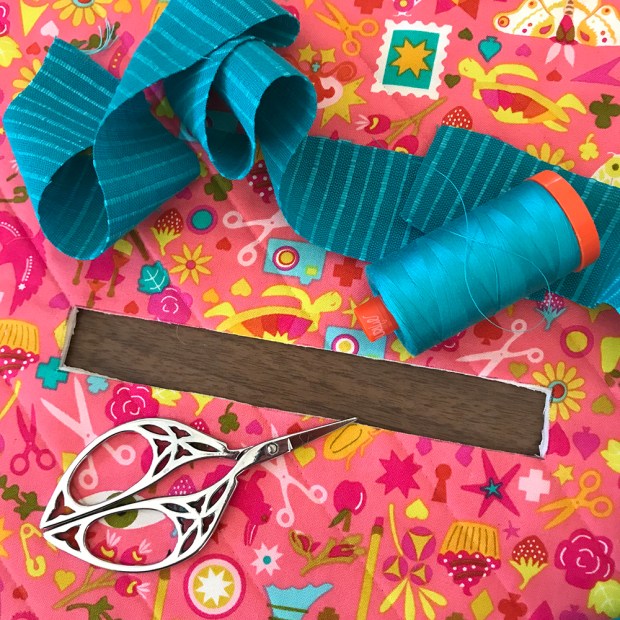
This pattern uses trims or ribbons for securing the secondary pockets and hiding the raw edges, and also for creating the side ties when using it as a machine cover. Below are some trims from my collection that I’ve found at Joanns, Hobby Lobby and even Walmart. Anything between 1/4″ to 3/8″ width is best. If it is too small then you will have trouble enclosing the raw edge of the pocket, any thicker and you cut into your pocket space. Trims that are more solid are best to hide the raw edges, but some lacier style trims can work ok, too.
If you don’t have any trims on hand, you can also use a thin bias binding strip instead. Start with a 1″ or 1.25″ cut strip, fold the raw edges into the center, then fold in half and press and use this as you would a piece of ribbon. You can also you another selvedge with the cut side pressed under. Lots of possibilities!
• • • • • • • • • • • • • • • •
POCKET BINDING
I like the look of the binding on the pocket because I think it balances the piece nicely, but if you prefer, you can eliminate this step and instead attach the lining to the pocket panel just as you did on the small secondary pockets. Just lay your lining piece, RST, on top of your finished main pocket panel and sew across the top with a 1/4″ seam. Flip the lining to the back, press, and top stitch along the top edge. You can include the fusible fleece when you do this, add it after tucked up to the seam, or skip it all together and use some lightweight interfacing on one or both pieces instead.
Above are a couple examples I saw on the #undercovermakermat hashtag on instagram that demonstrate this variation. If you have any questions about doing this instead of the binding, just let me know and I’m happy to help!
• • • • • • • • • • • • • • • •
Once your full pocket panel is complete, you will baste it to your mat body and bind the entire piece as covered in the pattern. BE SURE TO ADD YOUR SIDE TIES BEFORE BINDING! If you do not plan to use your mat as a cover, you can leave them off. I did forget to add them once and just had to unpick a little bit of my binding and tuck them in, which was not hard to do, so it’s not the end of the world if you forget, or even decide to add them later!
Just as with trim used to secure the secondary pockets, you can instead use a binding strip for your side ties, or even additional selvedges. If using a binding strip, simply top stitch along the folded edge to close it up. You can tie knots on the ends or stitch them closed.
Stay tuned next week for one more post talking about the thread catcher before we wrap things up on October 28!
Honestly, I’ve been wanting to do this tutorial for adding a handle opening to the Undercover Maker Mat for YEARS… but I feel like that’s basically the story of my life! For all who have been waiting, I appreciate your patience! Once great thing about this is that you can add it at any time to any mat – finished, or not. It’s sort of an afterthought, per say, and doesn’t affect anything in the pattern.
Most of my machines do not have handles, so this new little travel machine came into my life at just the right time! This process hurt my brain just a teeny bit, but in the end it’s really pretty easy! I’ve done my best to capture it in photos and I hope it will all be easy to follow (and I think it will once you’re actually doing the steps), but if you have any questions, never hesitate to contact me here or through social media.
This tutorial is for binding the handle opening, however, if you are familiar with facing, that technique will most certainly work for this!
Just one note, I cannot guarantee that this tutorial is detailed enough for complete beginner sewists who are working on this project. There are no complicated techniques, but you may need to familiarize yourself with basic binding techniques to understand some of the terminology and techniques used.
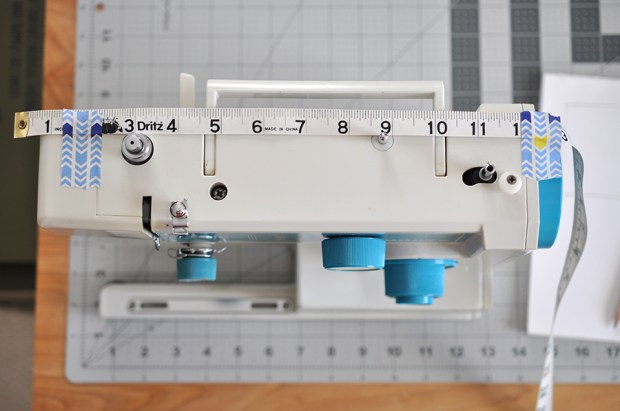
The first step in planning for your opening is to measure, then measure again, then measure about 17 more times. I’ll tell you it is PAINFUL to cut into your precious quilted body, so be sure to check yourself! I took so long doing it that my husband started to make fun of me, but it was worth it. Keep in mind how wide your mat is in relation to your machine and be sure to place your measuring device accordingly. You can see how mine is hanging off the edge a bit. You will need your opening to be just large enough for your handle to slide through. Mine ended up being a little less than 6″ by 3/4″. Your binding will only shrink the opening a very small amount, so you don’t need to take that into account. Also remember, you can always cut the opening larger, but you can’t make it smaller!
When you measure the placement of the opening around the height of the machine, be sure to leave some slack in your tape to account for the bulk of your quilted body. I used the bobbin winder pin on the top of my machine as a gauge. To double check my measurements, I placed my mat body over my machine and placed the tape measure on my mat. I felt the bobbin winder pin through the mat and noted where the tape measurer hit it. I then removed the mat and placed the tape measure in the same spot on the bobbin winder pin and checked my measurements against the handle. Every machine will be different, so figure out what method works best for you in determining your measurements.
Once you have your measurements, mark them on the body of your mat with an erasable pen or your preferred method and then check your placement again by placing the mat over your machine and feeling through it as best you can to see if the handle is lining up. Then its time to cut! Terrifying, I know. You can do it!
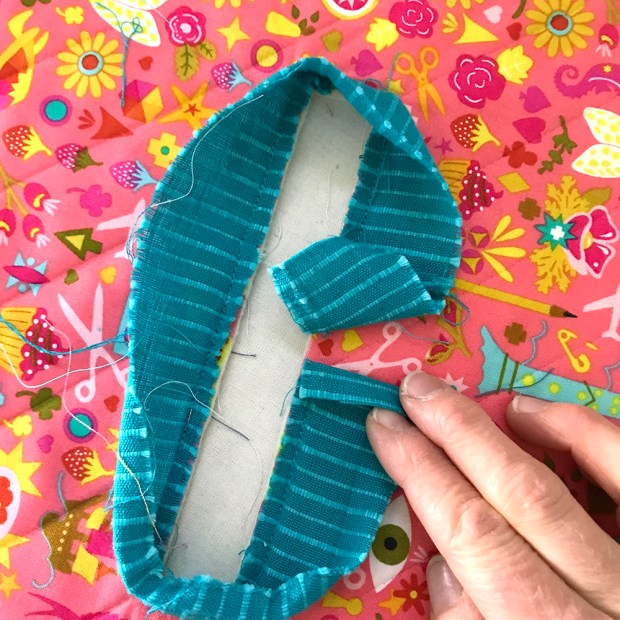
Now will you bind the hole. It’s much like binding the outside a quilt, but you handle the corners differently since they are inside. We will be using a single fold binding method. Cut a piece of binding fabric 1.5″ wide with the length being the diameter of your rectangle plus about 4″.
First, you will mark 1/4″ all the way around the outside of your rectangle on the top/outside of your mat. You will see in my photo above that I have stitch lines 1/4″ around my rectangle. This is from my initial failed attempt at binding that I tore out :D! Since I could see the lines, I did not need to use another form of marking, but you can use an erasable pen or you use a basting stitch.
Next you will clip diagonally into all four corners just shy of your 1/4″ marks as show above. You will now sew the binding down.
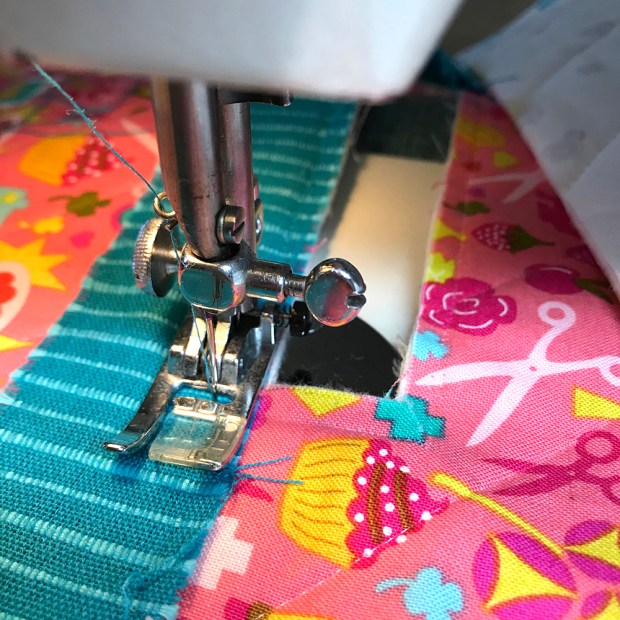
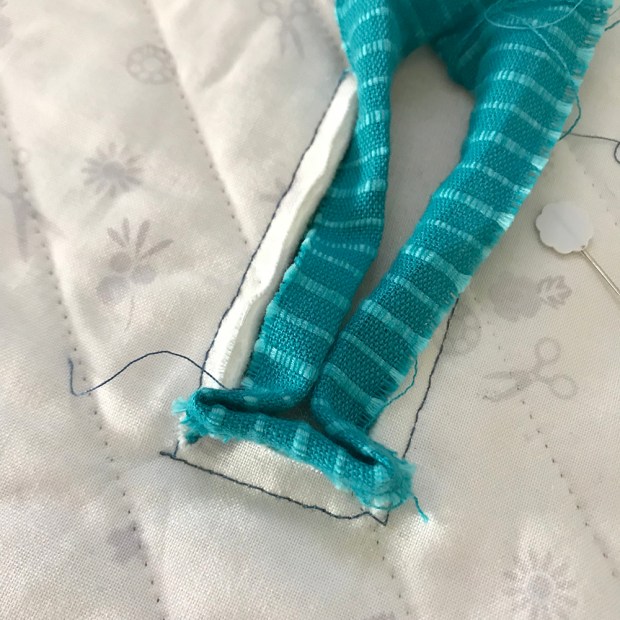
You will begin sewing the binding down along one long edge of your rectangle. I did not get a photo before I started sewing, so we’ll use this photo above as a reference for placement. Leave a small tail of unsewn binding for finishing later.
You will place your binding right side down onto your mat body and sew with a 1/4″ seam allowance. When you get to a corner, continue sewing 1/4″ past the opening of your rectangle, which will be indicated by your 1/4″ marks around.
Here’s where it gets just a bit fussy. It’s not difficult, it just takes a bit of finagling under your machine. With your needle down, lift your presser foot and pull the short side of your rectangle opening toward your presser foot so it is in line with the seam you just sewed. The little snips you made in the corners will allow you to do this.
You will then continue sewing your binding strip in a straight line onto this side. If this seems confusing when reading it, I promise it will make sense once you’re sewing. You will continue sewing all the way around your opening, repeating this process on all four corners.
When you get back to where you started, press one end of your binding strip back about 1/4″ and then lay the other end on top of it, trimming it about 1/2″ to 3/4″ past the overlap. Pin in place and finish stitching the seam securely.
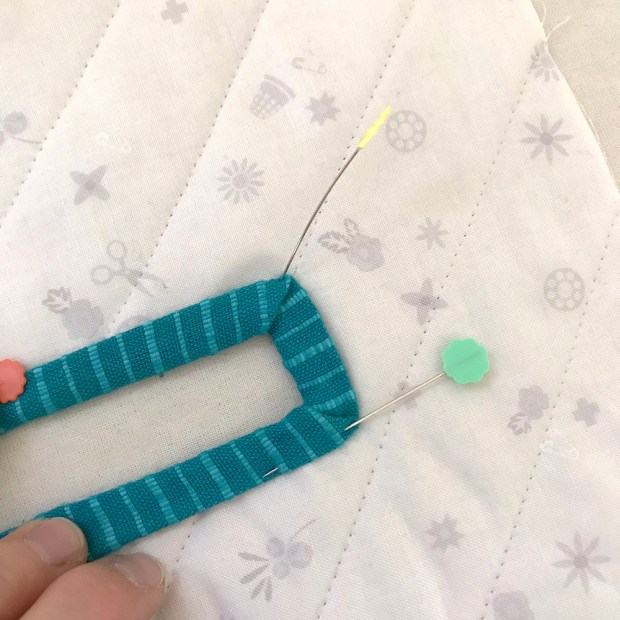
Now it’s time to press and turn the binding to the backside. Once complete, you can hand or machine stitch it in place, just as with an outer quilt binding.
Press your binding along the seam toward the hole opening to help it lay flat. You will now miter the corners working on one side at a time. First press one long edge inward and then miter one corner of a short edge as shown above, folding the outer point in to form a 45° angle and press.
Next, fold the other long edge in mitering the corner in the same way and press. Repeat with the other side of the opening.
You will then turn the binding through the opening to the underside of your mat and you will work on pressing and mitering that side. Don’t worry about your miters staying perfectly in place. Just make sure you gave them a good press before turning and they will fall back into place.
If you’re opening is small (and even if not), you may find the next steps a bit fussy, but just take it one step at at time, and you’ll get it done!
Working along one edge at a time, fold the binding strip onto itself, wrong sides together, up to the edge of your opening and press. Repeat for all four sides and feel free to use some glue to help keep it down!
Your piece will now look something like mine above once all sides are pressed. The Mariner cloth I am using was getting a bit frayed because of it’s loose weave, so I had a little trouble keeping things “crisp” for the photos.
To miter the corners on this side, first press one folded short edge down onto the mat down body. You will see above how the miters start to form with the one sides. Next press the long side down onto the mat, mitering the corner into itself as you can see above.
Repeat this step for all four corners, using pins or glue to help keep everything in place. It likely will not be perfect, your corners may be a little sloppy or your wrap around may be a bit uneven, but no one will see it, so don’t stress!
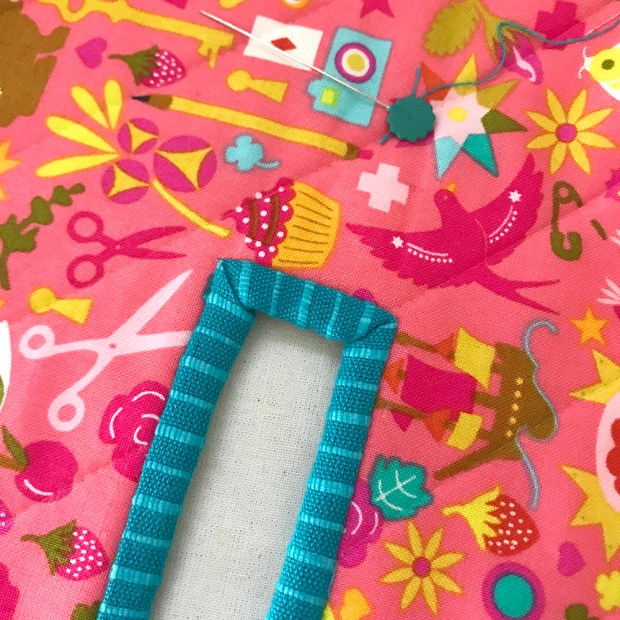
Finally, check that your miters are in place on the front of your mat and hand or machine stitch the binding in place. Now step back and admire your work as you look around for anything else you can cut a hole in!
I hope you have found this down & dirty tutorial helpful and useful! I’m so pleased with how it worked out on my mat and I hope you are, too.
I’m a bit behind schedule on the SAL, but I’ll be sharing some tips on the pocket panels in a couple days so stay tuned! Also, if you’re just joining in, you can find the free pattern and all the details here.
Last month, I had the opportunity to participate in a really fun Blog Hop for an awesome “block of the month” type quilt from Cotton Cuts called the Puzzle Mystery Quilt. This is seriously such a cool concept! if you haven’t heard of it before, this is how it works…
The club begins in February or July and runs for one year, with a new quilt theme each year. (And before I forget to mention it, sign ups for next years Mystery Quilt beginning in February start TODAY! Click here for all the details.)
The current Mystery Quilt theme that I was part of is Through the Garden Gate. When you sign up for the club, you choose a colorway and finished quilt size. The colorways/fabrics for the Spring Puzzle Mystery Quilt (PMQ) are so fun! There is always a variety of styles to choose from. Some of the upcoming spring choices include Panache by Rebecca Bryan, Fable by Rae Ritchie, Diving Board by Alison Glass and many more.
Each month you receive a packet of PRECUT fabric (the best part!) and directions on piecing that month’s blocks or block parts. The mystery aspect is that you have no idea how it will come together until the last month when you receive directions on how to piece all your parts together.
What I love most about this is how quick and easy it was. Because the fabrics come precut, you just sit down for about an hour of sewing and that month’s blocks are done. This is something I COULD ACTUALLY KEEP UP WITH! Right?!
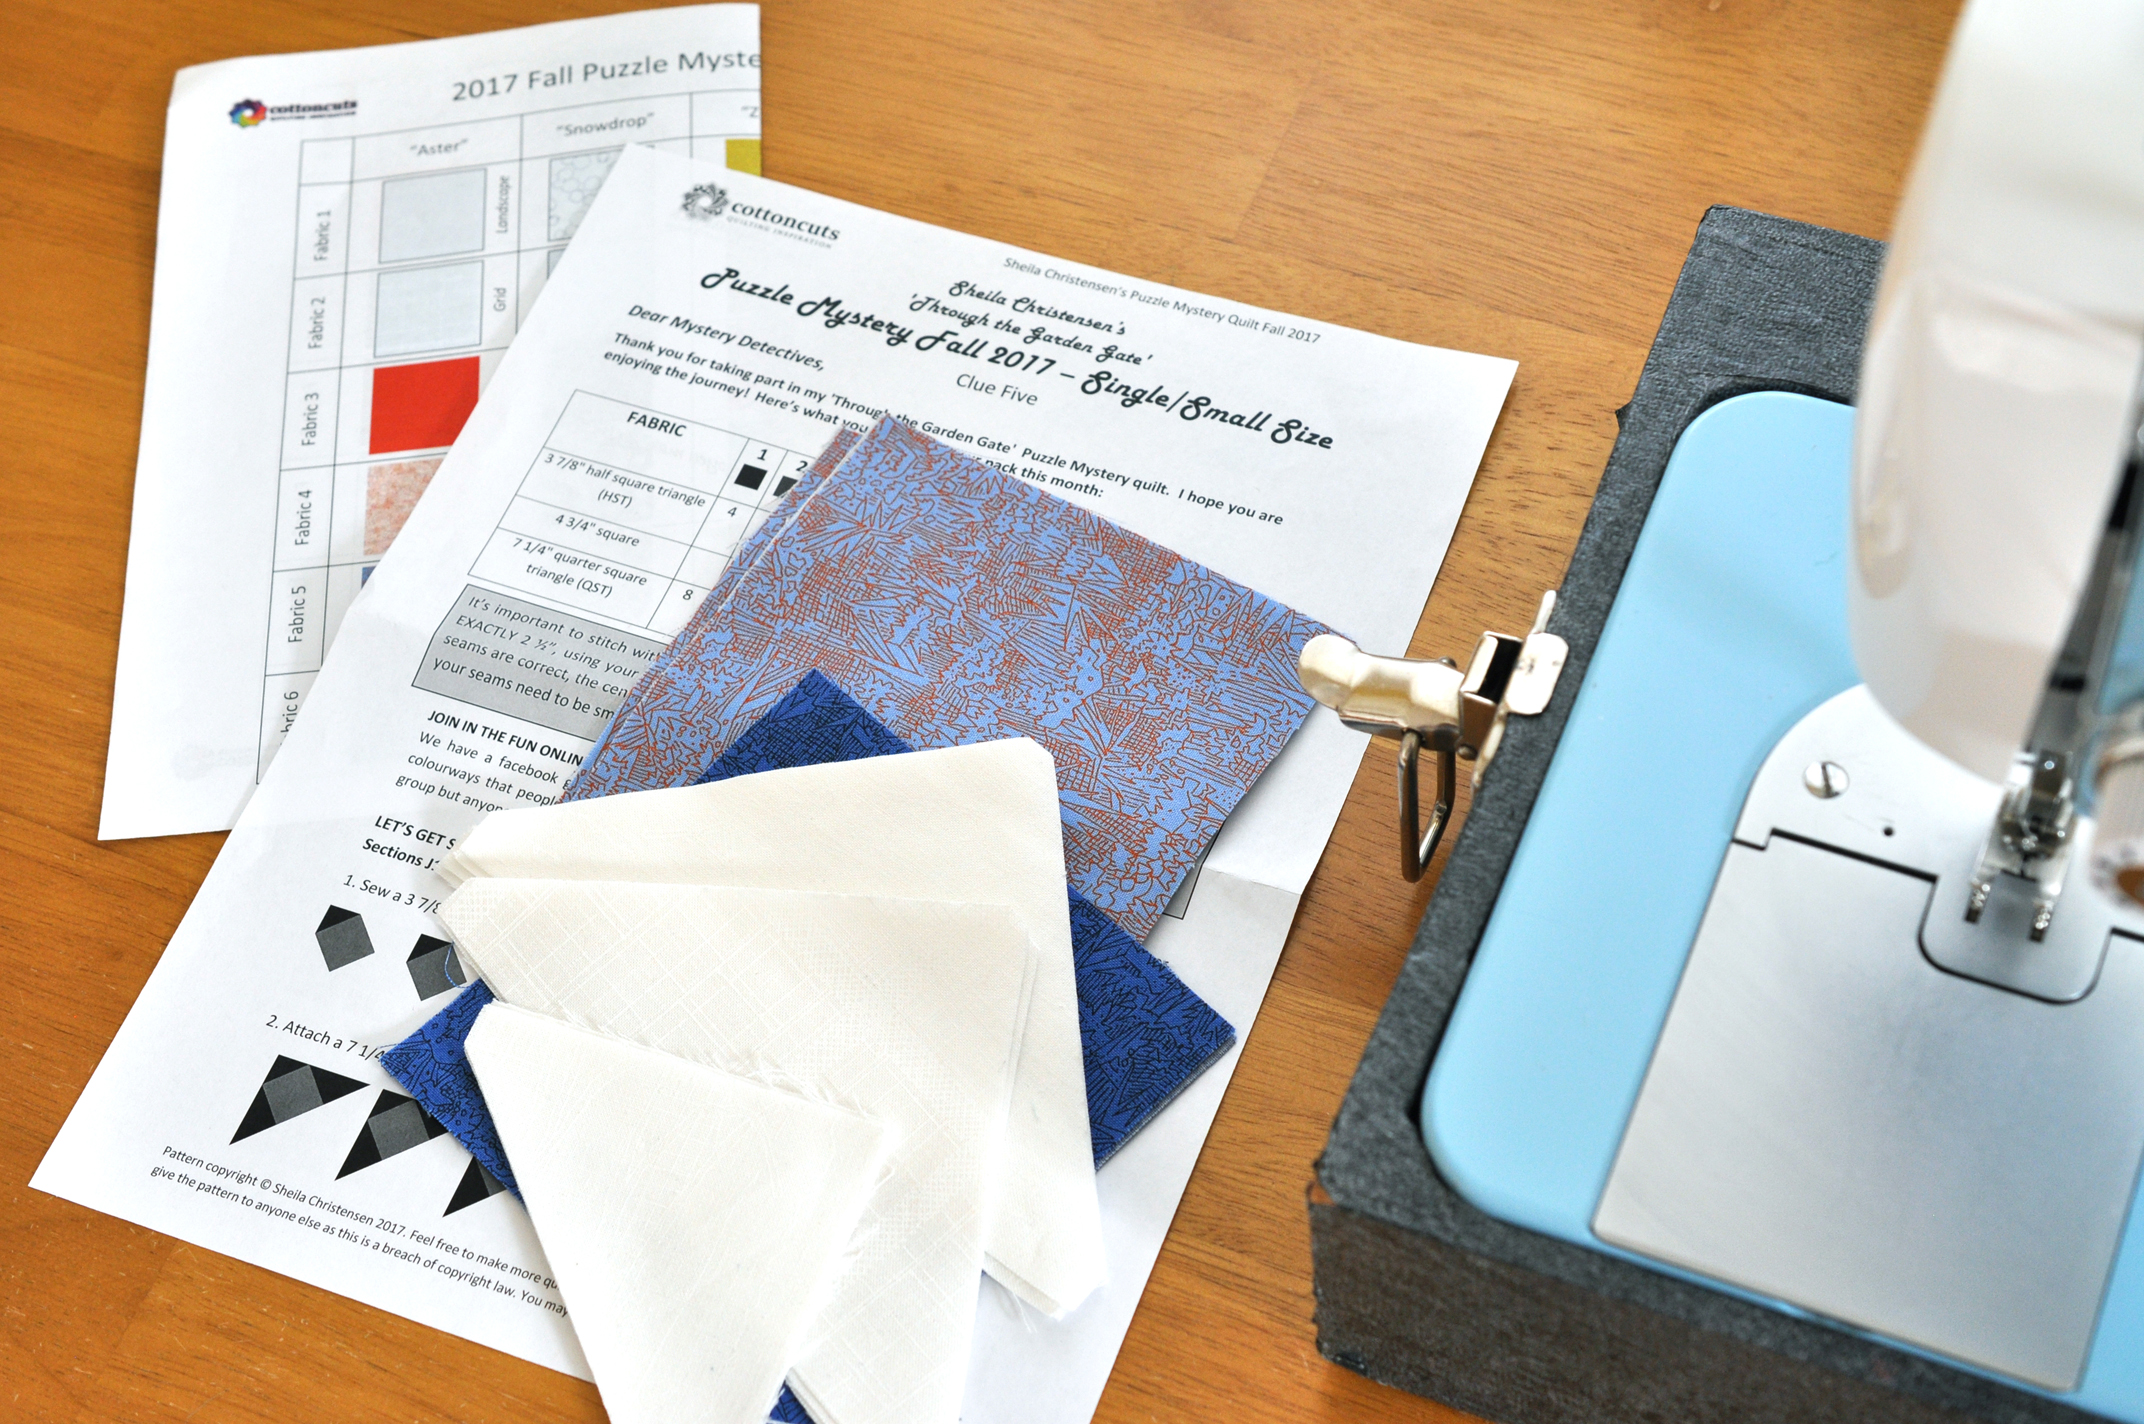
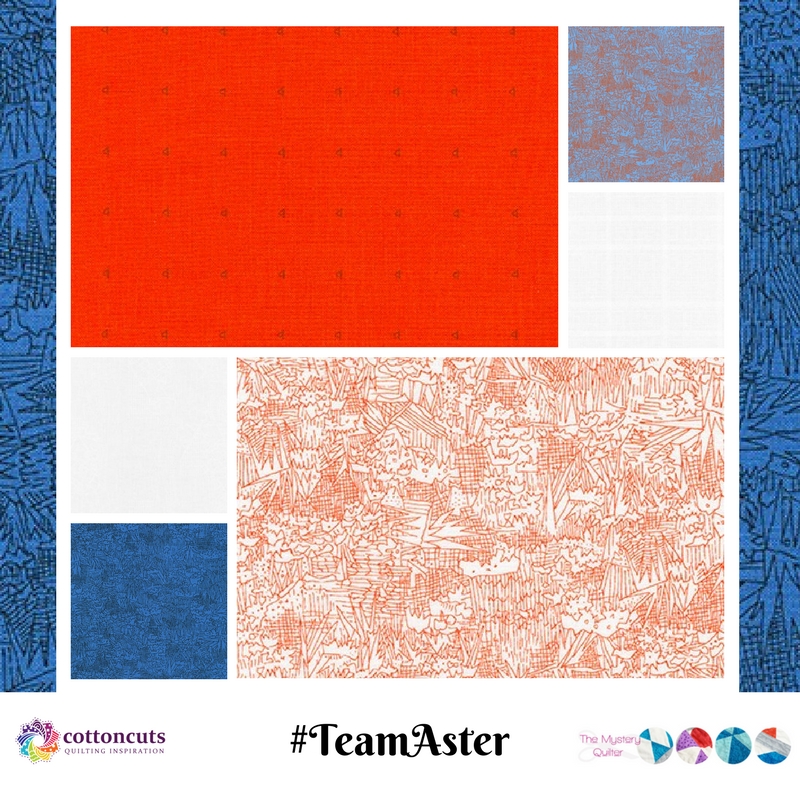
So, when you join the club, you make the entire quilt yourself, but to help spread the word and make an awesome quilt for Charity (which you can enter to win, read on!), Cotton Cuts asked a group of us to each make one month’s blocks. The colorway we worked on is the Aster colorway which is a mix of Carolyn Friedlander fabrics. Below you can also see the other colorways from the 2017 PMQ.
Here is an example of what you receive each month, your precut fabrics and direction sheet. It was really easy to follow and took me about 45 minutes, if even, to sew all my parts.
In the end, below are the November “blocks” I sewed up. I am so anxious to see how these all come together! Everyone who has participated has sent their parts back to Cotton Cuts for them to assemble the final quilt which will be raffled off to benefit Valley Industries.
As I mentioned in the beginning, sign ups for the 2018 Puzzle Mystery Quilt are now open! You can see all the colorways and learn more here. I’m really torn between the Dublin and Helinski colorways – which is your favorite??
You can check out the previous and upcoming clues through the Blog Hop here:
July – Sheila Christensen (www.mysteryquilter.com) with guest blogger Kim Moos
August – Yvonne Fuchs (www.quiltingjetgirl.com)
September – Teri Lucas (www.terificreations.com)
October – Wendy Welsh (www.wendysquiltsandmore.blogspot.com)
November – Nicole Young (www.lillyella.com)
December – Chris Dodsley (www.madebychrissied.blogspot.com)
January – Amy Smart (www.diaryofaquilter.com)
February – Sam Hunter (www.huntersdesignstudio.com)
March – Cheryl Sleboda (www.muppin.com)
Howdy, friends! I’m here today with a short post about planning my Moonstone Quilt. There is a high likelihood that all of this may only make sense in my own head, but planning this was a HUGE struggle for me, so I wanted to share my thought process in case it does happen to help anyone!
First, if you haven’t seen the Moonstone pattern by Giucy Giuce and Karen The DIY Addict, you must check it out! (You can find it here.) Moonstone is an English Paper Piecing pattern (aka hand sewing!) and it comes in a fantastic kit complete with all the pieces you need to make a quilt, or several small projects, along with acrylic templates for cutting your pieces. The kit and pattern are really well done and I think the design is just so striking! It was just recently released, but there are already a handful of really inspiring photos on social media under #moonstonequilt.
AAANNDDDD… there just so happens to be an AMAZING giveaway going on right now where TWO lucky winners will be flown to San Fransisco to hang out with Giuseppe and Karen for the launch of the Moonstone Sew Along! You can find all the details here.
Ok… onto my quilt!
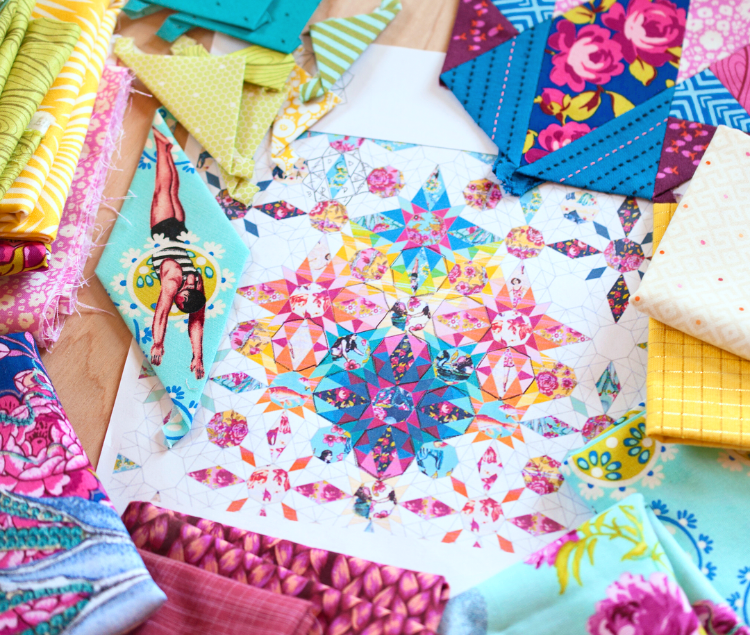
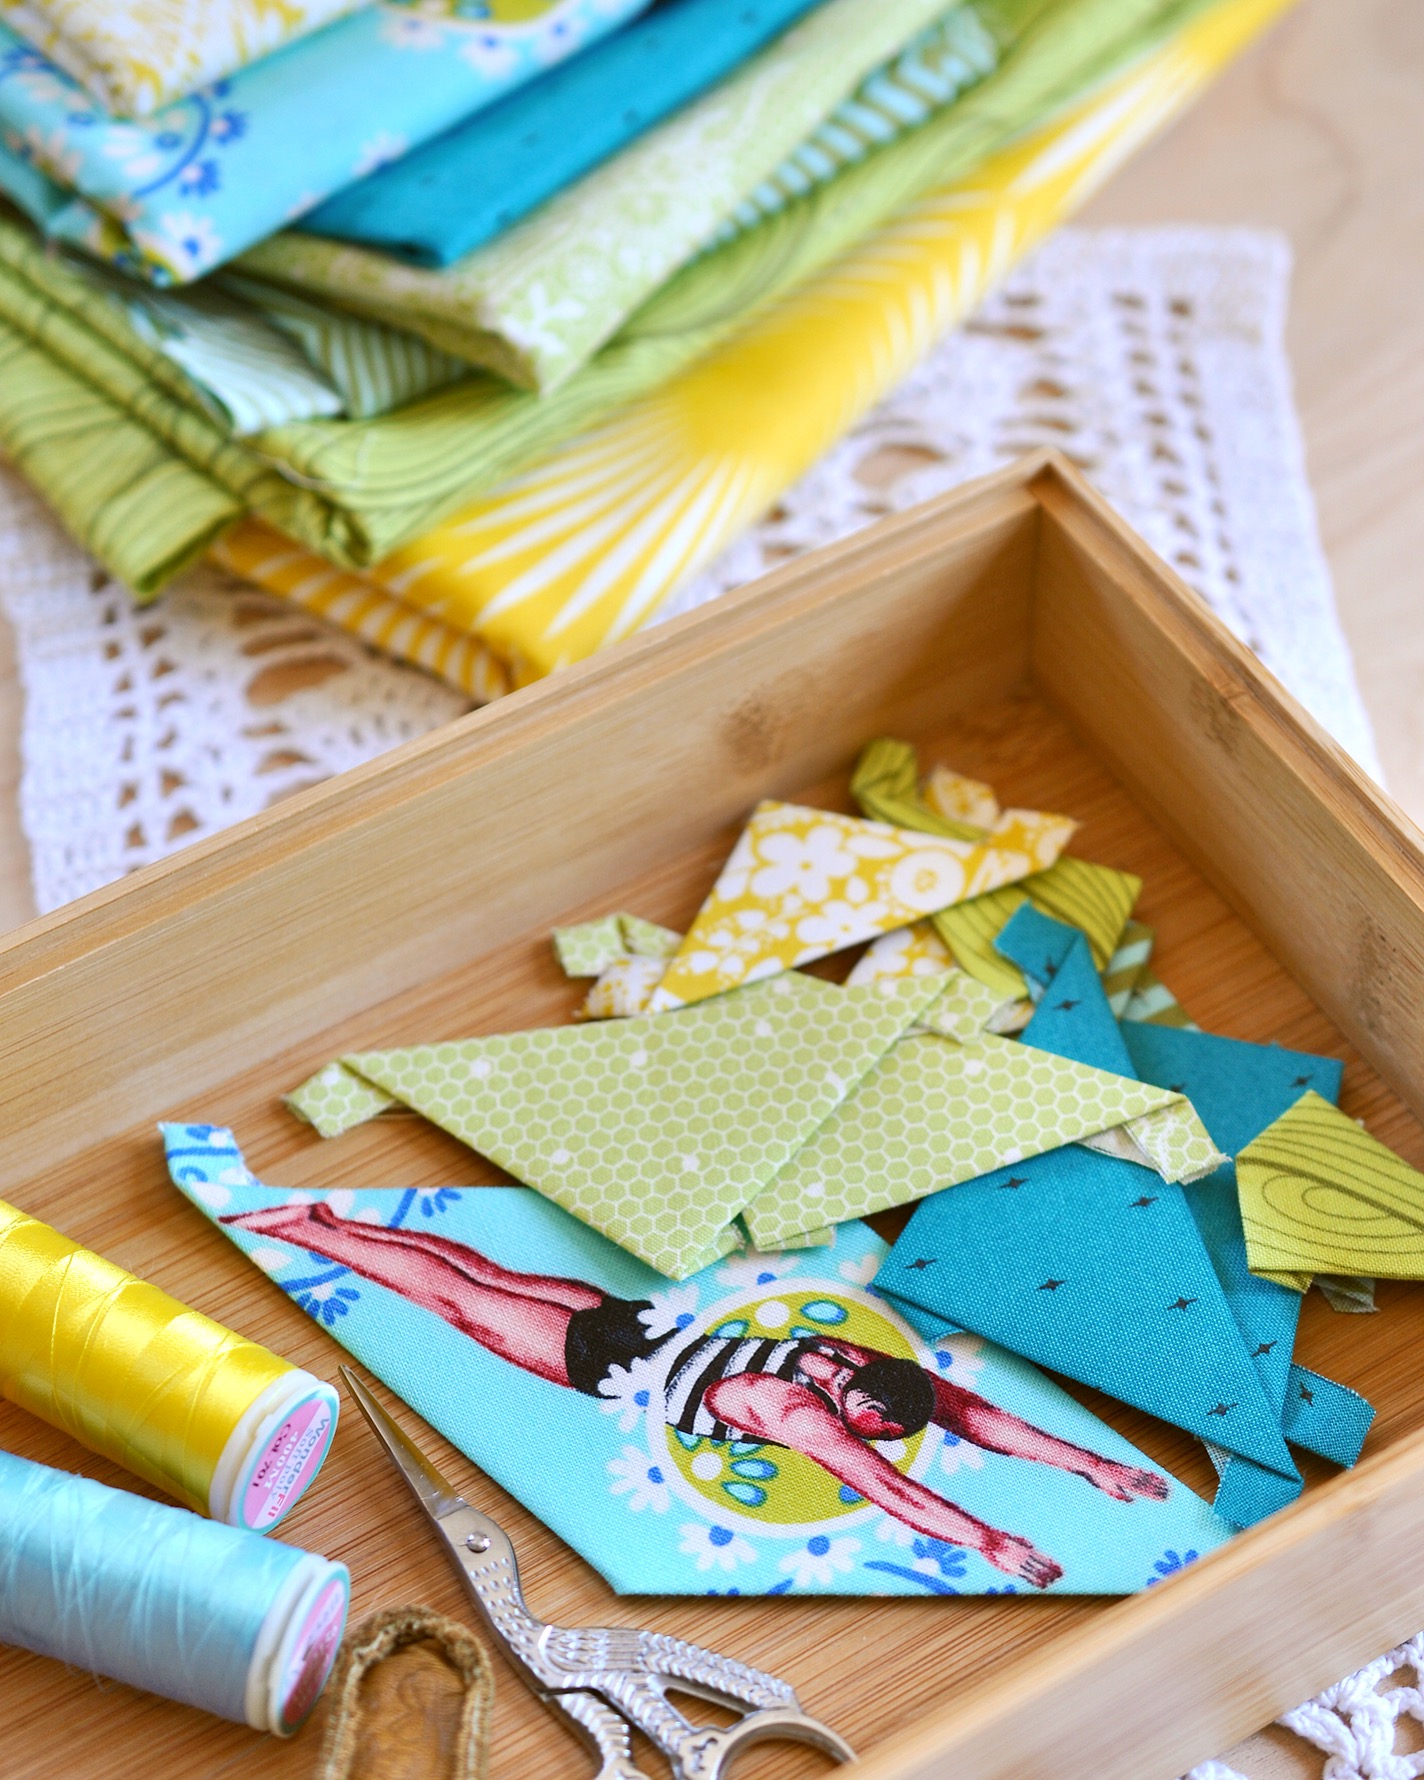
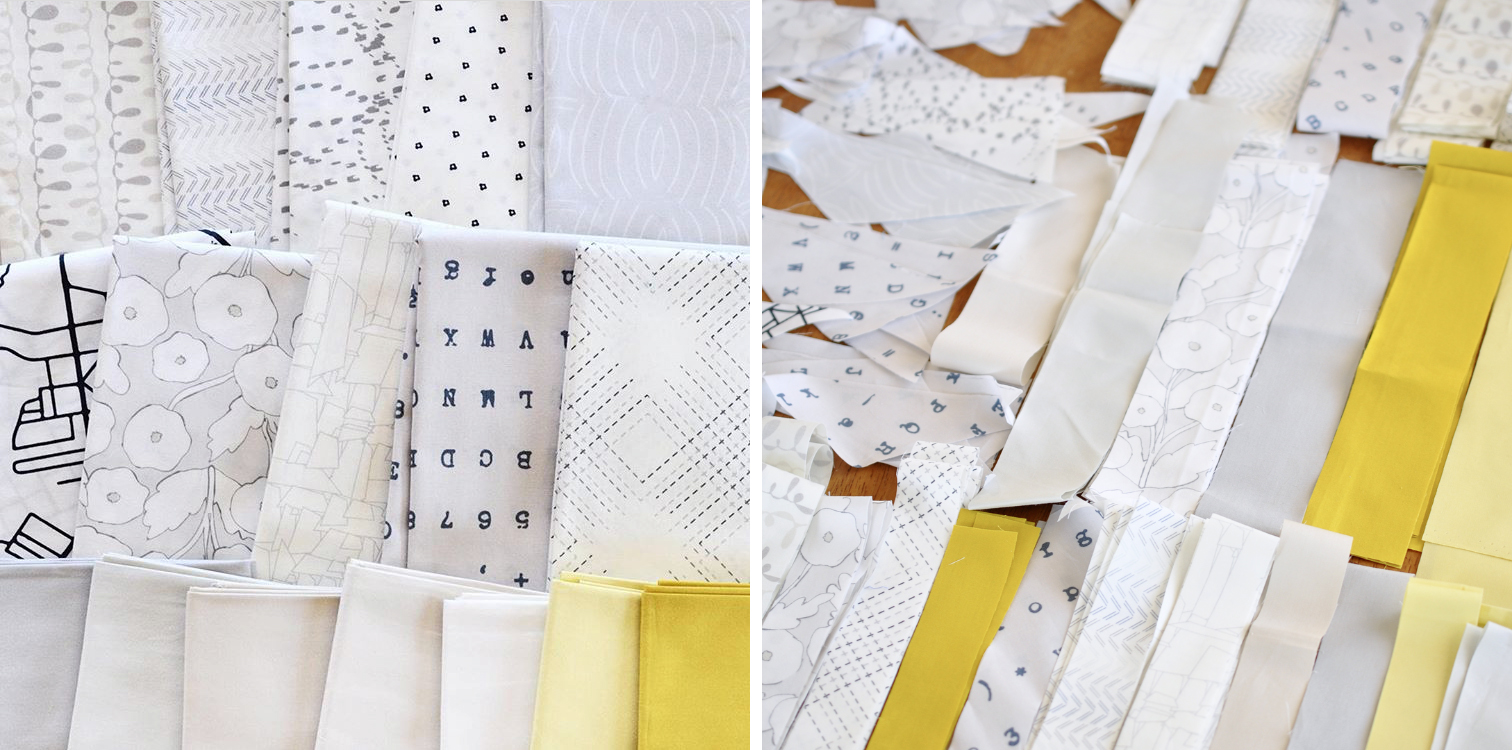
For my Moonstone quilt, all I knew was that I wanted to use the new line, Neptune and the Mermaid by Margot Elena (Tokyo Milk) for Free Spirit Fabrics. It’s absolutely dreamy and seems like it was just made for fussy cutting. That’s as far as my plan went. I couldn’t even decide what configuration of the pattern I wanted to use.
So I stared, and stared, and stared some more. I only chose a few of my favorite prints from the line, but was really struggling because there is a lot of variation in color in what I chose. As a whole, the line ties together, but when you just pick and choose some prints, not quite as much.
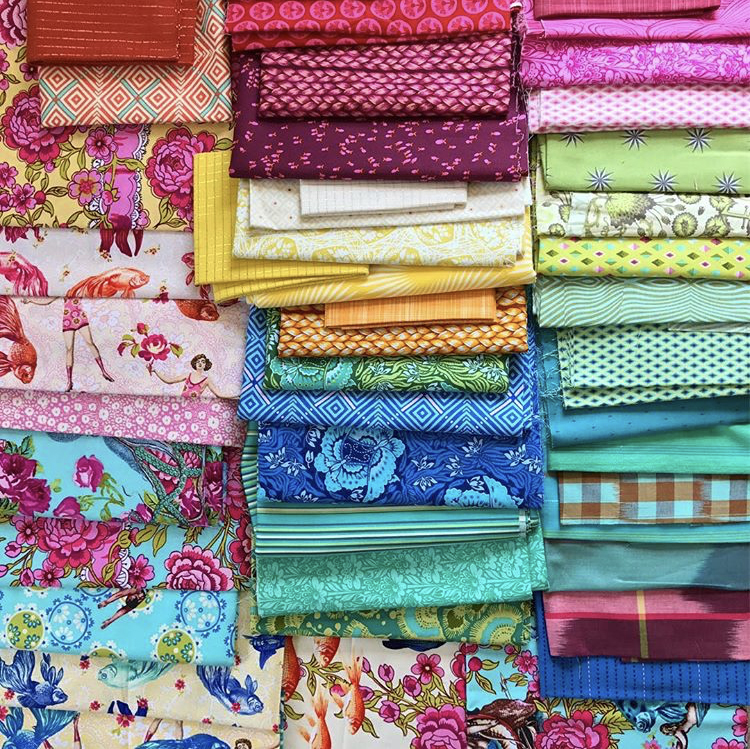
I started to pull some blenders in every color used in all the prints I had and decided that a Free Spirit Fabric designer mash up would be the way to go. I pulled what I could from my Tula Pink and Anna Maria Horner stash, and order a few more things by those two ladies, as well as Amy Butler and Heather Bailey.
I hadn’t really planned to use this many colors in the quilt, but once I saw them all together, how could I not? I had to figure out a plan. I organized all the blenders by color and took some photos. I spent a good amount of time looking at the photo of all my focals and then at the photo below of all the blenders. I stewed about it for awhile, as I usually do with projects. I kept hoping something would come to me.
And then I stewed some more. I mean, I stewed A LOT. I thought about while I walked the dogs, while I did dishes, I’m pretty sure I even dreamed about it.
Something that many of you likely already know about me is that I am a planner. Hard core. I so desperately wanted to start cutting and sewing, but knew that I had to figure out where it was going first.
So I thought about the focals and how I would fussy cut them. I took photos of all the parts I planned to use and thought about the main colors in each of those parts, then I made a list. This helped me figure out how many variations I had to work with in my design and how I may be able to organize them.
I kept going back to the idea of a color fade. Perhaps diagonally across the quilt or something, but I couldn’t make that work. I ended up order some of the dark blue color way of the Neptune line because I felt like I was going to need it to balance everything out.
It was time to make some decisions. First, I had to pick a pattern configuration and then I just had to start playing.
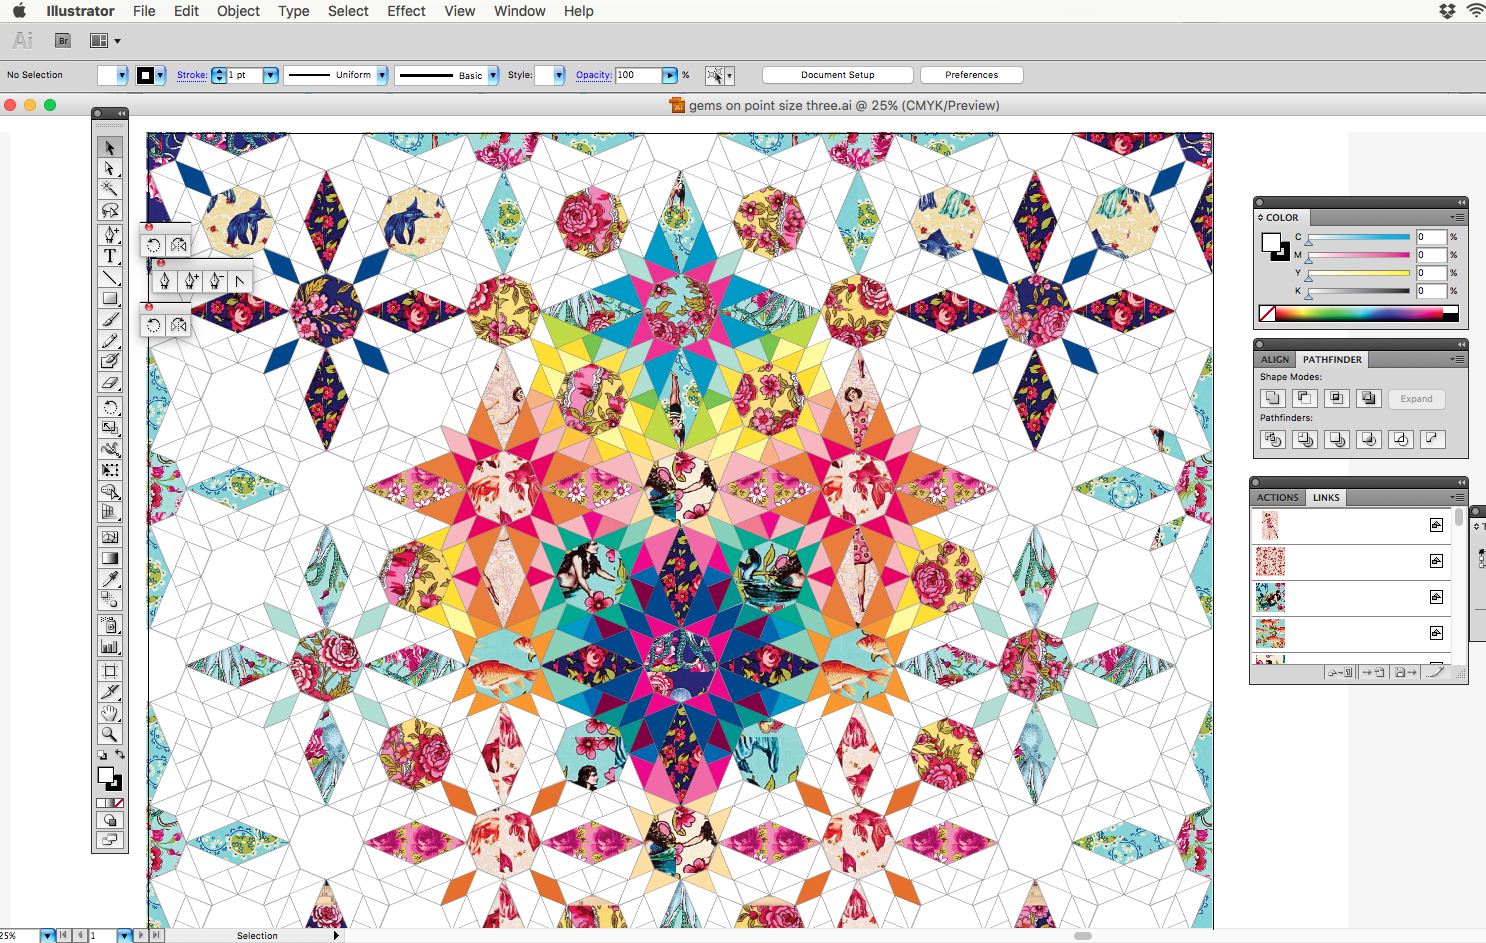
I use Adobe Illustrator for most of my drawing and layout. I understand many people do not have this program, so these next steps may not be helpful for everyone, but it is a great program that anyone can use with a little patience and a few YouTube tutorials!
I really loved the Gems configuration of Moonstone because I love the four pointed stars it makes, but I wanted my fussy cut focals to run horizontally and diagonally because they are primarily people and fish, so I rotated the gems configuration 45° to what you see below. I drew up the pattern in Illustrator so that I could begin placing my fabrics and colors.
I input JPG swatches of the focal fabrics and turn them into pattern swatches so that I can place them into shapes. It’s not perfect, but it definitely does the job!
Once I had the pattern drawn up, I stared at the blank canvas for a bit until I decided which shapes I wanted to focus on. I settled on the large four-pointed stars that you can see around the outer edges and their center octagons. Everything would radiate from these. I started playing with those elements only and trying different repetitive color arrangements.
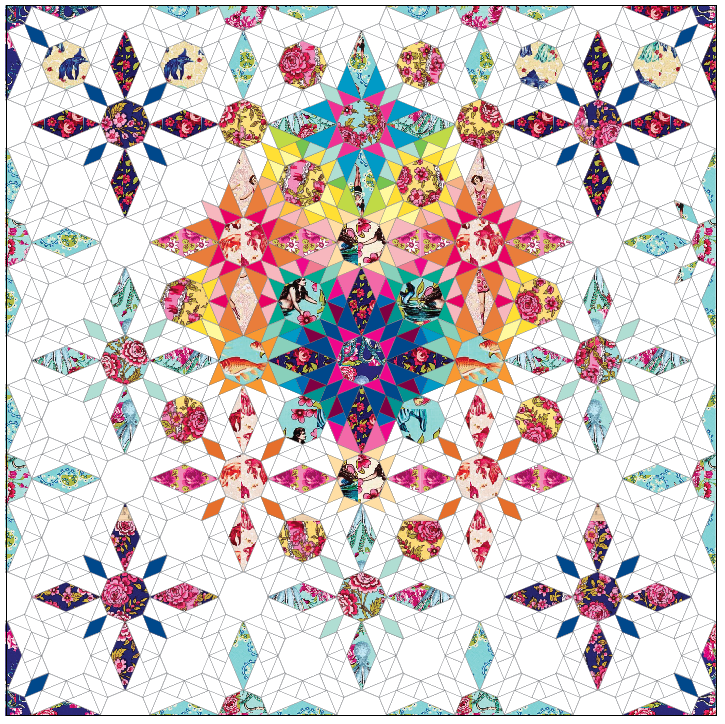
I was going a little crazy with all the possibilities so finally just chose my favorite and started filling in the spaces between. I still really wanted to achieve some sort of color gradation and began trying to do that between the stars. It took some time, but I finally felt like it was moving in the right direction!
Once I reached the point shown above, I felt confident enough about the direction that I could start sewing.
A good part of what I’ve already laid out will repeat around, but I do still have a bit more to work out. All in good time…
In the meantime, I can sew! I finished my first piece yesterday and have my second prepped. My plan is to work out from the middle of the quilt so that I can stop or keep going at any point. My current design plan is about 65″ square.
There’s no question that this quilt will take me quite awhile to finish, but I know I’ll enjoy the process, and that’s what matters!
Calling all my Southwest friends in or around New Mexico! (Or anywhere in the world who may want to get away for a couple days!)
My other half, Sariditty, and I are so excited to announce that we’ll be teaching our SARIELLA Saki Butterfly Quilt Workshop will be at Hip Stitch in Albuquerque, New Mexico on August 12 & 13. During this two-day class, you will learn all the basics of Foundation Paper Piecing and Appliqué, as well as how to tackle these techniques on a large scale, while you make a Saki butterfly quilt of your own. Basic knowledge of quilt piecing is required, all skill levels welcome. The class runs from 9am – 5pm both days. The finished quilt measures 75″ x 58″.
In addition to the workshop, we will also be doing a Trunk Show at Hip Stitch on Friday, August 11 at 6pm. All are welcome! Admission is $10. We will be sharing some of our work, as well as talking about our favorite modern quilting tips, tricks and techniques. There will also be some amazing door prizes!
The cost of the Saki Quilt Workshop is $200 and space is limited to 20 participants. Cost includes paper pattern, pattern templates, and admission to the trunk show. A materials list will be supplied upon registration. Sign ups are now open and you can register by calling the shop, visiting their website, emailing them, or just stopping in!
Earlier this year, Art Gallery Fabrics asked if I wanted to play with any of their new collections, and when I first saw Lower the Volume, I immediately knew I had to make a quilt. I have been wanting to make a low volume quilt for some time and this was the perfect opportunity to finally do it. Shortly there after, Mister Domestic asked me to be a part of his sewing party showcasing the new AGF Capsules and Fusions lines, to which I replied, “of course!”, seeing as I already had this plan in the works, and who doesn’t want to party?! But then I went into panic mode…
I knew there was no way I could finish this quilt “on time”. My thought was that I should make something else so I would have a beautiful finished product to show off when it was my day on the tour. This is what I typically do and how I always think. The problem with this is that I never let myself do the “big projects” that I really WANT to do, because I never have enough time to complete them.
I am a slow sewer, and I mean SLOW. This is partly because I just physically move slow and meticulously when I create, partly because I’m always working on about 13 things at once, and partly because I just don’t have a lot of time to sew, especially when spring hits and it’s time to tend to the land, or when my husband gets extra busy at work because sh*t is hitting the fan somewhere in the world.
So, there you have my little chunk of a quilt top in progress. I have no idea when I will finish it (though I’m super excited to because I am LOVING it!), because I’m not even done typing this blog post and already stressing about the new deadlines I have ahead of me next week.
Showing off this unfinished top for my day on the blog tour is painful and embarrassing for me. I’ve been feeling disappointed in myself all week and I know that’s just ridiculous, right?! We are always striving for a picture of perfection, even though every one of us knows that is never what life is actually like behind the scenes of social media. But, despite these feelings, I’m really glad that I chose to continue with this selfish sewing project, to let myself make something that I really wanted to, and to try and be more comfortable with being “less than perfect”. I do hope you like what you see thus far, though, and help cheer me onto the finish line!
· · · · · · · · · · · · · · · · · · · ·
ABOUT THE FABRIC & PATTERN
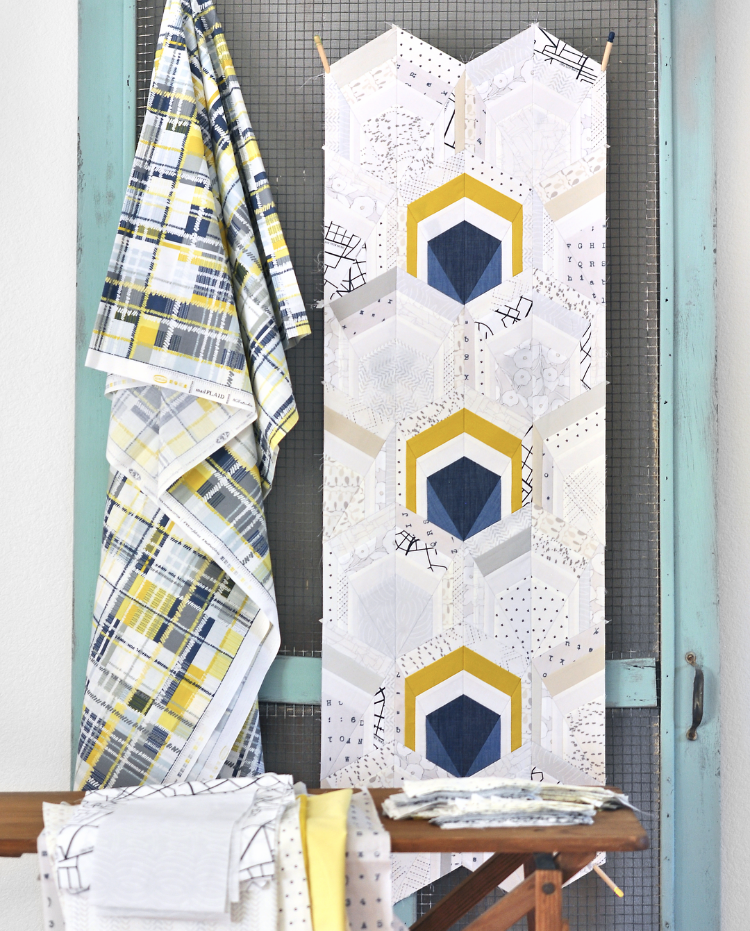
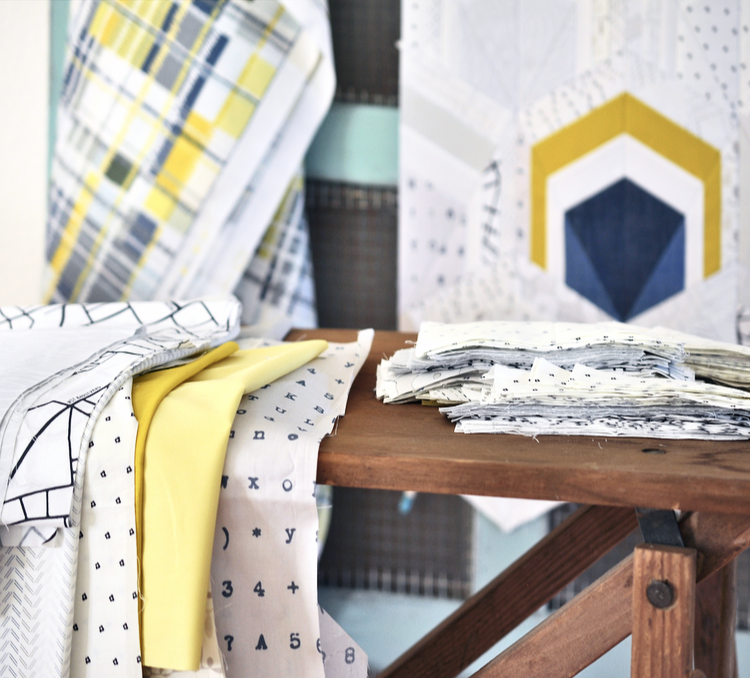
Lower the Volume is one of four new Art Gallery Fabrics Capsules collections, and I think its awesomeness speaks for itself! We all use low volumes in nearly every project we make, but what I love about this line is how it’s interesting and lively enough to stand all on its own. I originally planned to use the line exclusively in the quilt, but decided that a small pop of color would be a really nice accent.
I chose the fantastic plaid shown above from the new Mad Plaid capsule collection for the backing (because it matches my living room perfectly!) and pulled the accent colors from there, which are Art Gallery Pure Elements and Solid Smooth denims (my favorites!). Aside from a single row of blue and yellow hexies, the rest of the quilt will be all low volume.
The pattern I’m using is Sari’s and my Sariella Deco Hex pattern that we created for the April Stash Builder Anniversary box. If you saw the mini we originally made, you’ll see I’ve rotated the pattern 90° counter-clockwise here for use in the quilt. I also enlarged the pattern a bit. If you missed the pattern in the Stash Builder box, it will be available from Sariella later this year, so stay tuned! I will also share more about my process in making this quilt when I finish it.
· · · · · · · · · · · · · · · · · · · ·
STOP by the party!
Today wraps up week one of Mister Domestic’s Sewing Party, but be sure to check out the other posts from this week (shown above, links below), and also the Fusions portions of the tour beginning next week. I’ve already seen a few of the projects and they are legen… wait for it… DARY!
Happy December, friends! Gosh, has this year flown by. I always have such big plans at the start of each year and then beat myself up at the end when I’ve barely touch my grand to-do list. But, life happens and I’m trying to teach myself to not stress about the things I don’t accomplish, but rather enjoy the time I spend on the things I do!
Easier said than done though, right?
I drew up my Bias Weave quilt pattern at least six months ago, probably longer. I designed it specifically for my Stash Fabrics Design Star Bundle and got as far as cutting everything and piecing a few rows, when things got really out of control around here, so on the back burner it went. But, when Katarina Roccella asked if I’d like to create a piece for her Blithe fabrics lookbook, I just could not say no because I love her and her fabrics!
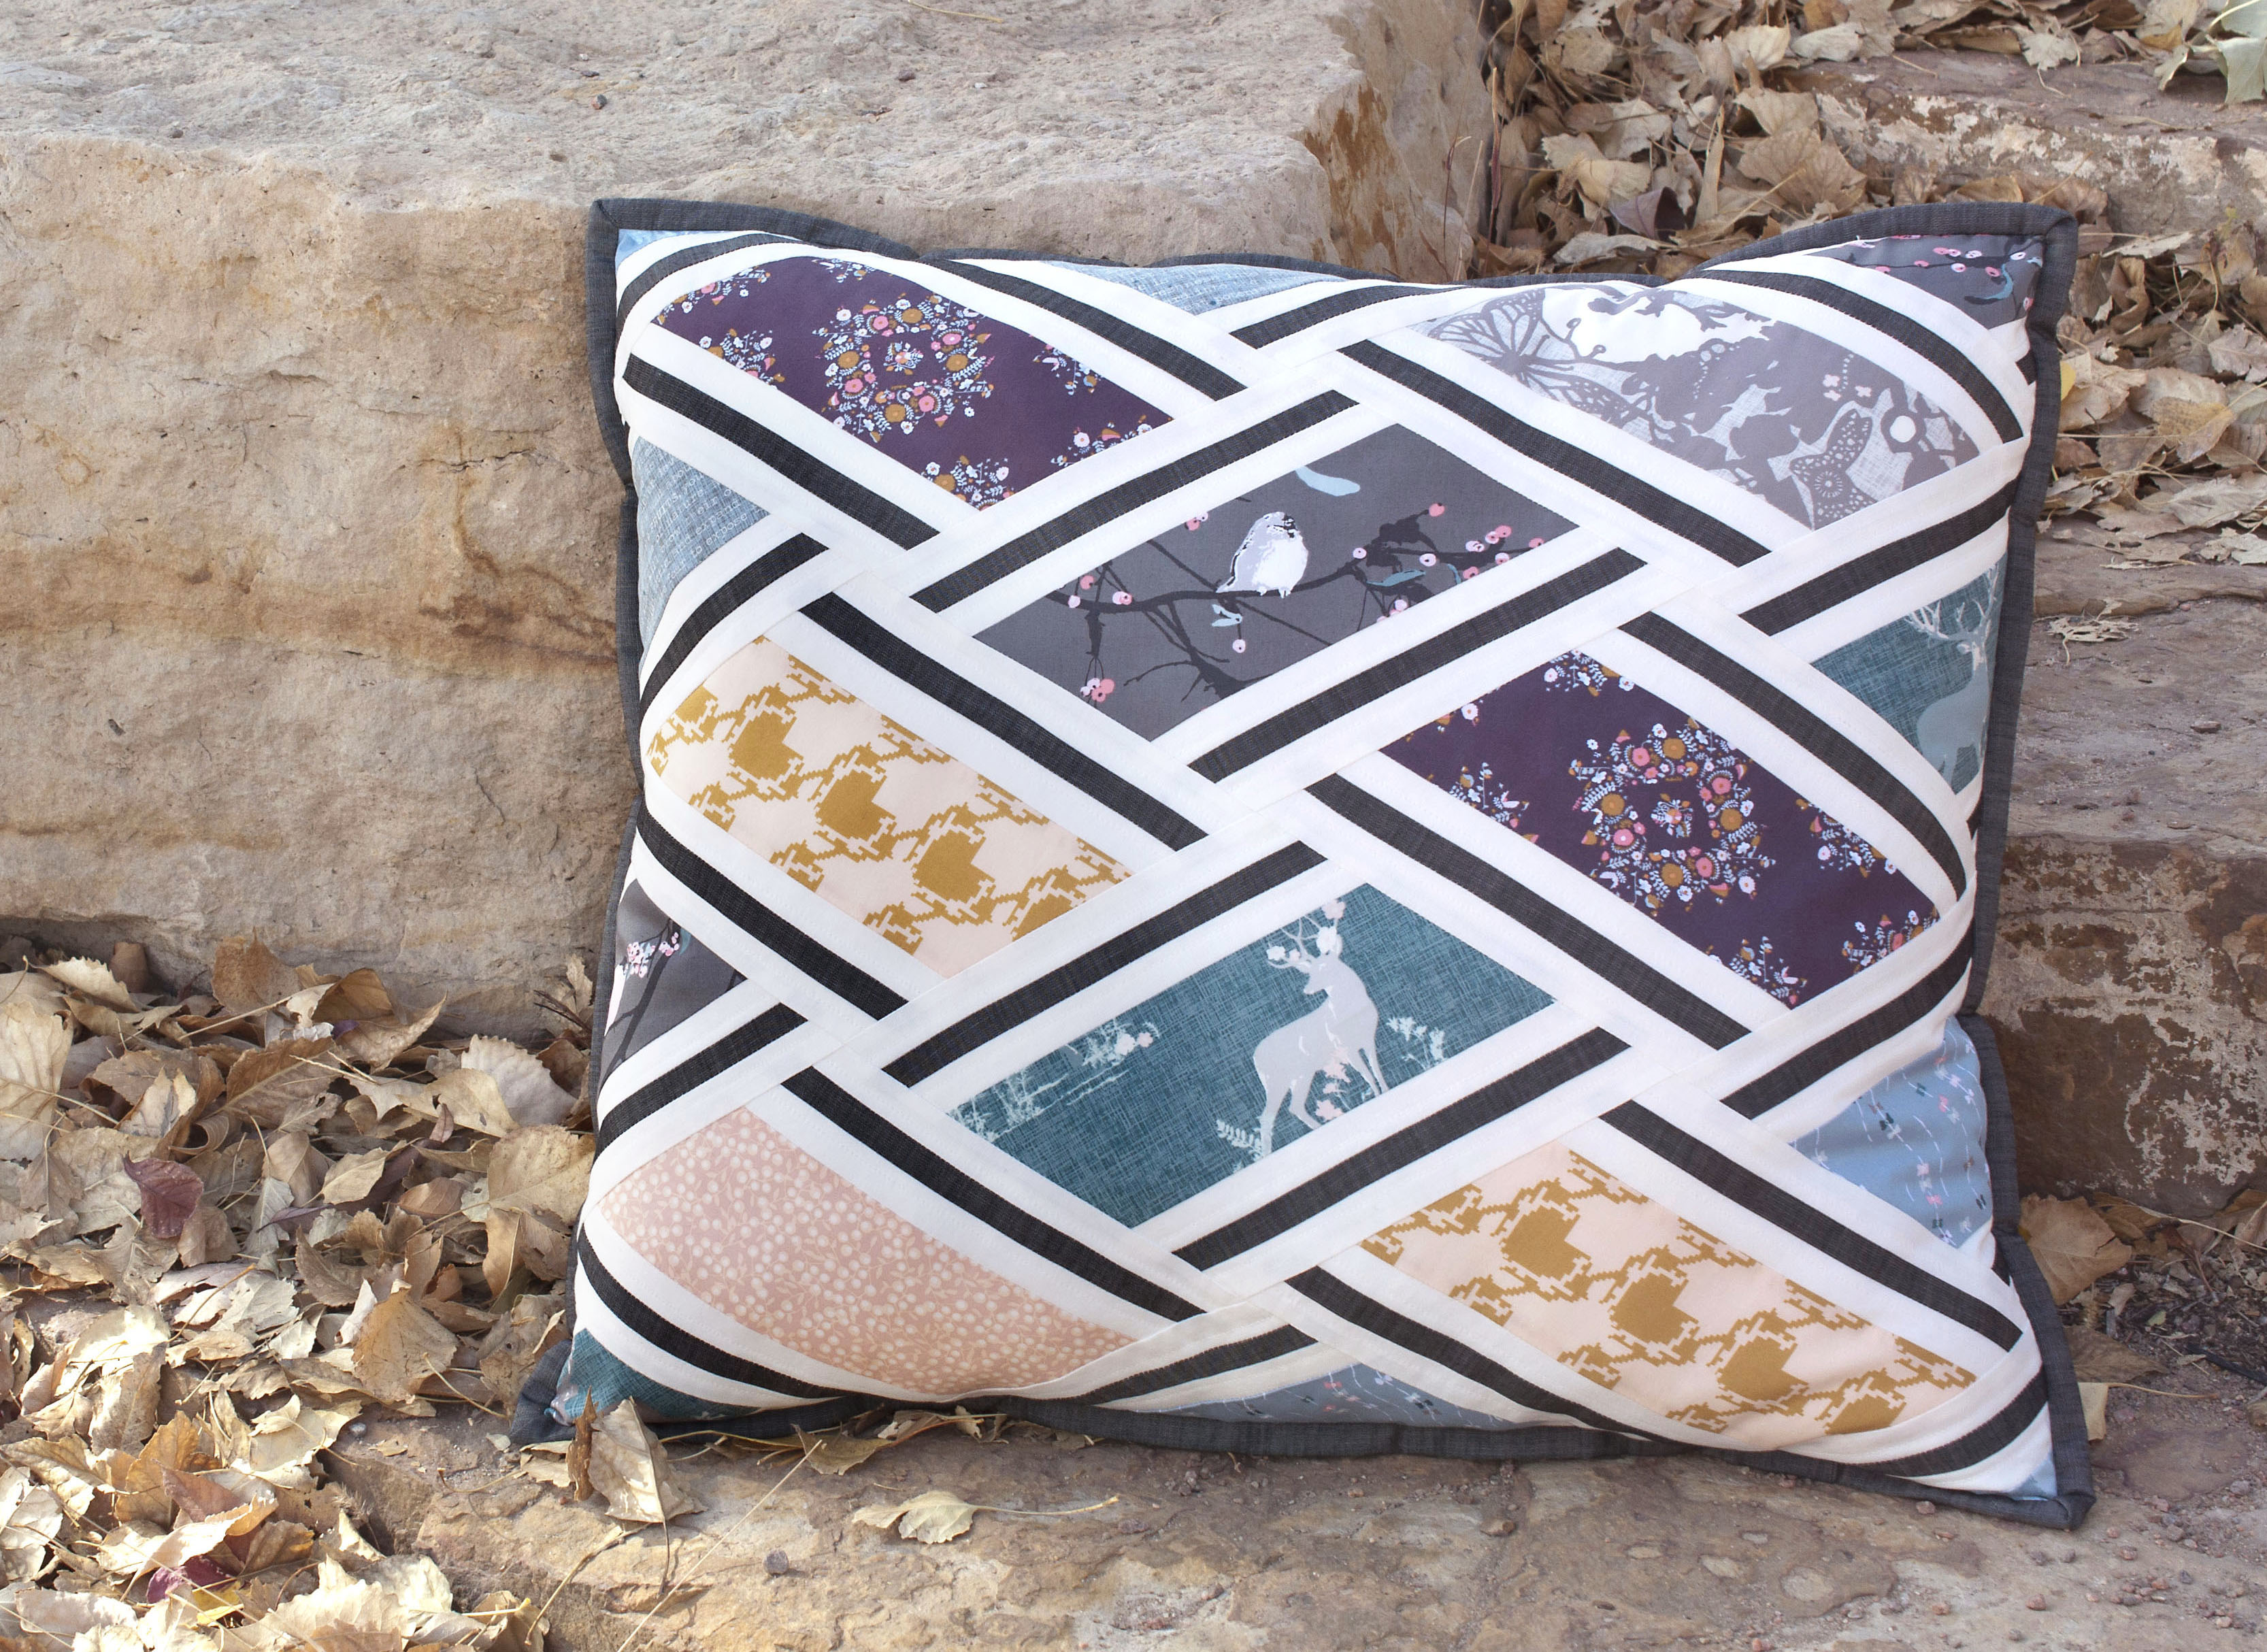
I decided that an oversized pillow version of the pattern would be a great way to showcase the fabrics and get me motivated to keep working on the full quilt.
I created this a couple months ago and the Blithe Lookbook is now out so I’m excited to share it with you! The pillow measures about 26″ x 23″ and is living on my bed right now. It’s a really nice sham size and it’s perfect for propping myself up to read. I’ve also used it on the floor when I’m crafting.
My husband put it best though, I have to say, “This is like a fancy person pillow. Like someone buys it out of a fancy magazine to put on a fancy couch that no one sits on. It’s all high class and sh*t.”. I’ll take that as a compliment, I think. (Disclaimer: My husband doesn’t always speak like a redneck. The first part was serious, then he started being a smart ass 🙂
———-
ABOUT THE FABRICS
Katarina has done it yet again, she is a true artist! Blithe is so dreamy and gorgeous. Deer, owls, birds, butterflies, tall trees, soft blenders, it feels like your taking a trip into a majestic winter wonderland. In addition to quilting cottons, the line includes canvas, knits, voile, ANNNNDDDDD Art Gallery Fabrics first printed linen – it is amazing! (It’s the antler print on the right below.)
The line also pairs beautifully with the Art Gallery Denim Studio collection. I used the vanilla mist yarn dye and wicked sky smooth solid denims for the border strips on the front and incorporated the nectarine sunrise smooth solid into the back. The cool foliage is a perfect match, as well.
Click here or the pic below to check out the entire fabric line and all the amazing projects in the Blithe Lookbook >
———-
ABOUT THE PATTERN
My Bias Weave pattern will be for a full quilt and include a few sizes, but like the pillow I created, you can make a variety of pieces using the “block”. I wanted to create the full quilt sample before releasing the pattern, but I’m considering releasing it with just a diagram and the directions before I finish the quilt. I will (unfortunately!) be having surgery soon and I will have a lot of down time where I can work on the computer, but won’t be able to cut and sew for a bit. What do you think? I know this isn’t uncommon, but it’s just not something I’ve done myself. Give me your feedback, please!
The pattern isn’t technically difficult to sew, but does require precision in cutting and piecing, so I’ll call it a skill builder! I did, however, build a little overage into the blocks to allow for trimming, which makes that precision pretty easy to accomplish.
There’s so many fun ways to play with color and fabric placement, I’m really excited to get this pattern out to testers and see what everyone comes up with!
I hope you’ve enjoyed a peek at this amazing new line, Blithe, and please take a second to leave me some feedback on the pattern release!


 So, when you join the club, you make the entire quilt yourself, but to help spread the word and make an awesome quilt for Charity (which you can enter to win, read on!), Cotton Cuts asked a group of us to each make one month’s blocks. The colorway we worked on is the Aster colorway which is a mix of Carolyn Friedlander fabrics. Below you can also see the other colorways from the 2017 PMQ.