
Now that you’ve built your loom (you can find that post here), it’s time to use it! I touched on options and materials a bit in the first post, but will cover all of that again. I will start here with stringing, then move on to weaving, and will do a third and final post about finishing options.
I will also write additional posts in the future on different things you can do with your loom and make with your woven panels as I make them myself, so be sure to check back for those!
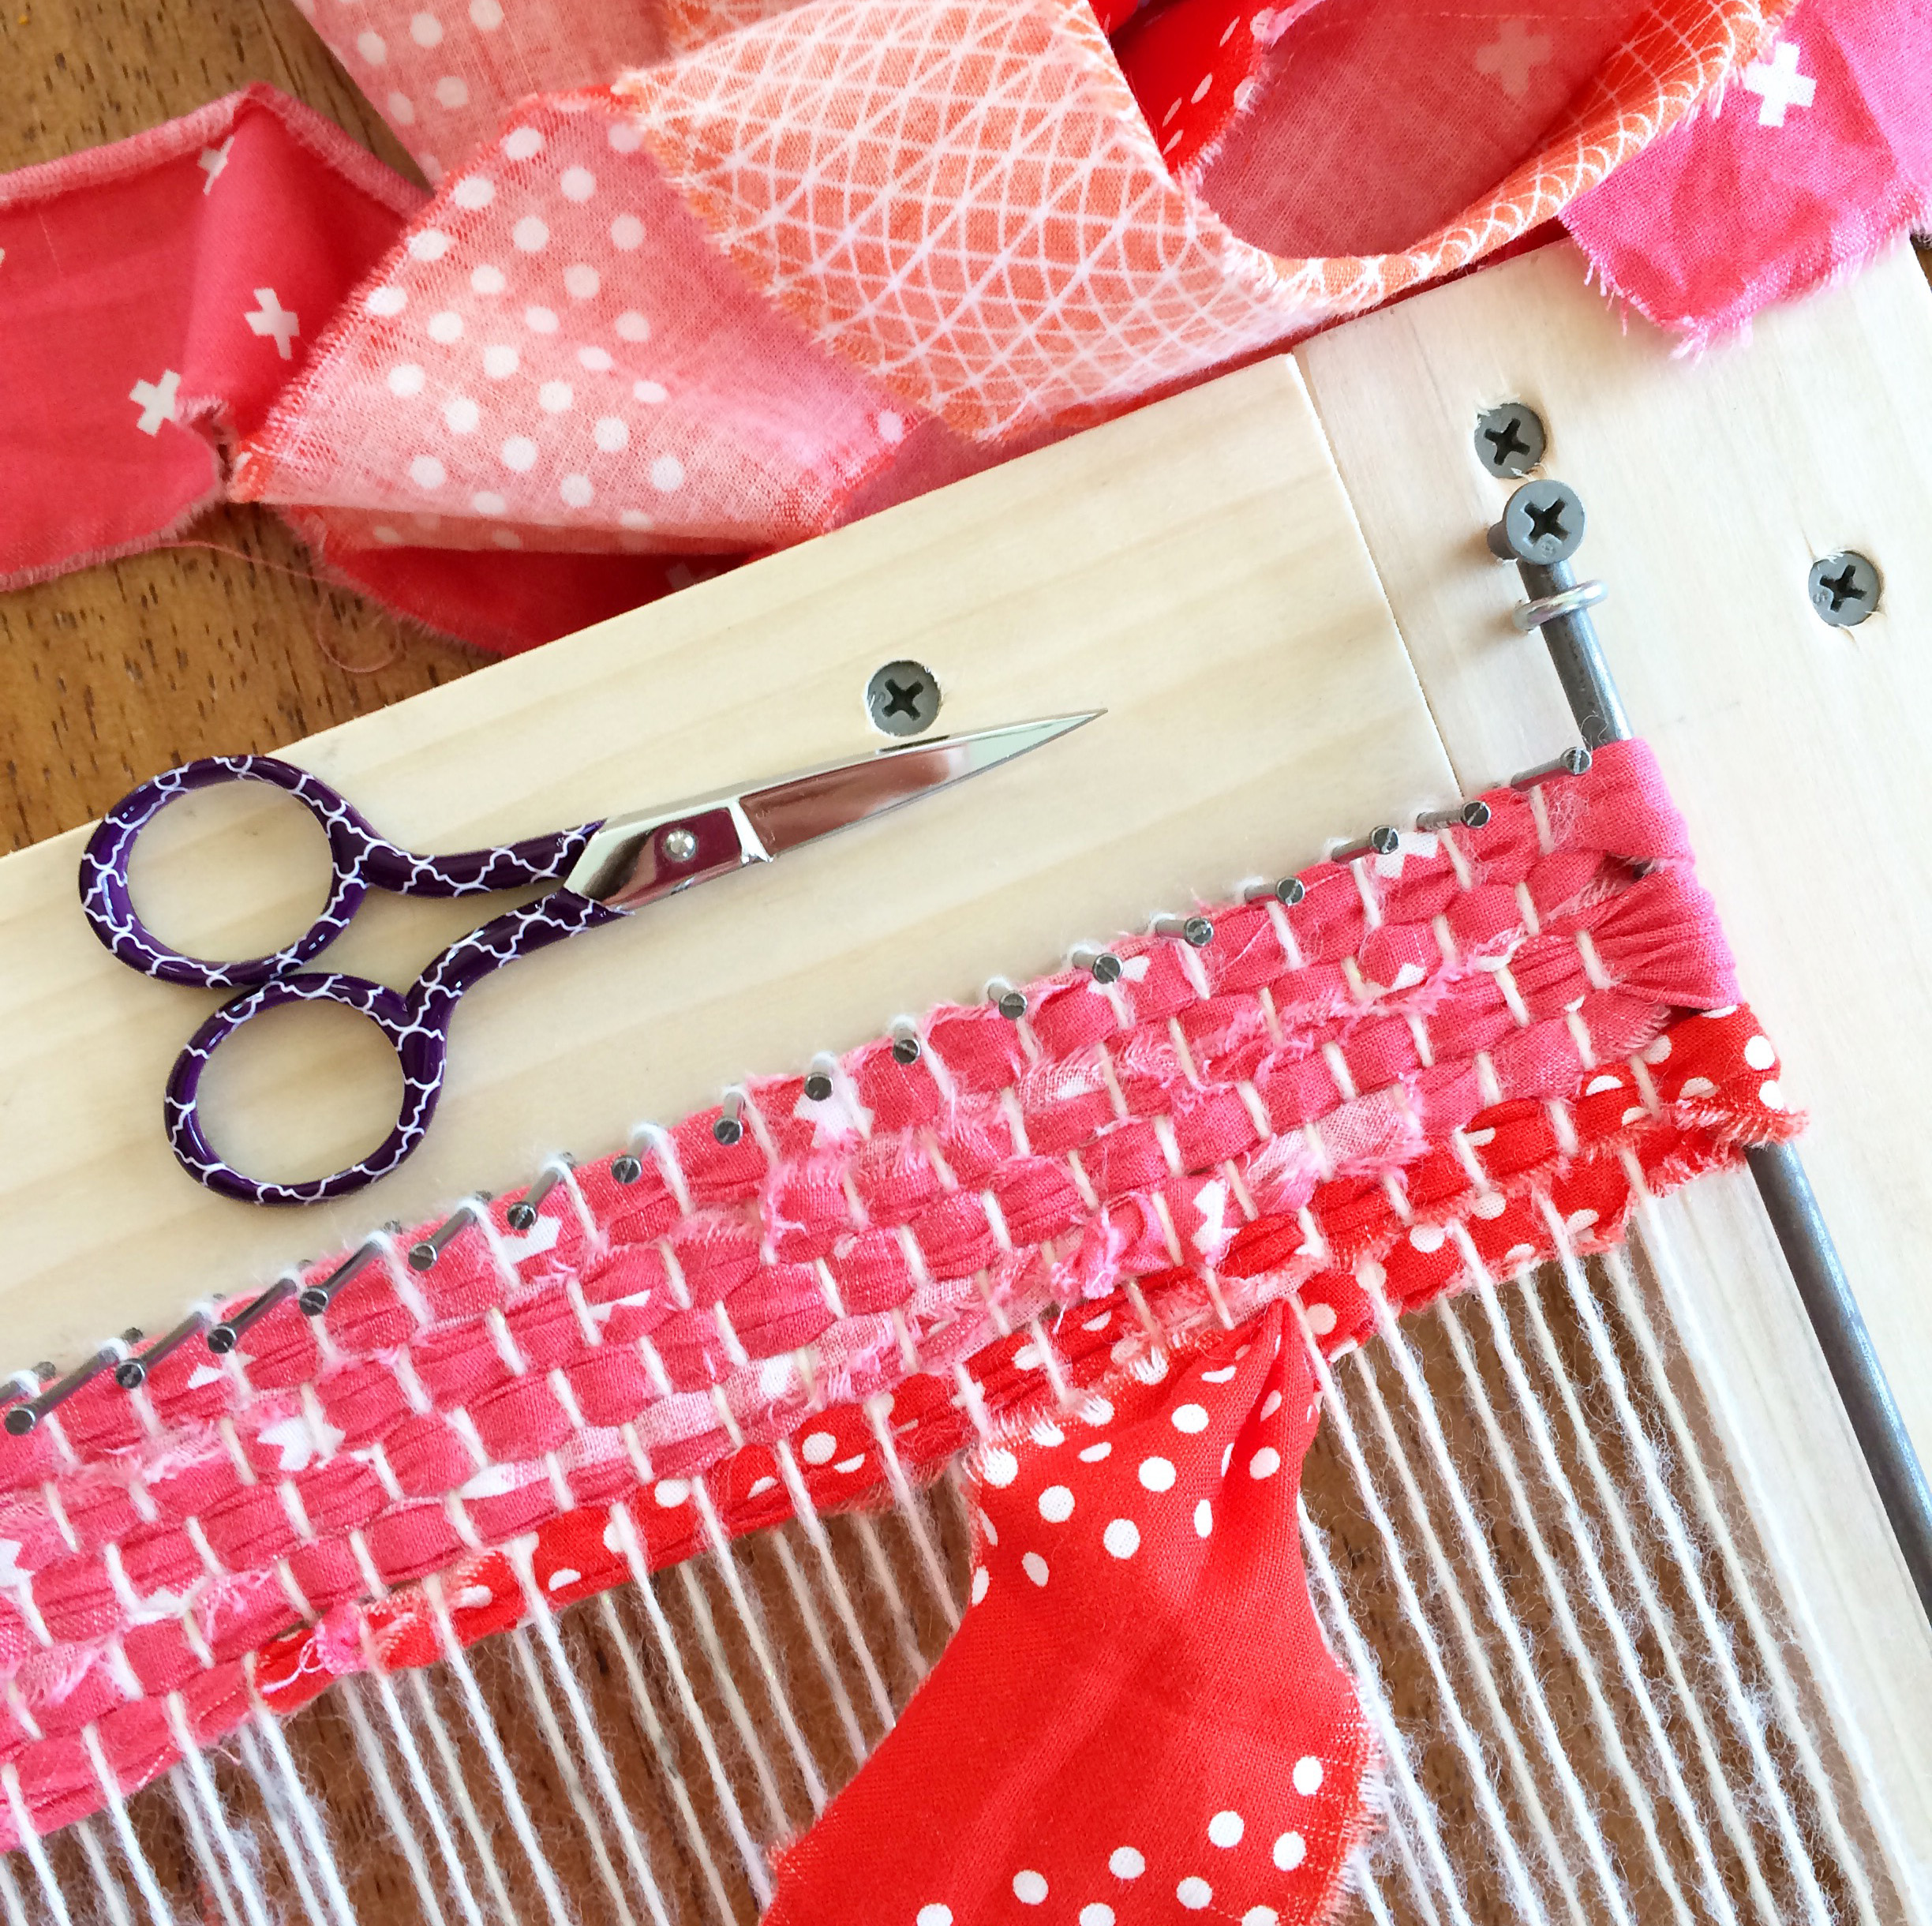
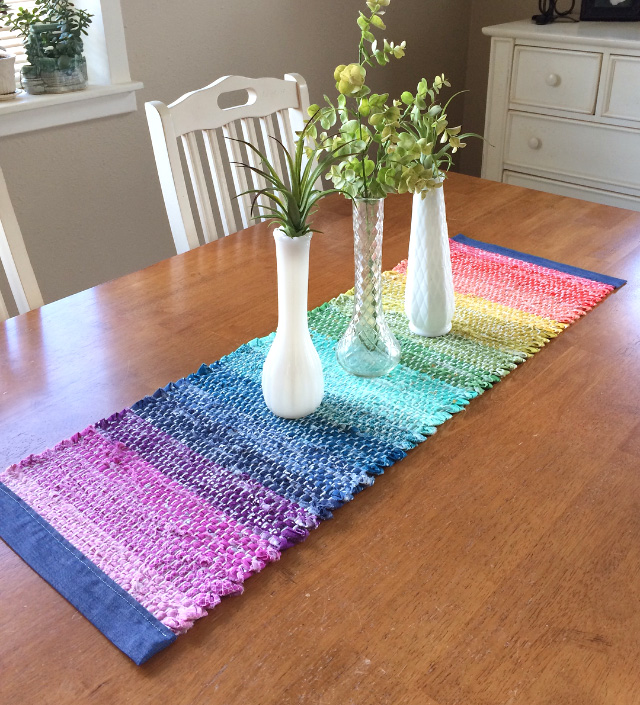
I started this project with the intention of using ripped strips of cotton fabric for the weaving, and that is how I created my rainbow runner below, but the possibilities of what you can weave into your piece really are endless. Consider various fabric substrates, yarns, ribbons, etc.
I need to begin by saying that not every aspect of weaving is science. There are some things that can’t be definitively explained. Some things come with a “feel” or by simply doing it once and figuring it out from there. So, please excuse some of the looseness of this post. I will provide all the information I can about this project and will post updates as I use my own loom more.
—–
STRINGING YOUR LOOM
The first step in using your loom is to run the warp threads. These will run with the length of the rails between the cross members and wrap around the nail posts. As with every aspect of this project, you have many options for stringing the warp threads of your loom, from the material you use to the way you run the threads. I will show you two options in this tutorial.
On my rainbow sample runner, I used one yarn in a continuous string. It was slightly off white with tiny metallic flecks in it. I wanted a strong contrast against the rainbow fabrics and love the way it looks. You can use any sort of yarn, thread, floss, cord, twine, or even fabric strips for your warp threads, and I will show you a few different options later in the post.
To string your loom with one continuous thread as I did in my rainbow runner, you will first begin by making a large loop with a secure knot on one end of your thread (I’m using yarn in this instance). You want to make sure you have enough to string the entire loom, so do not precut any lengths, just work from the skein or whatever amount your string comes as. If it is not long enough to make one continuous piece, you can simply knot an additional piece on and continue.

Hook your loop over one nail post at either end of either cross member, it does not matter where you begin. You will now run your thread down to the other cross member, around the first nail post and back up to where you began. Loop around the next nail post and continue this until you’ve wrapped around all the nail posts. You will now end at the last nail post on the opposite cross member from where you began. Secure your thread by making another knotted loop and hooking it over the nail post.
If you’d like your warp threads to be farther apart, giving a “looser” look to your finished weave, you can loop your threads around two nail posts, vs. just one, as shown in the bottom right photo above. Just remember that you will only see half the warp threads on each side of your woven piece. So, when you are looping on each nail post, the fabric will be on top of one thread and underneath the other. You can compare how the threads look strung on each nail post in the diagram above to how my finished rainbow runner looks. I strung my threads around each nail post on that piece.
Now here’s the important (and slightly loosey goosey) part, you DO NOT want your strings to be tight. When I started this project and just blindly jumped in, I strung my threads as tight as I could pull them. About five rows into my weaving, I realized the error of my ways. You will be amazed at how much slack is taken up by weaving the fabric strips through the threads, so you need them to be LOOSE when you begin. I’m sure you are asking, “how loose?”. Well, that’s the part I can’t really answer. You do not want them sagging to the table through your center loom opening or falling off the nail posts, but you otherwise want as much slack as you can have without those two things happening. Once I finish stringing my loom again for my next project, I’ll see if I can take a video that may help a bit.
STRINGING VARIATIONS
If you would like to use a variety of different materials or colors for your warp threads, you can do this a couple different ways. First, you can use the same continuous string method that was described above and knot your various threads together at any point you would like to change. Alternatively, you can create separate thread loops, rather than one continuous thread.
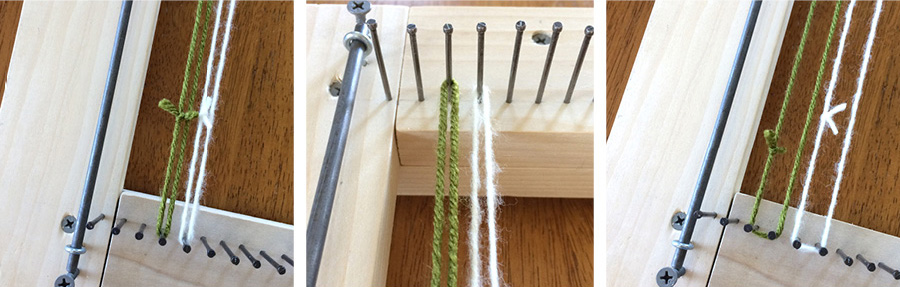
In the diagram above I have one green thread loop and one white thread loop. Each spans between one nail post on the cross members. You can also double the spacing on these as I described above, and even skip a nail post between loops for a more symmetric spacing.
—–
RIPPING STRIPS
Before I started this project, I had never torn fabric. I had received fabric with torn vs. cut edges, but had never done it myself. I wanted my woven piece to have a bit of a raw feel to it, so the frayed edges of ripped strips were the perfect option. Below I will show you how to tear fabric strips to achieve the look of my rainbow runner, but you can also use cut strips of fabric for your weaving.
I used 2″ strips throughout my piece for a consistent look, but plan to use a variety of different widths on my next project to achieve a scrappier look. The length of my most of my strips was the width of the fabric, but I also used some fat quarters and smaller pieces. You can use ANY size scraps you like for this project. Later in the post I will show you how to knot your strips together as you weave, but you can also seam your strips together with your sewing machine or hand stitches as you go.
The beauty of ripping fabric, and why some shops choose to do it, is that you will always have a perfectly straight and square edge. If you are beginning with a cut of fabric that already has a torn edge, you can skip the first step, but if you are beginning with a cut of fabric with a cut edge, you will first need to create a torn square edge.
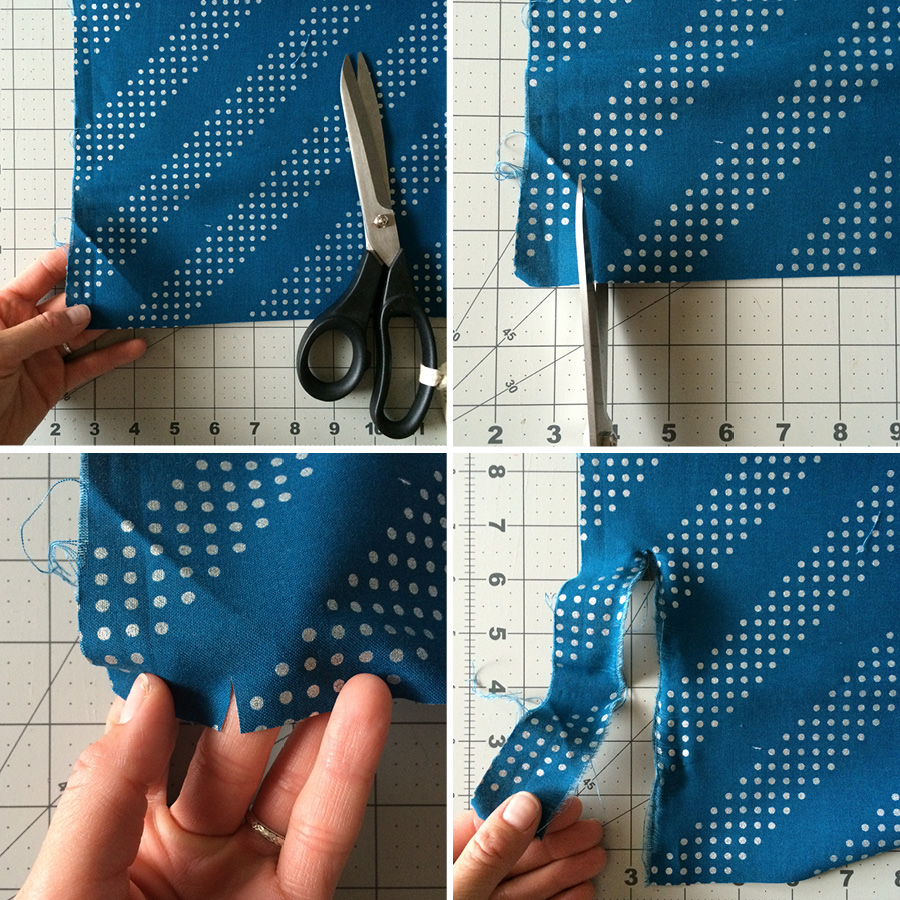
Depending on how straight or crooked your fabric is cut (you may be amazed at how off some cuts are!), the placement of your first snip will vary. You will start by snipping a small slit on a slevedge edge of your fabric about 1/2″ to 1″ in from the cut edge of your fabric and then simply hold the fabric on both sides of you cut and tear the strip off. If your tear does not run all the way to the other end of your fabric, you are still not square and need to move in farther with your initial snip.
Once you have your first fully torn edge, you can now measure to the width you’d like your strips, snip and tear. The result will be perfectly equal torn strips. It’s like magic! Ok, not really, but it sort of feels like it.

—–
WEAVING
Now it’s time to weave – hooray! Though it’s not necessary, I found using a Dritz Elastic threader as a “needle” made the weaving process much easier. They come in a three pack for about $2 – $4 online. I ordered mine from Amazon, but you can also find them on Craftsy and a variety of other websites. The Wefty needle also serves the same purpose.

When weaving your panel, you will begin at one cross member and weave to the middle of the loom along your rail length. You will then stop and start again at the other cross member and work to where you left off previously in the middle. You do this because it is much easier to squeeze the last rows into the middle of the loom than it would be to fight with the last rows along your cross member.
You will want to begin your weaving a few inches in from one of your rails. It doesn’t matter which side you start on or which direction you weave. Weave your fabric strip above every other warp thread and be sure to watch this carefully, as it’s easy to miss one or make a mistake and not notice it until later. Pull your fabric strip through the warp threads until the end of your strip is where you began weaving and work toward the anchor rod. When you get to your anchor rod, you will treat it just as another warp thread, going the opposite of your last thread. You will see below that my fabric was on top of my last warp thread, so I wove it under the anchor bar.

Wrap your fabric around the anchor bar and continue weaving to create the first full row. Once you cross over where you began, you can pull a bit from the end of your strip and tuck it under your first full row. Alternatively, you can just leave it as it, it will hold tight once your weave is complete and I will also talk about stitching the ends in place once you are done weaving.
You will now continue in the same manner of weaving, making sure to check your work as you go. Your fabric should always wrap around the anchor rod in the same way as your previous row, so that is one way to double check that you are still on track. When you get to a screw eye, be sure to not wrap your fabric around the post of the screw eye or you will not be able to remove the piece from the loom. Just weave the fabric on either side of the screw eye. It’s alright if you have to squish or stretch a bit to make it work, it will all even out when you remove the piece from the loom.

As you’re weaving your strips, you will find they twist and fold and bunch in different ways as they’re pulled through the warp threads. You can try to control this as you feed the strips, such folding the fabric on itself a certain way, or you can simply let it do its own thing!
You will also need to push your rows together toward the cross bar as you work. You can do this every row or every few rows, it’s just something you’ll get a feel for as you go. You can push your rows together as tight or as loose as you wish, depending on the look you are going for.
Also, you do want to pull your strips too tight as you weave. The anchor rod will keep your piece stable and square, but if you pull too tight, you can start to bow the anchor rod. This will make it hard to remove your piece from the loom and possibly cause irregular edges.
—–
ATTACHING STRIPS
When you are ready to attach your next strip of fabric (or other material), there are a couple ways you can do it. I used a knotting method, which I will show you below, or, as I mentioned above, you can machine or hand stitch materials together. You do not want to weave with too long of a strip at once, because it is just more to pull through the warp threads as you weave. It is best to attach the strips as you work.
When you are close to the end of the strip you are weaving with, leave about 5″ – 7″ loose. Lay a new strip on top of the end of this strip, lining up the ends as shown below. Fold both ends over about an inch and cut a small slit through both pieces.
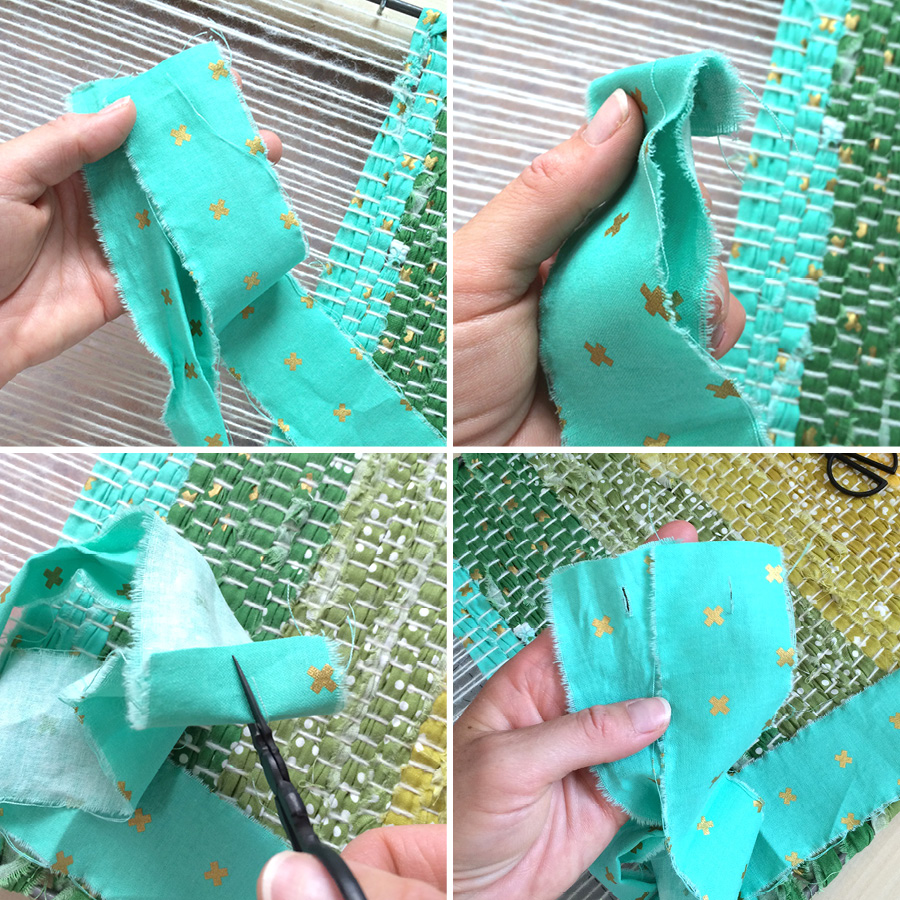
You now want to place your new strip, right sides together, on top of the strip in the loom, lining up the cut slits as shown in the photo below. The scissors are just to show the slit in both pieces. Next, take the loose end of the new strip and run it through the cut slits from the bottom. This new strip should be going first through the slit in the strip that is woven into the loom. Pull the piece through until it tightens into a knot. You can now continue weaving.

—–
FINISHING THE WEAVE
As mentioned previously, you will start weaving from one cross member of your loom into the middle. You will then start again at the other cross member and work to the middle where you left off.
The photo below shows what your panel will look like when you meet in the middle. Continue weaving until you close the gap and overlap your ends a few inches as shown on the right.
Once you are finished weaving, you can hand stitch these loose ends to surrounding fabric or you can do this after you remove the piece from the loom.
You’re now ready to remove your panel from the loom! You will first remove two screws at the end of the anchor rods on one cross member using a screwdriver and then slide the anchor rods out. They may feel tight and you can use pliers or vice grips to start pulling the anchor rods loose. Twisting them a bit can also help. Once the rods begin to move, they will slide out easier. Next, you will lift the woven panel carefully off one set of nail posts, and then the other. Be gentle as you do this to not tear your warp threads.
Now that your panel is off the loom, admire your work and give yourself a hand!A couple more little things and you’re done.
If you wove your warp threads as one continuous piece, your initial looped ends at the beginning and end of your thread will need to be secured. When you first remove the piece from the loom, use a safety pin to hold the ends in place, otherwise the warp thread end can get sucked down into your weave. To secure them permanently, use a needle and thread to secure the loop onto a lower portion of the thread. Start by knotting your thread onto the loop then run your needle through the warp thread one row below and knot to secure.

Also, If you did not stitch your final loose fabric tails down before removing the panel, you can do so now. You can also do this with the fabric ends where you began weaving at either cross member, if you wish.
—–
Now that your piece is woven and off the loom, you can call it complete as is or you can add various finishing touches, such as cuffs or tassles, or use the woven panel on something else, such as a bag or pillow. Since this post is already quite lengthy, I will address that in a separate one.
If you have any questions about this tutorial, please contact me anytime, just be as specific as possible so I can best assist you.
I so hope you enjoy this process as much as I have! Please use the hashtag #ripstripweaving so I can see what you are making!
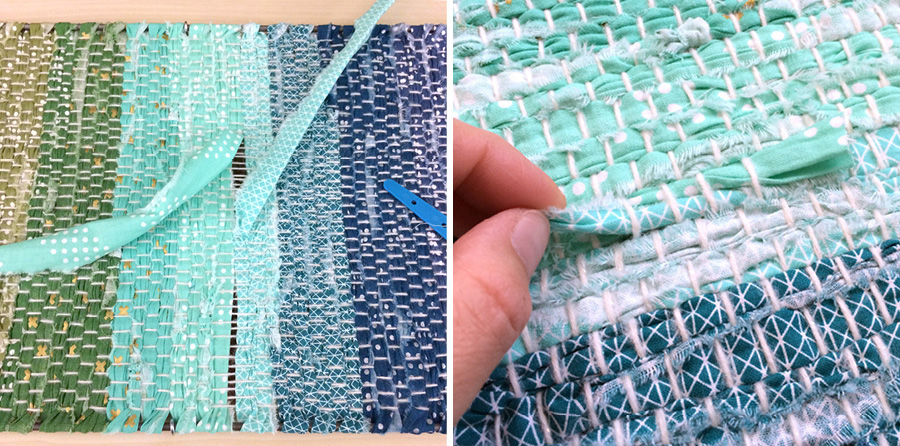
Here’s a shot of the materials I’ll be using for my next project. I plan to use a variety of threads for the warp threads and add a mix of yarns and other materials into the weave along with the fabric strips. I’m pretty excited about it and I’ll share more soon here and on Instagram!


Reblogged this on 2nana50's Blog and commented:
Part 2: Using your Loom… the fun begins!😃💜
LikeLike
I love this project! A couple of weeks ago my husband made a loom for me. Can’t wait to make this! Beautiful!!!
LikeLike
Oh yay! I can’t wait to see what you make! Please be sure to show me!
LikeLike
Just stumbled on this post, your table runner is beautiful!
LikeLike
I too have had a fondness for rag rugs for ages. I have made them with large wooden crochet hooks. My husband made me a loom several years ago. Then I happened to find a commercially made one at an auction so I now have two!
LikeLike