Maker Mat SAL: Pocket Panel Tips & Tutorials

Hello, Hello! If you are just joining the sew-a-long, please scroll down a few posts to find the kickoff and all the tips shared in previous posts or scroll to the bottom of this post for direct links.

So far we’ve worked on the main body of the mat and how to add a machine handle opening, and today I’m going to talk about the pocket panels. If you’re just getting started on your mat, don’t worry, there’s still plenty of time!

Before you begin your pocket panels remember that if you changed the size of your main body, you will need to also adjust the size of the pocket panels! You can do this by changing the size of one pocket or adjusting all the pockets equally. Don’t forget to think about seam allowances when calculating cutting sizes.

One thing to note about the pocket panels is that there are SO many ways you can customize this entire project, but especially this part. You can adjust the sizes, add more or less pockets, you can piece them all with any block you love or you can eve use one solid cut of fabric to make it really quick and easy. Be sure to check out the #undercovermakermat hashtag on social media to see tons of creative inspiration!

pockets

Above you can see just a few variations from mats that I’ve made in the past. The top left follows the pattern as written, which the bottom left follows the same sizing and layout, but uses full cuts of fabric (rather than piecing) with cute fussy cuts! On the right, there is a little mix of both. I substituted my Love Story pattern block for the butterfly and then used solid fabric cuts for the other pockets with some added lace trim details.

First I’m going to share some tutorials and tips on creating the accent pocket panels which are the paper pieced butterfly and the selvedge pockets, then I’ll cover a bit more details on piecing the panels and trim options.

All the information you need to create the accent pocket pieces is included in the pattern (including a link to a tutorial on making the butterfly for beginner paper piecers), but I will go into a bit more detail here and include some additional tips and photos, as well as design variation ideas.

•  •  •  •  •  •  •  •  •  •  •  •  •  •  •  •

PAPER PIECING TIPS

You can find the pattern for my Butterfly Charm Blocks here. All three butterfly designs are the same size and any can be used. The foundation paper piecing tutorial link included in the pattern is from Cassandra Madge and you can find it here. It was so sweet of her to use my pattern as the example for her tutorial!

Our methods of paper piecing are very similar, with just a few differences. I like to use the Add-A-Quarter Ruler, rather than a standard quilting ruler. It does the same job, but is just one of those tools that takes away some room for error. Another paper piecing tutorial I often direct people to is this video from Connecting Threads. You can see the Add-A-Quarter ruler being used.

paper piecing tips | lillyella stitchery

When I paper piece, especially small blocks, I like to use Foundation Paper. You can buy one from Carol Doaks or you can use any thin newsprint. Someone recently mentioned they found this pack from Dick Blick, and you can’t beat the price! I also apologize that I don’t remember who tagged me on that, please let me know if it was you! It is essentially just a thinner paper that creates less bulk and allows for easier removal. You can use any paper for paper piecing, but the thinner you can find, the easier it will make the process.

Another thing I ALWAYS do is to trace the pattern onto the back of the sheet. It does not have to be perfect because you will only be using it for reference, but it helps in a multitude of ways. I use a lightbox, but you can also use a window. Since this is the side where you will place your fabric, you can use these lines as a guide for cutting your fabric pieces. You can still use the printed side, but you have to work with your fabric upside down at that point, and I like to see the prints and placement.

After tracing and selecting fabrics, I also note my fabric selections or color accordingly on this side. Then I always know I’m placing the correct piece. These lines also help you as you sew to make sure a fabric cut will cover a segment. Place the fabric where you would for your next seam, but before sewing, hold the fabric approximately where your seam will be and fold the fabric over as you would when pressing it after sewing. You can then see if your piece is large enough to cover everything it needs to. You can then sew your seam with confidence, because unpicking a paper pieced seam is NO FUN!

Lastly, I find having these lines helps prevent you from missing a segment, which is something I see a lot in paper piecing. When you have the pattern lines on the side where you are placing fabric, you will notice if you’ve missed a piece. You still have to pay attention, but it’s definitely better than flying blind!

paper piecing tips | lillyella stitchery

In Cassandra’s tutorial, you will see her talking about adding some basting stitches to you sections to help when piecing them together. This is important and something I always do as well, however, I put my stitches in the seam allowance as you can see above in the left photo.

Another tip is that when trimming sections to the seam allowance after piecing, do not trim any sides that are on an outer edge (above right). This way you can trim your final block to size after it is completely pieced. It is not uncommon to lose a little bit in each seam, so this ensures you can have the correct sized block in the end, and also lets you trim the block to a slighty larger size, if desired.

After piecing sections, I always remove the paper from the seam allowance only before sewing sections together. This just helps with bulk and allows you to press a flatter seam before adding the next section. You can also see this in the above right photo.

•  •  •  •  •  •  •  •  •  •  •  •  •  •  •  •

SELVEDGE POCKETS

For those who are new to sewing or do not know what a selvedge is, it is the finished edge on a bolt of fabric. There are finished edges on both sides along the width of the fabric, but only one will contain printing and this is the side I use on this project. I cut my selvedges off with about one half inch to one inch or so of the fabric print included, just to make sure I always have enough extra to work with them. The directions on how to work with the selvedges to create the pockets are included in the pattern.

selvedges

•  •  •  •  •  •  •  •  •  •  •  •  •  •  •  •

VARIATIONS

Below are more variations from makes on Instagram to help inspire you!

examples5

•  •  •  •  •  •  •  •  •  •  •  •  •  •  •  •

TRIM

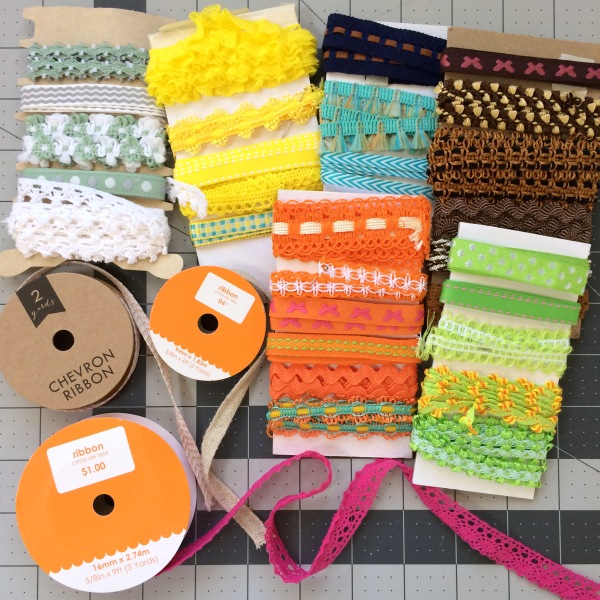
This pattern uses trims or ribbons for securing the secondary pockets and hiding the raw edges, and also for creating the side ties when using it as a machine cover. Below are some trims from my collection that I’ve found at Joanns, Hobby Lobby and even Walmart. Anything between 1/4″ to 3/8″ width is best. If it is too small then you will have trouble enclosing the raw edge of the pocket, any thicker and you cut into your pocket space. Trims that are more solid are best to hide the raw edges, but some lacier style trims can work ok, too.

ribbons

If you don’t have any trims on hand, you can also use a thin bias binding strip instead. Start with a 1″ or 1.25″ cut strip, fold the raw edges into the center, then fold in half and press and use this as you would a piece of ribbon. You can also you another selvedge with the cut side pressed under. Lots of possibilities!

trims

•  •  •  •  •  •  •  •  •  •  •  •  •  •  •  •

Undercover Maker Mat | lillyella stitchery

POCKET BINDING

I like the look of the binding on the pocket because I think it balances the piece nicely, but if you prefer, you can eliminate this step and instead attach the lining to the pocket panel just as you did on the small secondary pockets. Just lay your lining piece, RST, on top of your finished main pocket panel and sew across the top with a 1/4″ seam. Flip the lining to the back, press, and top stitch along the top edge. You can include the fusible fleece when you do this, add it after tucked up to the seam, or skip it all together and use some lightweight interfacing on one or both pieces instead.

pocket-binding

Above are a couple examples I saw on the #undercovermakermat hashtag on instagram that demonstrate this variation. If you have any questions about doing this instead of the binding, just let me know and I’m happy to help!

•  •  •  •  •  •  •  •  •  •  •  •  •  •  •  •

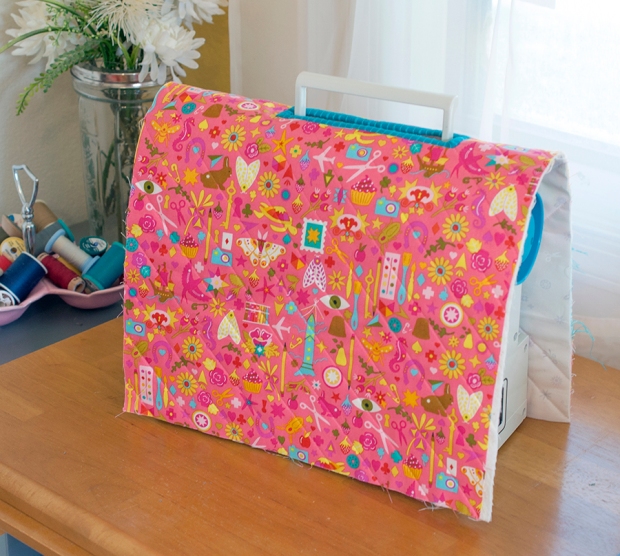
Once your full pocket panel is complete, you will baste it to your mat body and bind the entire piece as covered in the pattern. BE SURE TO ADD YOUR SIDE TIES BEFORE BINDING! If you do not plan to use your mat as a cover, you can leave them off. I did forget to add them once and just had to unpick a little bit of my binding and tuck them in, which was not hard to do, so it’s not the end of the world if you forget, or even decide to add them later!

tie double

Just as with trim used to secure the secondary pockets, you can instead use a binding strip for your side ties, or even additional selvedges. If using a binding strip, simply top stitch along the folded edge to close it up. You can tie knots on the ends or stitch them closed.

cover

cover1

Stay tuned next week for one more post talking about the thread catcher before we wrap things up on October 28!

ADDITIONAL POSTS:

Undercover Maker Mat Sew-a-long: All the details

PART ONE: Kickoff! Sizing your mat and tutorials for beginners

Sponsors and Prizes!

PART TWO: Adding a machine handle opening

Maker Mat SAL – Adding a Machine Handle Opening

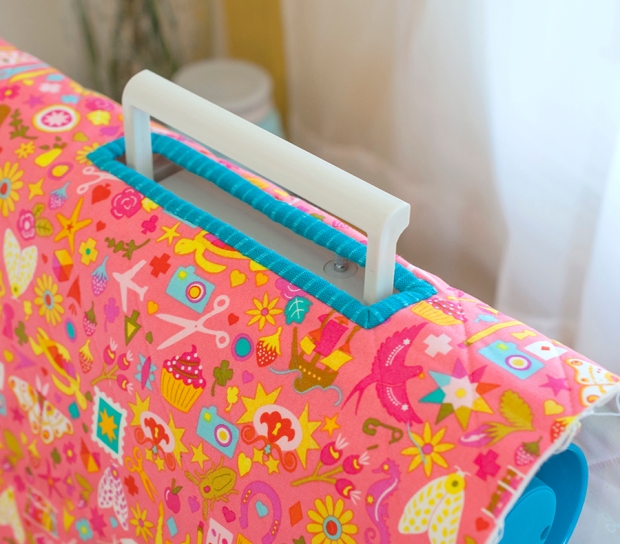
Honestly, I’ve been wanting to do this tutorial for adding a handle opening to the Undercover Maker Mat for YEARS… but I feel like that’s basically the story of my life! For all who have been waiting, I appreciate your patience! Once great thing about this is that you can add it at any time to any mat – finished, or not. It’s sort of an afterthought, per say, and doesn’t affect anything in the pattern.

Most of my machines do not have handles, so this new little travel machine came into my life at just the right time! This process hurt my brain just a teeny bit, but in the end it’s really pretty easy! I’ve done my best to capture it in photos and I hope it will all be easy to follow (and I think it will once you’re actually doing the steps), but if you have any questions, never hesitate to contact me here or through social media.

This tutorial is for binding the handle opening, however, if you are familiar with facing, that technique will most certainly work for this!

Just one note, I cannot guarantee that this tutorial is detailed enough for complete beginner sewists who are working on this project. There are no complicated techniques, but you may need to familiarize yourself with basic binding techniques to understand some of the terminology and techniques used.

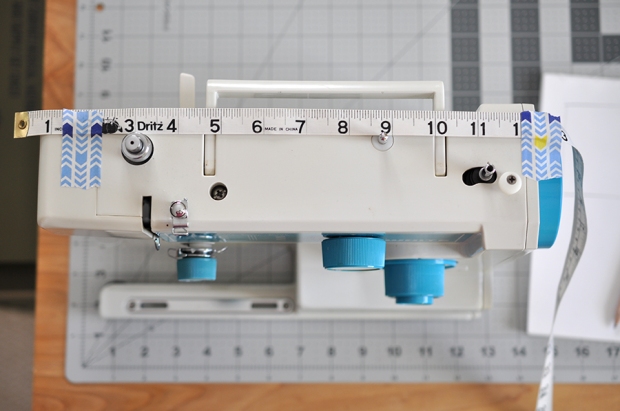
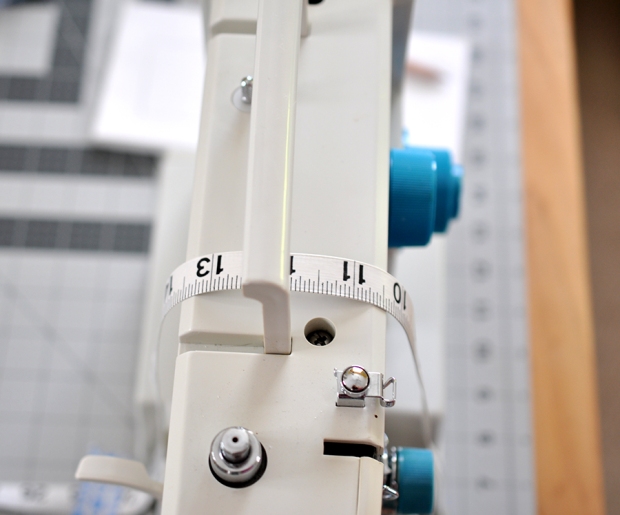
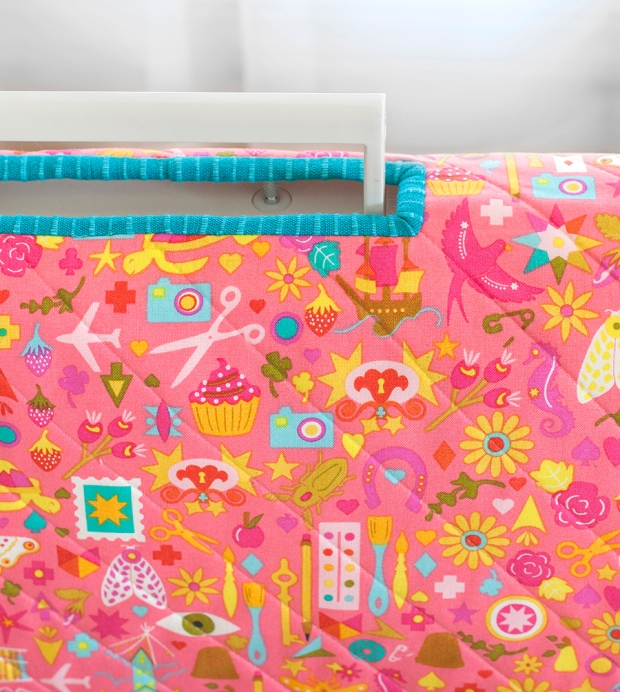
The first step in planning for your opening is to measure, then measure again, then measure about 17 more times. I’ll tell you it is PAINFUL to cut into your precious quilted body, so be sure to check yourself! I took so long doing it that my husband started to make fun of me, but it was worth it. Keep in mind how wide your mat is in relation to your machine and be sure to place your measuring device accordingly. You can see how mine is hanging off the edge a bit. You will need your opening to be just large enough for your handle to slide through. Mine ended up being a little less than 6″ by  3/4″. Your binding will only shrink the opening a very small amount, so you don’t need to take that into account. Also remember, you can always cut the opening larger, but you can’t make it smaller!

When you measure the placement of the opening around the height of the machine, be sure to leave some slack in your tape to account for the bulk of your quilted body. I used the bobbin winder pin on the top of my machine as a gauge. To double check my measurements,  I placed my mat body over my machine and placed the tape measure on my mat. I felt the bobbin winder pin through the mat and noted where the tape measurer hit it. I then removed the mat and placed the tape measure in the same spot on the bobbin winder pin and checked my measurements against the handle. Every machine will be different, so figure out what method works best for you in determining your measurements.

Once you have your measurements, mark them on the body of your mat with an erasable pen or your preferred method and then check your placement again by placing the mat over your machine and feeling through it as best you can to see if the handle is lining up. Then its time to cut! Terrifying, I know. You can do it!

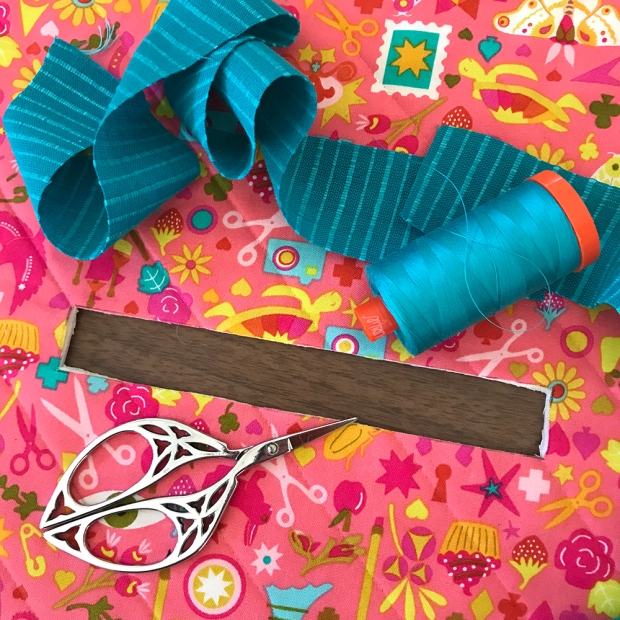
Now will you bind the hole. It’s much like binding the outside a quilt, but you handle the corners differently since they are inside. We will be using a single fold binding method. Cut a piece of binding fabric 1.5″ wide with the length being the diameter of your rectangle plus about 4″.

First, you will mark 1/4″ all the way around the outside of your rectangle on the top/outside of your mat. You will see in my photo above that I have stitch lines 1/4″ around my rectangle. This is from my initial failed attempt at binding that I tore out :D! Since I could see the lines, I did not need to use another form of marking, but you can use an erasable pen or you use a basting stitch.

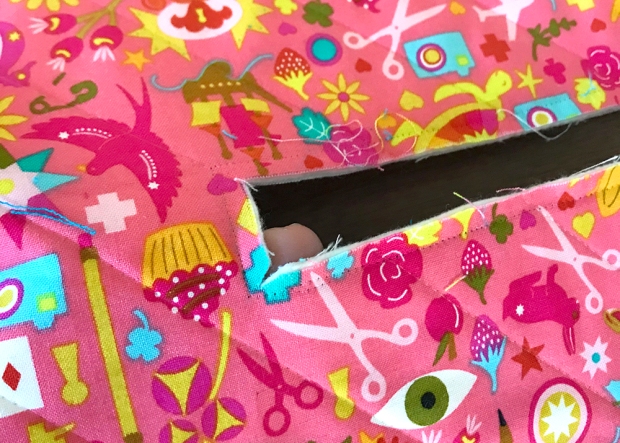
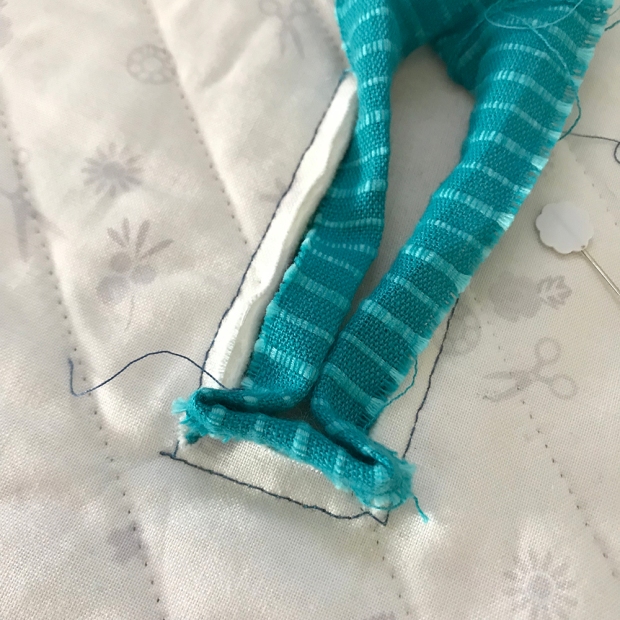
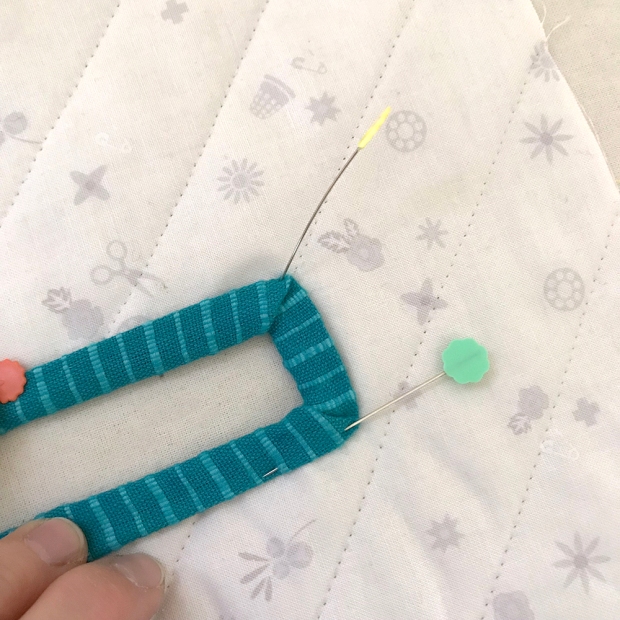
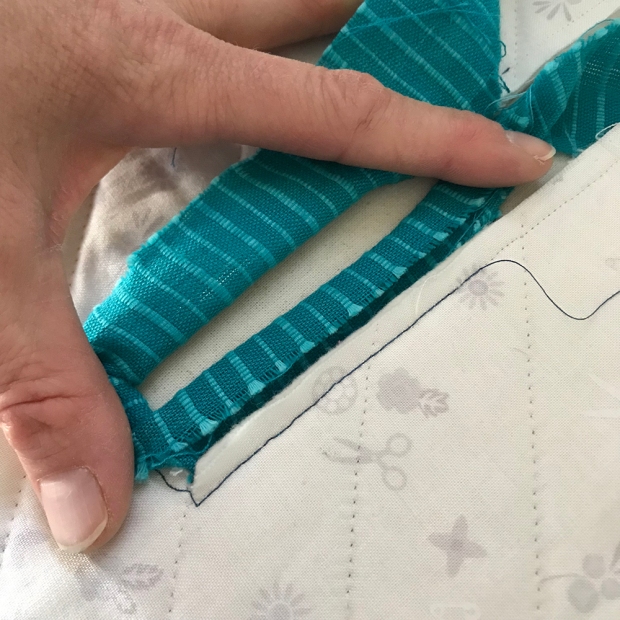
Next you will clip diagonally into all four corners just shy of your 1/4″ marks as show above. You will now sew the binding down.

You will begin sewing the binding down along one long edge of your rectangle. I did not get a photo before I started sewing, so we’ll use this photo above as a reference for placement. Leave a small tail of unsewn binding for finishing later.

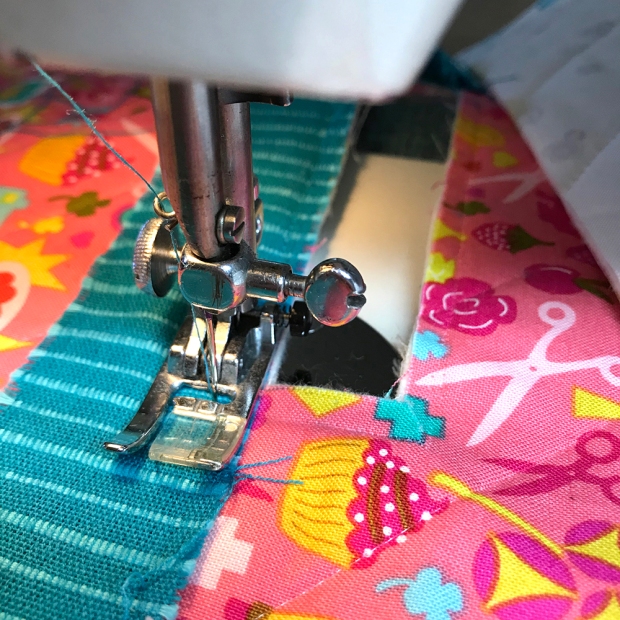
You will place your binding right side down onto your mat body and sew with a 1/4″ seam allowance. When you get to a corner, continue sewing 1/4″ past the opening of your rectangle, which will be indicated by your 1/4″ marks around.

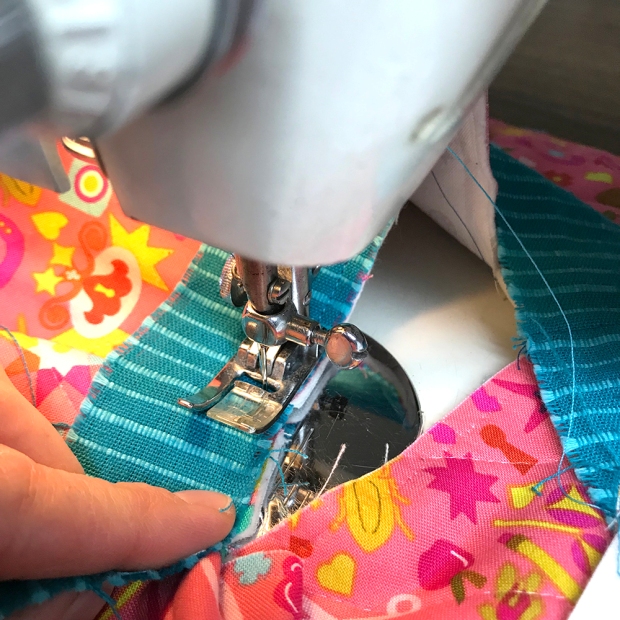
Here’s where it gets just a bit fussy. It’s not difficult, it just takes a bit of finagling under your machine. With your needle down, lift your presser foot and pull the short side of your rectangle opening toward your presser foot so it is in line with the seam you just sewed. The little snips you made in the corners will allow you to do this.

You will then continue sewing your binding strip in a straight line onto this side. If this seems confusing when reading it, I promise it will make sense once you’re sewing. You will continue sewing all the way around your opening, repeating this process on all four corners.

When you get back to where you started, press one end of your binding strip back about 1/4″ and then lay the other end on top of it, trimming it about 1/2″ to 3/4″ past the overlap. Pin in place and finish stitching the seam securely.

Now it’s time to press and turn the binding to the backside. Once complete, you can hand or machine stitch it in place, just as with an outer quilt binding.

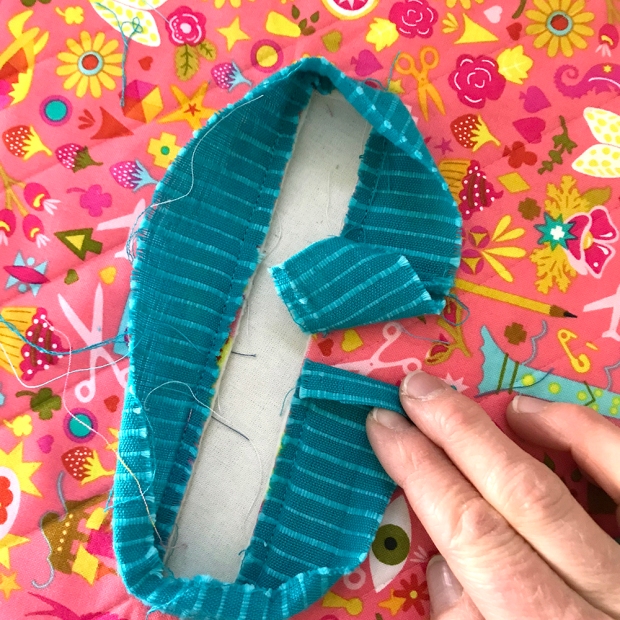
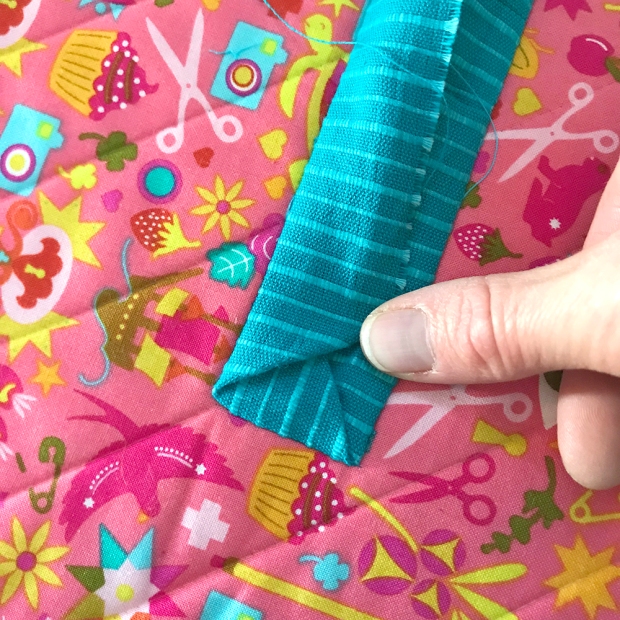
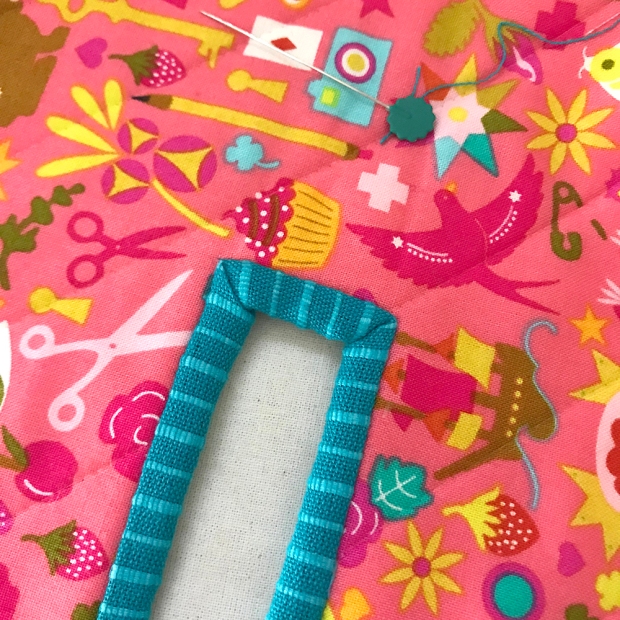
Press your binding along the seam toward the hole opening to help it lay flat. You will now miter the corners working on one side at a time. First press one long edge inward and then miter one corner of a short edge as shown above, folding the outer point in to form a 45° angle and press.

Next, fold the other long edge in mitering the corner in the same way and press. Repeat with the other side of the opening.

You will then turn the binding through the opening to the underside of your mat and you will work on pressing and mitering that side. Don’t worry about your miters staying perfectly in place. Just make sure you gave them a good press before turning and they will fall back into place.

If you’re opening is small (and even if not), you may find the next steps a bit fussy, but just take it one step at at time, and you’ll get it done!

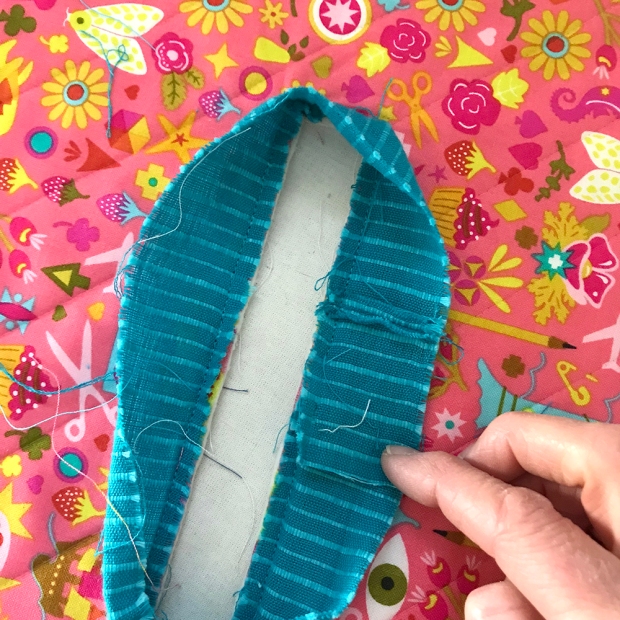
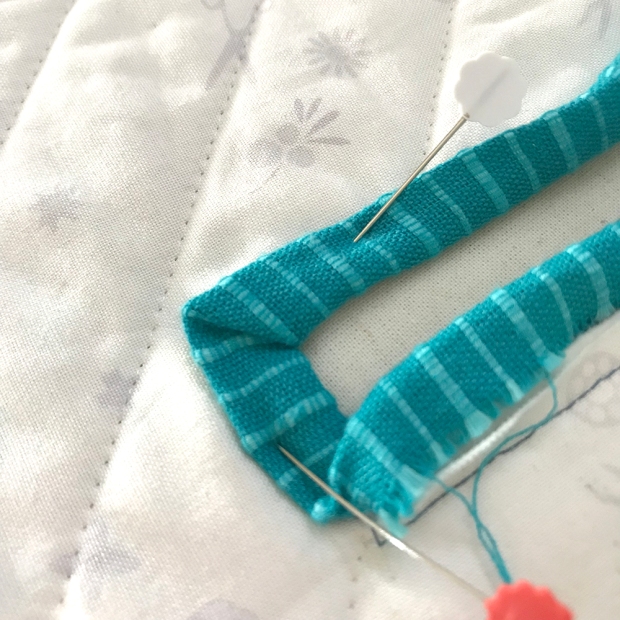
Working along one edge at a time, fold the binding strip onto itself, wrong sides together, up to the edge of your opening and press. Repeat for all four sides and feel free to use some glue to help keep it down!

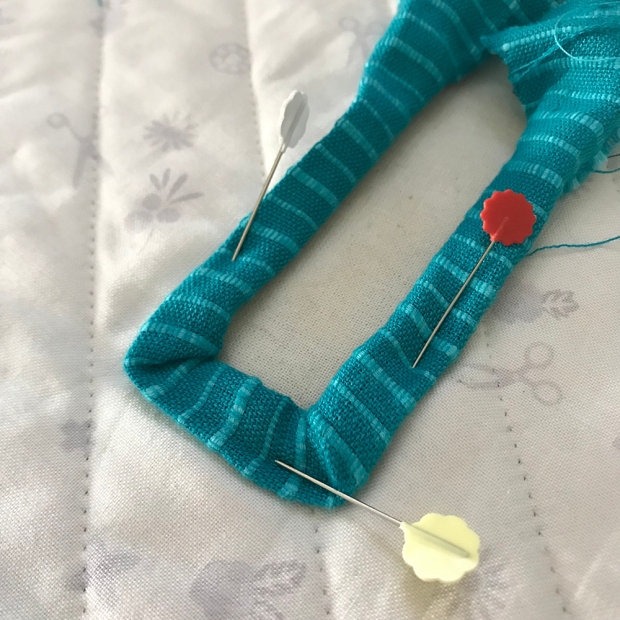
Your piece will now look something like mine above once all sides are pressed. The Mariner cloth I am using was getting a bit frayed because of it’s loose weave, so I had a little trouble keeping things “crisp” for the photos.

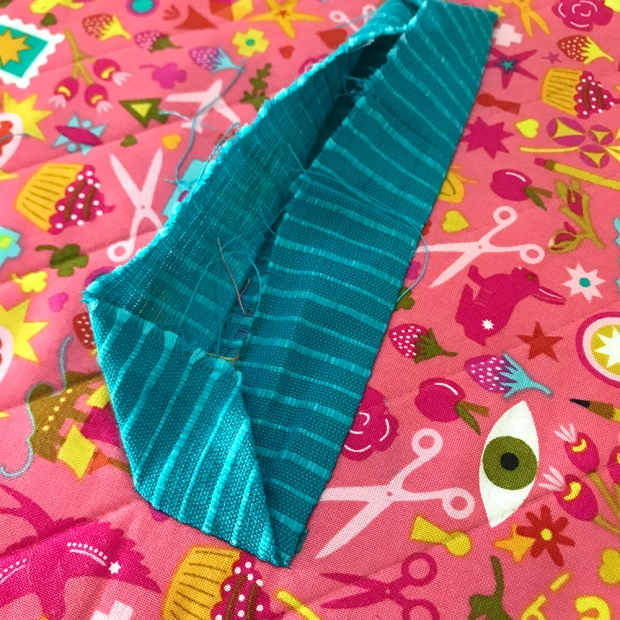
To miter the corners on this side, first press one folded short edge down onto the mat down body. You will see above how the miters start to form with the one sides. Next press the long side down onto the mat, mitering the corner into itself as you can see above.

Repeat this step for all four corners, using pins or glue to help keep everything in place. It likely will not be perfect, your corners may be a little sloppy or your wrap around may be a bit uneven, but no one will see it, so don’t stress!

Finally, check that your miters are in place on the front of your mat and hand or machine stitch the binding in place. Now step back and admire your work as you look around for anything else you can cut a hole in!

I hope you have found this down & dirty tutorial helpful and useful! I’m so pleased with how it worked out on my mat and I hope you are, too.

I’m a bit behind schedule on the SAL, but I’ll be sharing some tips on the pocket panels in a couple days so stay tuned! Also, if you’re just joining in, you can find the free pattern and all the details here.


Mini Maker Station SAL 2019 Kick Off!

DSC_1933

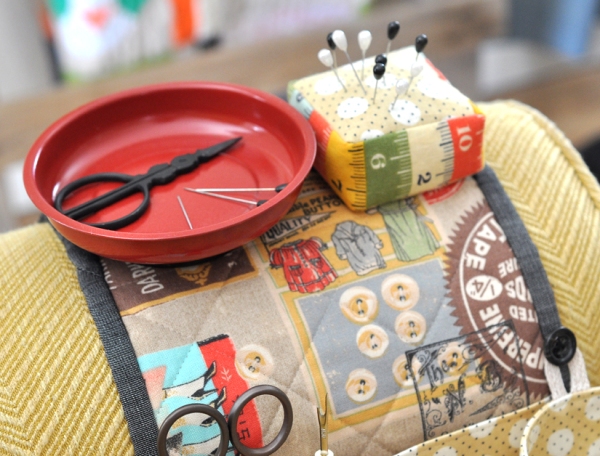
Good morning, friends! It’s time to kick off the 2019 Mini Maker Station Sew Along! I’m thrilled that so many of you have said you’re finally making the time to sew this up for yourself or for holiday gift. Sew Alongs always give me the motivation to create something that I’ve been wanting to.

If you haven’t downloaded the FREE pattern yet, you can find it here. This pattern requires some basic knowledge of sewing and quilting, but any beginner can tackle it! I’ll be including helpful tips, tutorial links, videos and more along the way for every step and I’m always happy to give personal assistance when I can. You can reach out to me anytime through social media or email.

This SAL will run three weeks, ending on October 4, but you are welcome to join in at any time and sew at your own pace. In today’s post I’m going to talk just a bit about selecting fabrics and go over some of the other materials you need. I’m also going to share some tutorial links on basic quilting and binding for those who may be new to quilting, and a couple tips about thread catcher placement. This week we’ll be working on the main body of the Maker Station and the thread catcher. Next Monday I’ll have a new blog post with some tips about creating the fabric basket and working with the magnets.

Share your progress photos on social media with the hashtags #minimakerstationSAL2019 and #minimakerstation to inspire and encourage others, and have a chance to win some fun prizes!

If you haven’t picked up a hardware or are waiting for yours to arrive, don’t worry! You can still begin your project as there is plenty you can do without it, especially during the first week. You can create the entire body and just wait to sew the last bit of binding down until you have the metal, and you can create the thread catcher. There is also quite a bit you can do on the pin cushion and basket next week before you need to add the magnets. You can find hardware kits in my Etsy shop here.

· · · · · · · · · · · · · · · · · · · · · · · · ·

FABRIC & MATERIALS

I want to quickly touch on why I don’t often include “fabric requirement” sections in my patterns, including this one. There are endless ways to layout and customize this project. I never want to lock someone into fabric placements by specifying what you should use where. One person may use three fabrics for the whole project, while another may use thirteen! Also, the cuts on a project like this are all small, so a fabric requirement list would simply be the same as the cutting instructions. The specific sizes of all the pieces you need for each part of the pattern are included at the beginning of each labeled section.

DSC_0845 edit

Now, onto materials! If you have not already purchased a hardware kit or sourced your own materials, you can find more information about those materials needed here, including my sources.

IMG_9046 edit

All fabrics used are standard quilting cotton. You could use some lightweight linens or blends, but thicker materials, such as canvas, may be too bulky for the pin cushion, basket and thread catcher, as they’re all pretty small. In addition to your fabrics, you also need a couple different interfacings. Sometimes these can be optional, as they are often used for added durability, but in this project they are required as they hold the magnets in place and create the basket.

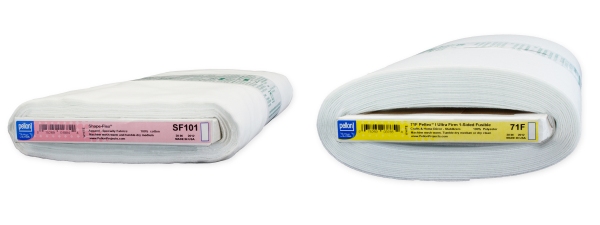
The first is Pellon brand SF101, also known as ShapeFlex. You can find this at any fabric store or Walmart with a craft section. You can also order it online. This can be substituted with another featherweight or lightweight fusible interfacing if you wish, but the SF101 is my preference.

interfacing

The second interfacing you need is Pellon brand Peltex 71F, ultra firm single sided fusible interfacing. I do not recommend substituting this with anything else as it creates the main structure of your fabric basket. Be sure that you get the 71F and not the 70 (sew in) or 72 (double sided fusible). This interfacing is very thick, it should look and feel similar to a piece of cardboard. It should not fold without “creasing” itself. You can also find this interfacing at fabric stores, Walmart (or the like), or online. Next week I’ll share some helpful tips for keeping the basket edges nice and crisp!

walnut

For filling the pincushion, I like to use ground walnut shells because I love the weight and feel, especially with the square shape. It’s like an adorable little bean bag! I purchase mine at a local quit shop, but Plum Easy (the brand I get) also sells online here. If you’re making this for a gift, just avoid the shells if someone has a nut allergy! I have also used polyester stuffing in the cushion, which works perfectly fine!

The last little “extras” you need are some thin ribbon or trim and buttons to hang your thread catcher (which is optional!).

· · · · · · · · · · · · · · · · · · · · · · · · ·

CREATING THE BODY & THREAD CATCHER

If you’re a sewist, but new to quilting, don’t fear! The body of the Maker Station is a great first project to dip your toes into the world of quilting!

To create the main body of the Maker Station, you will need basic knowledge of how to layer your top, batting and backing and how to do the quilting stitches. This tutorial from Suzy Quilts covers all the basics. It applies to a large quilt, so working with your main mat body will simply be a smaller and simpler version! Straight line quilting is a great design for beginners, or a crosshatch is a always a nice option, too. You can see how this looks on my sample below. I’m not sure its mentioned in the tutorial, but I love using a Herra Marker (a bone folder or scoring tool also works similarly) to mark my quilting lines, especially for something like a crosshatch. Here is a video on using a Herra Marker.

mmshome

Another quilting technique you will need to know comes at the end of the body and that is binding. This is the little edge “wrap” that goes around the entire piece and seals everything up. Here is a helpful tutorial from Bluprint.

The body and thread catcher are fairly straight forward and the pattern includes detailed instructions and diagrams on creating these pieces, but if you have questions at any point, feel free to contact me.

DSC_1933 edit crop

When it’s time to sew the buttons for hanging your thread catcher, think about where you will be using your Maker Station. I prefer to hang my thread catcher on the side farthest away from me so my leg doesn’t hit it and it’s not in the way of my pockets, so this placement will vary if you place the station to your right or your left. Also keep in mind it’s “reversible” in a sense, you can place either set of pockets on the inside of your seat or the outside. I sew at least two buttons on my body, but you can sew four buttons (one on every outer edge) so you’re fully versatile!

As I mentioned, this little thread catcher is an optional piece, but I love it. If you don’t use it for scraps, you can use it for extra storage. It’s also a handy design to use elsewhere, like on your sewing machine!

DSC_2046 blog

Those are all the basics for this week as we create our main body and thread catcher. I will be posting some photos of your projects on Instagram through the week, as well as sharing some of the SAL prizes, so I hope you follow along! Remember to use the tags #minimakerstationSAL2019 and #minimakerstation, and share with a friend!

{Click here for the MINI MAKER STATION SAL PART 2}

Mini Maker Station SAL Kick Off!

DSC_1933

Good gravy, how is it February?! I still have a Christmas tree in my studio, but hopefully I can get it down this week :)! I’m SO SO excited to kick off the Mini Maker Station Sew Along (SAL) today! This pattern was in the works for SO long, because A) I’m slow, B) I’m busy, and C) it was a ton of computer work, which I loathe! However, it’s a pretty easy sew, even for beginners. If you haven’t downloaded the pattern, you can find it here.

This SAL will run for a bit over two weeks, ending on February 18. In today’s post I’m going to talk just a bit about selecting fabrics and go over some of the other materials you need. I’m also going to share some tutorial links on basic quilting and binding for those who may be new to quilting, and a couple tips about thread catcher placement. This week we’ll be working on the main body of the Maker Station and the thread catcher. Next Monday I’ll have a new blog post with some tips about creating the fabric basket and working with the magnets.

You are free to work at your own pace and in any order you’d like! Share your progress photos on social media with the hashtags #minimakerstationSAL and #minimakerstation to inspire and encourage others, and have a chance to win a couple fun prizes!

If you haven’t picked up a hardware or are waiting for yours to arrive, don’t worry! You can still begin your project as there is plenty you can do without it, especially during the first week. You can create the entire body and just wait to sew the last bit of binding down until you have the metal, and you can create the thread catcher. There is also quite a bit you can do on the pin cushion and basket next week before you need to add the magnets.

· · · · · · · · · · · · · · · · · · · · · · · · ·

FABRIC & MATERIALS

I want to quickly touch on why I don’t often include “fabric requirement” sections in my patterns, including this one. There are endless ways to layout and customize this project. I never want to lock someone into fabric placements by specifying what you should use where. One person may use three fabrics for the whole project, while another may use thirteen! Also, the cuts on a project like this are all small, so a fabric requirement list would simply be the same as the cutting instructions. The specific sizes of all the pieces you need for each part of the pattern are included at the beginning of each labeled section.

Now, onto materials! If you have not already purchased a hardware kit or sourced your own materials, you can find more information about those materials needed here, including my sources.

IMG_9046 edit

All fabrics used are standard quilting cotton. You could use some lightweight linens or blends, but thicker materials, such as canvas, may be too bulky for the pin cushion, basket and thread catcher, as they’re all pretty small. In addition to your fabrics, you also need a couple different interfacings. Sometimes these can be optional, as they are often used for added durability, but in this project they are required as they hold the magnets in place and create the basket.

The first is Pellon brand SF101, also known as ShapeFlex. You can find this at any fabric store or Walmart with a craft section. You can also order it online. This can be substituted with another featherweight or lightweight fusible interfacing if you wish, but the SF101 is my preference.

interfacing

The second interfacing you need is Pellon brand Peltex 71F, ultra firm single sided fusible interfacing. I do not recommend substituting this with anything else as it creates the main structure of your fabric basket. Be sure that you get the 71F and not the 70 (sew in) or 72 (double sided fusible). This interfacing is very thick, it should look and feel similar to a piece of cardboard. It should not fold without “creasing” itself. You can also find this interfacing at fabric stores, Walmart (or the like), or online. Next week I’ll share some helpful tips for keeping the basket edges nice and crisp!

walnut

For filling the pincushion, I like to use ground walnut shells because I love the weight and feel, especially with the square shape. It’s like an adorable little bean bag! I purchase mine at a local quit shop, but Plum Easy (the brand I get) also sells online here. If you’re making this for a gift, just avoid the shells if someone has a nut allergy! I have also used polyester stuffing in the cushion, which works perfectly fine!

The last little “extras” you need are some thin ribbon or trim and buttons to hang your thread catcher (which is optional!).

· · · · · · · · · · · · · · · · · · · · · · · · ·

CREATING THE BODY & THREAD CATCHER

If you’re a sewist, but new to quilting, don’t fear! The body of the Maker Station is a great first project to dip your toes into the world of quilting!

To create the main body of the Maker Station, you will need basic knowledge of how to layer your top, batting and backing and how to do the quilting stitches. This tutorial from Suzy Quilts covers all the basics. It applies to a large quilt, so working with your main mat body will simply be a smaller and simpler version! Straight line quilting is a great design for beginners, or a crosshatch is a always a nice option, too. I’m not sure its mentioned in the tutorial, but I love using a Herra Marker (a bone folder or scoring tool also works similarly) to mark my quilting lines, especially for something like a crosshatch. Here is a video on using a Herra Marker.

Another quilting technique you will need to know comes at the end of the body and thatt is binding. This is the little edge “wrap” that goes around the entire piece and seals everything up. Here is a helpful tutorial from Craftsy.

The body and thread catcher are fairly straight forward and the pattern includes detailed instructions and diagrams on creating these pieces, but if you have questions at any point, feel free to email me through my website or contact me on social media. I’m always happy to help!

When it’s time to sew the buttons for hanging your thread catcher, think about where you will be using your Maker Station. I prefer to hang my thread catcher on the side farthest away from me so my leg doesn’t hit it and it’s not in the way of my pockets, so this placement will vary if you place the station to your right or your left. Also keep in mind it’s “reversible” in a sense, you can place either set of pockets on the inside of your seat or the outside. I sew at least two buttons on my body, but you can sew four buttons (one on every outer edge) so you’re fully versatile!

As I mentioned, this little thread catcher is an optional piece, but I love it. If you don’t use it for scraps, you can use it for extra storage. It’s also a handy design to use elsewhere, like on your sewing machine!

DSC_2046 blog

So those are all the basics for this week as we create our main body and thread catcher. I will be posting photos of my progress on Instagram through the week, so I hope you follow along! I’ll also be sharing the prizes.

Remember to use the tags #minimakerstationSAL and #minimakerstation, and share with a friend!

Sew-A-Long Tutorials for Beginners

Hello, my Sew-A-Long friends! Today I’ll be sharing a few tutorial links for those who are joining in the Undercover Maker Mat SAL, but may not be familiar with basic quilting or paper piecing (which is an optional element!). There are a lot of step-by-step photos in the pattern and many basic techniques, but it does require basic knowledge of making a “quilt sandwich”, binding a quilt, and paper piecing , if you choose. If you haven’t viewed my Instagram stories, please pop over and take a look. I’m saving all the SAL stories in a highlight which you can access anytime from my main profile. You can also turn on notifications for my posts and/or my stories so you don’t miss anything. I shared a few tips and examples yesterday on how to simplify or customize your mat, so this can help you with the planning stage.

Onto the tutorials! If you’re new to quilting, you will need basic knowledge of how to layer your top, batting and backing for the main mat body (aka the “quilt sandwich”), and how to do the quilting stitches. This tutorial from Suzy Quilts covers all the basics. It applies to a large quilt, so working with your main mat body will simply be a smaller and simpler version! Straight line quilting is a great design for beginners, or a crosshatch is a always a nice option, too. I’m not sure its mentioned in the tutorial, but I love using a Herra Marker (a bone folder or scoring tool also works similarly) to mark my quilting lines, especially for something like a crosshatch. Here is a video on using a Herra Marker.

Another quilting technique you will need to know comes at the very end of the project, but it is binding. This is the little edge “wrap” that goes around the entire piece and seals everything up. Here is a helpful tutorial from Craftsy.

Lastly, we have paper piecing. If you’d like to create the butterfly pocket panel as shown in the pattern, but have never paper pieced before, don’t be intimidated! This is a great time to learn! Cassandra Madge did a wonderful two-part tutorial for beginners using my Butterfly Charm Blocks pattern and you can find part 1 here and part 2 here.
As always, feel free to contact me anytime if you have questions along the way, and stay tuned for more helpful tips here and on Instagram!

Brimfield Meadows + EPP Tips

IMG_5812

Howdy, friends! Sheesh, this blog has been neglected. Some days I feel bad and others I don’t because most people have the attention span of a goldfish these days and blogs aren’t what they used to be. Still, I love to have a space to share more than a few words and one photo of something, regardless of who ever reads it!
Life has been extra crazy lately, but I squeezed in a few days of hand stitching recently because I needed to create something beautiful for myself. I stitched up the new Brimfield Meadows block from Brimfield Awakening and HOT DOG! I couldn’t be happier with it. It was quick and fun to sew, it came together like a dream and it’s such a unique and beautiful shape. I used Sleeping Porch lawn to match the bed quilt I’m working on and plan to make a pillow out of this block to go in my bedroom.

While I’m here, I just wanted to share a few things I loved about this pattern and how I sewed up the variation I chose. I’m also going to talk a bit about some of my favorite notions for English Paper Piecing, because I often get questions in my social media posts. I am by no means an EPP expert, but I have experimented with a variety of threads, basting techniques and stitching methods, and definitely have my favorites that I think yield nearly flawless results.

779D7210-5828-4922-9C9A-91A51BC2839B

Above are just a handful of the fabric placements I was playing with for this block. My final block matches the top left diagram above. You can see all the separate segments of the pattern and how I chose to combine two or three pieces in areas to create one larger piece. I love how you can do this to change the final look of there block, use larger fussy cuts, and make the stitching go quicker!

I simply taped some of the segments together to create the larger units. Note that the outer most tip of every “petal” is perforated on the paper so you can use them whole or split them as I did. Also, another design variation that isn’t shown above is different arrangement of those center “orange peels”. You can flip them 180° from how I used them, sew them up as one unit or even leave half or all of the segments out completely, letting your background show through. You can check out the hashtag #BrimfieldMeadows on social media to see some beautiful examples of all these variations.

While this photo above may look like someone’s unmade bed, it’s how I audition fabrics. If you look close you can see the method to my madness! I’m a total planner, so even when I say I’ll just “wing it”, I always end up making diagrams and taking pics of piles of fabrics to help me plan things, or at least start in the right direction.

· · · · · · · · · · · · · · · · · · · · · · · · · · · · · ·

TIPS & TOOLS

Basting curves was new to me, and it took me a couple tries to figure out the best order of basting down the sides, but once I did, it was really easy! I basted the concave edge first, then pulled the convex edge as needed to make it smooth, and did the two straight sides last. I cut small notches to help with the concave curves which you can see below. As I mentioned above, I used small pieces of tape to connect the paper pieces and create the larger units, which you can also see below.

IMG_0878IMG_0882

When I first started EPP, I would thread baste, mainly because I didn’t have glue basting supplies and didn’t feel like researching how to do it! I tried glue basting because it seemed to save time and it did not work for me AT ALL! The problem was that I was applying the glue all the way to the edge of the paper and I couldn’t grab my fabric to stitch it. I watched some amazing tutorial videos from the queen of EPP Karen the DIY addict and it changed my glue basting life! I watched her apply the glue a bit in from the edges and it was like a “why didn’t I try that?!” kind of moment, but it works like a charm and I’m all glue now! I prefer to use a glue pen (such as Sewline or Fons and Porter).

IMG_0901

When it comes to stitching all those pieces together, I also tried many methods and many threads! If you know me at all, you probably see what a perfectionist I usually am, so visible stitches drive me BONKERS! Though I have learned that sometimes this is on purpose to show consistency? Regardless, it’s not for me. Once again, Karen saved my EPP life with her flat back stitching tutorial. You can see in the photos above of the back of my block that my stitches are by no means consistent or perfect, but you can see directly above how they are not visible at all from the front. This is the only stitching method I use and while some people think it’s slower than others, I find it very easy and quick. It helps to line up pieces and I love that the stitches are hidden so well.

IMG_5744.JPG

Last but not least, my favorite thread and my favorite thimble! Hands down, I love InvisaFil thread from WonderFil. It is 100wt polyester and virtually invisible. I do double the thread over and sew with two strands simply because I like a secure thread on my needle, rather than a loose tail, but it’s strong enough to be used as a single strand. I have tried 80wt cotton threads and they also work well, but I’m a tight puller and am much more likely to break the cotton thread, but I’ve never broken the InvisaFil. I match my thread to my lighter fabric when possible, but as you can see in my detail shots, it’s not too important since you can’t see the stitches!

My favorite thimble, which I cannot stitch without these days, is the Natural Fit Leather thimble shown above which is from Clover. It comes in three sizes and I wear a small on my middle finger, but I have pretty tiny hands 🙂

So, that’s all I got for now! I hope some of these little tips and resources have been helpful to you. I’ll be sure to share my finished Brimfield Meadows pillow once it’s complete, and you may very well see more blocks popping up because I am in love with this pattern (which you can find here if you’re interested)!

happy stitching!
~ nicole

‘lil monsters treat bags
IMG_1015

Fall is in the air and Halloween is right around the corner! I usually don’t have any ‘lil monsters in my life, but since one of my besties happened to be in town for an extended visit, I couldn’t resist whipping up some new treat bags for her littles.

IMG_1078

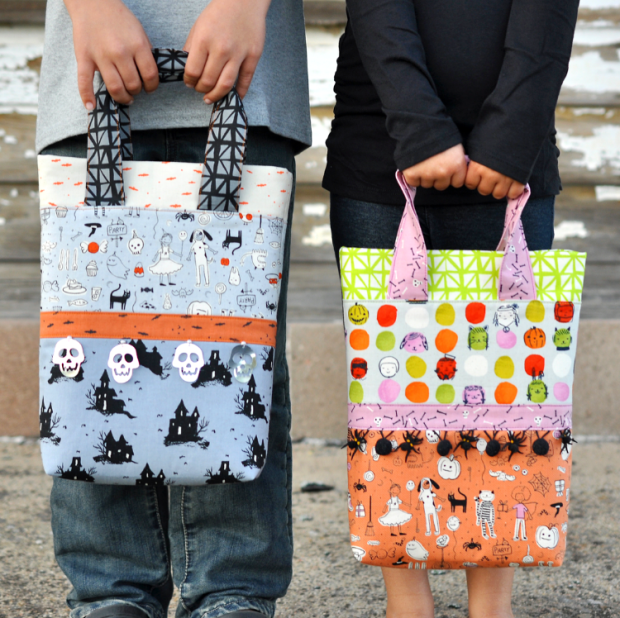
I used the midnight bite treat bag tutorial that I shared last year (find the free pattern here) and some ‘lil monsters fabric from cotton + steel, which was absolutely perfect. This line has a little more of a playful feel to it and I was able to pull prints and colors to make both an older boy and a little girl equally happy! Also, our Aurifil Sariella Thread Collection had just the right colors I needed for yet another project! #win

IMG_1014

IMG_1008

I used solid pieces for the top panel, instead of the pieced bat as in the original, making this project really quick. I used a spider pom pom trim on one and metallic skulls on the other, both of which I found at Joann’s.

IMG_1077

I hope this inspires you to whip up some treat bags for the ‘lil monsters in your life! I’d love to see what you make. Tag your pics on social media with #midnightbitetreatbag or email me! Happy Haunting!

IMG_1018IMG_1012

IMG_1076

Blithe Fabrics Blog Tour

main-b

I first got to play with Katarina Roccella’s newest line, Blithe,  when I made my Bias Weave pillow for the Lookbook last fall. It was love at first sight before I even had the fabric, but you just cannot help but fall head over heels in love once you start piecing it together. Something about the palette and the way it plays with the Art Gallery Fabrics denims just melts your soul. I had a few bits and pieces left from my first project and knew exactly what to make for my stop on the Blog Tour.

I see cathedral windows as a quilty bucket list item, you know? I’ve always loved them (even before I was quilting), and recently watched a friend make a Christmas pillow and it really sparked my fire. It was time. I spent hours looking at and trying various methods and tutorials and decided that the Faux Cathedral Window tutorial by Diary of a Quilt Maven was the way to go for me. The method is pretty much the same as the Missouri Star easy cathedral windows tutorial as well, in case you prefer it in video form.

strip1

What I liked most about this method was two things – first, it used small pieces of fabric, and that was all I had, and second, it felt very precise to me. Being a perfectionist, this is key. It’s also super easy to adjust the size of your windows to anything you wish and to create any shape piece you wish. I won’t walk you through the steps, because that is what the tutorial is for, but below are a few progress photos that may help demonstrate how I translated the tutorial into my finished pillow. Please excuse the bad lighting, it’s been a “work all night” kind of month! If you have any questions, please feel free to leave them in the comments below or send me an email anytime.

strip2

The solid fabric I used along with Blithe on my pillow is solid smooth Art Gallery Fabrics denim in Cool Foliage. It is absolutely perfect with this line and always a dream to work with. I made my window foundation pieces 3″ to start, versus 2.5″ as in the original tutorial, and I pieced 8 units across and four units down to create the window panel. I chose to use the text print inside the petals and the denim for the petal edges, but I also really love the look when these two elements are the same fabric.

owl-back

After the full window panel was complete, I pieced on the top and bottom strips that included a 1″ strip of the text print to help carry the design over, and then a 3″ strip of denim. I kept the back simple to showcase the beautiful owl print, but I think it would be really lovely to make a second window panel so the effect wraps all the way around the pillow. The finished pillow measures 20″ wide by about 18″ tall.

main2-b

The end result was exactly as I envisioned and there was nothing I did not like about the method I used to make it. l definitely be using it again and may actually have a cathedral window obsession after this experience. I already have two more projects planned!

Now that I have these two gorgeous pillows, I guess it’s time to make a bed quilt! It won’t be cathedral windows. I love them, but not that much 🙂

Be sure to check out all the other *amazing* projects in the blog tour by visiting Katarina’s Instagram feed and through the hashtag #blithefabricsblogtour!

two-pillows

Oh, What Fun Blog Hop: Gift Giving Vessels

blog-hop-logo

Howdy, friends, I’m back! And I hope you’re ready to get crafty…

As I mentioned in my previous post, my (belated) stop on the Hawthorne Threads Oh, What Fun Blog Hop is all about easy-to-sew (and easy to customize!) projects that are perfect for holding holiday gifts. Ditch that wrapping paper! I’ll be talking about how modify my free Sturdy Fabric Basket pattern to create ANY SIZE finished piece and sharing an adorable fabric sack pattern that I think you’ll love.

This new in-house fabric line by Hawthorne Threads could not possibly be any cuter. I’m pretty sure I squealed a little when I first saw it. Some of the prints are perfectly holiday, but what I really love is that some of them are more neutral – winter themed, or just geometric – and can be used for a a variety of occasions, which I’ll talk about more later. So, let’s get to it!

dsc_1015-blog2

These Sturdy Fabric Baskets are one of my favorite things to make. They’re quick and easy, and useful for so many things (plus, totally adorable!). I initially created the pattern a couple years ago to make baskets for holding fat quarters, scraps, trims, and notions in my sewing room, and then made one for holding remotes in the living room, another for hair accessories in the bathroom, and one for next to the door to catch my husbands wallet, sunglasses and all the miscellaneous junk that lives in his pockets!

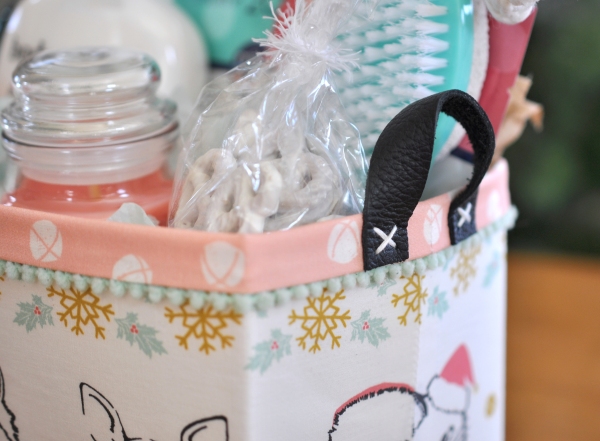
You can showcase a fun focal print or create any patchwork design you like (there are patchwork directions in the pattern). The original pattern size (shown above and below) finishes at 8″ wide by 5″ high and 5″ deep, and is perfect for mixed gift baskets of items such as bath & body products or edible treats, just to name a couple ideas. I love these baskets so much, I want to gift them to myself! I can do that, right? I mean, I DID make them.

Another great feature of this basket size is that it’s perfect for holding Christmas cards, so your recipient can repurpose it after it’s emptied. You can also give a bag of potpourri along with it and it can be used a cute holiday decoration!

dsc_0977-edit-blog

I used my favorite prints from Oh, What Fun on these two. The row of faces is cut from the border panel print and was the perfect size, and then I used the center of that panel (the cute confetti) to make the lining of the other basket. The ornament print is called Baubles and I also used it to make some cute gift tags which you’ll see later in the post. I added tiny pom pom trim to the basket shown above and I love the look! I tucked it under the lining foldover and glued it in place – super easy!

dsc_1033-blog

In the pattern file, I talk about using old belts or scraps of leather for the basket handles (which are optional.) I used scraps on both of these baskets. The gold was cut from a pouch I found at the thrift shop and the black is from a leather scrap pack I found at Hobby Lobby. I used embroidery floss to stitch them in place.

Thinner, lighter weight materials work best for the handles so they can bend easily. If your leather is too thick or sturdy, it can bow the sides of the basket out. You can also use ribbon, bias tape, or fabric in place of the leather.

dsc_0992-blog

———-

CUSTOMIZING YOUR BASKET

I receive emails quite often asking if I can resize the basket pattern cutting directions to create a specific sized piece that someone wants to make, so updating the pattern on how you can do this yourself has been on my to-do list for awhile, and this seemed like the perfect time! With a little math (don’t worry, it wont hurt too bad!), you can create any size basket you wish.

I’ve updated the original Study Fabric Basket PDF pattern file to include these directions and you can download it here.

Now I’ll show you a couple different sized baskets I created to get your creative juices flowing!

dsc_1083-blog

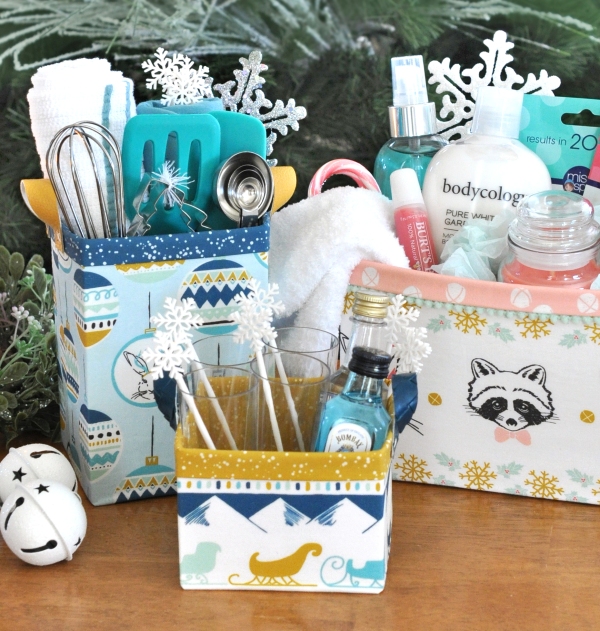
I wanted to make a piece that was sized for kitchen utensils and accessories, because that is another favorite set of mine to gift (perfect for housewarmings and showers, too!). This basket measures 4″ wide by 4″ deep and 6″ tall and I filled it with a dish towel, pot holder, whisk, spoon, spatula, measuring spoons and cookie cutters.

I used my favorite Baubles print in the Glacier Blue colorway and the lining is from Hawthorne’s Stardust basics line, which comes in 54 colors and coordinates so nicely with Oh, What Fun because it looks like snow!

dsc_1156-blog

And let’s not forget the guys or hard-to-shop-for friends and family on our lists! This basket measures 4″ wide by 4″ deep and 3″ high and holds four shot glasses with stir sticks and two mini bottles of liquor. It would also make a fun and inexpensive secret santa gift. Plus, this small basket is a nice size for later holding keys, jewelry, sewing notions or many other things. It also fits a pillar candle or mug.

dsc_1158-edit-blog

The handles on both of these baskets were also cut from old thrift shop pouches. Both are vinyl, so they had white backings. I left the white showing on the yellow handles and for the blue handles on the short basket, I glued a piece of the dark blue stardust to the backside before trimming them down. It worked out so well! I also did this to the gold handles on the treats basket shown at the beginning of the post.

dsc_1169-blog

———-

BUTTON LUNCH BAGS & GIFT TAGS

I have one more fun pattern to share, because it’s just perfect for gifting homemade treats (or a million other things) and then your recipient also has an adorable and useful little sack! I’ve had this Button Lunch Bag pattern from Purl Soho bookmarked forever and made a few modifications to dress them up and make them quilting cotton friendly.

dsc_1199-blog

The pattern calls for a sturdy cotton (such as a canvas), uses one solid fabric, and has a rolled hem, so I made a few easy changes to make them work with my materials and the look I was going for.

I wanted my bags to have a bottom accent fabric, so I pieced together the full panel before assembling the bag and then added some cute trim along the seam line. Also, since a rolled top hem wouldn’t look as nice with a printed quilting cotton, I instead used binding around the top of the bag. I added it last after assembling the bags. I used Pellon Shapeflex (SF101) to give the bags some extra bulk and I love the feel of them. I added the interfacing after piecing my full panel, before assembling the bag.

dsc_1282-blog

The original pattern uses binding to hide the inner seams, but I just used a wide, tight zig zag stitch which was quick and easy, but gives the seams a clean look and prevents fraying. Alternatively, if using binding around the top, you could make a full lining for the bag. Simply make a second bag, but with right sides in instead of out, slide it inside your assembled outer bag, and then stitch the top binding down through both, holding them together.

For these bags, I used two of the prints from Oh, What Fun that are not holiday specific. They are definitely festive enough for holiday gifting (especially with some metallic trim!), but keep the bags neutral enough to be reused all year long.

I used the Baubles print that I love so much to make the little tag on the cookies. I fussy cut the ornament circles from the print and used embroidery floss to hand stitch them onto felt cut with pinking shears. I then stitched down a small, folded piece of felt onto the top to make the hanger. You can use a light print or solid cotton on the reverse side to write or stamp a name.

I had so much fun with these, I couldn’t stop! They’re going on all my gifts this year, and I think I’ll hang a few from my tree, too!

tags

———-

I truly hope you have found this post useful and inspiring! All of these projects are easy and satisfying because they sew up quick and look totally adorable when done. This year I challenge you to ditch the wrapping paper and make some “gift wrap” instead!

As always, if you have any questions about the pattern along the way, you can contact me here anytime. Please be specific, so I can best assist you.

dsc_1192-blog2

———-

 oh-what-fun-giveaway-image

TIME FOR GIVEAWAY! (GIVEAWAY CLOSED – THANKS TO ALL WHO ENTERED!)

Who loves this Oh, What Fun fabric as much as I do? Would you like to win THREE YARDS for yourself?! To enter, please leave a comment on this post telling me what you would make with it and I will pick a winner at random on Friday! (Giveaway closed – congrats to @kgmcfall and thank you to all who entered!)

Now before you go, be sure to check out the other stops on the Blog Hop and see all the fabulous makes!

Monday 11/14 – Sew Sophie Lynn
Tuesday 11/15 – Hawthorne Threads
Wednesday 11/16 – Olivia Jane Handcrafted
Thursday 11/17 – Holly Gets Quilty
Monday 11/21 – Violette Field Threads

Happy Stitching!
~ nicole

dsc_1001-blog

Rip Strip Weaving: Using your Loom

rip strip weaving | lillyella stitchery

Now that you’ve built your loom (you can find that post here), it’s time to use it! I touched on options and materials a bit in the first post, but will cover all of that again. I will start here with stringing, then move on to weaving, and will do a third and final post about finishing options.

I will also write additional posts in the future on different things you can do with your loom and make with your woven panels as I make them myself, so be sure to check back for those!

I started this project with the intention of using ripped strips of cotton fabric for the weaving, and that is how I created my rainbow runner below, but the possibilities of what you can weave into your piece really are endless. Consider various fabric substrates, yarns, ribbons, etc.

rip strip weaving | lillyella stitchery

I need to begin by saying that not every aspect of weaving is science. There are some things that can’t be definitively explained. Some things come with a “feel” or by simply doing it once and figuring it out from there. So, please excuse some of the looseness of this post. I will provide all the information I can about this project and will post updates as I use my own loom more.

—–

STRINGING YOUR LOOM

The first step in using your loom is to run the warp threads. These will run with the length of the rails between the cross members and wrap around the nail posts. As with every aspect of this project, you have many options for stringing the warp threads of your loom, from the material you use to the way you run the threads. I will show you two options in this tutorial.

On my rainbow sample runner, I used one yarn in a continuous string. It was slightly off white with tiny metallic flecks in it. I wanted a strong contrast against the rainbow fabrics and love the way it looks. You can use any sort of yarn, thread, floss, cord, twine, or even fabric strips for your warp threads, and I will show you a few different options later in the post.

To string your loom with one continuous thread as I did in my rainbow runner, you will first begin by making a large loop with a secure knot on one end of your thread (I’m using yarn in this instance). You want to make sure you have enough to string the entire loom, so do not precut any lengths, just work from the skein or whatever amount your string comes as. If it is not long enough to make one continuous piece, you can simply knot an additional piece on and continue.

stringing1

Hook your loop over one nail post at either end of either cross member, it does not matter where you begin. You will now run your thread down to the other cross member, around the first nail post and back up to where you began. Loop around the next nail post and continue this until you’ve wrapped around all the nail posts. You will now end at the last nail post on the opposite cross member from where you began. Secure your thread by making another knotted loop and hooking it over the nail post.

If you’d like your warp threads to be farther apart, giving a “looser” look to your finished weave, you can loop your threads around two nail posts, vs. just one, as shown in the bottom right photo above. Just remember that you will only see half the warp threads on each side of your woven piece. So, when you are looping on each nail post, the fabric will be on top of one thread and underneath the other. You can compare how the threads look strung on each nail post in the diagram above to how my finished rainbow runner looks. I strung my threads around each nail post on that piece.

Now here’s the important (and slightly loosey goosey) part, you DO NOT want your strings to be tight. When I started this project and just blindly jumped in, I strung my threads as tight as I could pull them. About five rows into my weaving, I realized the error of my ways. You will be amazed at how much slack is taken up by weaving the fabric strips through the threads, so you need them to be LOOSE when you begin. I’m sure you are asking, “how loose?”. Well, that’s the part I can’t really answer. You do not want them sagging to the table through your center loom opening or falling off the nail posts, but you otherwise want as much slack as you can have without those two things happening. Once I finish stringing my loom again for my next project, I’ll see if I can take a video that may help a bit.

STRINGING VARIATIONS

If you would like to use a variety of different materials or colors for your warp threads, you can do this a couple different ways. First, you can use the same continuous string method that was described above and knot your various threads together at any point you would like to change. Alternatively, you can create separate thread loops, rather than one continuous thread.

stringing2

In the diagram above I have one green thread loop and one white thread loop. Each spans between one nail post on the cross members. You can also double the spacing on these as I described above, and even skip a nail post between loops for a more symmetric spacing.

—–

RIPPING STRIPS

Before I started this project, I had never torn fabric. I had received fabric with torn vs. cut edges, but had never done it myself. I wanted my woven piece to have a bit of a raw feel to it, so the frayed edges of ripped strips were the perfect option. Below I will show you how to tear fabric strips to achieve the look of my rainbow runner, but you can also use cut strips of fabric for your weaving.

I used 2″ strips throughout my piece for a consistent look, but plan to use a variety of different widths on my next project to achieve a scrappier look. The length of my most of my strips was the width of the fabric, but I also used some fat quarters and smaller pieces. You can use ANY size scraps you like for this project. Later in the post I will show you how to knot your strips together as you weave, but you can also seam your strips together with your sewing machine or hand stitches as you go.

The beauty of ripping fabric, and why some shops choose to do it, is that you will always have a perfectly straight and square edge. If you are beginning with a cut of fabric that already has a torn edge, you can skip the first step, but if you are beginning with a cut of fabric with a cut edge, you will first need to create a torn square edge.

tearing1

Depending on how straight or crooked your fabric is cut (you may be amazed at how off some cuts are!), the placement of your first snip will vary. You will start by snipping a small slit on a slevedge edge of your fabric about 1/2″ to 1″ in from the cut edge of your fabric and then simply hold the fabric on both sides of you cut and tear the strip off. If your tear does not run all the way to the other end of your fabric, you are still not square and need to move in farther with your initial snip.

Once you have your first fully torn edge, you can now measure to the width you’d like your strips, snip and tear. The result will be perfectly equal torn strips. It’s like magic! Ok, not really, but it sort of feels like it.

tearing2

—–

WEAVING

Now it’s time to weave – hooray! Though it’s not necessary, I found using a Dritz Elastic threader as a “needle” made the weaving process much easier. They come in a three pack for about $2 – $4 online. I ordered mine from Amazon, but you can also find them on Craftsy and a variety of other websites. The Wefty needle also serves the same purpose.

needle

When weaving your panel, you will begin at one cross member and weave to the middle of the loom along your rail length. You will then stop and start again at the other cross member and work to where you left off previously in the middle. You do this because it is much easier to squeeze the last rows into the middle of the loom than it would be to fight with the last rows along your cross member.

You will want to begin your weaving a few inches in from one of your rails. It doesn’t matter which side you start on or which direction you weave. Weave your fabric strip above every other warp thread and be sure to watch this carefully, as it’s easy to miss one or make a mistake and not notice it until later. Pull your fabric strip through the warp threads until the end of your strip is where you began weaving and work toward the anchor rod. When you get to your anchor rod, you will treat it just as another warp thread, going the opposite of your last thread. You will see below that my fabric was on top of my last warp thread, so I wove it under the anchor bar.

weaving1

Wrap your fabric around the anchor bar and continue weaving to create the first full row. Once you cross over where you began, you can pull a bit from the end of your strip and tuck it under your first full row. Alternatively, you can just leave it as it, it will hold tight once your weave is complete and I will also talk about stitching the ends in place once you are done weaving.

You will now continue in the same manner of weaving, making sure to check your work as you go. Your fabric should always wrap around the anchor rod in the same way as your previous row, so that is one way to double check that you are still on track. When you get to a screw eye, be sure to not wrap your fabric around the post of the screw eye or you will not be able to remove the piece from the loom. Just weave the fabric on either side of the screw eye. It’s alright if you have to squish or stretch a bit to make it work, it will all even out when you remove the piece from the loom.

rip strip weaving | lillyella stitchery

As you’re weaving your strips, you will find they twist and fold and bunch in different ways as they’re pulled through the warp threads. You can try to control this as you feed the strips, such folding the fabric on itself a certain way, or you can simply let it do its own thing!

You will also need to push your rows together toward the cross bar as you work. You can do this every row or every few rows, it’s just something you’ll get a feel for as you go. You can push your rows together as tight or as loose as you wish, depending on the look you are going for.

Also, you do want to pull your strips too tight as you weave. The anchor rod will keep your piece stable and square, but if you pull too tight, you can start to bow the anchor rod. This will make it hard to remove your piece from the loom and possibly cause irregular edges.

—–

ATTACHING STRIPS

When you are ready to attach your next strip of fabric (or other material), there are a couple ways you can do it. I used a knotting method, which I will show you below, or, as I mentioned above, you can machine or hand stitch materials together. You do not want to weave with too long of a strip at once, because it is just more to pull through the warp threads as you weave. It is best to attach the strips as you work.

When you are close to the end of the strip you are weaving with, leave about 5″ – 7″ loose. Lay a new strip on top of the end of this strip, lining up the ends as shown below. Fold both ends over about an inch and cut a small slit through both pieces.

rip strip weaving | lillyella stitchery

You now want to place your new strip, right sides together, on top of the strip in the loom, lining up the cut slits as shown in the photo below. The scissors are just to show the slit in both pieces. Next, take the loose end of the new strip and run it through the cut slits from the bottom. This new strip should be going first through the slit in the strip that is woven into the loom. Pull the piece through until it tightens into a knot. You can now continue weaving.

knotting2

—–

FINISHING THE WEAVE

As mentioned previously, you will start weaving from one cross member of your loom into the middle. You will then start again at the other cross member and work to the middle where you left off.

The photo below shows what your panel will look like when you meet in the middle. Continue weaving until you close the gap and overlap your ends a few inches as shown on the right.

rip strip weaving | lillyella stitchery

Once you are finished weaving, you can hand stitch these loose ends to surrounding fabric or you can do this after you remove the piece from the loom.

You’re now ready to remove your panel from the loom! You will first remove two screws at the end of the anchor rods on one cross member using a screwdriver and then slide the anchor rods out. They may feel tight and you can use pliers or vice grips to start pulling the anchor rods loose. Twisting them a bit can also help. Once the rods begin to move, they will slide out easier. Next, you will lift the woven panel carefully off one set of nail posts, and then the other. Be gentle as you do this to not tear your warp threads.

Now that your panel is off the loom, admire your work and give yourself a hand!A couple more little things and you’re done.

If you wove your warp threads as one continuous piece, your initial looped ends at the beginning and end of your thread will need to be secured. When you first remove the piece from the loom, use a safety pin to hold the ends in place, otherwise the warp thread end can get sucked down into your weave. To secure them permanently, use a needle and thread to secure the loop onto a lower portion of the thread. Start by knotting your thread onto the loop then run your needle through the warp thread one row below and knot to secure.

rip strip weaving | lillyella stitchery

Also, If you did not stitch your final loose fabric tails down before removing the panel, you can do so now. You can also do this with the fabric ends where you began weaving at either cross member, if you wish.

—–

Now that your piece is woven and off the loom, you can call it complete as is or you can add various finishing touches, such as cuffs or tassles, or use the woven panel on something else, such as a bag or pillow. Since this post is already quite lengthy, I will address that in a separate one.

If you have any questions about this tutorial, please contact me anytime, just be as specific as possible so I can best assist you.

I so hope you enjoy this process as much as I have! Please use the hashtag #ripstripweaving so I can see what you are making!

Here’s a shot of the materials I’ll be using for my next project. I plan to use a variety of threads for the warp threads and add a mix of yarns and other materials into the weave along with the fabric strips. I’m pretty excited about it and I’ll share more soon here and on Instagram!

fullsizerender