Maker Mat SAL: Optional Thread Catcher

DSC_0490 edi

Hello, Hello! If you are just joining the sew-a-long, please scroll down a few posts to find the kickoff and all the tips shared in previous posts or scroll to the bottom of this post for direct links.

Some of you are just joining in and some are already finished with their projects. Today is my last post about the steps of the pattern, but there is still plenty of time to sew! I will officially be wrapping up the SAL at the end of this month and choosing winners for the awesome prizes up for grabs, but you don’t have to finish your mat to be eligible to win. You just have to post your progress photos with the hashtags #undercovermakermatSAL2019 and #undercovermakermat on Instagram or Facebook. Every post is an entry. If you’re joining in and don’t have any social media accounts, feel free to email me some pics (nicole at lillyella dot com)!

•  •  •  •  •  •  •  •  •  •  •  •  •  •  •  •

THREAD CATCHER

Onto today’s business. You’re either a thread catcher kind of person, or you’re a throw-it-on-the-floor-and-sweep-it-up-later kind of person! So, this step is optional. The thread catcher is designed to hang from a button on the far right pocket, but it will also stand on it’s own and can sit on your work table. If you choose to have it stand alone, you may want to shorten the height of it a bit to make it easier to use.

As with all the elements of this pattern, there are endless ways to customize the thread catcher. You can use a single fabric embellished with trim and selvedges or you can create any sort of patchwork design you like. Piece in a single accent strip, make the bottom half a contrasting fabric or use another paper pieced block. Here are a few examples:

catcher-close

originalcatcher

IMG_2643 edit2

tulacatcher

purebredcatcher

•  •  •  •  •  •  •  •  •  •  •  •  •  •  •  •

OTHER USES

Outside of this project, the thread catcher alone is handy for a variety of other uses! I often hang one somewhere on my machine while I’m sewing and I’m also working on a set that will hang from hooks on the wall behind my sewing machine to hold tools and notions. You could hang some in a bedroom or bathroom for jewelry, toiletries, hair accessories, etc! You can easily adjust the size by adding or subtracting equal amounts to all pieces.

•  •  •  •  •  •  •  •  •  •  •  •  •  •  •  •

Remember to keep sharing your photos with the hashtags #undercovermakermatSAL2019 and #undercovermakermat!

ADDITIONAL POSTS:

Undercover Maker Mat Sew-a-long: All the details

PART ONE: Kickoff! Sizing your mat and tutorials for beginners

Sponsors and Prizes!

PART TWO: Adding a machine handle opening

PART THREE: Pocket Panel Tips & Tutorials

Maker Mat SAL – Adding a Machine Handle Opening

Honestly, I’ve been wanting to do this tutorial for adding a handle opening to the Undercover Maker Mat for YEARS… but I feel like that’s basically the story of my life! For all who have been waiting, I appreciate your patience! Once great thing about this is that you can add it at any time to any mat – finished, or not. It’s sort of an afterthought, per say, and doesn’t affect anything in the pattern.

Most of my machines do not have handles, so this new little travel machine came into my life at just the right time! This process hurt my brain just a teeny bit, but in the end it’s really pretty easy! I’ve done my best to capture it in photos and I hope it will all be easy to follow (and I think it will once you’re actually doing the steps), but if you have any questions, never hesitate to contact me here or through social media.

This tutorial is for binding the handle opening, however, if you are familiar with facing, that technique will most certainly work for this!

Just one note, I cannot guarantee that this tutorial is detailed enough for complete beginner sewists who are working on this project. There are no complicated techniques, but you may need to familiarize yourself with basic binding techniques to understand some of the terminology and techniques used.

The first step in planning for your opening is to measure, then measure again, then measure about 17 more times. I’ll tell you it is PAINFUL to cut into your precious quilted body, so be sure to check yourself! I took so long doing it that my husband started to make fun of me, but it was worth it. Keep in mind how wide your mat is in relation to your machine and be sure to place your measuring device accordingly. You can see how mine is hanging off the edge a bit. You will need your opening to be just large enough for your handle to slide through. Mine ended up being a little less than 6″ by  3/4″. Your binding will only shrink the opening a very small amount, so you don’t need to take that into account. Also remember, you can always cut the opening larger, but you can’t make it smaller!

When you measure the placement of the opening around the height of the machine, be sure to leave some slack in your tape to account for the bulk of your quilted body. I used the bobbin winder pin on the top of my machine as a gauge. To double check my measurements,  I placed my mat body over my machine and placed the tape measure on my mat. I felt the bobbin winder pin through the mat and noted where the tape measurer hit it. I then removed the mat and placed the tape measure in the same spot on the bobbin winder pin and checked my measurements against the handle. Every machine will be different, so figure out what method works best for you in determining your measurements.

Once you have your measurements, mark them on the body of your mat with an erasable pen or your preferred method and then check your placement again by placing the mat over your machine and feeling through it as best you can to see if the handle is lining up. Then its time to cut! Terrifying, I know. You can do it!

Now will you bind the hole. It’s much like binding the outside a quilt, but you handle the corners differently since they are inside. We will be using a single fold binding method. Cut a piece of binding fabric 1.5″ wide with the length being the diameter of your rectangle plus about 4″.

First, you will mark 1/4″ all the way around the outside of your rectangle on the top/outside of your mat. You will see in my photo above that I have stitch lines 1/4″ around my rectangle. This is from my initial failed attempt at binding that I tore out :D! Since I could see the lines, I did not need to use another form of marking, but you can use an erasable pen or you use a basting stitch.

Next you will clip diagonally into all four corners just shy of your 1/4″ marks as show above. You will now sew the binding down.

You will begin sewing the binding down along one long edge of your rectangle. I did not get a photo before I started sewing, so we’ll use this photo above as a reference for placement. Leave a small tail of unsewn binding for finishing later.

You will place your binding right side down onto your mat body and sew with a 1/4″ seam allowance. When you get to a corner, continue sewing 1/4″ past the opening of your rectangle, which will be indicated by your 1/4″ marks around.

Here’s where it gets just a bit fussy. It’s not difficult, it just takes a bit of finagling under your machine. With your needle down, lift your presser foot and pull the short side of your rectangle opening toward your presser foot so it is in line with the seam you just sewed. The little snips you made in the corners will allow you to do this.

You will then continue sewing your binding strip in a straight line onto this side. If this seems confusing when reading it, I promise it will make sense once you’re sewing. You will continue sewing all the way around your opening, repeating this process on all four corners.

When you get back to where you started, press one end of your binding strip back about 1/4″ and then lay the other end on top of it, trimming it about 1/2″ to 3/4″ past the overlap. Pin in place and finish stitching the seam securely.

Now it’s time to press and turn the binding to the backside. Once complete, you can hand or machine stitch it in place, just as with an outer quilt binding.

Press your binding along the seam toward the hole opening to help it lay flat. You will now miter the corners working on one side at a time. First press one long edge inward and then miter one corner of a short edge as shown above, folding the outer point in to form a 45° angle and press.

Next, fold the other long edge in mitering the corner in the same way and press. Repeat with the other side of the opening.

You will then turn the binding through the opening to the underside of your mat and you will work on pressing and mitering that side. Don’t worry about your miters staying perfectly in place. Just make sure you gave them a good press before turning and they will fall back into place.

If you’re opening is small (and even if not), you may find the next steps a bit fussy, but just take it one step at at time, and you’ll get it done!

Working along one edge at a time, fold the binding strip onto itself, wrong sides together, up to the edge of your opening and press. Repeat for all four sides and feel free to use some glue to help keep it down!

Your piece will now look something like mine above once all sides are pressed. The Mariner cloth I am using was getting a bit frayed because of it’s loose weave, so I had a little trouble keeping things “crisp” for the photos.

To miter the corners on this side, first press one folded short edge down onto the mat down body. You will see above how the miters start to form with the one sides. Next press the long side down onto the mat, mitering the corner into itself as you can see above.

Repeat this step for all four corners, using pins or glue to help keep everything in place. It likely will not be perfect, your corners may be a little sloppy or your wrap around may be a bit uneven, but no one will see it, so don’t stress!

Finally, check that your miters are in place on the front of your mat and hand or machine stitch the binding in place. Now step back and admire your work as you look around for anything else you can cut a hole in!

I hope you have found this down & dirty tutorial helpful and useful! I’m so pleased with how it worked out on my mat and I hope you are, too.

I’m a bit behind schedule on the SAL, but I’ll be sharing some tips on the pocket panels in a couple days so stay tuned! Also, if you’re just joining in, you can find the free pattern and all the details here.


Maker Mat SAL Sponsors & Prizes!

We’re just about through week one of the Undercover Maker Mat Sew Along and it’s time to talk prizes! Who doesn’t love the chance to score some sweet gifts while sewing up a super fun project?!

I have some really awesome and generous sponsors that have donated some SUPER FABULOUS prizes to give away during the sew along. Everyone who participates in the SAL and posts progress photos and/or finished pieces on social media with the hashtags #undercovermakermatsal2019 and #undercovermakermat will be eligible to win. All winners will be drawn at random at the end of sew along.

Here’s what’s up for grabs…

String & Story

HollyAnne of String & Story is offering a spot in the Spring session of her online Free Motion Quilting Academy course! YOU GUISE, that’s a $150 value! Isn’t that so sweet of her? You really need to check out this class. She has a session in progress right now, but you can sign up here to be notified about the next class.

Be sure to check out her Instagram posts to see the amazing work she does and what her students accomplish during the course. If you have always thought you could not learn to FMQ like a rockstar – THINK AGAIN! I guarantee HollyAnne can teach you! (And this is using any domestic machine!).

•  •  •  •  •  •  •  •  •  •  •  •  •  •  •  •

Hummingbird Lane Fabrics

You like fabric, right?! Well, we have two chances to win some! First up, I have a bundle of POP! Fabric by Rashida Coleman Hale for Ruby Star from Lesley at Hummingbird Lane Fabrics! This collection is SO CUTE and Lesley carries all the best in modern fabric. She’s also super sweet and amazing to work if you need help or something specific. You can check out her shop here!

•  •  •  •  •  •  •  •  •  •  •  •  •  •  •  •

STASH FABRICS

More fabric! Next we have a $25 gift certificate to Stash Fabrics! You know how much I love shopping with them! The shipping is lightening fast and the service can’t be beat! They ship all over the world and have just about every single thing you could ever need from fabric to notions to patterns. You can check out the online shop here!

•  •  •  •  •  •  •  •  •  •  •  •  •  •  •  •

EYE CANDY QUILTS

Are you a Fierce Quilter? I’ll say I get a little fierce when I quilt because I hate it so much :D! My brows furrow and my tongue sticks out the side of my mouth, but I do love rocking this pin from Anneliese at Eye Candy Quilts. It lives on my jean jacket and I’ve got one for one of you to win! You can find them here in her Etsy shop and I recommend stocking up on some for gifts for all your quilty friends!

•  •  •  •  •  •  •  •  •  •  •  •  •  •  •  •

MAKER PIN CO

If you follow me on social media, you’ve probably seen my super fun collaboration with Amanda at Maker Pin Co! She works with all your favorite designs to create THE CUTEST enamel pins based off quilting patterns and fabric designs, and she’s giving away a $20 shop credit! Here are a couple of my current favorites in her shop AND my Midnight Bite Bat Pin will be out soon, too and I can’t wait!! You can find all the current designs in her shop here!

•  •  •  •  •  •  •  •  •  •  •  •  •  •  •  •

Sandy Oz Stitches

Don’t you love handmade gifts? I find that people don’t often make things for me since I make things myself, but there is nothing better than receiving a handmade gift from someone else! Sandy Osborne makes THE CUTEST little sewing accessories, pouches etc AND she knits!! So good. She made the little notion basket and button card shown below for the sew along and is also including a pack of 24ct gold straw needles and a $10 gift card to Super Buzzy! Isn’t that so sweet?! You can check out her Etsy shop here and follow all the adorable things she creates on instagram here!

•  •  •  •  •  •  •  •  •  •  •  •  •  •  •  •

image

LILLYELLA STITCHERY

Hey, that’s me! Last, and I’m gonna say not least :D, I’m offering three winners my entire pattern library! If you don’t know how to paper piece – DON’T Worry! My Take Wing Mini pattern includes complete step by step instructions on how to foundation paper piece for beginners.

image

•  •  •  •  •  •  •  •  •  •  •  •  •  •  •  •

I will have the next SAL post up in a couple days talking about how to add a handle hole to your Maker Mat body, then we’ll talk about pocket panels!

Undercover Maker Mat SAL 2019

SALgraphic2019

It’s almost time! The 2019 Undercover Maker Mat Sew Along will kick off on October 7 and run thru October 23! Anyone is welcome to join in and sew along. There is no sign up or obligation and the sew along will be casual! You can download the free pattern here. I will be following the schedule below but you are welcome to sew at your own pace and join in any time!

There are many ways to customize this project and adjust it to your skill level, so please note that many specifics indicated in the schedule are optional. Before the SAL begins, I will share a blog post discussing some of these options, variations and customizations to help you plan. I will talk about sizing the mat to your specific machine and this year I will also be sharing a little tutorial on how to add a hole in the mat for a handle, if your machine has one.

UNDERCOVER MAKER MAT SAL SCHEDULE

October 7: Kick off! Make main body panel

October 15: Adding a machine handle opening

October 17: Pocket panels

October 18: Make optional thread catcher

October 28: Share your finished projects!

In the meantime, you can download the pattern and start thinking about your fabric pull. You can also check out the hashtag #undercovermakermat on social media to see oodles of inspiration! If you’ll be joining in, I’d love for you to share the top graphic from the post and tag me @lillyellastitchery and use the hashtag #UndercoverMakerMatSAL2019!

~ Nicole

DSC_0428 edit B

Oh, What Fun Blog Hop: Gift Giving Vessels

blog-hop-logo

Howdy, friends, I’m back! And I hope you’re ready to get crafty…

As I mentioned in my previous post, my (belated) stop on the Hawthorne Threads Oh, What Fun Blog Hop is all about easy-to-sew (and easy to customize!) projects that are perfect for holding holiday gifts. Ditch that wrapping paper! I’ll be talking about how modify my free Sturdy Fabric Basket pattern to create ANY SIZE finished piece and sharing an adorable fabric sack pattern that I think you’ll love.

This new in-house fabric line by Hawthorne Threads could not possibly be any cuter. I’m pretty sure I squealed a little when I first saw it. Some of the prints are perfectly holiday, but what I really love is that some of them are more neutral – winter themed, or just geometric – and can be used for a a variety of occasions, which I’ll talk about more later. So, let’s get to it!

dsc_1015-blog2

These Sturdy Fabric Baskets are one of my favorite things to make. They’re quick and easy, and useful for so many things (plus, totally adorable!). I initially created the pattern a couple years ago to make baskets for holding fat quarters, scraps, trims, and notions in my sewing room, and then made one for holding remotes in the living room, another for hair accessories in the bathroom, and one for next to the door to catch my husbands wallet, sunglasses and all the miscellaneous junk that lives in his pockets!

You can showcase a fun focal print or create any patchwork design you like (there are patchwork directions in the pattern). The original pattern size (shown above and below) finishes at 8″ wide by 5″ high and 5″ deep, and is perfect for mixed gift baskets of items such as bath & body products or edible treats, just to name a couple ideas. I love these baskets so much, I want to gift them to myself! I can do that, right? I mean, I DID make them.

Another great feature of this basket size is that it’s perfect for holding Christmas cards, so your recipient can repurpose it after it’s emptied. You can also give a bag of potpourri along with it and it can be used a cute holiday decoration!

dsc_0977-edit-blog

I used my favorite prints from Oh, What Fun on these two. The row of faces is cut from the border panel print and was the perfect size, and then I used the center of that panel (the cute confetti) to make the lining of the other basket. The ornament print is called Baubles and I also used it to make some cute gift tags which you’ll see later in the post. I added tiny pom pom trim to the basket shown above and I love the look! I tucked it under the lining foldover and glued it in place – super easy!

dsc_1033-blog

In the pattern file, I talk about using old belts or scraps of leather for the basket handles (which are optional.) I used scraps on both of these baskets. The gold was cut from a pouch I found at the thrift shop and the black is from a leather scrap pack I found at Hobby Lobby. I used embroidery floss to stitch them in place.

Thinner, lighter weight materials work best for the handles so they can bend easily. If your leather is too thick or sturdy, it can bow the sides of the basket out. You can also use ribbon, bias tape, or fabric in place of the leather.

dsc_0992-blog

———-

CUSTOMIZING YOUR BASKET

I receive emails quite often asking if I can resize the basket pattern cutting directions to create a specific sized piece that someone wants to make, so updating the pattern on how you can do this yourself has been on my to-do list for awhile, and this seemed like the perfect time! With a little math (don’t worry, it wont hurt too bad!), you can create any size basket you wish.

I’ve updated the original Study Fabric Basket PDF pattern file to include these directions and you can download it here.

Now I’ll show you a couple different sized baskets I created to get your creative juices flowing!

dsc_1083-blog

I wanted to make a piece that was sized for kitchen utensils and accessories, because that is another favorite set of mine to gift (perfect for housewarmings and showers, too!). This basket measures 4″ wide by 4″ deep and 6″ tall and I filled it with a dish towel, pot holder, whisk, spoon, spatula, measuring spoons and cookie cutters.

I used my favorite Baubles print in the Glacier Blue colorway and the lining is from Hawthorne’s Stardust basics line, which comes in 54 colors and coordinates so nicely with Oh, What Fun because it looks like snow!

dsc_1156-blog

And let’s not forget the guys or hard-to-shop-for friends and family on our lists! This basket measures 4″ wide by 4″ deep and 3″ high and holds four shot glasses with stir sticks and two mini bottles of liquor. It would also make a fun and inexpensive secret santa gift. Plus, this small basket is a nice size for later holding keys, jewelry, sewing notions or many other things. It also fits a pillar candle or mug.

dsc_1158-edit-blog

The handles on both of these baskets were also cut from old thrift shop pouches. Both are vinyl, so they had white backings. I left the white showing on the yellow handles and for the blue handles on the short basket, I glued a piece of the dark blue stardust to the backside before trimming them down. It worked out so well! I also did this to the gold handles on the treats basket shown at the beginning of the post.

dsc_1169-blog

———-

BUTTON LUNCH BAGS & GIFT TAGS

I have one more fun pattern to share, because it’s just perfect for gifting homemade treats (or a million other things) and then your recipient also has an adorable and useful little sack! I’ve had this Button Lunch Bag pattern from Purl Soho bookmarked forever and made a few modifications to dress them up and make them quilting cotton friendly.

dsc_1199-blog

The pattern calls for a sturdy cotton (such as a canvas), uses one solid fabric, and has a rolled hem, so I made a few easy changes to make them work with my materials and the look I was going for.

I wanted my bags to have a bottom accent fabric, so I pieced together the full panel before assembling the bag and then added some cute trim along the seam line. Also, since a rolled top hem wouldn’t look as nice with a printed quilting cotton, I instead used binding around the top of the bag. I added it last after assembling the bags. I used Pellon Shapeflex (SF101) to give the bags some extra bulk and I love the feel of them. I added the interfacing after piecing my full panel, before assembling the bag.

dsc_1282-blog

The original pattern uses binding to hide the inner seams, but I just used a wide, tight zig zag stitch which was quick and easy, but gives the seams a clean look and prevents fraying. Alternatively, if using binding around the top, you could make a full lining for the bag. Simply make a second bag, but with right sides in instead of out, slide it inside your assembled outer bag, and then stitch the top binding down through both, holding them together.

For these bags, I used two of the prints from Oh, What Fun that are not holiday specific. They are definitely festive enough for holiday gifting (especially with some metallic trim!), but keep the bags neutral enough to be reused all year long.

I used the Baubles print that I love so much to make the little tag on the cookies. I fussy cut the ornament circles from the print and used embroidery floss to hand stitch them onto felt cut with pinking shears. I then stitched down a small, folded piece of felt onto the top to make the hanger. You can use a light print or solid cotton on the reverse side to write or stamp a name.

I had so much fun with these, I couldn’t stop! They’re going on all my gifts this year, and I think I’ll hang a few from my tree, too!

tags

———-

I truly hope you have found this post useful and inspiring! All of these projects are easy and satisfying because they sew up quick and look totally adorable when done. This year I challenge you to ditch the wrapping paper and make some “gift wrap” instead!

As always, if you have any questions about the pattern along the way, you can contact me here anytime. Please be specific, so I can best assist you.

dsc_1192-blog2

———-

 oh-what-fun-giveaway-image

TIME FOR GIVEAWAY! (GIVEAWAY CLOSED – THANKS TO ALL WHO ENTERED!)

Who loves this Oh, What Fun fabric as much as I do? Would you like to win THREE YARDS for yourself?! To enter, please leave a comment on this post telling me what you would make with it and I will pick a winner at random on Friday! (Giveaway closed – congrats to @kgmcfall and thank you to all who entered!)

Now before you go, be sure to check out the other stops on the Blog Hop and see all the fabulous makes!

Monday 11/14 – Sew Sophie Lynn
Tuesday 11/15 – Hawthorne Threads
Wednesday 11/16 – Olivia Jane Handcrafted
Thursday 11/17 – Holly Gets Quilty
Monday 11/21 – Violette Field Threads

Happy Stitching!
~ nicole

dsc_1001-blog

Oh, What Fun Blog Hop (and the reality of life)

header

Hello and happy Friday, friends! If you have popped over from the Hawthorne Threads blog, you will have seen that today is my day on the Oh, What Fun Blog Hop, and I have to start by saying oh, what fun it has been to work with these stinkin’ adorable fabrics! #icouldntresist

This line is new to the amazing in-house collections that Hawthorne Threads designs and prints digitally. If you are not familiar with their in-house lines, for the love of fabric go check them out now! I guarantee you will be awestruck and overwhelmed. When I browse their site I go into MAKE ALL THE THINGS overload.

—–

Upon first seeing Oh, What Fun, I knew exactly what I wanted to do with it. When it comes to gift giving, I often keep things simple and utilitarian. I’m a big fan of food gifts and useful things such as bath and body products, and my favorite thing about giving them is making the presentation adorable. Christmas is such a visual holiday. We can’t help but feel warm, peaceful and excited all at the same time when we see lights, Christmas trees and beautifully wrapped gifts, so I find the extra time and effort that goes into presentation is totally worth it for me.

So, I decided my post would be all about easy-to-sew gift giving vessels and adorable extras to decorate them with. Alright, so where are the projects, you ask?! Well, that’s where reality comes in.

I think we all realize, though sometimes forget, that blogs and social media are merely a glimpse at the highlights of life. I, for the most part, keep my everyday life and reality separate from my sewing adventures, and am often able to do this without interruption. But, the truth is that sometimes I fail. Sometimes it is too much to balance and we have to admit defeat. I am totally beating myself up that today is my day to share and that I am not ready, but the reality is that while I am here making pretty things, my husband is away in a dangerous country fighting for our freedom. There are fire fights, there are daily attacks, there are friendly workers who one day just decide to strap on a suicide vest and blow themselves up in the middle of the base. There are injuries and there are deaths. Too many lately. And this is my everyday reality.

The last six months have been rough, the last few weeks have been especially rough, and the last seven days have been excruciating, but all that matters at this moment as I write this, is that my husband is now home. Reality shifts again, for a little while, with different struggles and different challenges for now, and then eventually we do it all over again.

—–

So, on that note, I ask you to please stay tuned and pop back next week to see my finished Oh, What Fun projects, because I promise you will love them! I will be sharing some variations of my Sturdy Fabric Basket pattern AND doing a tutorial on how you can modify the pattern to create ANY size and shape basket you like! This is something I get emails about ALL the time, so I’m excited to finally get that together for you. I’ll also be showing you a few other cute patterns and embellishment ideas AND will have an awesome giveaway where you can win three yards of Oh, What Fun for yourself!

In the meantime, go check out the other stops on the Blog Hop and see all the fabulous makes!

Monday 11/14 – Sew Sophie Lynn
Tuesday 11/15 – Hawthorne Threads
Wednesday 11/16 – Olivia Jane Handcrafted
Thursday 11/17 – Holly Gets Quilty
Friday 11/18 – Lillyella (that’s me!)
Monday 11/21 – Violette Field Threads

I hope you all have an awesome weekend, I’ll be back in a few days!
~ nicole

two

{Photos by Hawthorne Threads}

Rip Strip Weaving: Using your Loom

rip strip weaving | lillyella stitchery

Now that you’ve built your loom (you can find that post here), it’s time to use it! I touched on options and materials a bit in the first post, but will cover all of that again. I will start here with stringing, then move on to weaving, and will do a third and final post about finishing options.

I will also write additional posts in the future on different things you can do with your loom and make with your woven panels as I make them myself, so be sure to check back for those!

I started this project with the intention of using ripped strips of cotton fabric for the weaving, and that is how I created my rainbow runner below, but the possibilities of what you can weave into your piece really are endless. Consider various fabric substrates, yarns, ribbons, etc.

rip strip weaving | lillyella stitchery

I need to begin by saying that not every aspect of weaving is science. There are some things that can’t be definitively explained. Some things come with a “feel” or by simply doing it once and figuring it out from there. So, please excuse some of the looseness of this post. I will provide all the information I can about this project and will post updates as I use my own loom more.

—–

STRINGING YOUR LOOM

The first step in using your loom is to run the warp threads. These will run with the length of the rails between the cross members and wrap around the nail posts. As with every aspect of this project, you have many options for stringing the warp threads of your loom, from the material you use to the way you run the threads. I will show you two options in this tutorial.

On my rainbow sample runner, I used one yarn in a continuous string. It was slightly off white with tiny metallic flecks in it. I wanted a strong contrast against the rainbow fabrics and love the way it looks. You can use any sort of yarn, thread, floss, cord, twine, or even fabric strips for your warp threads, and I will show you a few different options later in the post.

To string your loom with one continuous thread as I did in my rainbow runner, you will first begin by making a large loop with a secure knot on one end of your thread (I’m using yarn in this instance). You want to make sure you have enough to string the entire loom, so do not precut any lengths, just work from the skein or whatever amount your string comes as. If it is not long enough to make one continuous piece, you can simply knot an additional piece on and continue.

stringing1

Hook your loop over one nail post at either end of either cross member, it does not matter where you begin. You will now run your thread down to the other cross member, around the first nail post and back up to where you began. Loop around the next nail post and continue this until you’ve wrapped around all the nail posts. You will now end at the last nail post on the opposite cross member from where you began. Secure your thread by making another knotted loop and hooking it over the nail post.

If you’d like your warp threads to be farther apart, giving a “looser” look to your finished weave, you can loop your threads around two nail posts, vs. just one, as shown in the bottom right photo above. Just remember that you will only see half the warp threads on each side of your woven piece. So, when you are looping on each nail post, the fabric will be on top of one thread and underneath the other. You can compare how the threads look strung on each nail post in the diagram above to how my finished rainbow runner looks. I strung my threads around each nail post on that piece.

Now here’s the important (and slightly loosey goosey) part, you DO NOT want your strings to be tight. When I started this project and just blindly jumped in, I strung my threads as tight as I could pull them. About five rows into my weaving, I realized the error of my ways. You will be amazed at how much slack is taken up by weaving the fabric strips through the threads, so you need them to be LOOSE when you begin. I’m sure you are asking, “how loose?”. Well, that’s the part I can’t really answer. You do not want them sagging to the table through your center loom opening or falling off the nail posts, but you otherwise want as much slack as you can have without those two things happening. Once I finish stringing my loom again for my next project, I’ll see if I can take a video that may help a bit.

STRINGING VARIATIONS

If you would like to use a variety of different materials or colors for your warp threads, you can do this a couple different ways. First, you can use the same continuous string method that was described above and knot your various threads together at any point you would like to change. Alternatively, you can create separate thread loops, rather than one continuous thread.

stringing2

In the diagram above I have one green thread loop and one white thread loop. Each spans between one nail post on the cross members. You can also double the spacing on these as I described above, and even skip a nail post between loops for a more symmetric spacing.

—–

RIPPING STRIPS

Before I started this project, I had never torn fabric. I had received fabric with torn vs. cut edges, but had never done it myself. I wanted my woven piece to have a bit of a raw feel to it, so the frayed edges of ripped strips were the perfect option. Below I will show you how to tear fabric strips to achieve the look of my rainbow runner, but you can also use cut strips of fabric for your weaving.

I used 2″ strips throughout my piece for a consistent look, but plan to use a variety of different widths on my next project to achieve a scrappier look. The length of my most of my strips was the width of the fabric, but I also used some fat quarters and smaller pieces. You can use ANY size scraps you like for this project. Later in the post I will show you how to knot your strips together as you weave, but you can also seam your strips together with your sewing machine or hand stitches as you go.

The beauty of ripping fabric, and why some shops choose to do it, is that you will always have a perfectly straight and square edge. If you are beginning with a cut of fabric that already has a torn edge, you can skip the first step, but if you are beginning with a cut of fabric with a cut edge, you will first need to create a torn square edge.

tearing1

Depending on how straight or crooked your fabric is cut (you may be amazed at how off some cuts are!), the placement of your first snip will vary. You will start by snipping a small slit on a slevedge edge of your fabric about 1/2″ to 1″ in from the cut edge of your fabric and then simply hold the fabric on both sides of you cut and tear the strip off. If your tear does not run all the way to the other end of your fabric, you are still not square and need to move in farther with your initial snip.

Once you have your first fully torn edge, you can now measure to the width you’d like your strips, snip and tear. The result will be perfectly equal torn strips. It’s like magic! Ok, not really, but it sort of feels like it.

tearing2

—–

WEAVING

Now it’s time to weave – hooray! Though it’s not necessary, I found using a Dritz Elastic threader as a “needle” made the weaving process much easier. They come in a three pack for about $2 – $4 online. I ordered mine from Amazon, but you can also find them on Craftsy and a variety of other websites. The Wefty needle also serves the same purpose.

needle

When weaving your panel, you will begin at one cross member and weave to the middle of the loom along your rail length. You will then stop and start again at the other cross member and work to where you left off previously in the middle. You do this because it is much easier to squeeze the last rows into the middle of the loom than it would be to fight with the last rows along your cross member.

You will want to begin your weaving a few inches in from one of your rails. It doesn’t matter which side you start on or which direction you weave. Weave your fabric strip above every other warp thread and be sure to watch this carefully, as it’s easy to miss one or make a mistake and not notice it until later. Pull your fabric strip through the warp threads until the end of your strip is where you began weaving and work toward the anchor rod. When you get to your anchor rod, you will treat it just as another warp thread, going the opposite of your last thread. You will see below that my fabric was on top of my last warp thread, so I wove it under the anchor bar.

weaving1

Wrap your fabric around the anchor bar and continue weaving to create the first full row. Once you cross over where you began, you can pull a bit from the end of your strip and tuck it under your first full row. Alternatively, you can just leave it as it, it will hold tight once your weave is complete and I will also talk about stitching the ends in place once you are done weaving.

You will now continue in the same manner of weaving, making sure to check your work as you go. Your fabric should always wrap around the anchor rod in the same way as your previous row, so that is one way to double check that you are still on track. When you get to a screw eye, be sure to not wrap your fabric around the post of the screw eye or you will not be able to remove the piece from the loom. Just weave the fabric on either side of the screw eye. It’s alright if you have to squish or stretch a bit to make it work, it will all even out when you remove the piece from the loom.

rip strip weaving | lillyella stitchery

As you’re weaving your strips, you will find they twist and fold and bunch in different ways as they’re pulled through the warp threads. You can try to control this as you feed the strips, such folding the fabric on itself a certain way, or you can simply let it do its own thing!

You will also need to push your rows together toward the cross bar as you work. You can do this every row or every few rows, it’s just something you’ll get a feel for as you go. You can push your rows together as tight or as loose as you wish, depending on the look you are going for.

Also, you do want to pull your strips too tight as you weave. The anchor rod will keep your piece stable and square, but if you pull too tight, you can start to bow the anchor rod. This will make it hard to remove your piece from the loom and possibly cause irregular edges.

—–

ATTACHING STRIPS

When you are ready to attach your next strip of fabric (or other material), there are a couple ways you can do it. I used a knotting method, which I will show you below, or, as I mentioned above, you can machine or hand stitch materials together. You do not want to weave with too long of a strip at once, because it is just more to pull through the warp threads as you weave. It is best to attach the strips as you work.

When you are close to the end of the strip you are weaving with, leave about 5″ – 7″ loose. Lay a new strip on top of the end of this strip, lining up the ends as shown below. Fold both ends over about an inch and cut a small slit through both pieces.

rip strip weaving | lillyella stitchery

You now want to place your new strip, right sides together, on top of the strip in the loom, lining up the cut slits as shown in the photo below. The scissors are just to show the slit in both pieces. Next, take the loose end of the new strip and run it through the cut slits from the bottom. This new strip should be going first through the slit in the strip that is woven into the loom. Pull the piece through until it tightens into a knot. You can now continue weaving.

knotting2

—–

FINISHING THE WEAVE

As mentioned previously, you will start weaving from one cross member of your loom into the middle. You will then start again at the other cross member and work to the middle where you left off.

The photo below shows what your panel will look like when you meet in the middle. Continue weaving until you close the gap and overlap your ends a few inches as shown on the right.

rip strip weaving | lillyella stitchery

Once you are finished weaving, you can hand stitch these loose ends to surrounding fabric or you can do this after you remove the piece from the loom.

You’re now ready to remove your panel from the loom! You will first remove two screws at the end of the anchor rods on one cross member using a screwdriver and then slide the anchor rods out. They may feel tight and you can use pliers or vice grips to start pulling the anchor rods loose. Twisting them a bit can also help. Once the rods begin to move, they will slide out easier. Next, you will lift the woven panel carefully off one set of nail posts, and then the other. Be gentle as you do this to not tear your warp threads.

Now that your panel is off the loom, admire your work and give yourself a hand!A couple more little things and you’re done.

If you wove your warp threads as one continuous piece, your initial looped ends at the beginning and end of your thread will need to be secured. When you first remove the piece from the loom, use a safety pin to hold the ends in place, otherwise the warp thread end can get sucked down into your weave. To secure them permanently, use a needle and thread to secure the loop onto a lower portion of the thread. Start by knotting your thread onto the loop then run your needle through the warp thread one row below and knot to secure.

rip strip weaving | lillyella stitchery

Also, If you did not stitch your final loose fabric tails down before removing the panel, you can do so now. You can also do this with the fabric ends where you began weaving at either cross member, if you wish.

—–

Now that your piece is woven and off the loom, you can call it complete as is or you can add various finishing touches, such as cuffs or tassles, or use the woven panel on something else, such as a bag or pillow. Since this post is already quite lengthy, I will address that in a separate one.

If you have any questions about this tutorial, please contact me anytime, just be as specific as possible so I can best assist you.

I so hope you enjoy this process as much as I have! Please use the hashtag #ripstripweaving so I can see what you are making!

Here’s a shot of the materials I’ll be using for my next project. I plan to use a variety of threads for the warp threads and add a mix of yarns and other materials into the weave along with the fabric strips. I’m pretty excited about it and I’ll share more soon here and on Instagram!

fullsizerender

Rip Strip Weaving: Building Your Loom

weave

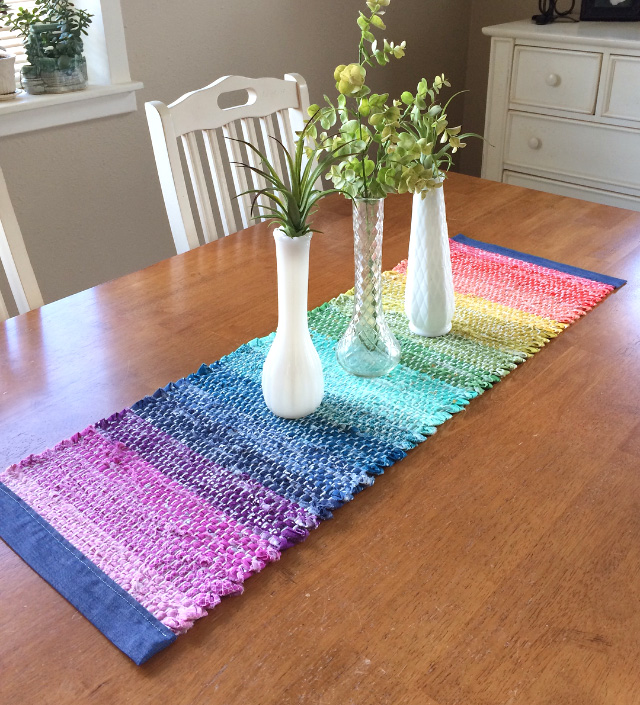
I’ve had a deep love and sense of nostalgia for rag rugs for as long as I can remember. My grandmother had them all over her little house, and when I think of my childhood, the scrappy multicolored stripes are always right there. And I’m sure I am not alone in this feeling!

I don’t know why it took me so long to make this, but I guess it was just time! Let me preface this post by saying there is nothing new or innovative about what I am making here or how I am doing it. Weaving, in an endless number of forms, has been around forever. This tutorial is simply one way that made sense to me and is perfect for using fabric scraps, which I clearly have plenty of!

double2

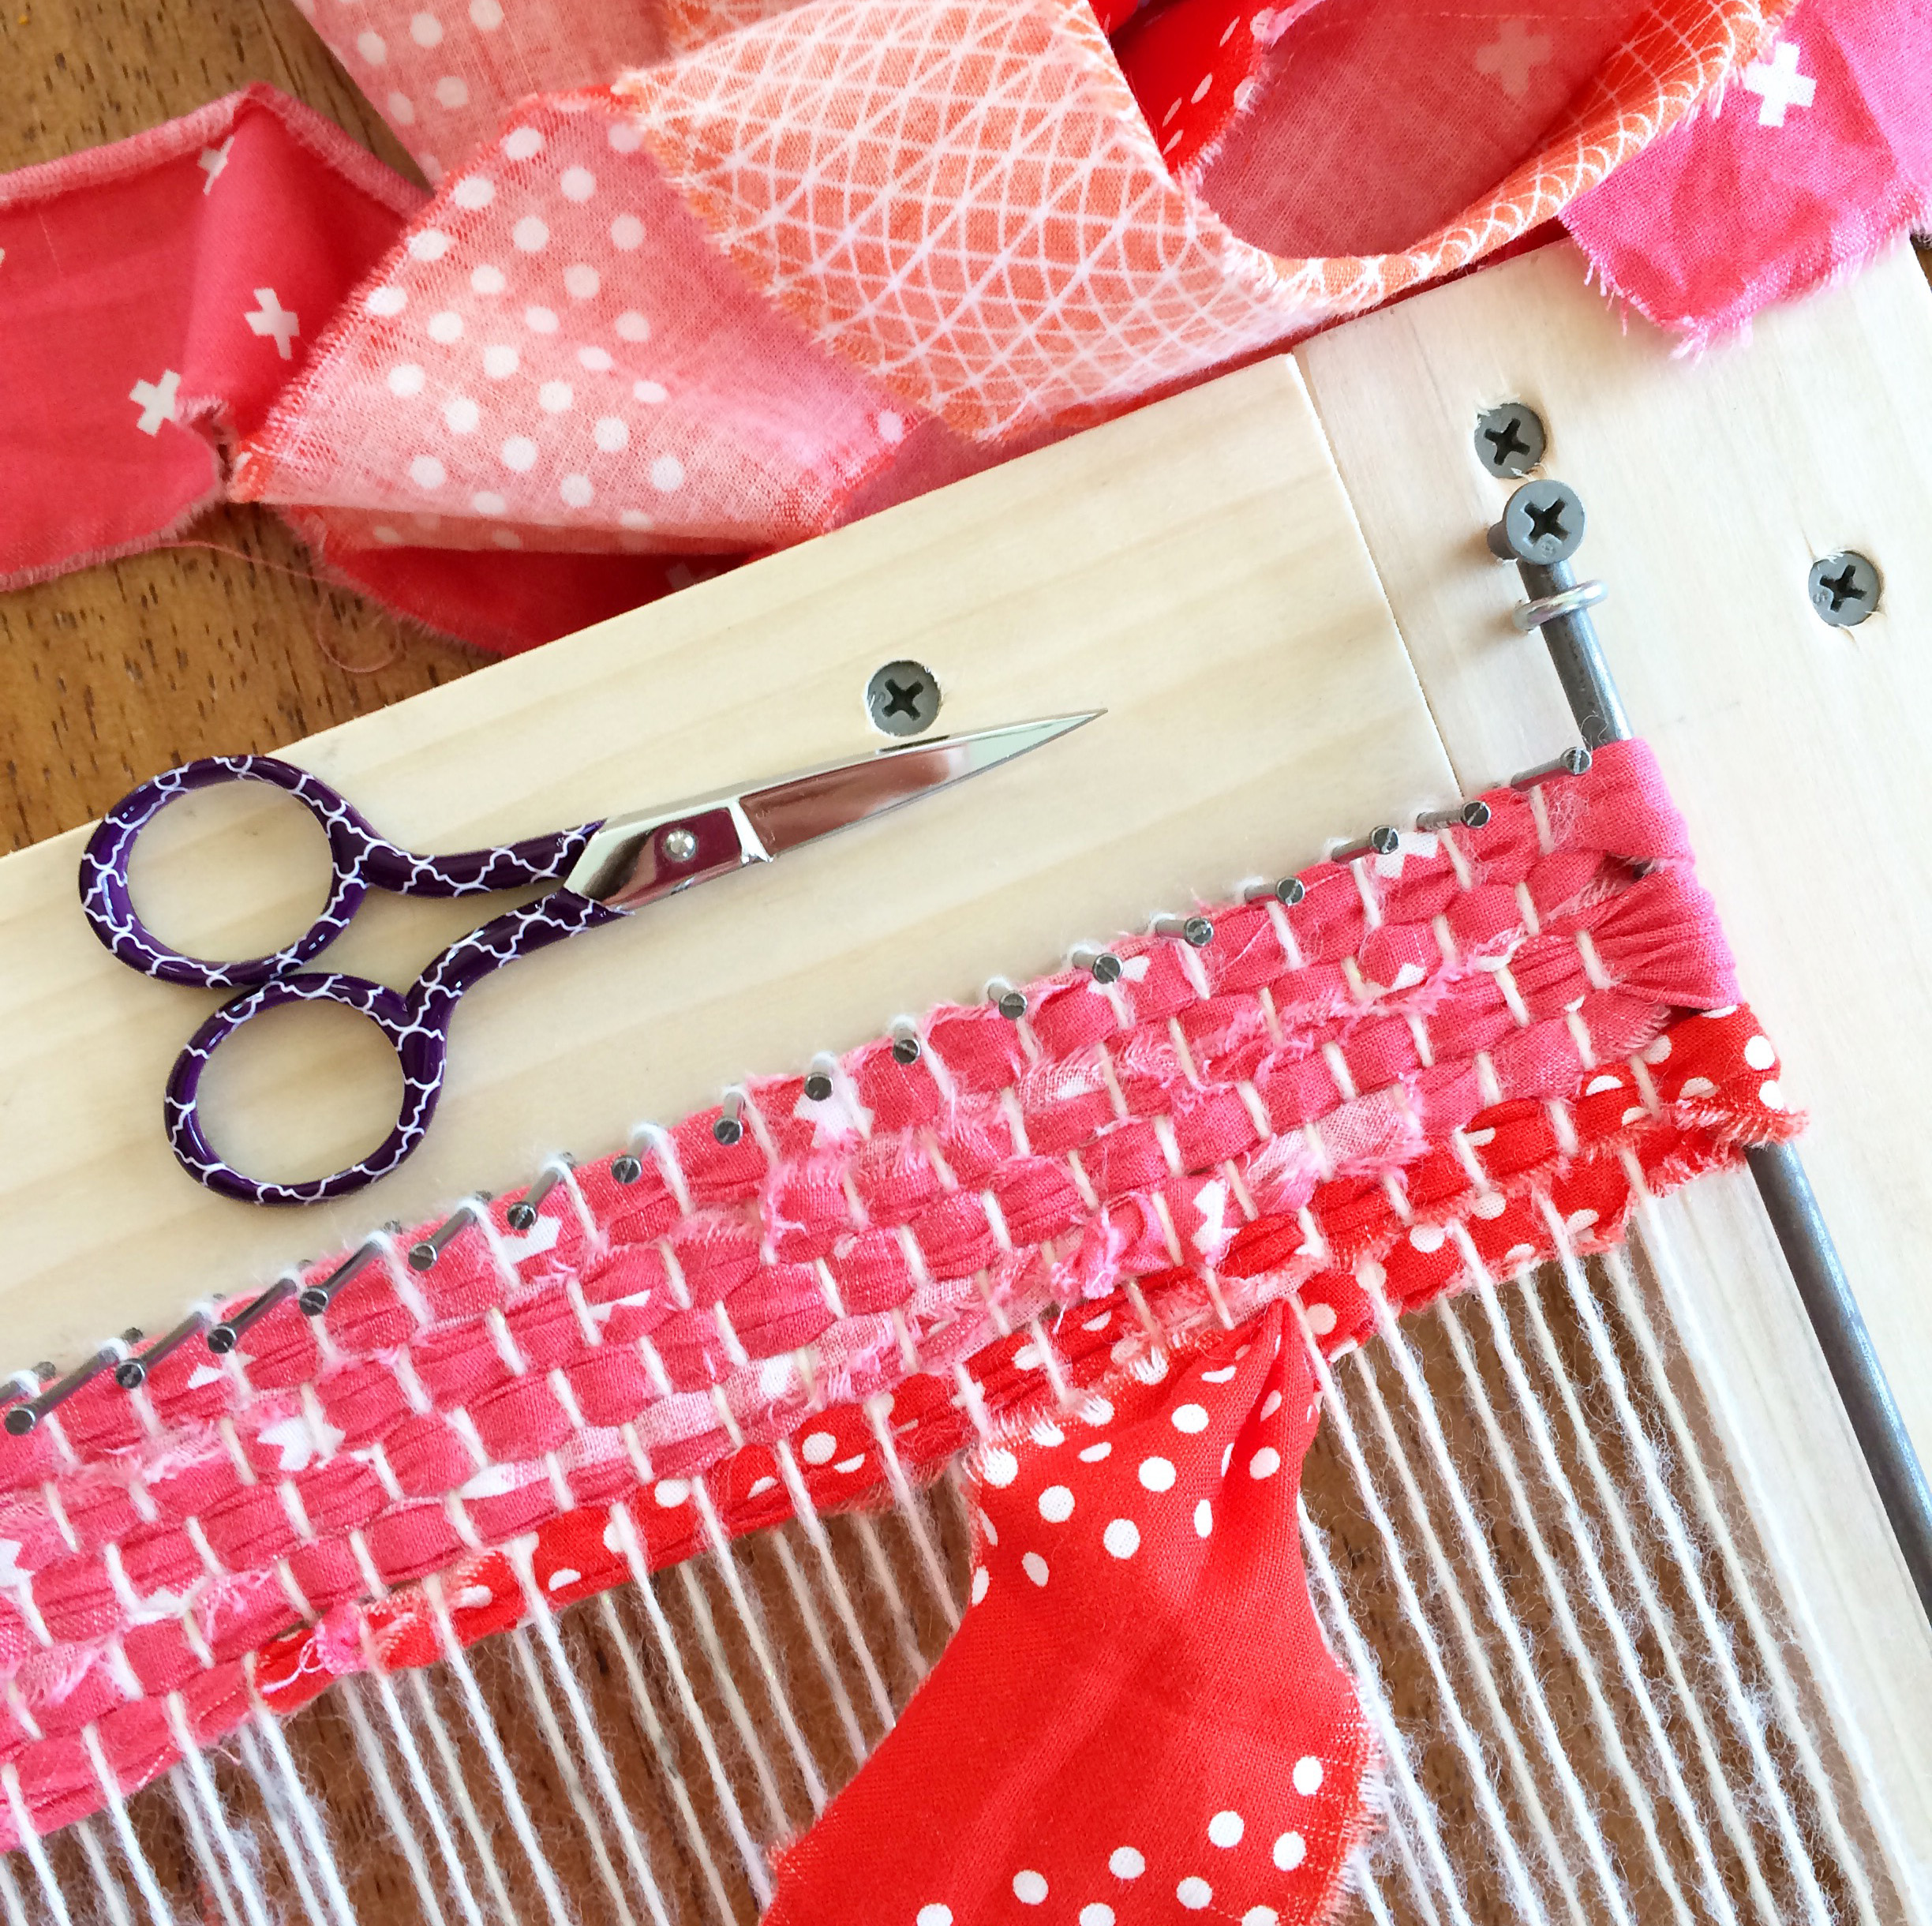
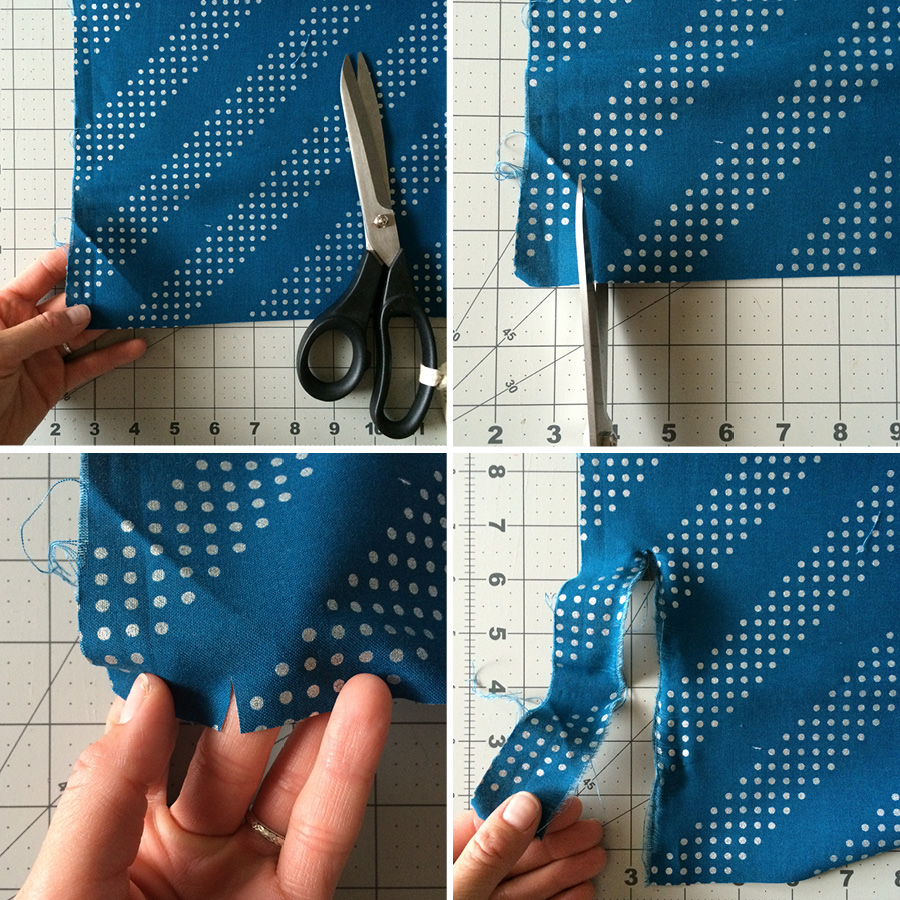
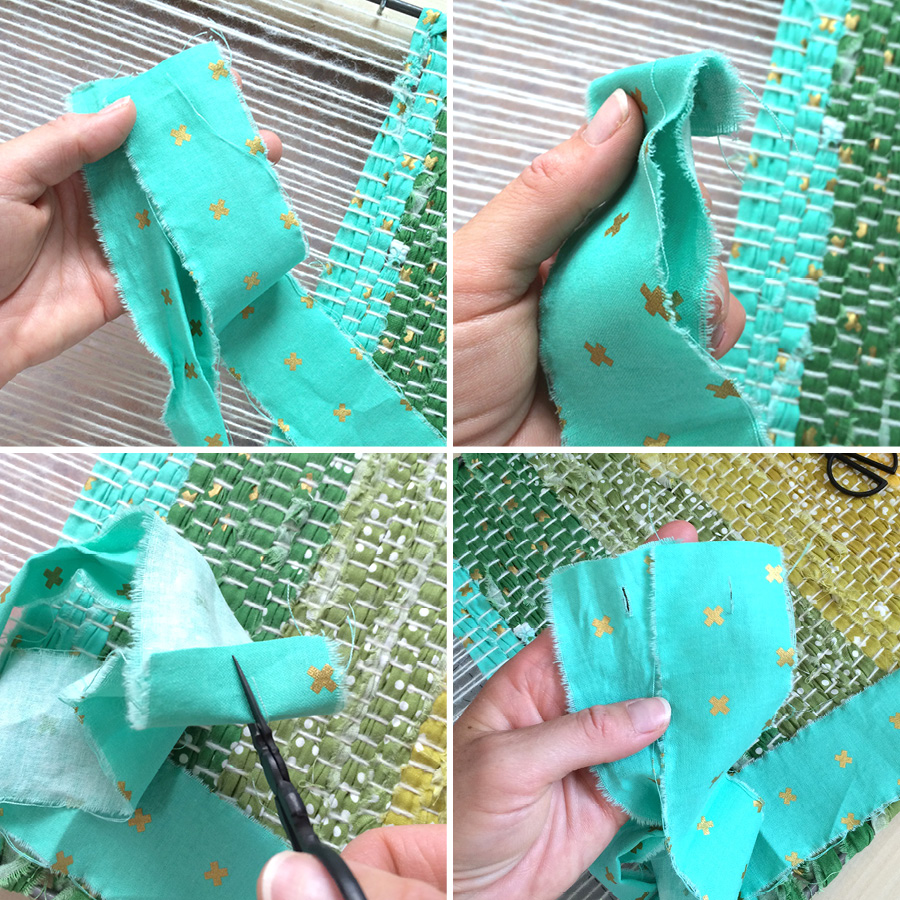
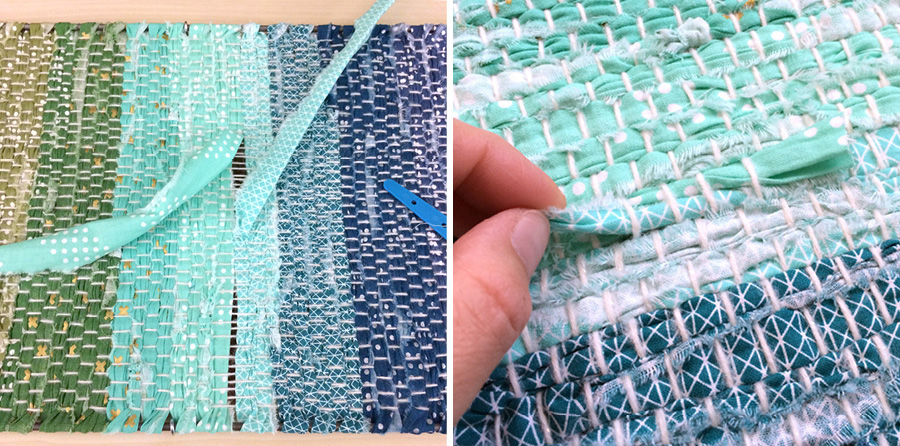
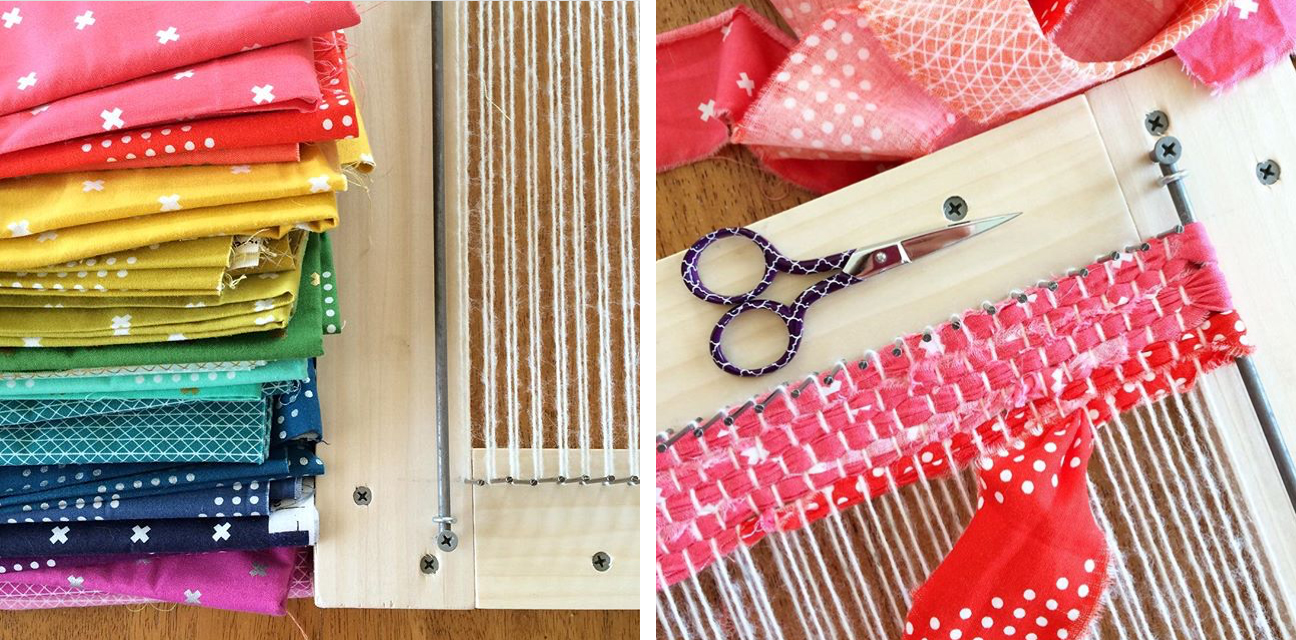
I’m calling it Rip Strip Weaving because I used torn strips of cotton fabric, but the possibilities of what you can create with this loom are endless. I used 2″ strips, but plan to make my next one using a variety of widths and materials to get a very scrappy look. You can use strips of any lighter weight material for this project – cotton, knit, denim, rayon, sheer fabrics, you name it. You can also weave with yarn, twine or ribbon and in beads or any other decorations you like. I will be using a mix of all those things on my next runner. I finished the above runner with denim cuffs, but will be adding fringe tassels on the next.

I used yarn for warp threads, but you can also use any type of cord, twine, ribbon, even thin strips of fabric. I kept my warp threads pretty close together for this project, but will talk about adjusting that later in the post.

double

The following tutorial will show you how to make a loom in any size, and then I will do another post later this week on how to use it. I will try to be as thorough as possible, but as always, if you have any questions, feel free to leave them in the comments or email me anytime.

I will be showing the construction of the loom using basic hand tools (plus an electric drill) for those who have little or no woodworking experience. If you have experience or other power tools, you will easily see where you can take short cuts and make the construction process a little easier and faster.

Don’t be intimated by this project! This post will be long and include a lot of photos simply to make sure I make it as easy as possible, but the construction really is quite simple. Though some of the information may not make sense until you are in the process of creating the loom, please read through the entire tutorial before beginning. This is necessary to help understand all the materials and tools needed and some things to consider when determining the size of your loom. And as I mentioned, please do not hesitate to contact me anytime if you have questions before you begin or as you are working.

Now, let’s get started!

—–

MATERIALS & TOOLS

I will first cover the tools and materials I used and then talk more about amounts/sizes needed during the construction steps, as this will differ depending on the size you are making your loom.

The frame of the loom is made with 1″x3″ Poplar and you should be able to find this at most any home improvement store. I chose Poplar because it is popular in construction due to its low price, ease of use, and resistance to warping. This means your loom will keep it’s shape. Though it is called 1×3, note that the actual measurement of the wood piece is smaller. It’s just one of those weird construction things!

rip strip weaving | lillyella stitchery

You will also need 1.25″ screws, wood glue (helpful, but not required), 3/16″ steel round bar rods, #212 eye screws, 1.5″ smooth finish nails and 7/8″ rubber bumpers for feet (also optional).

You will also need the following tools: Hammer, electric drill and drill bits, hand saw, metal saw, tape measure and a square (I used a small speed square). Clamps are helpful, but not necessary.

—–

PREP & PLANNING

The first step is to determine what size you would like your finished woven piece to be. I designed mine to be a table runner measuring 12″ wide by 36″ long. The loom I created can also make shorter pieces by adding a cross bar, so I could make 18″ x 12″ placemats, or any size in between. I can also use the woven panels to create things like pillows, bag panels etc, so keep this in mind when deciding what you would like to make or what size you would like your loom. One thing I want to note about size is that when I made my first runner, the 12″ width stayed true to size when I took it off the loom, but the 36″ length shrunk up about 2″. This will be affected by how you wrap your warp threads and possibly how large your piece is. Since I’ve only used this one size loom one time, I can’t really speak more on the shrink factor. Just keep this in mind when determining the size of your loom. It may be hard to end with an exact size.

You can create any size piece, large or small, using this method. You would have a pretty clunky loom if you just wanted to make coasters or something tiny, but it would still work. You could also create a good size floor rug with this method, as long as you have the open space to use the loom. The finished loom will measure about 5″ wider and higher than the size of your woven piece.

rip strip weaving diagram | lillyella stitchery

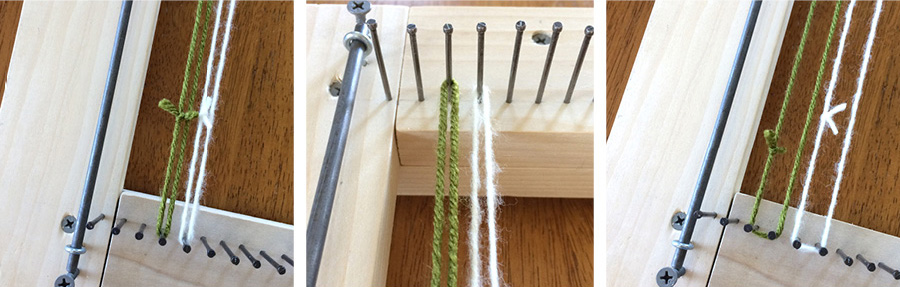
The above diagram shows the different parts of the loom and how I will be referring to them throughout the tutorial. If the woven piece you would like to make is not symmetric, your larger dimension will be used for the rails and the smaller will be the cross members. The rails will hold the anchor rods and the cross members will hold the nail posts. Your warp threads will run between the two cross members on the nail posts and you will be weaving back and forth between the rails.

The anchor rods and nail posts will be placed 1/2″ in from the center opening on the rails and cross members, so the center opening of your loom will measure 1″ smaller in width and length than the finished size of your woven piece. For example, my woven runner measures 12″ x 36 and the center opening of my loom measures 11″ x 35″.

The amount of all the materials you need will be determined by the size of the woven piece you are making. There will be a little math involved, so I recommend drawing out a little diagram of your loom as you to go to help figure out sizes and to use for reference when building.

For the wood frame, you will need two lengths of 1″x3″ Poplar that are the same as the smaller dimension of your finished woven piece (for the spacers), two lengths that are  6-8″ longer than this same dimension (for the cross members), and two lengths that are 6-8″ longer than your larger measurement (for the rails). For example, for my 12″x36″ runner, I started with two lengths of wood that measured approximately 12″, two that measured 20″, and two that measured 44″. This was a total of about 13′ of wood. You do not need to worry about having perfectly square ends on your wood lengths. The tutorial will show you how to build the frame with slight overlaps and use the edges of cross pieces to trim flush. This is the easiest method for those with no woodworking experience or fancy tools. If you have power tools or a guide available to cut square edges, you will be able to skip that step and cut your pieces to the exact size.

For the anchor rods, you will need two lengths of 3/16″ steel round bar measuring approximately 3″ longer than the larger dimension of your woven piece.

The number of screws, screw eyes, nails and bumpers needed will vary. I used 16 screws on my loom. You will need two for each corner, four total to hold the anchor rods and additional screws to attach the spacers. I used two on each 12″ length of my spacers. If your piece is larger, you will want to use a few more. You will need to place screw eyes on either end of both anchor rods and then approximately every 8″ – 9″ along the length of the rods. I used ten total on my loom. The number of nails needed will be determined by the smaller dimension of your woven piece and how far apart you want your warp threads (I will talk about this a bit more later). I placed my nails 3/8″ apart and used 31 nails on each cross member of my loom to create my 12″ runner, just for reference.

—–

FRAME CONSTRUCTION

As I mentioned above, these steps are shown using basic hand tools and not having the ability to cut your pieces with square ends. We are allowing for overhang on each piece so that you can use the cross piece to cut the edges flush. If you have square ends on your wood cuts, you can line them up flush and skip the step of trimming.

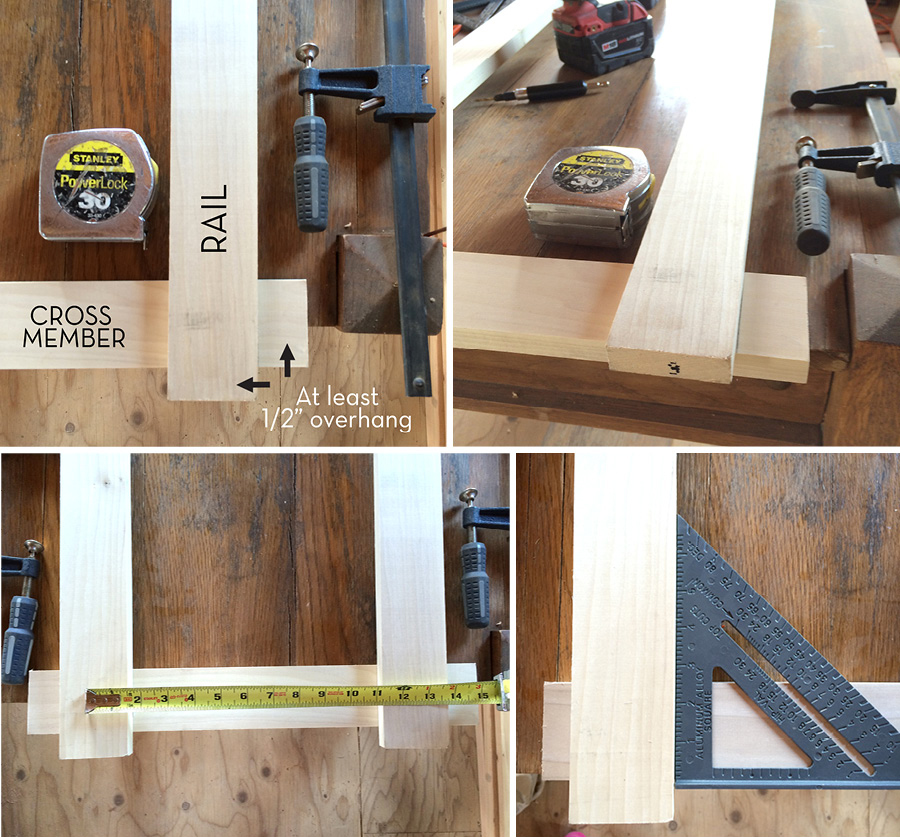
You will begin by laying one cross member piece lengthwise. This piece should measure at least 5″ longer than your shorter woven piece dimension. This allows for the width of the rail pieces plus at least 1/2″ overhang on either edge. I exaggerated the overhang in my photos so you could see it easily. I have about a 2″ overhang on all my pieces.

rip strip weaving loom tutorial | lillyella stitchery

Next you will lay one rail length perpendicular on top using your square to make sure it is squared up. Draw a pencil line along both the left and right edges of the rail piece onto the cross member below. You can now use a clamp, if you have them, to keep this piece in place.

Next you will place the second rail piece on top of the cross member at the appropriate distance. As I mentioned before, this opening should measure 1″ smaller than the dimension of your finished woven piece. My runner was 12″ and the space between my rail pieces is 11″. Once again use your square and draw lines to mark the placement. Once in place, hold with another clamp.

frame2

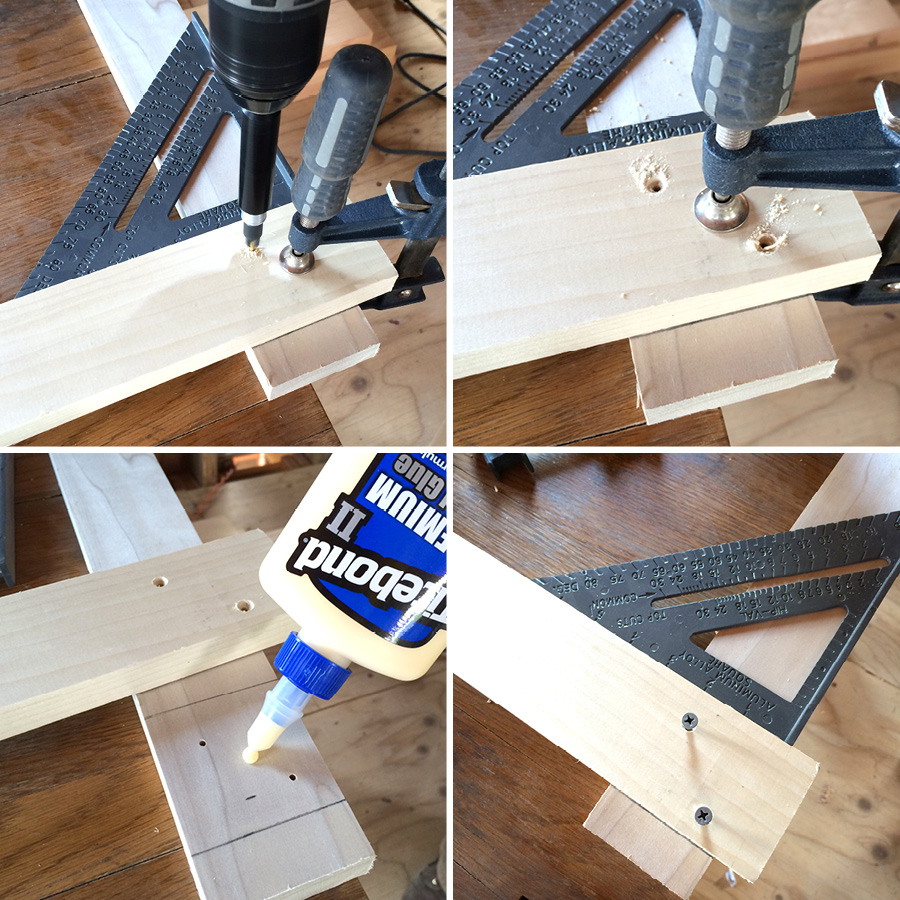
The next step is to secure the rails to the cross member with screws. Using an electric drill, predrill two holes through the rail into the cross member in the orientation show above. Predrilling holes is beneficial for two reasons. First, it helps prevent possible splits in the wood, but more importantly, it helps prevent your pieces from shifting their position when the screw catches. If you have never predrilled holes before, you want to use a bit that is slighty smaller in diameter than your screw, so that your screw will still hold tight and not be loose in the hole. If you are purchasing drill bits specifically for this project, any associate at the store would be happy to help you. You will be predrilling for the 1.25″ screws and then also later for the finish nails. With that information, they can give you the bits you need.

If using wood glue, you can unclamp your pieces and spread it on the cross member between your drawn lines. Dap a few dots around and spread it evenly with your finger or a paper towel.

Lay your rails back in place on the cross member, once again using your square and double checking your opening measurement, then screw the pieces together using the 1.25″ screws through the predrilled holes.

You will now repeat these steps to add the second cross member on the opposite end of your rails. Placement will be determined by once again measuring the center opening. It should measure 1″ shorter than the larger dimension of your finished woven piece. For example, I wanted my runner to measure 36″, so the opening between my cross members was 35″.

frame3

Once both cross members are secure, you can now trim your overhanging edges flush using your hand saw. If your cuts are a little rough or your wood splinters at all, you can just smooth it with some sandpaper.

The next step is to add the spacers. These are additional cuts of poplar that will sit on top of the cross members between the rails.

frame4

The spacers will first need to be cut to size. You will use the same 1″x3″ poplar for the spacers. Begin by drawing a straight line near one end of a cut of poplar using your square to ensure it will be straight. If you already have a cut a poplar with a square cut end, you can skip this step.

Next, you will measure the space between your rails and cut your spacer piece to the same size. Repeat this for the second cross member. Be sure to measure each opening. Though they should be the same, it is best to double check!

Once your spacers are cut, you will lay them in place and once again predrill holes. I used two screws on my 11″ width. If your piece is significantly longer, you will want to use more. Be sure to keep your holes close to the outer edge of your frame so that they will not be in the way when adding your nail posts.

After predrilling, you can apply wood more glue and then screw in place, or just screw in place if not using glue. Once both spacers are in place, your frame is complete! Give yourself a hand!

—–

NAIL POSTS & ANCHOR RODS

Now that your frame is complete, it is time to add your anchor rods and nail posts. The first step is to draw guidelines to help with placement. Using a long straight edge, draw a light, thin line 1/2″ from your opening on all four sides of the frame. You will then place your nail posts.

You may some old finish nails laying around, like I did, but if you are purchasing ones to use for this project, you will want 1.5″ length. I placed my nail posts 3/8″ apart, and honestly, I don’t really know how I decided this. I just thought about how tight I would like my weave based on the size of my finished piece. There’s no good way for me to explain how to figure this out, but you can look at my runner to help you decide. The nail posts determine the space between your warp threads, which is the white yarn that runs the length of my runner. You can see my weave is fairly tight, and I love the look of it. I believe it creates a piece that isn’t too hard to create, but is solid enough to be used for a variety of things, such as using the woven panel on a pillow or bag. I would NOT recommend going smaller, or you will really fight with it when weaving. If you are making something large, such as a rug, you could easily space your nail posts at 1/2″ or wider.

With the nail post placement on my loom, I can also create a wider, more open looking weave, by not wrapping my warp threads on each post, but on every other, so you do have some flexibility with any measurement you choose.

You will begin by marking the placement of each nail post on one cross member. You will want to start in the middle of your cross member and work out to the line you drew 1/2″ into each rail. When you get to this line, it is ok if your last nail post is a little closer or farther away from your line than your measurement. You want to be at least 1/4″ away from this line or it will be too hard to weave.

frame5

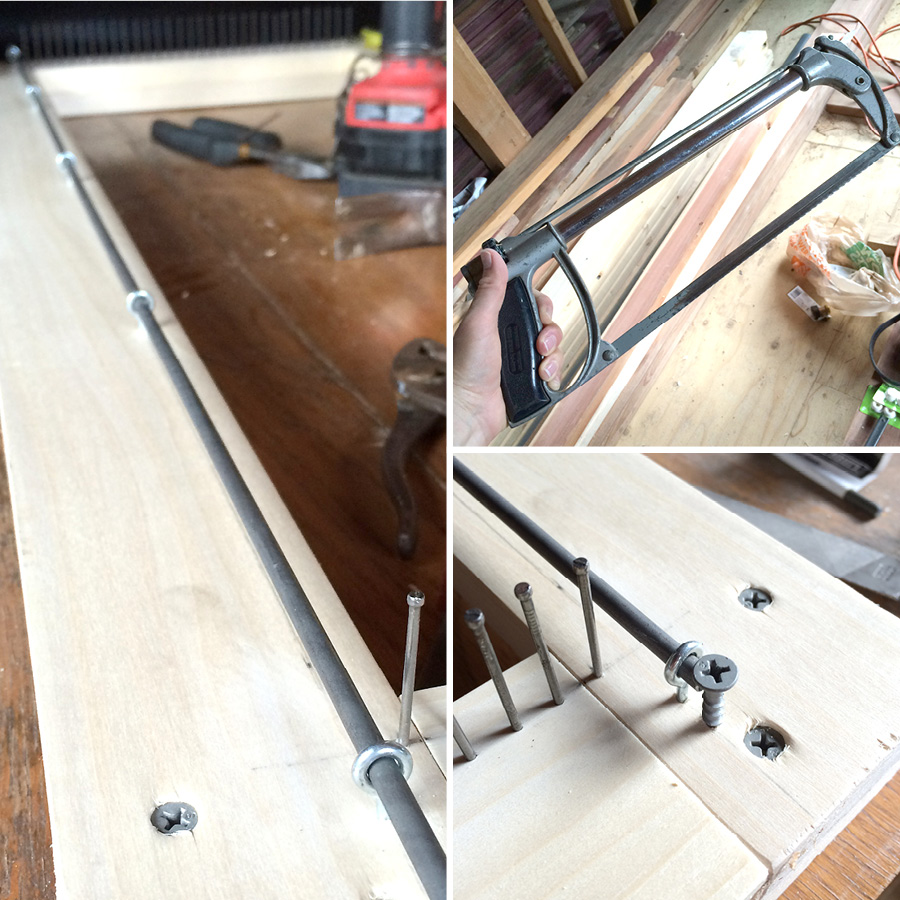
The above photos show a couple things. It is important that you predrill each nail hole. Be sure to not make them too large, you want the nails very tight. But, if you do not predrill, your wood will split. I set my first few this way so that you could see the importance of predrilling.

Once your holes are drilled, you will set your nails using a hammer. You will want about 3/4″ to 1″ of nail above the wood. This measurement isn’t too important, you just want to make sure your nails are secure into the cross member spacer and will not pull out. There will be a lot of tension on them from your warp threads.

Repeat these steps to place your nail posts on the other cross member. The next step is to place your anchor rods. These keep your woven piece square and prevent it from pulling in on the sides as you get to the middle of the piece.

Your anchor rods will run along the line you drew 1/2″ in from the center opening on each rail. They will be held in place by the screw eyes. You will place one screw eye about 1″ past your nail posts toward the outer edge of your frame on each corner. You will then place another screw eye approximately every 8″ to 10″ along the length of your rails. Based on this length, figure out the measurement needed to place them evenly. For example, the space between nail posts along my rail was about 36″ so I placed one screw eye every 9″. You can see this in the full loom diagram at the beginning of the post.

You will place these by first predrilling holes, and then screwing them into the rail. A pair of pliers is helpful to screw them tightly into place.

frame6

Your 3/16″ steel round bar will slide through these screw eyes to create your anchor rod. To hold it in place, you will place a screw just past each outermost screw eye on the four corners. You will need to remove the anchor rods when you are finished weaving your piece and are ready to take it off the loom, so the screw allows you to do this.

Your round bar will need to be cut to size. First place your end screws on one cross member (predrill then screw into place, leaving enough screw exposed so the head sits just above the screw eye), then slide your steel round bar through the eye holes and mark the length you need to cut your round bar where you will place the holding screws on the other cross member. A sharpie works good for this. Slide your round bar out and cut it to size using a metal hack saw.

Slide your round bar back through the eye holes and place the second set of holding screws at the other end. Your loom is now complete! The final optional step is to install the rubber bumper feet onto the bottom at each corner of the frame to help prevent scratching on any surface you use your loom on, such as if you lay it on a floor or table.

—–

Now that your loom is ready, it’s time to use it! I’ll be posting later this week all about that, but if you have any questions about this before building your loom, please feel free to contact me here or on Instagram. Be sure to use the hashtag #ripstripweaving so I can see what you’re making! I am so excited to watch you all do this!

~ nicole

RIP STRIP WEAVING, PART TWO: USING YOUR LOOM

Maker Mat Sew-a-long Prizes!

I think we’ll all agree that the real fun is in creating our mats, but… prizes are really fun, too, right?!I have had some awesome and generous prize donations to share with you and have also put together a few things myself  🙂

I have now posted about all the steps in the pattern and you can find links to all the previous posts at the end of this post if you’re just joining in. I’m going to wait another week before drawing winners for the prizes to give everyone (including myself!) some more time to work on their projects. You do not need to complete your mat to be eligible to win, you just need to post at least one progress photo on Instagram or Facebook using the hashtags #undercovermakermatSAL and #undercovermakermat. If you do not use social media, you can email me your photos.

I will pick my three favorite completed mats to win a prize of their choosing, and then I will randomly draw the remaining prize winners from all the posts in the sew-a-long hashtag. How does that sound? Alright… onto the prizes!

prize-image-strip

First up, from Make Modern Magazine, I have five 6-month subscriptions! I love this mag, there’s always a great variety of projects and well-written, informative articles. Plus, it’s run by an awesome group of ladies!

Next, I have a three month subscription to Stash Builder Box! If you’re not familiar with Stash Builder Box, it’s a monthly subscription club where you receive fabrics, patterns, notions and other fun items and they donate a portion of the profits to help children in need. They also work to create quilts to send to different organizations. You can read more of their website. It’s a total win-win for everyone when you support them!

Last, but certainly not least, from our sponsors, I have a $25 gift certificate to Stash Fabrics! It’s no secret that Stash is my favorite fabric shop, they have such a a wide variety and they usually ship the same day. Can’t beat that! Beth and her team are also the sweetest. Friendly service means everything to me these days.

pattern-bundle

In addition to those awesome prize donations, I’m also giving away three bundles of all my patterns (shown above) and the little prize pack shown below with 12 fat quarters, rainbow wonder clips, colored pencils, graph pad, omnigrid ruler and more!

prizepack

Now get back to work, because I have to as well! ; ) And keep posting your photos!

Have a fabulous weekend!
~ nicole

—–

ADDITIONAL SEW-A-LONG POSTS:

Undercover Maker Mat Sew-a-long: All the details

PART TWO: September 6 – Kickoff, prizes and main body panel variations

PART THREE: September 8 – Accent Pocket Panels

PART FOUR: September 12 –Full Pocket Panel & Assembly

PART FIVE: September 15 – Optional Thread Catcher

Maker Mat Sew-a-long: Optional Thread Catcher

You guys. This sew-a-long has just been so awesome! I keep saying it, but it’s true. As always, I am blown away by your creativity! The best thing about designing patterns, for me, is watching other people bring them to life, and this one just has so much personality to it.

I was thinking about this while working on mine yesterday. I chose two sets of fabrics for two mats, with no thought but what do I want to look at everyday, and then I laughed when I realized how similar the two pulls were. I realized that my mats 100% represented me, my style and my personality, and that the same was true for every one being made. Of course this holds true for many quilts and other sewing projects, but there are so many ways to customize and personalize this project, that I just feel every one gives so much insight into the person who made it.

I’m still working on mine, but will share some pics tomorrow! Below is the mat I made for the Paperie blog tour earlier this year. Aren’t those fabrics gorgeous?

DSC_0490 edi

Some of you are just joining in and some are already finished with their projects. Today is my last post about the steps of the pattern, but there is still plenty of time to sew! Tomorrow I will be sharing some additional prizes, but will be waiting until next Friday (September 23) to draw winners. I will choose my two favorite finished mats to win prizes, but will draw the remaining prize winners from all the photos in the hashtag, so even if you’re just beginning, you’re still eligible to win! You just have to post your progress photos with the hashtag #undercovermakermatSAL on Instagram or Facebook. If you’re joining in and don’t have any social media accounts, feel free to email me some pics (nicole at lillyella dot com)!

—–

THREAD CATCHER

Onto today’s business. You’re either a thread catcher kind of person, or you’re a throw-it-on-the-floor-and-sweep-it-up-later kind of person! So, this step is optional. The thread catcher is designed to hang from a button on the far right pocket, but it will also stand on it’s own and can sit on your work table. If you choose to have it stand alone, you may want to shorten the height of it a bit to make it easier to use.

As with all the elements of this pattern, there are endless ways to customize the thread catcher. You can use a single fabric embellished with trim and selvedges or you can create any sort of patchwork design you like. Piece in a single accent strip, make the bottom half a contrasting fabric or use another paper pieced block. Here are a few examples:

catcher-close

originalcatcher

IMG_2643 edit2

tulacatcher

purebredcatcher

—–

OTHER USES

Outside of this project, the thread catcher alone is handy for a variety of other uses! I’m working on a set that will hang from hooks on the wall behind my sewing machine to hold tools and notions (I’ll share pics when I’m done!), or you could hang some in a bedroom or bathroom for jewelry, toiletries, hair accessories, etc! You can easily adjust the size by adding or subtracting equal amounts to all pieces.

—–

Just a handful of you have finished the thread catcher so far, but here are some pics from the sew-a-long hashtag!

catchers

—–

Remember to keep sharing your photos with the hashtags #undercovermakermatSAL and #undercovermakermat! Tomorrow I’ll be sharing some additional prizes up for grabs and I will also share more photos from everyone sewing along throughout next week!

ADDITIONAL POSTS:

Undercover Maker Mat Sew-a-long: All the details

PART TWO: September 6 – Kickoff, prizes and main body panel variations

PART THREE: September 8 – Accent Pocket Panels

PART FOUR: September 12 –Full Pocket Panel & Assembly

PART FIVE: September 15 – Optional Thread Catcher