Bad business, a cautionary tale or a sad reality? You decide.

Today I have an unfortunate story to share with you. It’s one that happens too often and many times without fair resolve. And frankly, it’s bullshit. I’m sharing this story now because I was not able to come to a fair agreement with the party involved and have exhausted the options I’m willing to pursue. My hope in sharing this is that you can be a more educated consumer and also to help prevent this same thing from happening to you or someone you know.

Here are the facts and nothing but the facts. I’ll let you make up your own mind on what’s “right”, “wrong” or “fair”, but I’d love to hear your thoughts here and on social media.

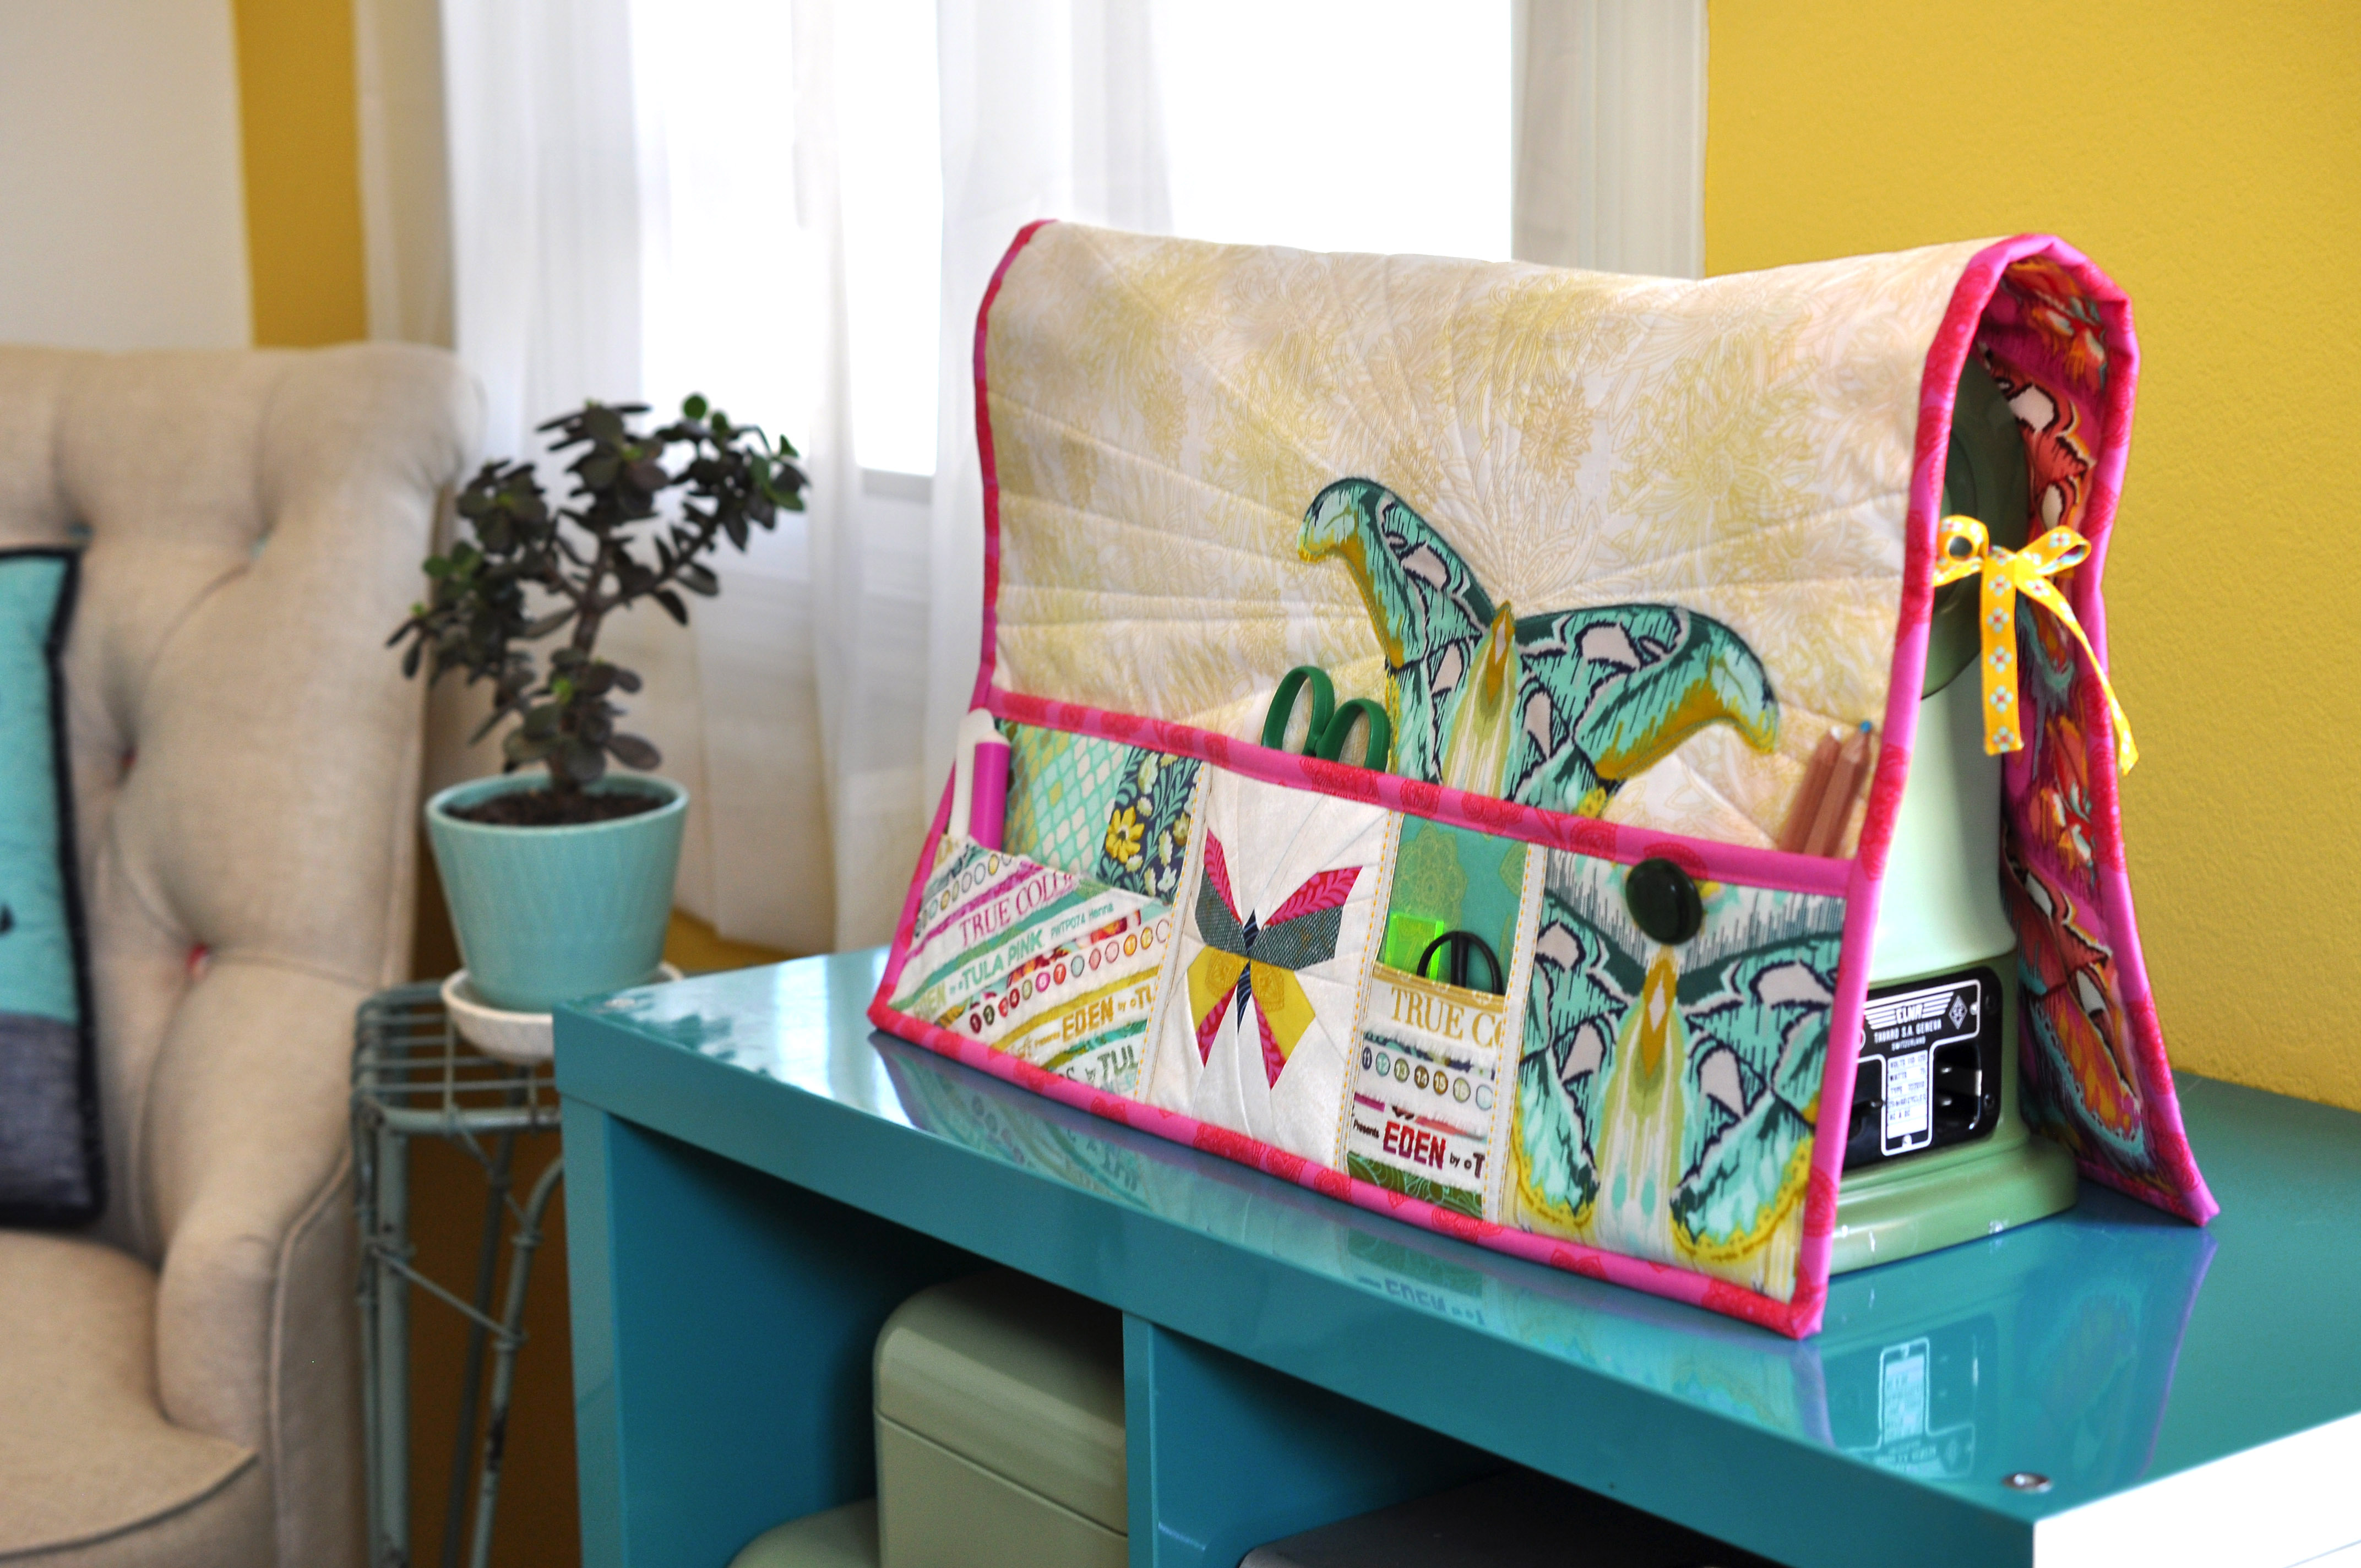
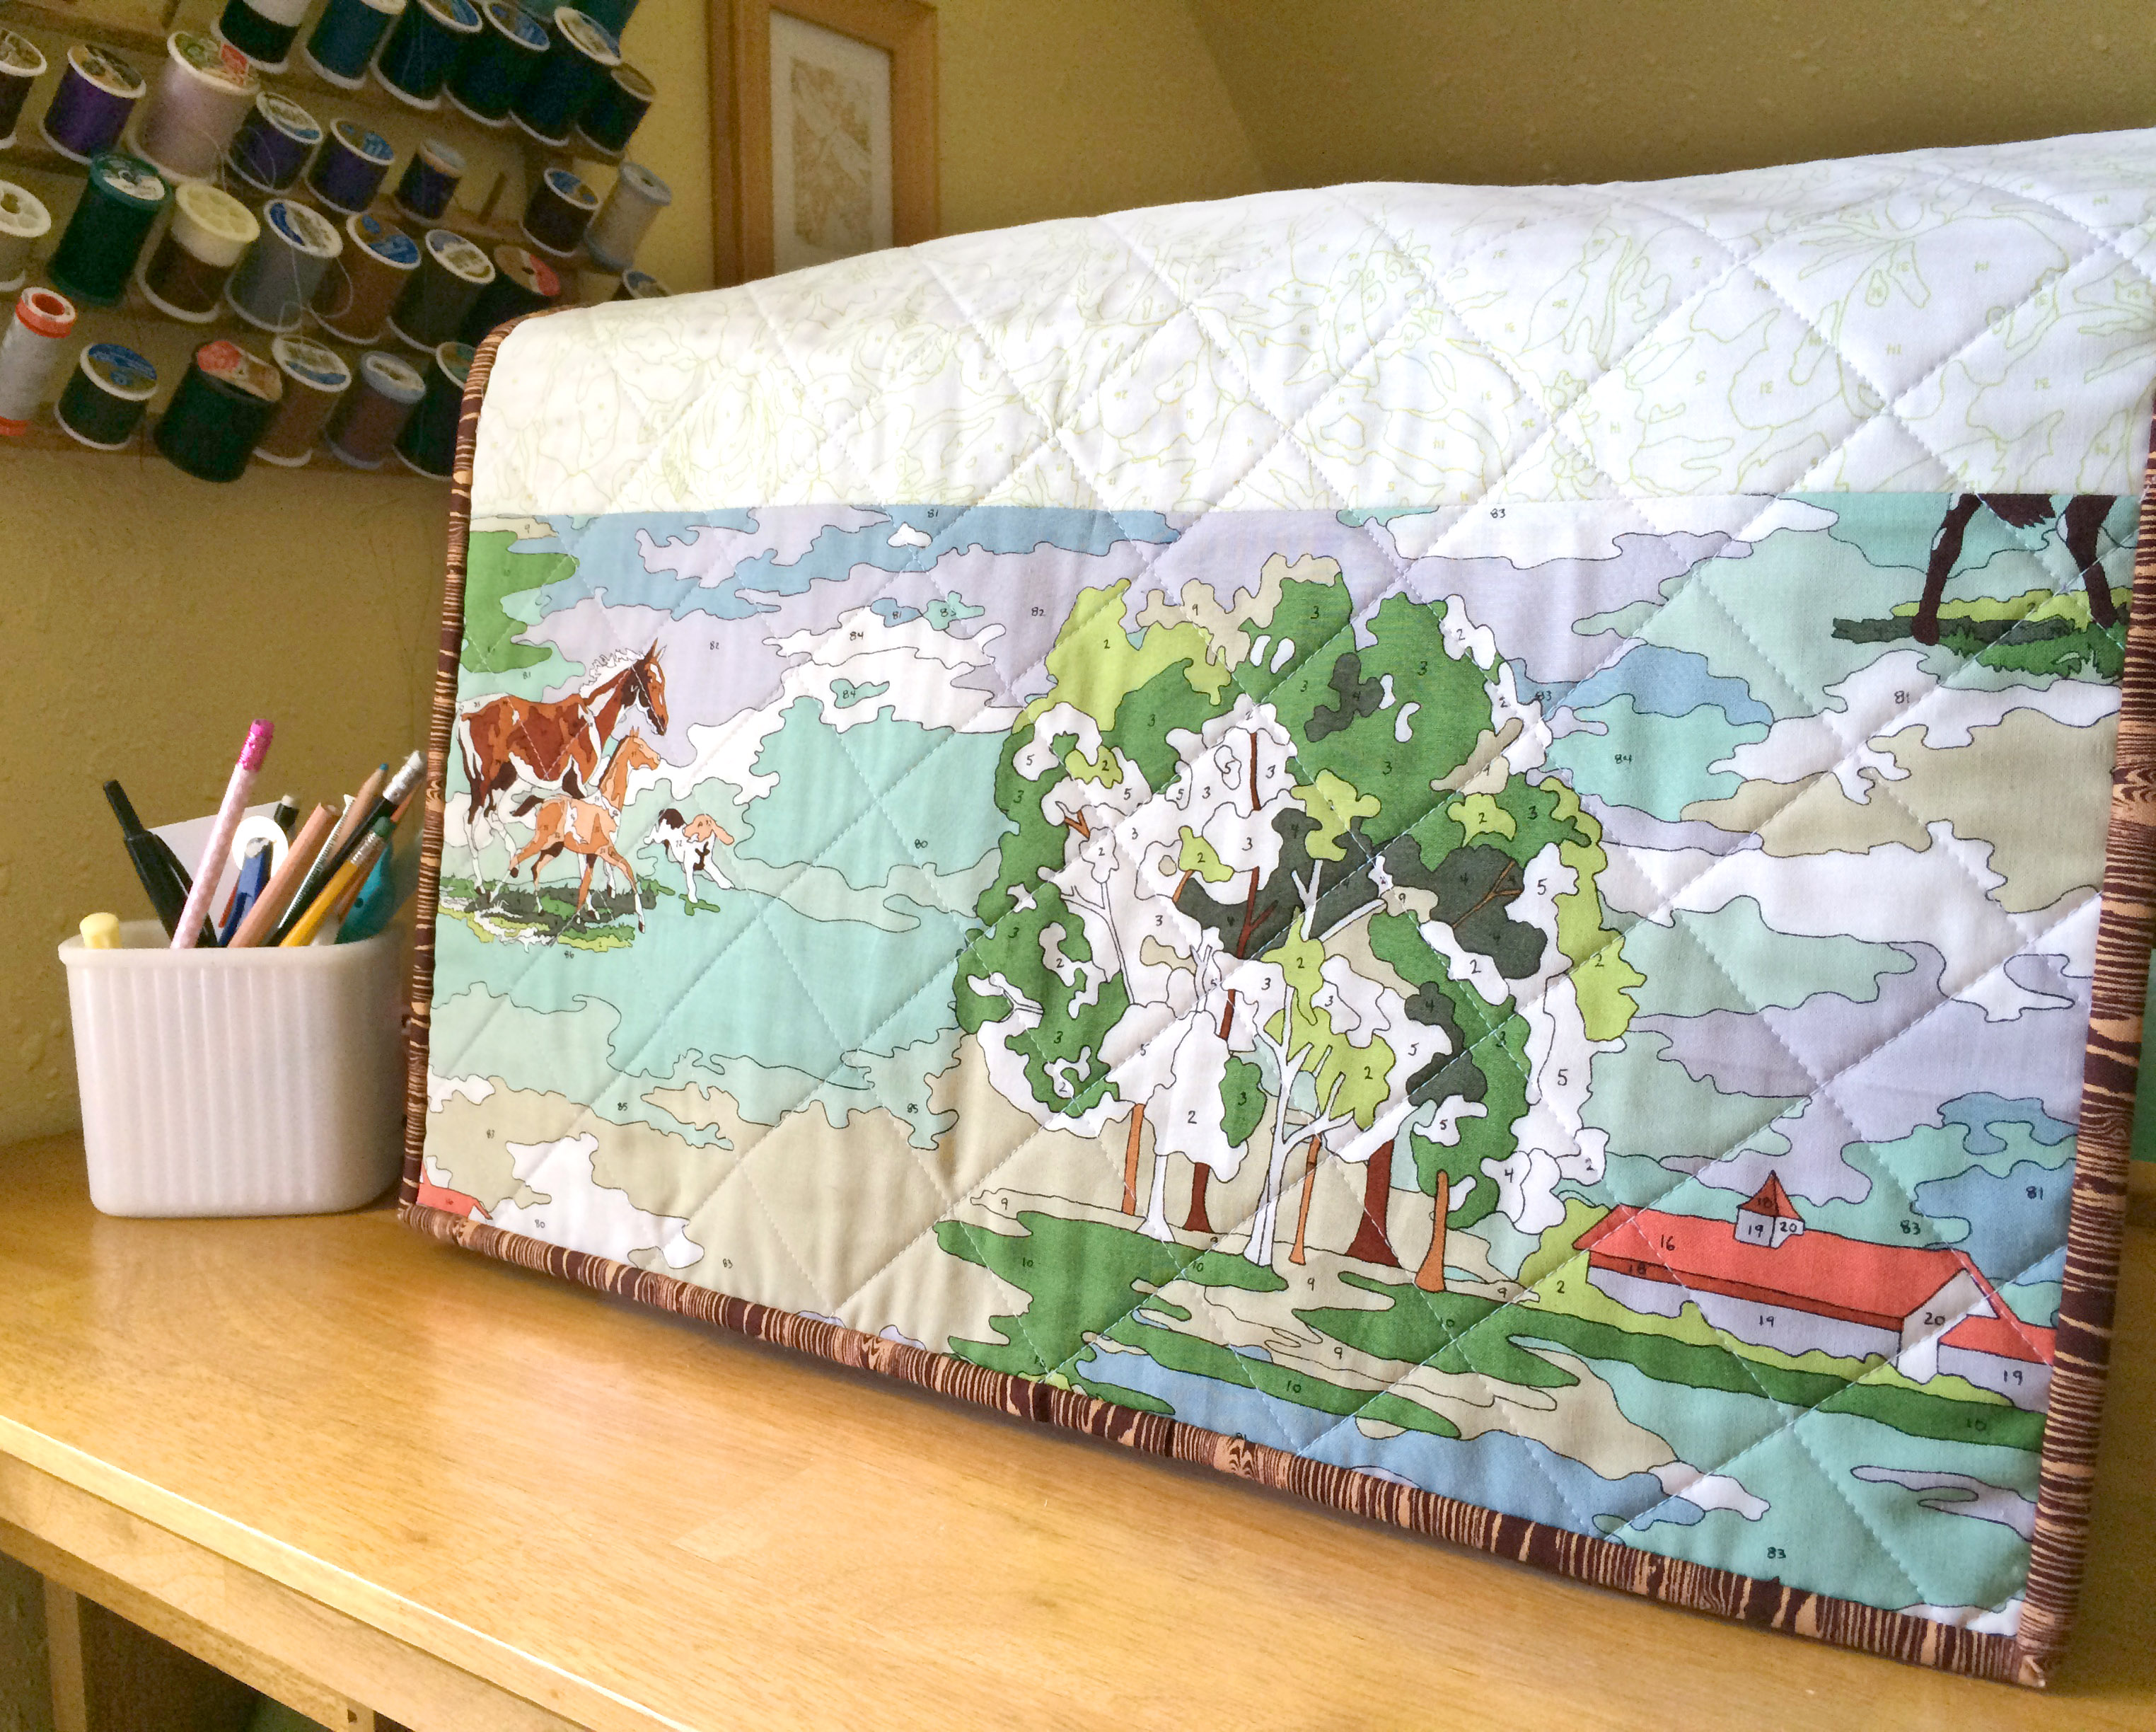
A couple months back, a friend sent me a link to the book above, 101 Quilting Tips and Tricks by Penny Haren published by Laundauer/Fox Chapel Publishing. Yes, that’s MY photo of MY Undercover Maker Mat pattern on the COVER, and no, they did not ask for my permission to use it.

I tried to contact the author via several platforms with no response and also promptly called the publisher, Laundauer, who is now under Fox Chapel Publishing. No one could help me aside from giving me an email address, so I wrote and waited, and waited. I finally received a response from the COO of Fox Chapel. He explained that my image was pulled from Pinterest to use on an internal mockup and was never changed out. He offered to replace the image on a potential second printing in approximately one year and offered me an insulting amount of money, $200. At the time of writing this, I have not heard from the author, though I do know she is aware of the situation. Perhaps she was advised not to contact me, but I will say if this was my book, I would be sending a hefty apology regardless of what actually happened internally.

Now, I have to interject a few things before we continue. First, I have worked as a graphic designer for over 20 years. I have worked on extremely large projects with large clients (The Cleveland Indians, for example), I have worked on books, I have been IN books, I know how every step of the process works. I cannot say that the scenario Fox Chapel explained isn’t true, but it’s just hard for me to believe (and really, what “nationally know speaker, columnist, consultant and author” uses someone else’s image on the cover of their book without even know where it came from?). Second, I have been paid more to use my image with full credit inside of a book, so you can see how ridiculous the offer from Fox Chapel was.

I’m updating this post here by adding in that word ridiculous is simply MY OPINION and the opinion of those I consulted with. Everyone’s idea of FAIR compensation is different, and we’re all entitled to our opinions. If Fox Chapel believes that what they are offering is fair, then that is their opinion and we are all free to decide how we feel about it I clearly disagree and am sharing the facts here for you to decide if you agree.

· · · · · · · · · · · · · · · · · · · · · · · · · · · · · · · ·

Honestly, I felt like I was being treated like some naive girl with a sewing machine and and a smart phone rather than a mature woman and artist who was worked her ass off to build a business for herself.

· · · · · · · · · · · · · · · · · · · · · · · · · · · · · · · ·

Not only was the book being sold numerous places online and distributed through major distributors to shops across the world, but the book cover was (and still is at the time of writing this) being used as a marketing tool for the company on two Facebook banners, on their catalog, etc – despite requests to remove it. I guess I should take this as flattery?

I consulted with an invaluable colleague in the industry and worked out a VERY fair contract I know there is not much money in publishing)  to which Fox Chapel declined and offered me slightly more than the first offer (a little more than double), continually pointing out that they admitted their mistake, that sales for the book were slow and limited (I really don’t call all those sales venues shown above LIMITED, and that’s not all of them), and that they’ve made internal changes to prevent this. All fine and dandy, but also irrelevant to the situation at hand.

This is not simply an issue of an image being used without permission. I want to explain the many ways a situation like this can negatively and financially affect a small business owner and artist like myself, and maybe like you. Having this book in the marketplace hinders my ability to contract this image for other uses or even use it on a cover of MY OWN BOOK someday. It has the potential to cause confusion in the marketplace in many ways. People could come to associate the image with the author rather than myself. The book cover or image could begin to link to the book rather than myself on social media sites such as Pinterest, directly taking traffic and pattern sales away from me. Fox Chapel disagreed that either of these points were possible or relevant which BLOWS MY MIND. There are many other factors also, such as people who buy the book assuming the cover pattern is included, only to be disappointed that it’s not. I could go on and on.

I have received many messages from friends, colleagues and  shop owners across the country who have seen or stock the book, recognizing my image and seeing I was not credited. Regardless, what I was asking for in compensation was very fair for the image use on a book cover, the points mentioned above, and my time in dealing with the matter, but their second offer was the best they could do. I declined this compensation and am instead sharing this story with you.

· · · · · · · · · · · · · · · · · · · · · · · · · · · · · · · ·

As a friend so perfectly put it, it feels like they’re leaving the money on the nightstand as they walk out.

· · · · · · · · · · · · · · · · · · · · · · · · · · · · · · · ·

Now, I don’t know how large Fox Chapel is. I’m all for capitalism, I don’t despise big business or corporations, and I don’t believe that the size of a company always relates to their actions, so I’m not going to say that this is what you get from big business or anything like that. This situation is simply a reflection of the morals and ethics of those in charge at Fox Chapel and they’re clearly not in line with what I believe. As an author, I would be embarrassed to be associated with this company. As a consumer, I would not choose to give them my money. Does sharing this story and the book image ultimately give them exposure and marketing? Perhaps. I considered blurring out the title, but I think that seeing it all is more helpful in sharing this story. If someone sees this and decides they want the book, that’s on them.

So the big question… how can we, as artists, prevent this?

One simple, yet not foolproof, way to help prevent image theft is to watermark all of your images. Will I do that moving forward? Probably not. I don’t like the way it looks or the time it takes. I don’t think that should mean I’m left vulnerable to this happening again, but sadly it does. Also, a watermark is not a guarantee with how easy it can be to photoshopped out sometimes.

The only legal way to protect your work is to register it with the US Copyright Office which is expensive ($55 per work) and time consuming. Many of you may be thinking “but don’t we automatically have ownership of all our images?”, short answer, yes, but not what it comes to fighting a situation like this in a legal manner.

I consulted with an intellectual property lawyer who was very helpful. Technically you COULD get a lawyer involved in a situation like this without having a registered copyright, but the costs to do so would far outweigh any monetary reward, and sadly, I am not independently wealthy. In the US, all parties pay their own court costs UNLESS it is a statutory situation, such as an official copyright, that has a different legal standing in court, comes with a minimum reward amount and requires the offending party to pay your court costs. I have already started the copyright process with my most popular images and all of my pattern content to help protect myself moving forward. It’s unrealistic to be able to do this for every photo I post on Instagram or share on Pinterest, but I’ll just have to pick and choose as I move forward.

I wish I could continue to fight this, even at a loss to myself, simply out of principal, but I believe Fox Chapel is well aware of all this and taking advantage of that situation. Perhaps that’s the saddest part of this story. It shows me they simply do not care despite all the claims by the COO of respecting me as a talented artist.

In closing, I think we see that this story is all the things I questioned in the title – bad business, a cautionary tale and a sad reality. While this situation is so incredibly frustrating and angering, I do have some satisfaction in sharing with you. I know I can’t RUIN Fox Chapel, but I hope they feel some impact from all of this. Even if it is simply fielding a hundred emails about their poor business practices and maybe losing some book sales.

I would really love to hear what you think in the comments below and especially on social media. I want Fox Chapel to know how their customer base and distributors feel about this type of behavior. You can find me on Instagram here and on Facebook here, and you can find Fox Chapel on Instagram here, on Facebook here, and via email here.

UPDATES:
You can find an update after hearing from the author here, and the “resolution” to this case here.

Thanks, friends!
~ nicole

Maker Mat SAL: Pocket Panel Tips & Tutorials

Hello, Hello! If you are just joining the sew-a-long, please scroll down a few posts to find the kickoff and all the tips shared in previous posts or scroll to the bottom of this post for direct links.

So far we’ve worked on the main body of the mat and how to add a machine handle opening, and today I’m going to talk about the pocket panels. If you’re just getting started on your mat, don’t worry, there’s still plenty of time!

Before you begin your pocket panels remember that if you changed the size of your main body, you will need to also adjust the size of the pocket panels! You can do this by changing the size of one pocket or adjusting all the pockets equally. Don’t forget to think about seam allowances when calculating cutting sizes.

One thing to note about the pocket panels is that there are SO many ways you can customize this entire project, but especially this part. You can adjust the sizes, add more or less pockets, you can piece them all with any block you love or you can eve use one solid cut of fabric to make it really quick and easy. Be sure to check out the #undercovermakermat hashtag on social media to see tons of creative inspiration!

pockets

Above you can see just a few variations from mats that I’ve made in the past. The top left follows the pattern as written, which the bottom left follows the same sizing and layout, but uses full cuts of fabric (rather than piecing) with cute fussy cuts! On the right, there is a little mix of both. I substituted my Love Story pattern block for the butterfly and then used solid fabric cuts for the other pockets with some added lace trim details.

First I’m going to share some tutorials and tips on creating the accent pocket panels which are the paper pieced butterfly and the selvedge pockets, then I’ll cover a bit more details on piecing the panels and trim options.

All the information you need to create the accent pocket pieces is included in the pattern (including a link to a tutorial on making the butterfly for beginner paper piecers), but I will go into a bit more detail here and include some additional tips and photos, as well as design variation ideas.

•  •  •  •  •  •  •  •  •  •  •  •  •  •  •  •

PAPER PIECING TIPS

You can find the pattern for my Butterfly Charm Blocks here. All three butterfly designs are the same size and any can be used. The foundation paper piecing tutorial link included in the pattern is from Cassandra Madge and you can find it here. It was so sweet of her to use my pattern as the example for her tutorial!

Our methods of paper piecing are very similar, with just a few differences. I like to use the Add-A-Quarter Ruler, rather than a standard quilting ruler. It does the same job, but is just one of those tools that takes away some room for error. Another paper piecing tutorial I often direct people to is this video from Connecting Threads. You can see the Add-A-Quarter ruler being used.

paper piecing tips | lillyella stitchery

When I paper piece, especially small blocks, I like to use Foundation Paper. You can buy one from Carol Doaks or you can use any thin newsprint. Someone recently mentioned they found this pack from Dick Blick, and you can’t beat the price! I also apologize that I don’t remember who tagged me on that, please let me know if it was you! It is essentially just a thinner paper that creates less bulk and allows for easier removal. You can use any paper for paper piecing, but the thinner you can find, the easier it will make the process.

Another thing I ALWAYS do is to trace the pattern onto the back of the sheet. It does not have to be perfect because you will only be using it for reference, but it helps in a multitude of ways. I use a lightbox, but you can also use a window. Since this is the side where you will place your fabric, you can use these lines as a guide for cutting your fabric pieces. You can still use the printed side, but you have to work with your fabric upside down at that point, and I like to see the prints and placement.

After tracing and selecting fabrics, I also note my fabric selections or color accordingly on this side. Then I always know I’m placing the correct piece. These lines also help you as you sew to make sure a fabric cut will cover a segment. Place the fabric where you would for your next seam, but before sewing, hold the fabric approximately where your seam will be and fold the fabric over as you would when pressing it after sewing. You can then see if your piece is large enough to cover everything it needs to. You can then sew your seam with confidence, because unpicking a paper pieced seam is NO FUN!

Lastly, I find having these lines helps prevent you from missing a segment, which is something I see a lot in paper piecing. When you have the pattern lines on the side where you are placing fabric, you will notice if you’ve missed a piece. You still have to pay attention, but it’s definitely better than flying blind!

paper piecing tips | lillyella stitchery

In Cassandra’s tutorial, you will see her talking about adding some basting stitches to you sections to help when piecing them together. This is important and something I always do as well, however, I put my stitches in the seam allowance as you can see above in the left photo.

Another tip is that when trimming sections to the seam allowance after piecing, do not trim any sides that are on an outer edge (above right). This way you can trim your final block to size after it is completely pieced. It is not uncommon to lose a little bit in each seam, so this ensures you can have the correct sized block in the end, and also lets you trim the block to a slighty larger size, if desired.

After piecing sections, I always remove the paper from the seam allowance only before sewing sections together. This just helps with bulk and allows you to press a flatter seam before adding the next section. You can also see this in the above right photo.

•  •  •  •  •  •  •  •  •  •  •  •  •  •  •  •

SELVEDGE POCKETS

For those who are new to sewing or do not know what a selvedge is, it is the finished edge on a bolt of fabric. There are finished edges on both sides along the width of the fabric, but only one will contain printing and this is the side I use on this project. I cut my selvedges off with about one half inch to one inch or so of the fabric print included, just to make sure I always have enough extra to work with them. The directions on how to work with the selvedges to create the pockets are included in the pattern.

selvedges

•  •  •  •  •  •  •  •  •  •  •  •  •  •  •  •

VARIATIONS

Below are more variations from makes on Instagram to help inspire you!

examples5

•  •  •  •  •  •  •  •  •  •  •  •  •  •  •  •

TRIM

This pattern uses trims or ribbons for securing the secondary pockets and hiding the raw edges, and also for creating the side ties when using it as a machine cover. Below are some trims from my collection that I’ve found at Joanns, Hobby Lobby and even Walmart. Anything between 1/4″ to 3/8″ width is best. If it is too small then you will have trouble enclosing the raw edge of the pocket, any thicker and you cut into your pocket space. Trims that are more solid are best to hide the raw edges, but some lacier style trims can work ok, too.

ribbons

If you don’t have any trims on hand, you can also use a thin bias binding strip instead. Start with a 1″ or 1.25″ cut strip, fold the raw edges into the center, then fold in half and press and use this as you would a piece of ribbon. You can also you another selvedge with the cut side pressed under. Lots of possibilities!

trims

•  •  •  •  •  •  •  •  •  •  •  •  •  •  •  •

Undercover Maker Mat | lillyella stitchery

POCKET BINDING

I like the look of the binding on the pocket because I think it balances the piece nicely, but if you prefer, you can eliminate this step and instead attach the lining to the pocket panel just as you did on the small secondary pockets. Just lay your lining piece, RST, on top of your finished main pocket panel and sew across the top with a 1/4″ seam. Flip the lining to the back, press, and top stitch along the top edge. You can include the fusible fleece when you do this, add it after tucked up to the seam, or skip it all together and use some lightweight interfacing on one or both pieces instead.

pocket-binding

Above are a couple examples I saw on the #undercovermakermat hashtag on instagram that demonstrate this variation. If you have any questions about doing this instead of the binding, just let me know and I’m happy to help!

•  •  •  •  •  •  •  •  •  •  •  •  •  •  •  •

Once your full pocket panel is complete, you will baste it to your mat body and bind the entire piece as covered in the pattern. BE SURE TO ADD YOUR SIDE TIES BEFORE BINDING! If you do not plan to use your mat as a cover, you can leave them off. I did forget to add them once and just had to unpick a little bit of my binding and tuck them in, which was not hard to do, so it’s not the end of the world if you forget, or even decide to add them later!

tie double

Just as with trim used to secure the secondary pockets, you can instead use a binding strip for your side ties, or even additional selvedges. If using a binding strip, simply top stitch along the folded edge to close it up. You can tie knots on the ends or stitch them closed.

cover

cover1

Stay tuned next week for one more post talking about the thread catcher before we wrap things up on October 28!

ADDITIONAL POSTS:

Undercover Maker Mat Sew-a-long: All the details

PART ONE: Kickoff! Sizing your mat and tutorials for beginners

Sponsors and Prizes!

PART TWO: Adding a machine handle opening

Maker Mat SAL – Adding a Machine Handle Opening

Honestly, I’ve been wanting to do this tutorial for adding a handle opening to the Undercover Maker Mat for YEARS… but I feel like that’s basically the story of my life! For all who have been waiting, I appreciate your patience! Once great thing about this is that you can add it at any time to any mat – finished, or not. It’s sort of an afterthought, per say, and doesn’t affect anything in the pattern.

Most of my machines do not have handles, so this new little travel machine came into my life at just the right time! This process hurt my brain just a teeny bit, but in the end it’s really pretty easy! I’ve done my best to capture it in photos and I hope it will all be easy to follow (and I think it will once you’re actually doing the steps), but if you have any questions, never hesitate to contact me here or through social media.

This tutorial is for binding the handle opening, however, if you are familiar with facing, that technique will most certainly work for this!

Just one note, I cannot guarantee that this tutorial is detailed enough for complete beginner sewists who are working on this project. There are no complicated techniques, but you may need to familiarize yourself with basic binding techniques to understand some of the terminology and techniques used.

The first step in planning for your opening is to measure, then measure again, then measure about 17 more times. I’ll tell you it is PAINFUL to cut into your precious quilted body, so be sure to check yourself! I took so long doing it that my husband started to make fun of me, but it was worth it. Keep in mind how wide your mat is in relation to your machine and be sure to place your measuring device accordingly. You can see how mine is hanging off the edge a bit. You will need your opening to be just large enough for your handle to slide through. Mine ended up being a little less than 6″ by  3/4″. Your binding will only shrink the opening a very small amount, so you don’t need to take that into account. Also remember, you can always cut the opening larger, but you can’t make it smaller!

When you measure the placement of the opening around the height of the machine, be sure to leave some slack in your tape to account for the bulk of your quilted body. I used the bobbin winder pin on the top of my machine as a gauge. To double check my measurements,  I placed my mat body over my machine and placed the tape measure on my mat. I felt the bobbin winder pin through the mat and noted where the tape measurer hit it. I then removed the mat and placed the tape measure in the same spot on the bobbin winder pin and checked my measurements against the handle. Every machine will be different, so figure out what method works best for you in determining your measurements.

Once you have your measurements, mark them on the body of your mat with an erasable pen or your preferred method and then check your placement again by placing the mat over your machine and feeling through it as best you can to see if the handle is lining up. Then its time to cut! Terrifying, I know. You can do it!

Now will you bind the hole. It’s much like binding the outside a quilt, but you handle the corners differently since they are inside. We will be using a single fold binding method. Cut a piece of binding fabric 1.5″ wide with the length being the diameter of your rectangle plus about 4″.

First, you will mark 1/4″ all the way around the outside of your rectangle on the top/outside of your mat. You will see in my photo above that I have stitch lines 1/4″ around my rectangle. This is from my initial failed attempt at binding that I tore out :D! Since I could see the lines, I did not need to use another form of marking, but you can use an erasable pen or you use a basting stitch.

Next you will clip diagonally into all four corners just shy of your 1/4″ marks as show above. You will now sew the binding down.

You will begin sewing the binding down along one long edge of your rectangle. I did not get a photo before I started sewing, so we’ll use this photo above as a reference for placement. Leave a small tail of unsewn binding for finishing later.

You will place your binding right side down onto your mat body and sew with a 1/4″ seam allowance. When you get to a corner, continue sewing 1/4″ past the opening of your rectangle, which will be indicated by your 1/4″ marks around.

Here’s where it gets just a bit fussy. It’s not difficult, it just takes a bit of finagling under your machine. With your needle down, lift your presser foot and pull the short side of your rectangle opening toward your presser foot so it is in line with the seam you just sewed. The little snips you made in the corners will allow you to do this.

You will then continue sewing your binding strip in a straight line onto this side. If this seems confusing when reading it, I promise it will make sense once you’re sewing. You will continue sewing all the way around your opening, repeating this process on all four corners.

When you get back to where you started, press one end of your binding strip back about 1/4″ and then lay the other end on top of it, trimming it about 1/2″ to 3/4″ past the overlap. Pin in place and finish stitching the seam securely.

Now it’s time to press and turn the binding to the backside. Once complete, you can hand or machine stitch it in place, just as with an outer quilt binding.

Press your binding along the seam toward the hole opening to help it lay flat. You will now miter the corners working on one side at a time. First press one long edge inward and then miter one corner of a short edge as shown above, folding the outer point in to form a 45° angle and press.

Next, fold the other long edge in mitering the corner in the same way and press. Repeat with the other side of the opening.

You will then turn the binding through the opening to the underside of your mat and you will work on pressing and mitering that side. Don’t worry about your miters staying perfectly in place. Just make sure you gave them a good press before turning and they will fall back into place.

If you’re opening is small (and even if not), you may find the next steps a bit fussy, but just take it one step at at time, and you’ll get it done!

Working along one edge at a time, fold the binding strip onto itself, wrong sides together, up to the edge of your opening and press. Repeat for all four sides and feel free to use some glue to help keep it down!

Your piece will now look something like mine above once all sides are pressed. The Mariner cloth I am using was getting a bit frayed because of it’s loose weave, so I had a little trouble keeping things “crisp” for the photos.

To miter the corners on this side, first press one folded short edge down onto the mat down body. You will see above how the miters start to form with the one sides. Next press the long side down onto the mat, mitering the corner into itself as you can see above.

Repeat this step for all four corners, using pins or glue to help keep everything in place. It likely will not be perfect, your corners may be a little sloppy or your wrap around may be a bit uneven, but no one will see it, so don’t stress!

Finally, check that your miters are in place on the front of your mat and hand or machine stitch the binding in place. Now step back and admire your work as you look around for anything else you can cut a hole in!

I hope you have found this down & dirty tutorial helpful and useful! I’m so pleased with how it worked out on my mat and I hope you are, too.

I’m a bit behind schedule on the SAL, but I’ll be sharing some tips on the pocket panels in a couple days so stay tuned! Also, if you’re just joining in, you can find the free pattern and all the details here.


Maker Mat SAL Kickoff – Sizing your Mat & Tutorials for Beginners!

It’s time to kick off the 2019 Undercover Maker Mat Sew Along! I’m thrilled that so many of you are joining in. This is my favorite sew along because I love seeing all the personality that people put into their projects, plus it’s just awesome when I hear how much everyone loves having it and using it!

If you’re just tuning in, you can download the free Maker Mat pattern here. This sew along is open to everyone, there’s no sign up or obligation and anyone is free to join in at any time. I’ll be following the schedule outlined here sharing tips along the way, but you are welcome to sew at your own pace. There will be some amazing prizes up for grabs, too, and everyone who posts their progress photos and finished pieces on social media with the #undercovermakermatsal2019, #undercovermakermat and @lillyellastitchery will be eligible to win! Every post counts as an entry and winners will be drawn at random.

This week we’re pulling fabric and sewing up the main body of the mat. Today I’m going to talk about how to customize the size of the Maker Mat to fit your specific machine and then later this week I’ll be sharing a tutorial for adding a machine handle hole to the body. This is also something you can do to any finished mat if you’ve made one previously.

· · · · · · · · · · · · · · · · · · · · · · · · · · · · · · ·

SIZING YOUR MAT

The finished mat as it is designed in the pattern measures 20″ wide by 23″ long. This size was based off a couple machines I had on hand and what felt good to fit on a variety of tables. This size can be easily changed if you find that you need a larger or smaller mat to cover your machine or fit on your work surface. I just got this adorable little travel machine, so I’m making a tiny mat to fit it. Aside from determining the size of your main body, the only other change you’ll need to make to the pattern is adjusting the width of the pocket panel, which I will cover next week.

A couple things to consider when sizing your mat. If you plan to use it as a mat under your machine and also a cover, you will follow the steps below for measuring your machine, but you will also want to think about the table you’ll be on when using the mat under your machine. You may need 25″ or more to fully cover your machine, but may find this leaves too much mat on your table that you don’t have room for. If this is the case, perhaps consider a happy medium. The cover does not need to fully cover the machine to be functional.

To customize the size of your mat, start by measuring the width of your machine and deciding if you’d like any “extra”. The base of my machine measures 13″ across, but since the hand wheel sticks out a bit farther, I’m going to make my body 13.5″ wide.

Next you will measure up and over your machine. You will want to leave a little slack in your tape or add a bit to your measurement to account for a little bulk in the body once it’s quilted. I left some slack in my photos above, so I’m going to make my mat 24.5″ long. If you do not plan to also use your mat as a cover, then you do not need to worry about this measurement and can stick with the original 23″ length in the pattern, or measure your table and decide what size you like.

I’m a visual person so I like to make diagrams of my measurements. Above you will also see my handle hole measurements, but I’ll cover that in more detail later this week. So, to fit my machine, I’ll be making the main body of my Mat 13.5″ wide by 24.5″ long vs the 20″ x 23″ specified in the pattern. (I may choose to add a bit more to the width, just to have some extra pocket space, but I don’t want the sides too “floppy” when it’s covering the machine since I’ll be traveling with it.)

As I mentioned, if you change the width of your mat, you will need to equally add or subtract measurements when making the pocket panel pieces. I will cover this in more detail next week, but for those who like too work ahead, an easy way to do this is to simply add or subtract from one of the end pockets and keep the inner pocket dimensions the same, but you can, of course, adjust them any way you like.

· · · · · · · · · · · · · · · · · · · · · · · · · · · · · · ·

FABRIC PULL

This is a piece to have fun with! I usually go with a subtle background so that I can really have fun with the pocket panels, but I’m going to change things up this time. Since my mat will be smaller for this machine, I’m going to make my pockets a little simpler. I will use some prints and perhaps piece one panel of stripes, but I’m going to use that super fun focal print from Alison Glass Handiwork as the body with the bright blue mariner cloth binding.

This is pretty much how I make decisions on fabrics, I try to lay things out as best I can and just step back to take a look. This time when I stepped back, I tripped right over my space heater and conked my head, but I don’t really need ALL of my scalp anyway.

· · · · · · · · · · · · · · · · · · · · · · · · · · · · · · ·

TUTORIALS FOR BEGINNERS

If you’re a sewist, but new to quilting, don’t fear! The body of the Maker Mat is a great first project to dip your toes into the world of quilting!

To create the main body of the Maker Mat, you will need basic knowledge of how to layer your top, batting and backing and how to do the quilting stitches. This tutorial from Suzy Quilts covers all the basics. It applies to a large quilt, so working with your main mat body will simply be a smaller and simpler version! Straight line quilting is a great design for beginners, or a crosshatch is a always a nice option, too. I’m not sure its mentioned in the tutorial, but I love using a Herra Marker (a bone folder or scoring tool also works similarly) to mark my quilting lines, especially for something like a crosshatch. Here is a video on using a Herra Marker.

Another quilting technique you will need to know comes at the end of the body and that is binding. This is the little edge “wrap” that goes around the entire piece and seals everything up. Here is a helpful tutorial from Bluprint.

· · · · · · · · · · · · · · · · · · · · · · · · · · · · · · ·

So this week share photos of your fabric pulls and your main body progress and be sure to use #undercovermakermatsal2019, #undercovermakermat and @lillyellastitchery when posting! Tomorrow I’ll start sharing some of the amazing sponsors and prizes I have lined up!

Undercover Maker Mat SAL 2019

SALgraphic2019

It’s almost time! The 2019 Undercover Maker Mat Sew Along will kick off on October 7 and run thru October 23! Anyone is welcome to join in and sew along. There is no sign up or obligation and the sew along will be casual! You can download the free pattern here. I will be following the schedule below but you are welcome to sew at your own pace and join in any time!

There are many ways to customize this project and adjust it to your skill level, so please note that many specifics indicated in the schedule are optional. Before the SAL begins, I will share a blog post discussing some of these options, variations and customizations to help you plan. I will talk about sizing the mat to your specific machine and this year I will also be sharing a little tutorial on how to add a hole in the mat for a handle, if your machine has one.

UNDERCOVER MAKER MAT SAL SCHEDULE

October 7: Kick off! Make main body panel

October 15: Adding a machine handle opening

October 17: Pocket panels

October 18: Make optional thread catcher

October 28: Share your finished projects!

In the meantime, you can download the pattern and start thinking about your fabric pull. You can also check out the hashtag #undercovermakermat on social media to see oodles of inspiration! If you’ll be joining in, I’d love for you to share the top graphic from the post and tag me @lillyellastitchery and use the hashtag #UndercoverMakerMatSAL2019!

~ Nicole

DSC_0428 edit B

Sew-A-Long Tutorials for Beginners

Hello, my Sew-A-Long friends! Today I’ll be sharing a few tutorial links for those who are joining in the Undercover Maker Mat SAL, but may not be familiar with basic quilting or paper piecing (which is an optional element!). There are a lot of step-by-step photos in the pattern and many basic techniques, but it does require basic knowledge of making a “quilt sandwich”, binding a quilt, and paper piecing , if you choose. If you haven’t viewed my Instagram stories, please pop over and take a look. I’m saving all the SAL stories in a highlight which you can access anytime from my main profile. You can also turn on notifications for my posts and/or my stories so you don’t miss anything. I shared a few tips and examples yesterday on how to simplify or customize your mat, so this can help you with the planning stage.

Onto the tutorials! If you’re new to quilting, you will need basic knowledge of how to layer your top, batting and backing for the main mat body (aka the “quilt sandwich”), and how to do the quilting stitches. This tutorial from Suzy Quilts covers all the basics. It applies to a large quilt, so working with your main mat body will simply be a smaller and simpler version! Straight line quilting is a great design for beginners, or a crosshatch is a always a nice option, too. I’m not sure its mentioned in the tutorial, but I love using a Herra Marker (a bone folder or scoring tool also works similarly) to mark my quilting lines, especially for something like a crosshatch. Here is a video on using a Herra Marker.

Another quilting technique you will need to know comes at the very end of the project, but it is binding. This is the little edge “wrap” that goes around the entire piece and seals everything up. Here is a helpful tutorial from Craftsy.

Lastly, we have paper piecing. If you’d like to create the butterfly pocket panel as shown in the pattern, but have never paper pieced before, don’t be intimidated! This is a great time to learn! Cassandra Madge did a wonderful two-part tutorial for beginners using my Butterfly Charm Blocks pattern and you can find part 1 here and part 2 here.

As always, feel free to contact me anytime if you have questions along the way, and stay tuned for more helpful tips here and on Instagram!

Maker Mat Sew-a-long: Main Body Panel

Undercover Maker Mat Sew-a-long | lillyella stitchery

Good morning, friends! I’m so excited to officially kick off the Undercover Maker Mat Sew-a-long and have loved seeing some of your fabric pulls already! If you’re just tuning in, you can find all the details and the free pattern in my previous post (scroll down or click here). Please be sure to use #undercovermakermatSAL and #undercovermakermat on your photos so we can all inspire and motivate each other!

As mentioned, I’m going to follow the schedule that I shared, but you are welcome begin and end anytime, and sew at your own pace. I will try to share a few extra tips and suggestions at each step, but everything you need to complete the project is in the pattern.

—–

Today, I’m going to talk a little about some options for the main body of the mat, but first, I want to talk about PRIZES! Because who doesn’t love prizes?

prizes!

First up, I have some super awesome, generous donations to giveaway! I have FIVE 6-month subscriptions to Make Modern Magazine, a three month subscription to Stash Builder Box and a $25 gift certificate to Stash Fabrics!

I’ll also be giving away three bundles of all my lillyella stitchery patterns AND a bundle of fabric, notions and other fun stuff that I’m putting together, which I’ll share soon, and possibly a few more things that get added along the way!

I’m thinking that I will pick my three favorite finished mats and then draw the rest of the winners at random. What do you guys think?

—–

Alright, onto to business! I talked about the overall size of the mat and how to modify this to fit your machine on my original post, so be sure to check that out. Now I’m going to talk a little about fabrics and design options.

On the previous mats I’ve made, I have chosen a simple, low volume for the main body, so that the colors and prints used on the pocket panel would really pop. My very first one was a solid piece and on the next one I made for the Paperie Fabrics blog tour shown below, I pieced a thin strip of accent fabric in and really love the look.

two-mats2

On the Tula one shown above, I added an applique moth peaking out from behind the pocket panel, and I think it’s so fun.

Because the main body is 20″x23″, you need yardage for this piece, but if you are working with scraps or a FQ bundle, you can simply piece it together any way you like.

Even if you choose to use a low volume background, another fun option is to add a print to the “back” of the cover, what would show on the back of your machine when being used a cover, such as on this one:

purebredback

—–

Another way to approach this project is to make the main body bold and vibrant, and keep the pocket panel simpler. Below are a few examples I found on the #undercovermakermat hashtag on Instagram using fun prints or patchwork designs. I hope these, and all the examples I shared in the original post, will help inspire you!

undercover maker mat examples

—–

I am making two mats during this sew-a-long (at least that’s the plan), but after unexpectedly spending all night in the ER and heading back to the doctor shortly, I have nothing to show you yet! Hopefully I can make some progress later this evening and I’ll share my final fabric pulls and finished bodies on my instagram page. And as long as I’m not under the knife, I’ll be back here Thursday to talk about the paper pieced and selvedge pocket panels!

ADDITIONAL POSTS:

Undercover Maker Mat Sew-a-long: All the details

PART TWO: September 6 – Kickoff, prizes and main body panel variations

PART THREE: September 8 – Accent Pocket Panels

PART FOUR: September 12 –Full Pocket Panel & Assembly

Undercover Maker Mat Sew-a-long

Undercover Maker Mat Sew-a-long | lillyella stitchery

Can we just call this a party? Because I’m so excited that it kind of feels like a party! And I want an excuse to eat party food. So… there’s that.

This sew-a-long will officially kick off on September 6 and I’ve included a schedule below that I will be personally following, but you are welcome to begin anytime and sew at your own pace. Everything you need to complete the project from start to finish is included in the free pattern, which you can download here.

September 6: Kick off! Make main body panel
September 8: Make paper pieced butterfly and selvedge pocket panels
September 12: Make full pocket panel, assemble to body
September 15: Make optional thread catcher
September 23: Draw prize winners!

tie double

Below you will find some notes about the materials used and ways you can modify and customize this pattern to your sewing level and taste, including photos of different mats made to help inspire you! I will be sharing a few tips and tricks, and photos of my progress a long the way based on the schedule, and I hope that you share your progress as you go, too!

Use the hashtags #undercovermakermatSAL and #undercovermakermat on your posts so we can all enjoy each other’s work as we sew-a-long!

If you have any questions as you are preparing or sewing, please don’t hesitate to comment here, send me an email through my Contact page, or send me a direct message on Instagram. Once I decide on my fabrics (the struggle is real!), I’ll share my pulls, but here are a few notes on materials and plenty of inspiration photos to get you started!

Undercover Maker Mat | lillyella stitchery

I will be making my mat as the original is designed with the paper pieced butterfly and selvedge pockets, but these elements can be changed to just solid fabrics or any patchwork design you like. You will see various ways they are done in the photos at the end.

SIZE
The finished mat, as it is designed, measures 20″ wide by 23″ long. This size is based off a couple machines I had on hand and what felt good to fit on a variety of tables. This size can be easily changed if you find that you need a larger or smaller mat to cover your machine or fit on your work surface. To change the length of the mat, you simple need to add more to your main body piece. If changing the width of the mat (the 20″ dimension), you will need to equally add or subtract measurements from the main body and the pocket panel pieces. The easiest way is to simple add on to one of the end pockets and keep the inner pocket dimensions the same, but you can, of course, adjust them any way you like. You can also choose to break up the pockets differently than I have hear to suit your needs.

selvedges

SELVEDGES
For those who are new to sewing or do not know what a selvedge is, it is the finished edge on a bolt of fabric. There are finished edges on both sides along the width of the fabric, but only one will contain printing and this is the side I use on this project. I cut my selvedges off with about one half inch to one inch or so of the fabric print included, just to make sure I always have enough extra to work with them. The directions on how to work with the selvedges to create the pockets are included in the pattern.

ribbons

TRIM
This pattern uses trims or ribbons for securing the secondary pockets and hiding the raw edges, and also for creating the side ties when using it as a machine cover. Below are some trims from my collection that I’ve found at Joanns, Hobby Lobby and even Walmart. Anything between 1/4″ to 3/8″ width is best. If it is too small then you will have trouble enclosing the raw edge of the pocket, any thicker and you cut into your pocket space. Trims that are more solid are best to hide the raw edges, but some lacier style trims can work ok, too.

If you don’t have any trims on hand, you can also use a thin bias binding strip instead. Start with a 1″ or 1.25″ cut strip, fold the raw edges into the center, then fold in half and press and use this as you would a piece of ribbon. You can also you another selvedge with the cut side pressed under. Lots of possibilities!

trims

—–

I think that covers it for now! As I mentioned before, if you have any questions, please don’t hesitate to contact me. I’ll now leave you with a few inspiration photos of other versions I have made and those made by others. You can also see oodles more with the hashtag #undercovermakermat on Instagram and Facebook. (All images are from the fore mentioned hashtag, I will credit all makers later tonight – gotta get the fields mowed now!)

cover1

DSC_0428 edit B

 undercover maker mat | lillyella stitchery

—–

ADDITIONAL POSTS:

Undercover Maker Mat Sew-a-long: All the details

PART TWO: September 6 – Kickoff, prizes and main body panel variations

PART THREE: September 8 – Accent Pocket Panels

PART FOUR: September 12 –Full Pocket Panel & Assembly

PART FIVE: September 15 – Optional Thread Catcher